How to join new concrete to old concrete - Inspire DIY Kent Thomas

ฝัง
- เผยแพร่เมื่อ 25 ก.ค. 2024
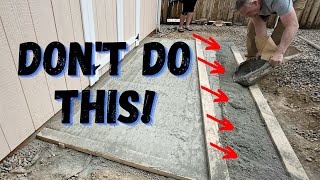
- In this video I’ll show you how I pour a new section of concrete next to some old concrete and have them join together so they don’t sink or lift, and no gaps or cracks, and never open up.
The most important part is drilling into the old concrete and attaching some reinforcing bars, the second part is to prep the old concrete by painting on a cement and water mix. Then mix your concrete and get it in there,
Remember to write your initials in the wet concrete so you can always have claim to your great DIY concrete patch.
Click here to subscribe (it's free) and you won't miss any of my DIY tutorials on TH-cam
/ @inspirediy
When clicked these links will take you directly to Amazon or an eBay site, InspireDIY is an Amazon associate/eBay Affiliate. Using these links does not impact the price in anyway for you, but InspireDIY may be able to earn from recommendations.
The drill I used is an Ozito 900 watt SDS rotary hammer drill, I love this tool - it comes with a 3 year warranty for DIY use.
Alternative (Budget) Rotary Hammer Drill amzn.to/3ASN196
Stanley 8mtr Tylon Tape Measure amzn.to/46lvS88
Drill bit = kango reo concrete 4 head cut
(US) Bosch amzn.to/2W2SCLn
(UK and AU) DeWalt amzn.to/37SX95y
Reinforcing bars were sourced from a local demolition trader for $1 per mtr.
20kg bags of instant concrete (mix with water) $9 each
Hyde concrete trowel 14” amzn.to/3yWl93y Can be used for both concreting and plastering ebay.us/GgSRxN
Chemset epoxy is a brand name of an anchoring adhesive formulation that cures to a strong bond in concrete applications, designed to hold starter bars, reinforcing bars, balustrades or handrail fasteners.
(US) amzn.to/3m8FzCN (UK) amzn.to/3gf6c54 (Aust) amzn.to/3m8FZsR
The boring stuff, these videos are intended to provide information and inspiration only. If you choose to imitate, duplicate or copy anything you may have observed in these videos, you do so at your own risk. Kent Thomas & Inspire DIY do not take any responsibility for any action taken as a result of the information or advice on this TH-cam channel (or other platforms) and shall not have any liability in respect of any injury or damage that may result.
Kent Thomas/Inspire DIY disclaims any control over, relationship with, or endorsement of views expressed by any third party, including but not limited to, sponsored partners, featured guests in any episodes, or other TH-cam (or other social platform) users. Any unsponsored links to other websites are provided only as a convenience, and not an endorsement of those pages by Kent Thomas/Inspire DIY. Kent Thomas/Inspire DIY encourages you to read the privacy statements of any third-party websites.
Kent Thomas/Inspire DIY does not warrant the accuracy, completeness, or usefulness of the information available on this TH-cam page or any other social media platforms. Nothing contained in or provided though this TH-cam page, website or social media platforms is intended to constitute advice or to serve as a substitute for the advice of a building or construction professional, or local government, council laws and building codes. Any reliance you place on such information is strictly at your own risk. - แนวปฏิบัติและการใช้ชีวิต


This was super helpful. I have concrete pad in front of our shed that is not as wide as the shed so it’s a tripping hazard and just annoying. I’m ready to tackle it!
Oh that's awesome Annet, let us all know how you get on. regards, Kent
Ty for the water cement pretreat tip. That was exactly the answer i needed!
Hey Jon, it’s a great tip init 👌 well done mate - and thanks for the lovely comment. Kent
Thanks Kent
A very clear and precise video👍
Thanks Geoffrey, very kind! Kent
Very satisfying. Well done, thank you!
Thanks for watching and the lovely comment Peter. All the best. Kent
Great video, thanks. I'm adding a bathroom to my garage, so this will really help.
Hey J O, thanks for the nice comment, best of luck with your project 👍Kent
Very helpful. Thanks!
You’re welcome Doug, thanks mate👍 Kent
Really helpful brother!
Cheers MMFC, glad it helped mate🤘Kent
Thank you - from S. California.
You are most welcome 44bett 😉 Kent
This is example of a good video. It explains the process and why you’re doing it without any useless bullshit.
I would like to add one important tip. Anytime you drill concrete you should use an air gun to blow out the hole. If not, the dust will prevent epoxy ( if you’re using it) from grabbing onto the old cement. For a job like this it isn’t necessary because there isn’t going to be any pull force on the rebar but if you were doing vertical rebar for something structural then it definitely matters
Great work! And glad you wore open-toed shoes ;)
Haha.. safety first Dark Samus🤙 Kent
Excellent 👍
Cheers John, very kind 🤙Kent
Thanks. I would glue the rebar into the hole with some of the cement slurry too. Dust in the hole is maybe not quite so important when using cement
Thanks was looking for this
Sweet! You are welcome Achutha👍
very helpfull
Glad you think so! cheers, Kent
Nice one, thanks I need to extend a slab for a garage rather than dig up all the old concrete which is perfectly good. I’m thinking maybe a thickish pva mix on the edge of the old cut edge might make a bond with the new stuff? Anyways thanks for taking the time to do this. Cheers
Good on ya Russ, PVA is great for concrete adhesion👌 best of luck mate. Kent
Informative
Cheers mate, Kent🤙
You should probably inject structural sealant like epoxy into those holes to transfer the load.......and welding those bars together when you are at it is good idea too. To make a better joint between the old and good concrete, you should apply a layer of bond coat too.
Great suggestion cellchow. Cheers mate🤙 Kent
I subscribed bc of the cat. Nice tutorial
Thanks Insik, from me and the kitty cat👍
If you were trying to extend an existing slab by about 4 inches (by adding forms and pouring in concrete around the edges) would you have to do this with rebar?
Hey John, yes - to answer your question. That would be the perfect scenario for this technique 👌 best of luck mate. Kent
Good to know. I am getting a slab replaced that's used for a backyard patio. However, it has three pillars in it and the studs/concrete is deep. Chipped most of it away but there is some remaining concrete that won't come out unless the pillars get removed. Can't do that, so rebar is the option to join new pour.
Hey Daniel, drilling and adding rebar into those footings is a great option. Well done mate👍Kent
I have a similar situation. I have a wrap-around patio with 6 4x6s posts/pillars. The concrete slab under the patio roof has numerous large cracks. My idea is to rent a concrete wet saw and cut 12” to 14” squares around the pillars. That will isolate the pillars from the jackhammering when the time comes (maybe 2yrs.). For now, I will cut slots/notches across the cracks in the concrete and place ½” anchor bolts with a sleeve nut between the anchors to tighten midway down in the old concrete. Then make some shallow square designs in the concrete and pour some 9000 psi concrete in the anchor slots and fill in the cutouts. This will stabilize the cracks for now and hide this temporary measure. Total cost will be less than $100.00.
Neat, but you forgot to bond it with Acrylic slurry, one part water, one part Acrylic and Portland cement, mix until you get a consistency of warm butter, then brush it on old concrete, then pour right away.
If you have greasy surface make sure you wash it with at least 3000 PSI pressure washer.
Hi, thanks for the great videos!! I have a question . I tried this dry pour last weekend. I followed the instructions and the slab looks great except for one thing. Large sections of the 1 foot by 8 foot slab have the top 1/8 or so peeling off. The top seems unevenly crumbly. Can you offer some insight? I’m planning on dry pouring two more sections soon. :) thanks!
Hey Ez, have you heard of 'Spalling'? have a search on the net and see if that's what's happened here. It's common for us DIY'ers whose ratios/blend may be slightly off at installation. can be corrected with fresh concrete poured over top. good luck, Kent
@@InspireDIY thanks for the info! Will check it out! :)
Don't forget though if you have post tension wires in the house slab, there is possibility of cutting those doing this causing a catastrophic failure of the wires and slab. Also if it is a new home, doing this will void the warranty on your homes slab.
Good knowledge shared there x Steel🤙 cheers mate, appreciate it. Kent
Curious to know everyone's thoughts on this.. I was told you need 5cm of concrete around rebar otherwise water can penetrate and rust the metal (causing expansion and failure) .. is that correct?
Great question Lee👍
I am thinking of cutting out the blacktop floor of my garage and doing concrete but will have to do it in small sections which means a lot of random "joints" that won't really make sense for a garage floor. When you finished this could you tell that was a new piece of concrete? I am hoping I can break this up into parts and it will look like it was a single pour.
Hey Kaje, at first it was obviously new concrete (different colour than the dirty 20yr old concrete) but it seemed to blend in and isn’t as noticeable now couple years on. You can use the gaps caused by pouring in sections as expansion joints and claim it was intentional 😉, best of luck, Kent
@@InspireDIY The problem is i won't be able to do this uniformly so it wouldn't look intentional, especially for a garage floor.
What is the strip you put against the brick? Is it to absorb the expansion and contraction?
Hey Robson, you are bang on mate.. expansion foam strip 👍 Kent
Can you show a follow up? How did it turn out? I have a similar project.
Yeah sure thing Oscar, so far so good👌I'll figure out how to do a follow up video on TH-cam, may need to be Instagram 🤷♂️, Kent
@@InspireDIY I will look for you there. Thanks!
@@InspireDIY yess! I’d like to see too, especially if the ‘joins’ are too visible or have separated over time. What about colour differences?
Hey Fia, I’m yet to do the follow up… but it’s on the cards soon - I’ll tag you👍
The concrete colour difference is the biggest obstacle for sure when joining new to old concrete.. but the repairs are 100% tied in and not moving, so mission accomplished 👌Kent
why didb't you just add longer pieces?
I see a barrier between the building and new pour. Please tell me about this
Oh great question 007, 1, it stops it sticking to the brick and 2, it’s there to allow the concrete to expand and contract freely without applying pressure to adjacent structures (building, plumbing etc) look up expansion joint foam, you can get rolls of different width and length at the local hardware store or online 👍 cheers, Kent
Probably would help to use some epoxy in those holes, no?
Hey Connor, yeah you are right - epoxy is good at both holding the rebar in place and stopping it from rusting if moisture gets to it. this patch was in a somewhat contained space by 4 sides and not structural so I didn't bother. all the best mate, Kent
I think it would have been better if you used bolts because they stick more strongly in the old slab 10cm bolts 5 in the new slab and 5 in the old one my best wishes to you and your family
Great suggestion mate, I’ll have to try that technique, cheers👍 Kent
How did you get those thin cutting blades on your grinder? They are too thin for mine, won't clamp down on the shaft.
hey Onjo, the nut on the grinder can be flipped over to suit thinner/thicker discs, yours may have this function too. Cheers, Kent
How about adding a layer of new on top of old (instead of side to side as you show here) - same logic?
Hey Kevin, in conversation with a concrete contractor the other day, his suggestion was at least 50mm thick (2 inches), using a finer aggregate, and always with a steel mesh reinforcing incorporated. Of course a ‘self leveling’ layer poured is never going to meet those guidelines💁🏻♂️Anyway, his logic sounds good to me! Let me know if you discover something different, 👍Kent
@@InspireDIY thanks for reply. Not a “covering” - more like an added 8 inches in height for a two foot by two foot square (long story). So rebar (pieces) more than a “mesh”?
Yeah, that sounds fair. The mesh gives the tensile strength (optional by the sounds of it - small but thick section), but definitely the reo-bar or dowels which will lock the two together. I reckon you're all over it👌 Kent
You rock and your feline overlord is adorable
Hey M, thank you, I think she helps out💁🏻♂️ she always hangs around anyways. 👍Kent
😎🇦🇺👍
Rebar should be overlapped about 40 times the diameter of the rebar. Example number 5 rebar (1/2 inch rebar) would be (40 X 1/2) = 20 inches. Those little one inch overlaps you have are worthless.
BTW: You place concrete, not pour concrete.
Well well RCollins, you were paying attention! and thanks for educating us all at the risk of sounding like an structural engineer crossed with an English professor (just jokes). You are quite the astute TH-cam viewer and are completely correct!
I will continue to pour my concrete - though not because I make a runny mix.. but because old dogs struggle with terminology and nomaclature. Cheers mate. 'facetiously' Kent
@InspireDIY you pour the water and pour the bag of dry concrete, even with a concrete truck you pump and pour. So wtf you talking about "place"? You place flagstone, you place posts in the holes after you aug them