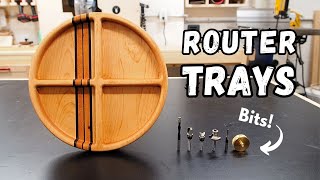
The Scoring Method - fast and accurate router templates

ฝัง
- เผยแพร่เมื่อ 7 ส.ค. 2024
- This is the best way I have seen for (manually) making router templates. Quick, simple, accurate, easy to learn and no extra parts needed more than the template material. This method can be used for everything from small tasks like recessing hinges or locks to larger shaping operations.
00:00 Intro and arrow template
03:56 Template material
04:39 Template #1 Drawer pull grip
12:55 Template #2 Shaping wood
20:56 Template #3 Big inner round - วิทยาศาสตร์และเทคโนโลยี


Just when you think you've finally seen all the useful woodwork videos on youtube, you bump into something like this, which shows you solutions to problems you did not realize could be solved this easily and elegantly. Awesome.
Nice to be of help🙂. So simple method it's a mystery it's not widespread since many years.
As a Danish person, I don't think I've ever seen a more Swedish presentation of anything 😂 what an amazing method, and the delivery, while not for everyone, is amazingly useful for tutorials
Don't know if "swedish presentation" is good or bad or just "swedish" but I take it as a good thing😁
Cause we can “hear” the native language, coming from a Norwegian 😉😁
@@Sol-hl2rj that sounds about right
Awesome as usual. Probably the most-fact-per-minute for all woodtubers.
Thanks Mikael!
This is nice woodworking TH-cam. Straight, to the point, no special production and very useful!
My one man production team is very low budget😁. Thanks, appreciate your comment very much.
@@CarmoniusFinsnickeri change nothing!
Ok, Carmonius, you are a ‘badass’ instructor. I’m subscribing. No frills, just loads of crazy good information.
Thanks! Appreciate your comment.
also I love the format of your video. I love that you did a quick walkthrough to give an idea and then you go in detail and show how you make them. It's perfect.
Thanks! It's a format I would appreciate myself if I watched an instruction video. Quite bad for view retention but I try to put the viewers in first place.
Best tutorial in a long long time. Thx
That was the best i have seen for a long time on TH-cam! Very helpfull! Tack!
Tack! Nice to hear.
Wow, Carmonius you really are a master of your craft. This was a pleasure to watch. Thank you for sharing your knowledge!
Thanks, I really appreciate your comment!
This was awesome!! I’ve always struggled with creating templates. This is the best method I’ve ever seen. Thank you!!
@@a29miller Thanks. Yes this is very simple and good method that is easy to master.
I saw this video a good while ago and thought it was really neat. These last few days I've been wondering how to make a template for small box and remembered this video. It's such an easy and accurate method, I love it. I've never seen it anywhere else and I feel like this could be useful for every single person who owns a router. Thank you.
Thanks! I agree, it's really useful and simple and it's strange it's not well known. I did a quite extensive search before I did this video and found nothing. Hope your box turned out well!
Good techniques and nicely presented!
Such an awesome idea! thanks for sharing.
Amazing method for quick and accurate template making - thanks for sharing!
Simple but very effective. Thanks for sharing that that.
So great! Straight to the point. Good technique. From a professional...
Thanks! Appreciate your "straight to the point"-comment, I try to do my best to not waste peoples time.
Hi Ola, again great informative video - Thanks
Wow such a dense lesson, and you’re a great instructor. Thanks for sharing all this info, I look forward to experimenting designs with it
Thanks I really appreciate your comment. Good luck with the experiments.
Great stuff! And not your first. Thank you for sharing.
Very easy to understand. Thank you!
Great video! Thanks for sharing this method!
Very good tips thank you for sharing them.
Great tips thanks for sharing
Wow, thank you very much for this great video.
Great instructions. I've used this method after seeing the 2nd part of the superjig built instructions. It just worked like intended. Chapeau!
Thanks! Yes, think I said in that build video this method deserved it's own video.
This great. Thanks for sharing.
That is a great tip, thanks for sharing.
Brilliant as usual!
Great video!
Brilliant! You're an excellent instructor!
Thanks!
Clever and useful as always. Thanks
Really good. Thanks.
Excellent, thank you
Excellent presentation, covering every aspect and answering every query as you went, so no questions left unanswered, brilliant. Subbed 👍😁
Thanks!
Takk Carmonius! This is a really good tip, I’ve not seen it before - it’s definitely going to be used very soon. Appreciated!
Thanks! It's so simple but very few seem to know of this method.
Thank you Sir! Well thought out template making method. Your router skills have benefited me the most, thank you! I will definitely fabricate my templates this way. I wish I could like this cool presentation 10k times.💯/💯
You're welcome, and thanks for the 10k likes🙂
Great video! Thank you!
Ho yeah, I've learn a lot of pretty interesting things! Thanks. I'm wondering why I didn't saw those tricks earlier...
Seems like very few knew this trick, nice you learned something new:)
Whoa, ingenious idea how to clamp pieces to the crosscut sled as well! 👍
Thanks! Used that clamping method more than 10 years, at that time I was more or less alone...Now since microjig dovetail clamps were introduced it has become quite common.
@@CarmoniusFinsnickeri I'd never seen it before 🙂 Watching your vid about it right now. If I heard correctly the base of your sled is 15mm. My (much smaller) sled is 12mm thick, so I would have to build a new one if I wanted to route those grooves 🤔 Certainly something to add to my to-do list. Since I wanted to use my crosscut sled this week to saw 45° bevels at the end of some longer planks, I wondered how to secure them to the sled. This seems a far better method than the usual 'quick clamps' that you also talked about in the vid.
@@nolanhitchens Much better than any other hold down ideas. I use this clamping concept in almost all my jigs. Check out some microjig crosscut sleds also to get more inspiration. I think 12mm is thick enough for their clamps but you won't have much remaining material underneath, if I remember correctly the dovetail track is around 9mm deep.
Genius Video!
Perfect timing. I’m about to make a Paulk bench, and was trying to think of an easy way to cut straight templates.
Great! Good luck with your bench.
nicely done!
Really good thank you 🙏
I really enjoyed this video. No bad jokes or "funny" pet talk, straight to the point, hands-on advice from experience and showcase of examples. Just a thought: might be a good idea to use a DIY Microjig table saw taper jig (normally used as a jointer) to score the template lines; I think it'd be the quickest option if you manage to implement a good positioning for the clamps. Well done
Thanks! I have a taper jig like that, built with festool rail clamps before the dovetail clamps where invented. Not sure how that would simplify things though, for straight cuts the normal fence is quickest way, for angled cuts the tracksaw works really well.
@@CarmoniusFinsnickeri
I was thinking of taking advantage of your idea of lengthening layout lines to the endgrain, but doing it for all of them. Then it'll be a matter of positioning the two endgrain transferred lines (ie of each layout line) right onto the edge of the taper jig and securing with dovetail clamps. The advantages I see with this method is not having to swap to the crosscut sled, not needing the table saw fence for alignment, and the ability to do any tapered line. I hope this makes sense. Btw, your Superjig is very nice. I recall Stumpy Nubs doing something similar with his box joint jig and an incremental positioner.
@@alaricomanju7280 ok I get it. But still working upside down with angled cuts, the tracksaw is really fast for those cuts, sliding mitre saw even better if it's small parts. Anyway, thanks for the feedback and also comment about the superjig. I've seen Stympus jig and it's very nice but mine is a different beast🙂
@@CarmoniusFinsnickeri
You're probably right, after all, you've done this many times; mine was just a thought. Anyways, I hope to see soon more of your work. Cheers
@@alaricomanju7280 everyone will find their own favourite methods for making the scoring passes, no right or wrong. Always good to have one more option in the toolbox.
Thank You absolutely one of the best tips.!
I’d use a radial arm saw to make the cuts.
Auto body (Bondo) could be used to fill the saw cuts if they cause an issue.
Thanks! That's a very good option for those who have a radial arm saw, my feeling is that they are not very common anymore. I never been in the situation where the saw tracks cause a problem, if I was I would maybe choose another method to make the template. But thanks for that tip also.
Thanks!
Hard to believe I’ve never seen this method before. Great video. I wonder if it would be worth the effort of adding wood filler or even epoxy to the score lines. That way you could use the template from any position with no interference.
Thanks! I would say not worth the effort, it's enough to break the edges of the score lines slightly with a sandpaper. I've used the template with that side up several times and with two hands on the router and no risk of tilting down into a score line a stop is very unlikely.
Interesting. Thanks for the feedback
😁👍
I just do full thickness cuts with my track saw.
Yepp that's smart and quick, doesn't work for all shapes though. Then I'm referring to tight shapes where a through cut would run into a piece of the template not intended to cut into, but also the final design I show in the video, corners with large inner round. You also loose some parallell and square accuracy that can be better acchieved with a table- than a track saw. But a mix of through and partial cuts is good to have in the toolbox.
You have a new subscriber.