I found this video to be very helpful, especially the part on disconnecting the test equipment from the car without losing refrigerant to the atmosphere. Thanks very much for making it. Also, using the material from your video as well as other information I've found online, I wrote up a test procedure. In case helpful to you or others watching your site, here is my note: Automobile A/C testing with manifold gauges 30 June 2021 This procedure covers measurement of static and dynamic pressures at idle speed. I cannot control the engine rpm (without someone stepping on the gas pedal) because the throttle is controlled by a motor in modern vehicles and cannot be controlled without special test equipment. The steps are the same regardless of rpm. - Verify that all hose connectors are tight and that the yellow hose is blocked off (tied back to manifold) - Zero the manifold gauges (i.e., vent any pressure in the lines) - Close all valves (LP and HP on the manifold and LP and HP port valves) - ENGINE OFF - Connect LP and HP lines to respective A/C ports - Open the LP and HP valves at the ports (NOT the manifold) - Record low and high pressures and temperature (Check against R134A chart) - Start engine and turn on A/C - Watch gauges and once the engine is fully warmed up you will see them cycle as the compressor in enabled/disabled by the car's monitoring sensors. Once they stabilize, record the highest high pressure and the corresponding low pressure. Note: The high pressure should be between 2.3 and 2.5 times the ambient temperature in degrees F. - Do NOT turn the engine off to remove the manifold test gauges. You want the A/C system suction to remain on so as to recover the residual gas in the lines. - Close the high pressure valve at the A/C port and remove the line from the port. - Open the high pressure manifold valve to allow half the residual gas in the high pressure line to transfer into the center (yellow) line. By doing this you are roughly doubling the volume and hence halving the residual pressure in the high pressure line. - Next open the low pressure (blue) manifold valve slowly to allow the gas stored in the red/yellow lines to bleed into the A/C unit via the low pressure line (blue). Note: this is akin to charging the A/C system with new refrigerant from a bottle except in this case you are using the low pressure (blue) valve on the manifold to control the flow rate. - Once the low and high pressure manifold gauges have equalized, close the low pressure (blue) valve at the LP port on the A/C system and remove the low pressure fixture from the port. - Shut off the engine - Put the caps back on the low and high pressure A/C ports
thank you for being so clear ....you are the only one of all videos that explained well the entire process.that means when to open and close valves and how to open and close as well when connecting and disconnecting..thank you.
Hey Tiberi, I've seen other videos around this topic, but yours made more sense. You actually explained the procedure for disconnecting the hoses in the end which is very IMPORTANT! I'm surprised you're only getting this many views. Thanks again for explaining the important details.
Thanks for this video! Most helpful video explaining the removal process. I was wondering how to relieve pressure in the red hose! This is the only video I’ve seen that explains this! Thousand thanks!
You didn’t say which way to turn the valve on the actual gauge set left or right. The set I have shows clearly which way is open and closed on the quick connect hoses but no info on the other ones that are on the main gauge part.
Good morning. I am just starting my journey as a diy’er and I am retro fitting the a/c system in my car to 134a specs. Your video I understand to the max. The gauge you use is similar in design. The minor difference is , my gauge is by unwell. My yellow hose connection does not come with purge valve . Please explain the position of the yellow hose during the whole operation .
i dont think opening the red valve on the manifold gauge will purge the refrigerant out towards the blue valve because those two valves , blue and red, are each independent access port or opening to the yellow hose in the middle. there is no opening between the blue and red valves so that the refrigerant could get through. opening those blue and red valves will only be necessary when you want to recover the refrigerant or to vacuum the system. in my observation, when you opened the red valve, the residual refrigerant went to the yellow hose and stayed there and then when you closed the red valve after that and opened the blue valve the refrigerant that stayed at the yellow hose will not be sucked out into the blue side of the valve. i believed that is a loss of refrigerant but very minimal.
So hoses are hooked up, gauges indicate the system is low, then no gas is added but hoses are disconnected... confusing at best. Would think that with low system you would add gas while hoses are connected.
How come when i open the manifold low pressure knob, the attached refrigerant can is not dispensing, reading on the gauges does not move at all on both side.
Loved the video. Took notes. I am a starter on A/C for my cars. I purchased a cheap Manifold gauge and it started leaking right away. Other than Snapon, which of these high end brands would you pick: Mac tools, Matco or Yellow Jacket for about $200? Thanks.
I'm a little confused. The engine is running with the AC on. The coupler is connected to the low side port and the valve at the coupler is open (turned clockwise) , allowing compressor to be sucking fluids into the low side port. I've closed the valve at the high side port and disconnected the coupler from the high side port. With the valves at the manifold open, and the low side coupler connected, and its valve opened, fluid in the high side hose gets sucked into the low side port. So far so good. But what would happen if I closed the valves on the gauge set before closing the valve (and removing the coupler) at the low side port? That is, what would happen if I closed the valve at the low side port after the valves on the gauge set are closed? If I close the low side port first, won't there be a bit of refrigerant remaining in the low-side hose? With the valves at the gauge set open, refrigerant in the high side hose will be pulled "up" through the high-side hose, through the manifold, then "down" through the low side, into the compressor. Now the high side hose, manifold, and low side hose, have become emptied of refrigerant. In my imaginations, I'm seeing the open valves at the gauge set, especially the low side valve, allowing any remaining refrigerant in the low side hose to be drawn through the low side port, sucked through the low side port into the AC by the compressor. I am imagining that closing the low side valve at the low side port (and disconnecting the coupler) _before_ i close the valves at the gauges, to be allowing a bit of refrigerant to remain in the low side hose. Or maybe it makes no difference? For some reason I'm having some trouble visualizing what's going on. Also, if I had previously been charging the system rather than just simply checking the pressure, I would first close the valve at the refrigerant can, to allow any refrigerant remaining in the yellow hose, to be sucked in, before I closing the valve at the high side port, and opened the valve at the high side gauge, to allow any refrigerant remaining in the high side hose, to be sucked in. Let's say you have attached your gauge set, checked the static pressure, then the pressure with the AC on. Then you've turned the AC off. It takes a while for the pressure to equalize again. You have neither evacuated the system or added refrigerant, so you have had both valves at the gauge set closed, the whole time. Then you close both valves at the AC ports and remove both couplers from the ports. There will be a small amount of refrigerant in the low side hose and unless you have waited a fairly long time there will be a somewhat larger amount in the high side hose depending upon how long you have waited before disconnecting. And unless you have first gone through the procedure you have described to return the refrigerant in the hoses, to the AC system, now before putting your gauge set away for storage you open the valve at the end of the yellow hose and open the valves at the gauge set - and the refrigerant in the low side and especially the high side hoses will come out of the yellow hose. When this happened to me I was surprised at how much refrigerant was in the 1.5 meter high side hose - and that instructors had not warned me about recovering it. For some reason once the is AC turned off on my vehicle the expansion valve starts to equalize the pressure right away but it doesn't fully equalize for about a 1/2 hour. The pressures so the high side hose had a lot more refrigerant in it. So it seems to me that even if you are just checking pressures, you need to turn on the AC, open the valves on the gauge set, and go through the procedure to recover the refrigerant in the hoses. To try and make my job easier I put ball valves at at the end of my hoses so I can just quickly close the valve by turning the ball, and proceed to recover the refrigerant from the hoses before removing the hoses from the ports.
Thank for the video. Just ran a test on my system. Brand new 2017 WRX seems like the compressor is cycling too often. Cycles every 5-15 seconds or so. My A/C blows ice cold at about 40 degrees but the constant cycling of the compressor drops the rpm while driving causing the car to hesitate or stutter. Temp at time of test today was about 65-68 degrees. After the car warmed up with A/C on full blast the PSI was right around where it should be about 25psi. However when I throttled the car to 2000rpm the PSI would drop down around 15PSI. Any thoughts on this situation? Thanks!!
My connectors have a problem. (Granted, they are cheap). The blue doesn't retract completely. The red one snaps, but leaks freon like crazy. What is wrong?


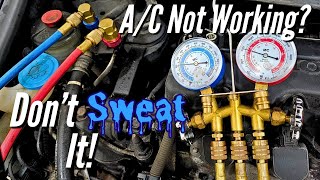


I found this video to be very helpful, especially the part on disconnecting the test equipment from the car without losing refrigerant to the atmosphere. Thanks very much for making it. Also, using the material from your video as well as other information I've found online, I wrote up a test procedure. In case helpful to you or others watching your site, here is my note:
Automobile A/C testing with manifold gauges
30 June 2021
This procedure covers measurement of static and dynamic pressures at idle speed. I cannot control the engine rpm (without someone stepping on the gas pedal) because the throttle is controlled by a motor in modern vehicles and cannot be controlled without special test equipment. The steps are the same regardless of rpm.
- Verify that all hose connectors are tight and that the yellow hose is blocked off (tied back to manifold)
- Zero the manifold gauges (i.e., vent any pressure in the lines)
- Close all valves (LP and HP on the manifold and LP and HP port valves)
- ENGINE OFF
- Connect LP and HP lines to respective A/C ports
- Open the LP and HP valves at the ports (NOT the manifold)
- Record low and high pressures and temperature (Check against R134A chart)
- Start engine and turn on A/C
- Watch gauges and once the engine is fully warmed up you will see them cycle as the compressor in enabled/disabled by the car's monitoring sensors. Once they stabilize, record the highest high pressure and the corresponding low pressure. Note: The high pressure should be between 2.3 and 2.5 times the ambient temperature in degrees F.
- Do NOT turn the engine off to remove the manifold test gauges. You want the A/C system suction to remain on so as to recover the residual gas in the lines.
- Close the high pressure valve at the A/C port and remove the line from the port.
- Open the high pressure manifold valve to allow half the residual gas in the high pressure line to transfer into the center (yellow) line. By doing this you are roughly doubling the volume and hence halving the residual pressure in the high pressure line.
- Next open the low pressure (blue) manifold valve slowly to allow the gas stored in the red/yellow lines to bleed into the A/C unit via the low pressure line (blue). Note: this is akin to charging the A/C system with new refrigerant from a bottle except in this case you are using the low pressure (blue) valve on the manifold to control the flow rate.
- Once the low and high pressure manifold gauges have equalized, close the low pressure (blue) valve at the LP port on the A/C system and remove the low pressure fixture from the port.
- Shut off the engine
- Put the caps back on the low and high pressure A/C ports
Just came across this video. Very helpfull many thanks for taking the time to post this.
Merry Christmas & All the best from England. 😊👍👍
thank you for being so clear ....you are the only one of all videos that explained well the entire process.that means when to open and close valves and how to open and close as well when connecting and disconnecting..thank you.
Hey Tiberi,
I've seen other videos around this topic, but yours made more sense. You actually explained the procedure for disconnecting the hoses in the end which is very IMPORTANT! I'm surprised you're only getting this many views. Thanks again for explaining the important details.
Thanks for this video! Most helpful video explaining the removal process. I was wondering how to relieve pressure in the red hose! This is the only video I’ve seen that explains this! Thousand thanks!
The video was informative but it did not show how to purge air from the system before adding additional Freon 134A, which is crucial.
Great demonstration video, thankyou for sharing. 👍🏻👌🏻🖐 🇦🇺
Thanks for explaining the important details.
One of the best videos out there man thank you
You didn’t say which way to turn the valve on the actual gauge set left or right. The set I have shows clearly which way is open and closed on the quick connect hoses but no info on the other ones that are on the main gauge part.
thanks it was very helpful good video and good sound and very well explained
Good morning. I am just starting my journey as a diy’er and I am retro fitting the a/c system in my car to 134a specs. Your video I understand to the max. The gauge you use is similar in design. The minor difference is , my gauge is by unwell. My yellow hose connection does not come with purge valve . Please explain the position of the yellow hose during the whole operation .
i dont think opening the red valve on the manifold gauge will purge the refrigerant out towards the blue valve because those two valves , blue and red, are each independent access port or opening to the yellow hose in the middle. there is no opening between the blue and red valves so that the refrigerant could get through. opening those blue and red valves will only be necessary when you want to recover the refrigerant or to vacuum the system. in my observation, when you opened the red valve, the residual refrigerant went to the yellow hose and stayed there and then when you closed the red valve after that and opened the blue valve the refrigerant that stayed at the yellow hose will not be sucked out into the blue side of the valve. i believed that is a loss of refrigerant but very minimal.
Thanks for the video
So hoses are hooked up, gauges indicate the system is low, then no gas is added but hoses are disconnected... confusing at best. Would think that with low system you would add gas while hoses are connected.
Excellent!! Thank You!!
So you leave the pressure in the low side when you store it?
prob the best on y.t. purge step obviously included when/if adding freon/r 134.
How come when i open the manifold low pressure knob, the attached refrigerant can is not dispensing, reading on the gauges does not move at all on both side.
Loved the video. Took notes. I am a starter on A/C for my cars. I purchased a cheap Manifold gauge and it started leaking right away. Other than Snapon, which of these high end brands would you pick: Mac tools, Matco or Yellow Jacket for about $200? Thanks.
I'm a little confused. The engine is running with the AC on. The coupler is connected to the low side port and the valve at the coupler is open (turned clockwise) , allowing compressor to be sucking fluids into the low side port. I've closed the valve at the high side port and disconnected the coupler from the high side port. With the valves at the manifold open, and the low side coupler connected, and its valve opened, fluid in the high side hose gets sucked into the low side port. So far so good. But what would happen if I closed the valves on the gauge set before closing the valve (and removing the coupler) at the low side port? That is, what would happen if I closed the valve at the low side port after the valves on the gauge set are closed? If I close the low side port first, won't there be a bit of refrigerant remaining in the low-side hose? With the valves at the gauge set open, refrigerant in the high side hose will be pulled "up" through the high-side hose, through the manifold, then "down" through the low side, into the compressor. Now the high side hose, manifold, and low side hose, have become emptied of refrigerant. In my imaginations, I'm seeing the open valves at the gauge set, especially the low side valve, allowing any remaining refrigerant in the low side hose to be drawn through the low side port, sucked through the low side port into the AC by the compressor. I am imagining that closing the low side valve at the low side port (and disconnecting the coupler) _before_ i close the valves at the gauges, to be allowing a bit of refrigerant to remain in the low side hose. Or maybe it makes no difference? For some reason I'm having some trouble visualizing what's going on.
Also, if I had previously been charging the system rather than just simply checking the pressure, I would first close the valve at the refrigerant can, to allow any refrigerant remaining in the yellow hose, to be sucked in, before I closing the valve at the high side port, and opened the valve at the high side gauge, to allow any refrigerant remaining in the high side hose, to be sucked in.
Let's say you have attached your gauge set, checked the static pressure, then the pressure with the AC on. Then you've turned the AC off. It takes a while for the pressure to equalize again. You have neither evacuated the system or added refrigerant, so you have had both valves at the gauge set closed, the whole time. Then you close both valves at the AC ports and remove both couplers from the ports. There will be a small amount of refrigerant in the low side hose and unless you have waited a fairly long time there will be a somewhat larger amount in the high side hose depending upon how long you have waited before disconnecting. And unless you have first gone through the procedure you have described to return the refrigerant in the hoses, to the AC system, now before putting your gauge set away for storage you open the valve at the end of the yellow hose and open the valves at the gauge set - and the refrigerant in the low side and especially the high side hoses will come out of the yellow hose. When this happened to me I was surprised at how much refrigerant was in the 1.5 meter high side hose - and that instructors had not warned me about recovering it. For some reason once the is AC turned off on my vehicle the expansion valve starts to equalize the pressure right away but it doesn't fully equalize for about a 1/2 hour. The pressures so the high side hose had a lot more refrigerant in it. So it seems to me that even if you are just checking pressures, you need to turn on the AC, open the valves on the gauge set, and go through the procedure to recover the refrigerant in the hoses.
To try and make my job easier I put ball valves at at the end of my hoses so I can just quickly close the valve by turning the ball, and proceed to recover the refrigerant from the hoses before removing the hoses from the ports.
Thanks for your video
Tyvm
Thank for the video. Just ran a test on my system. Brand new 2017 WRX seems like the compressor is cycling too often. Cycles every 5-15 seconds or so. My A/C blows ice cold at about 40 degrees but the constant cycling of the compressor drops the rpm while driving causing the car to hesitate or stutter. Temp at time of test today was about 65-68 degrees. After the car warmed up with A/C on full blast the PSI was right around where it should be about 25psi. However when I throttled the car to 2000rpm the PSI would drop down around 15PSI. Any thoughts on this situation? Thanks!!
what where your high side readings?
are you suppose to purge the yellow before introducing the Freon back into the system??? just was wondering? thank you for sharing!!! Excellent video.
jimbola77 yes you should purge all the hoses when you hook up. he already had refridgerant in the gauge set so he didn't have any air to purge.
Which way do the hoses go on the manifold? Mine have a valve on one end.
Grrr he does not show how to hook it up to the can wow wtf is this total bs?
Or disconnect. I disconnected the can after following all this. Thank God I had a shop rag to catch the freon and dye
thank you
I have in an 03 durango 15psi on the lowside and 150psi on the highside. outside temp is 86F
Richard Cowtails low charge. You need to find a pressure temperature chart. For 134a a pressure temperature chart shows 225-250 on the high side
If that is static reading ( with car off) then you may have a restriction.
What are all the other readings on the dial for?
Mary Lamb temperature and r12 readings typically.
My connectors have a problem. (Granted, they are cheap).
The blue doesn't retract completely.
The red one snaps, but leaks freon like crazy. What is wrong?
They're cheap. Unfortunately buy a better set!
Well try
12:03 ccw