Make Your Own Pixhawk Raspberry Pi Drone in 36 Minutes (2020) | The Ultimate Project Drone

ฝัง
- เผยแพร่เมื่อ 8 ธ.ค. 2020
- Raspberry Pi drones are an amazing platform for tinkerers who want to get their ideas into the world. But they need a flight controller in order to work.
In this video we walk through how to set up a drone with the very popular pixhawk flight controller! These little boards are a little old, but are super cheap, still advanced, and very reliable (even more reliable than Navio2 raspberry pi drones).
--
-------------------
--------------------------------------------------------
Here is the link to build this drone: dojofordrones.com/raspberry-p...
USE THE COUPON CODE 4G FOR $100 OFF!!
ONLY 9 COUPONS LEFT!!!
--------------------------------------------------------
-------------------
--
Here, we'll show you how to:
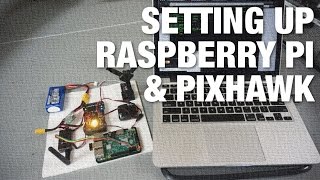
- Set up the Raspberry Pi+Pixhawk hardware
- Wire the RPI and Pixhawk together via a UART connection
- Flash ArduPilot firmware to the Pixhawk
- Set up the RPI SD card and dependencies
- Set up RPI OS to allow communication via UART
- Control the Pixhawk drone from the Raspberry Pi with MAVProxy AND a simple Dronekit Python script
3D Printable Parts Referenced in the Video:
- Vibration Plates:
github.com/emlid/hardware/blo...
github.com/emlid/hardware/blo...
- RPI Pixhawk Platform: drive.google.com/file/d/1N8qF... - แนวปฏิบัติและการใช้ชีวิต


Always keeping at least one eye open all the time, is a sign of a good pilot.
Hahahah I knew there had to be a good reason for my one eye blinking XD
I literally don't know how to say thanks to this person.
I was looking for a proper video in TH-cam about how to make my own drone and program it by python using raspberry Pi but i didn't find any proper video. But this man is legend. Lot's of love for you brother .
Hey guys support this man , talents like this deserves a lot more from us .
Love you 3000 ♥️
💯👍👍
This is masterpiece ! Have been searching on internet , trying to find ways to communicate to my omnibus f4 v2 pro via raspberry pi . Now I have some lead . Thanks man !
Such a nice and clean explanation, even going through the code.
Glad you found the video useful, Rotorhead FPV!
REALLY appreciate the way you have walked me throught this somewhat complex subject. So many tubers just whip through connections as if it is nothing and you spent time going through each connection in detail - many thanks. Definitely following your posts and I like the way you present your subjects. - Peter
Give this man an Award!!!
I will gladly accept the highly desired Nwanze award!!
I have so many people to thank. Of course my mother, the beautiful substance of caffeine, and so so many others.
Thank you, thank you!
Awesome blinking brilliant thanks for your kind stictoitivness....
@@thedronedojoyou forgot to thank Scott. Remember, if he hadn’t punched you in the back of the head that time in 4th grade you would have never got the firmware update with the drone interest script included. If that didn’t happen you’d probably be a run of the milll D14 v3 and you’d be doing what all the v3 D14’s are doing. Which is working as droid cops for the CCP.
Great video, and extremely helpful! I do believe that the wiring diagram of the rasp and pixhawk has the tx and rx wires reversed as to where they go. Thank you again!
Thanks! Superb demo.
Great video, I have been actually researching info on this subject, your video is great and extremely helpful
Hi there Anarchy FPV! Really glad this video helped you out!! It's a great drone to build for sure.
I like and appreciate your videos. Very informative. One suggestion - when plugging in the Dupont connectors if you leave the metal clip part facing out it makes it easier if you ever have to diagnose pins. Gives access for meter to connect into to confirm voltage or signal
Thank you for the Headless Raspberry Pi tutorial (about 19:00) amongst the other great stuff shown here. Excellent video, excellent craftsmanship!
No problem @Richard Vasquez! Glad you got some value out of this!
Love the video. So well explained!
Great explanation, keep going up and don't stop successful, great work 👍👍👍
Pixhawk videoo. I've been waiting for a long time. Finallyy :))
Glad we could come through for you Emin!!! :)
Absolutely outstanding video, thank you. Just one small note - as at October 2021 - the Raspberry Pi headless operating system has SSH disabled by default, so the Putty session gets rejected. In case anyone else is having this problem, the solution is to add an empty text file called "ssh" (no extension) in the root of the SD card.
To clarify: I connected the Raspberry Pi via ethernet cable rather than wifi. This might make a difference(?)
fab project, i have all the hardware lying around so good to give this a go. thanks
Very nice!! Hope it goes well!
Hi could you plx help me in my project?
Men, Thank you so much, you really are the goat, very helpful and inspiring!
Thanks @leo Bringer for that compliment! Glad you got some value out of this!
P.S.... For Pixhawk 4 users... With all my peripherals, my pixhawk didn't have enough 5v current left to power my 4gb pi 4 (needs lots of power). I powered it via the same pins but directly from a 5v pad on the pdb... Worked great.
What an excellent step-by-step guide.
I'd love your next video to cover video streaming from the Pi.
Glad you enjoyed it Sarah! Thank you for the suggestion as well!
Yep I too want low latency video streaming....
I really liked the way you presented this. I am an amateur, and have my own commercial drones. But the commercial drones don't have some features I would like. So, how many kinds of "gee whiz" stuff can be programmed into these homemade drones? Is it possible to make one of these that rival the best of DJI, or Skydio drones? Also, would I be able to extend the flight times with better batteries? The commercial battery packs are limited to their own platforms, but something like this means I will always have access to battery power because these drones use off-the-shelf batteries. What kind of flight times have you been seeing?
Thank U so much for clean tutorial
You crack me up!
Good video as usual sir!
Dude, You have got my attention :-) Amazing project !
Thanks so much Ruud! Glad you enjoyed the project!!!
Please make more this is great!
Ooooo pixhawk!!!! Very nice!
Thank you!!!
Blinks with both eyes... see I’m human :) love the tutorial man!
Glad I didn't blow my cover... ;) Hahah glad you enjoyed it!!
^ See even my emojis can only blink with one eye
Great video, thanks!!. I would like to know if Pixhawk is the only flight controller suitable for such application or the system can be interfaced with other flight controllers too.
Dude, this is slick as s...
Also, awesome video.
Also, once you pointed out your odd blinking habits they were super apparent in the extro. But again, loved the video and excellent job presenting the info!
Thanks so much Super SLo!!! Glad you enjoyed the video. Just checking out of blinking both eyes rehab and they completely failed me ;)
You're amazing man...
Thank you Dhanushka!!! Hope you find this video helpful!
Drone Dojo Guy you rock!
Keep up the good work man👍👍
Thanks for a great video!!!! One question, when picking the Pixhawk hardware I heard there is a difference between the pixhawk 4 and pixhawk 2.1 (Cube) regarding computing capacity. What are your thoughts on them if I were to pick one?
In my opinion their use as a flight control is very similar. The big difference is the 2.1 comes with a 'carrier' board that also may have a companion computer. In this video, the companion computer is the raspberry pi. So the 2.1 may have a raspberry pi type companion computer built in (depending on the carrier board for the cube module). Differences in computing power for the companion computers could drastically effect the complexity of functions your drone is able to perform (computer vision / AI for example).
Dude! You are my hero!
Hahah glad to help, Angelo!
Nice Video... Really good video to start working
THANK YOU SENSEI 🙇♂️
Teacher make student master. Wax on, wax off my grasshopper.
Super Video !!! I learned a lot and touched nice botton softly .
Glad you enjoyed it Tadashi!! Also, thanks for being kind and respectful to the like button XD
Love your videos man. I appreciate you breaking it down for me. Basically changed my life. Been trying to figure this out for a long time. Only thing I ask is if you can wear a better colored beanie for visual purposes. Maybe try a purple and gold? Thanx, much love.
This video is indeed life changing, my young Padawan. Glad it could help. As for your beanie request, I have a personal policy where I only endorse greatness- and I can't seem to remember a single super bowl that purple and gold colored teams have won?
This is awesome and so are you.
Thank you so much ninline2000
Fantastic info and details!
Glad you got some value out of this video!
Would love to see some OpenCV / Vision application on top of the flight control stack!
I will be getting my Pixhawk into rover mode for UGV, can afford to crash my camera(s).
Hi there Mr. Spacely! We have a few videos on incorporating computer vision for precision landing, but will definitely consider some more OpenCV / Vision applications. Thanks for the suggestion!
@@thedronedojo it should be very good if you do more videos about open CV
This man is Brilliant
i no smart i one blink ape
That was super clear bro. thank you for that, I am working on bonding pixhawk with nvidia jetson it will be a great thing if u made a video about that too, anyways thank you ♥
Glad you found the video useful, Muhammad Tarek! Bonding the pixhawk with the jetson would be very powerful! The principles should be the same as outlined in this video. Best of luck!!
hey man i really love this series. do these packages work with RC airplanes as well over quadcopters?
Hello, thanks for the video
Is your guide compatible with other flight controllers? Like for example omnibus f4 pro
It is, just did it with omnibus f4 pro v2 using uart 6 and raspi zero2
Nice video!👏
Working on a USV for our organisation "Missing People Sweden" that can scan our lakes or ocean for lost people in water.
Hopefully i get this working in a few months.
Just discovered this channel and is great, congrats!
What about the drone design videos?
I'm interested to know what method you use for weight estimation.
Cheers.
Glad you like it, aldohz! The basic system for me is to start with the frame selection, then that narrows down the spectrum of other parts you're able to use. Like for the F450 frame, 920 - 1100 KV motors is probably the range that would work, so I'd select a motor in that range and find it's weight.
Ok I'm beyond stoked to find this as I'm learning python (career related), bought my first 3d printer recently, and? I'm insanely interested in creating my own drones. You got mad game but, what freaks me out about this and my "low low budget" is sticky tape? Anyway, thanks so much, for ALL OF THIS.
Wow Jack, so this is the ultimate cross section of interests for you!! Awesome. Appreciate the compliments. I can see why some would be scared of the sticky tape mounting method, but that stuff is actually really robust- and best of all really fast to implement! Depending on what type of stick tape you use of course. I totally get those who would prefer more permanent methods however- especially if this was for an industrial application.
You are the most humane I have ever seen, don't worry about that. I know people are different and I fully accept those conditions. It is not a crime to be different.
Thanks for the kind words, Frosts Maker!!!!
Make for SWARM!!! That will be an awesome Christmas present!!!
Hmmmmm might just have to add this to the project list....
youre best dude thanks
33:10 I hate it when they say “smash”. Thank you for being different. Subscribed.
Thank you for being gentle to the subscribe button XD
fantastic presentation
Thanks for the tutorial! Is taping the components (and such large pieces for that matter) reliable enough? I would never think it was. And at 10:31 you can see through how much of that tape is idle and unused, actually
Nice job on your videos! Is there a limit on how fast can i send commands to the Pixhawk from the raspberry? Will the Pixhawk bottleneck the system?
How long will the drone's battery last when using? And with this build, is it possible to upgrade to a higher capacity?
dojoooooo!!!!!!!
we need a flight video of this project and a tutorial
Sub'd, nice tut. Especially liked the blinking section, although maybe a small suggestion. A separate camera showing you blinking at all times cuz when you're doing sections with only your hands on camera, we need to see that you're still blinking, with both eyes.
No cause then my single eye blinking will be further exposed!!!
You're a legend
Great video!! - I have a large all weather RC Sailboat - I'd love to install this into the boat as there is ample room inside the hull... How do you guys think it would go? I'm only using 3 channels, 1) for rudder, 2) Boom and Jib in and out (Sail Winch) 3) External 360 winch Servo for GoPro 8 FPV (Look Around). I live on the coast in Australia with 4G coverage in some very cool areas that even ELRS may not reach. Would this work? Thanks and take care.
Go job...I'll check out your listing B.O.M...also nice to see a fellow Packers fan...GO PACK GO! ALL THE WAY TO SUPERBOWL!!! :)
Thanks, Todd! Also, sad face on the packers.... I'm getting tired of saying there's always next year!! Still salty about that one haha
Really helpful video
Glad you found it useful!!
Man that`s very good I hope there will be a second part abaut the transport mission ,,,,,, (Like)
Glad you enjoyed the video!
Cool video!
Could you please make a review of MSP protocol and how to interact with F4/F7 flight controllers over USB?
Thank you! I will look into that!
Hey great video! Does the flight controller need to be pixhawk or navio2 to make a rb pi 4 drone?
Thank you for your tutorials., I am using Pixhawk 4 and Raspberry Pi 3. Is it the same for connection? I mean we just only use 4 wires from the telem port 2 (5V, GND, Tx and Rx) ?
Well kool 👍 I'm thinking of trying it out at some point just read up on info b4
You should definitely do it! Raspberry pi drones are pretty sweet.
Your videos are awesome dude !!! Am I concern what is the max flight time and distance it can be on Air?
awesome mate, really enjoyed your video
one question though, can we do the same using raspberry and betaflight F3 controller?
Hi there chiko360' !
Great question. My understanding about betaflight F3 is that the flight control firmware is completely different than ArduPilot. For this reason, the python control we outlined in this video would not work on a befaflight controller.
The main reason is that ArduPilot uses the MAVLink middleware, so this material should work for any drone using a MAVLink based flight control firmware (Like PX4 too).
You r a drone Jedi!
I always wondered something,when someone arrives here from another plannet is there a formal check in process or does welcome wagon show up with a few bucks and your new SS#? amazing stuff I love tech.
I have gone through this process and can tell you through experience there is a formal check in process. I am from Andromeda
Thanks a lot.. kindly I have one question about the installation of RPI, can we fix it far from pixhawk in the down side of the drone? and it should be in the anti-vibration panel or not necessary?
Hi there Nidal! Great question.
The Raspberry Pi can be fixed wherever you'd like to mount it, and it doesn't have to be on the anti-vibration panel. Only the pixhawk is recommended to be on the anti-vibration panel so you can protect the IMUs.
thanks... i needed this badly
how do i calibrate the motors and gps connected to the pixhawk?
Glad you enjoyed it! Here is a video on ESC/motor calibration th-cam.com/video/l8rjjvAZvHM/w-d-xo.html
@@thedronedojo thanks again! what about the gps calibration while doing missions with mission planner
Thank for knowledge, i m from Pakistan,
No problem Masood! Glad you found this helpful!
Thanks for the awesome guide. It would be great if you could make videos related to path planning with dronekit and how can we communicate with Raspberry Pi via 4G. Anyway, Thanks for the Awesome content once again.
Thanks for the suggestion, Shubbam! I will definitely consider that. Glad you enjoyed the guide!
Hi, nice work and video, Would you think that is possible to use a CC3D controller or a Pixhawk mini, instead a pixhawk? thanks!
Hi there Alexander! It would definitely be possible to use a pixhawk mini instead! Good question.
Thanks for the tutorial and I have a question: how could I access my raspberrypi to run the dronekit script before the drone takes off?
Thank you for the perfect explanation.
Can u please let me know the other commands to control the drone?
Great video, nice project :-)
Thank you! Glad you found the video useful! :)
amazing!
Glad you enjoyed it!!
This video provides the only method that I have found (other than loading APSync) that works and installs mavproxy correctly which enables my RPi4 (with the latest Raspbian OS version 5.10) to communicate with my PX4. I thank you for this clear and concise video, Drone Dojo.
Hello, Thank you for educational videos.
In the mission planner platform options there's no Pixhawk 2 and I am using it, so would be a problem if I select Pixhawk 1 ?
Also I got errors when trying to install the different sudo kits like sudo pip install future...etc... could you please tell me what might be the issue ?
thanks in advance
Great video
Damping reduces amplitude of vibration. Dampening makes something wet.
The more you know XD
Man. I lovoe you!
That's funny cause I
Just curious, is this possible on other flight controllers? There are tons of other mini flight controllers that use ardupilot and with uart connections. Thanks
Great Video! Will this also work with the Raspberry Pi Zero?
Thanks Benjamin! While I haven't made a drone with the Pi Zero, as long as it has UART it should definitely work!
Interesting video. Well done! Will there me any further updates for the drone? (Such as Image recognition or obstacle avoidance) ;) Would be really interesting!
Glad you enjoyed the video, Bennedictbyy Byy! Missions such as image recognition and obstacle avoidance are certainly possible with this drone. A video like that may be the next one, thanks for the suggestion!
Awesome video. Could you also have a video showing a ROS based pi board controlling a Pixhawk quad
Ohhh I like that suggestion! I will highly consider that one! Thanks Ashish
@@thedronedojo Thank you. Eagerly waiting for that tutorial
Very good tutorial Sir, thank you
can you show a way of controlling through pi's wifi?
Possible to transfer a video stream, when it's flying?
the next project I suggest to build quadcopter with detection face using openCV and Raspberry pi. That would be a really cool thing bro! :D
Thank you!!
Thank you for the suggestion, Arya!!!
Hi, very nice. I was wondering if the same can be done using CC3D
Thanks for this video. Can we use USB micro port of Pixhawk and connect it to RPI USB port and control the drone...
Hi,very nice project!I have a very stupid question, What exactly I need to control the dron by wire instead of remote control,I´m saying because my intention is to build drone big enough to seat on it and have the same controls but communicate by wire with the drone hardware.I know you have out there many remote controls with 15-20 command buttons etc.I would like to build the same but communicate by wire
How would I go about doing this with a Pi 0? I prefer that system as it has a lower power draw - vital for solar
Hello bro, is there any way to connect the pi to pixhawk via USB directly? without the telem cable?
This was wonderful thanks a lot
Also I wanted to establish the same connection over the usb to usb on pi.. is it feasible?
Glad you enjoyed it, VibSin!
To answer your question, it is definitely possible to connect the two via the RPI USB and the Pixhawk MICRO-USB. You'd just have to find the device name of the USB port you are using on the raspberry pi (This was /dev/ttyAMA0 for the UART device of the RPI).
@@thedronedojo ok..the docs don’t mention much on this
Ex that some failsafe may be deactivated, which may be okay
Will test the performance side
Best tutorial on youtube !! Fantastic !!. It is possible to install (and run flawless) on a Raspberry pi 4b 2GB Ram or 4gb is better ?? Thnx in advance
Thank you Guillermo!!
It is definitely possible to run advanced applications on the Pi 4B with even 2 GB RAM. For example, some of my computer vision applications could perform around 20 FPS while processing 720p images.
Hope this helps!
I know its been a little over a year now but I'm curious as to which Pi image you actually used for this project. I noticed your file name that you flashed to your sd card did not match the pi.img file you pulled from raspbians website. The video cuts when your preparing to flash the sd card and I noticed the image name began with Emlid. I'm familure with emlid and their line of products. Did you have to use their image to get this to work? thank you.
im a drone builder, ok you,ve got my attention
Hahah glad to hear it, Kyle Fpv!