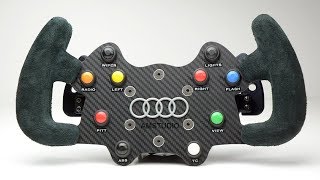
Building an Arduino powered USB Button Box for my Racing Sim

ฝัง
- เผยแพร่เมื่อ 30 ต.ค. 2018
- Multiplayer Morons aside, one of the most frustrating things about Sim Racing is having to navigate through menus while driving to adjust settings on the fly. It's unrealistic, and in games like the F1 Series from Codemasters, more often than not end up with you in the wall.
In today's video we set about to fix this problem by building our own 32 Function Button Box with Rotary Encoders, so we can easily make adjustments to the car's settings such as Fuel Trim, Differential, Brake Bias and Energy Recovery System without having to take our eyes off the road!
Thankfully, the guys over at AMSTUDIO have a fantastic DIY guide, which I followed in order to build my own, so today I'm going to take you through the process of building it, setting it all up and putting it to the test to see if it helps.
To watch AMSTUDIO's DIY video, which includes the circuit diagrams and Arduino Sketch File, head over to this video: • MAKE THIS BUTTON BOX |...
PARTS USED FOR THE BUTTON BOX:
Note: These are the parts I used, available from Jaycar Electronics in Australia. To purchase overseas, you can use the affiliate links provided on AMSTUDIO's video.
SPST - Single Pole Single Throw
DPDT - Double Pole Double Throw
4 x Mini Centre Off DPDT (I used DPDT as they had sold out of SPST) Momentary Switches (ST0358)
2 x SPST Momentary Toggle Switch (ST0577)
4 x Red Push Button Momentary SPST Switch (SP0657)
4 x Black Push Button Momentary SPST Switch (SP0656)
2 x Silver Push Button Momentary Switch (SP0755)
4 x Pushbutton Rotary Encoder (SR1230)
4 x Brushed Aluminium Knobs (HK7020)
1 x Jiffy Enclosure 197x113x63mm (HB6012)
1 x Kit Wiring Cable Pack 8 Colour 13/0.12mm (WH3025)
1 x Arduino Micro Module - goo.gl/XZgo4B
1 x Micro USB Cable (WC7753)
BUY THE TV FEATURED IN THIS VIDEO HERE:
amzn.to/2EKb9mi
GRAB YOUR FANATEC SIMULATOR GEAR HERE: boostedmedia.net/go/fanatec-w...
(A small portion of the sale price goes to helping this channel)
Other Gear used in my rig:
FANATEC CLUBSPORT WHEEL BASE V2.5:
boostedmedia.net/go/fanatec-c...
FANATEC CLUBSPORT BMW M3 GT2 RACING WHEEL:
boostedmedia.net/go/fanatec-b...
FANATEC CLUBSPORT FORMULA CARBON F1 RACING WHEEL:
boostedmedia.net/go/purchase-...
FANATEC CLUBSPORT PEDALS V3:
boostedmedia.net/go/fanatec-c... - เกม


![TREASURE - 'KING KONG' COMEBACK SPECIAL [THE TREASURE SHOW]](http://i.ytimg.com/vi/Jx1wyMaQzf0/mqdefault.jpg)

Finally someone who actually tells you how to solder properly. I've been soldering for 11 years and the number of people who show terrible joints in their videos is shocking
It is toe-curling to watch sometimes, but that is becomming the norm these days... Random not knowing people who make videos for thousands of viewers with crappy content and lack of skill with terrible QC and a bad finish. Tthey arent even ashamed for their crappy work, even more, they are proud of it and tell others to do the same -_- Boosted Media is a channel that does things correct without fooling arround or with crappy solutions.
*This is brill; **_thanks so much!_* Primary plan is MFD / Arduino touchscreens for DCS (I already have the square button frames) but this opens a whole new vista! cheers
Thank you so much for posting this it helped me tremendously. I bought a button box for the PS4 and now have been able to use it on the PC for ACC. Tomorrow I will be mapping it in the game.
I have followed you from England since covid and love the videos you post. They are so informative they are amazing. Keep up the great work.
Nice video!
Thanks for making it possible :)
I like the short and sweet of amstudio, but also like more detailed like you boosted media. definitely answers questions for the newbies.
Great job! There never seems to be enough buttons, even on my GSI wheel. I plan to make a box based on your excellent instruction.
Great and informative vid, but just wondering if you had any issues with bouncing for the rotary encoders? I understand you can get encoders on a module with resisters etc built in to remove bounce, but the ones you used looked like the bare bones ones and was curious if you had a fix for getting rid of bounce for the bare bones encoders. Thanks.
hey, Will, quick question mate. When you soldered up DPDT's, did you wire to centre of toggle as in 7:00 (yellow wires) and did you just use one side of the switch wiring to simulate SPST? Thanks
if you dont mind waiting and have the tools to solder, whole box can be put together for as low as £30 via aliexpress.
i got one of the illuminated led power push buttons and put it on the red wire on the usb power so i can disconnect the pox without having to unplug it
How far you've come will, how far indeed 😁
@bootsted media
How did you fixed, the buttons box at the Fanatec?
Sir thanks for all your videos and help. Watching them (along with others) helped me get started iRacing. My question is the SR1230 part number for the rotary encoder seems to no longer exsist on Jaycar. Can you point me to an alternative?
Ok so after many hours of looking through these comments and playing around i have finally got this working! I am no coding master and kept getting error on the joystick / keypad side so if you are like me then here is what i did to get it working:
1) Download the Arduino software (www.arduino.cc/en/Main/Software)
2) Download the script (github.com/AM-STUDIO/32-FUNCTION-BUTTON-BOX) click the green box saying clone or download. Save it to your desktop.
3) Download the joystick library (github.com/MHeironimus/ArduinoJoystickLibrary) click the green box saying clone or download. Save it to your desktop.
4) Download the keypad library (github.com/Chris--A/Keypad) click the green box saying clone or download. Save it to your desktop but do not extract the files.
5) Extract the script folder to your desktop then open that folder. Double click on the file named "32-FUNCTION-BUTTON-BOX-master" Then double click on the file named "ARDUINO_BUTTON_BOXV2" this will open up the Arduino software with the script needed to work this project.
6) In the Arduino software at the top click "sketch" tab then "include library" then "add Zip library..." from there go to your desktop and select the keypad folder just downloaded (Keypad-master)
7) Next go extract all the files from the joystick library file just downloaded and open that file. Open the extracted file and then open the next file called "ArduinoJoystickLibrary-version-2.0 and you will see a file called "joystick".
8) Now open a new file explorer window and select "this computer" then Documents" then "Arduino" then "libraries" now drag and drop the joystick folder into this folder.
9) Go back to the Arduino software and select "tools" then "boards" and select "Arduino Micro" Then select the right port (it will show you the one is being used).
After all that you should be done! Hope this help.
I did all this and everything seems to be working with the exception that I get a couple duplicate buttons. I'm using a smaller matrix, and no rotaries, but I'm not sure if that would cause the problem.
Everything but 3 switches all work, and those partially work, but some of them all return button 1 on the joystick. I've checked my soldering, and even switched what switches connect to on the Arduino. The problem just moves to the new switches.
Any ideas?
Any idea why keep getting error on the joystick/keypad side?? From the original video from AMStudio, I thought it was a simply case of soldering exactly the same as they did and upload the sketch software code and that should be it?? I am also getting that joystick/keypad error...
How do you make a code if you wanted to do a different amount of buttons
are you able to use this while in VR? im looking to build one myself but concerned of while in vr the none use of the button box.
Yeah I’ve been able to feel my way around pretty well.
I'm pretty confused with this one. How do you wire the second set of wires. I can't get mine to connect to all of the components without going over the 5 limit.
do you think it might be worth putting a header on the Arduino? just thinking about ease of replacement for a failure in the future if one should present itself.
Probably not a bad idea.
Male header pins on the 'duino, mount the thing on a custom PCB using female headers on the PCB. The "custom PCB" can be made from protoboard if you don't know how to design your own PCB, or don't feel like it for a one-off. If the Arduino fails for some reason it's a simple matter of pulling it out and sticking a new one in.
For the buttons and such, you can use JST connectors. You can get them in sets of PCB mountable "sockets" and pre-wired "plugs". This allows you to replace buttons, should they go bad.
That's how I approach all of my builds; I never solder cables or microprocesors directly to my protoboards.
Great video! I want to make a custom keyboard ONLY for the use of World of Warcraft. It will have oversized keys for direction, then buttons dedicated to certain things such as character, bags, map, ect... Only key functions that I constantly use. Additionally, two large, round, controllers, on the floor that can control these same features. No need to let your feet go to waste when a controller can be made large enough for the feet to manipulate. In fact, someone with no arms could play any game with the foot controller i have in mind. I'd like to be able to play WoW hands free while I am busy eating. Today I'm going to breadboard a few switches, write a bit of code, draw some pictures, and prep up to make such a set of controllers. It will be three boxes, both feet, and my left hand!
Did you finish this?
mine give a error when loading the board any idea what i could do
Thank you bro🎉
How are the 3 way switches wired? Can you take a picture of them?
Building a button box sounds like a fun project. Until I realized that I don't have any tools (not even the drills), and no experience working with them, either. So, off-the-shelf Button Boxes it is for me. Derek Speare Design seems to be a good one, for example.
What temprerature do you run the iron at?
Where did u get the file for the arduino?
i was looking for this as i crash when needing to change things like ERS
Did you use diodes? Don't you have possible ghosting if you don't use them?
how do the toggles wire up i've seen amstudio's vid but since there's a wire to 3 connections right and it goes to 2 toggles and one button but on the 3rd wire since there are only 2 connections on the buttons where does the wire go
Sorry. I don’t understand what you mean. There is only two connections used on the toggle switches. Look at the circuit diagram on AMSTUDIO’s video :)
@@boostedmedia The 3 way on/off/on momentary switches with 3 connections. Can you show how those are wired.
Regarding prices - I don't want to make people think that buying at a local store is a bad thing, it's definitely not, but only if prices are reasonable. $140 is way too much for those parts.
Realistically its maybe a third of that and even less when buying offshore. IMO its sort of a crime to only buy online as it is to sell products with a 300-500% increase or more. This is mostly the fact when it comes to electronics, as most of the parts are coming from - you know where. Other than that - a great Video and who does not know AMS nowadays - overall great quality projects.
what is the top plate on top of your next level racing rig? it looks deeper than the one that comes with the next level racing wheel wheel stand. is the gaming desktop add on?
It’s the standard part mate. Maybe it’s different to the older F1-GT?
I'm currently researching a box build. Will this work with a Arduino UNO?
i cant find the arduino code in the description . can you share it aging
I have to ask, I'm in the middle of making a button... Dashboard. I'm starting wiring it now, but I have a slightly different button setup. wil the IDE work even if I only haev 2 encoders? I might have 6 buttons I can connect instead of the 2 missing encoders, would that be possible?
You may have to modify the code slightly but yes it can definitely work.
@@boostedmedia Maybe I bit over more than I can chew, but we'll see. I think my idea of hard mounting a thin MDF to the base is pretty good, but more suited for ETS2, ATS, and FS19. Button box is a great thing for immersion, but without a full racing rig it's hard to find a place to place it.
Have a question. How do you solder Momentary Toggle Switch? I couldn't understand from AMSTUDIO's video neither. Plz help :)
Not sure how much more simply it could be explained other than the circuit diagram already supplied. Sorry.
@@boostedmedia NP. Problem was, momentaries have 3 pins but in the diagram everything was showed like 2 pins. Didn't know what to do with ground connections. I found the solution from somewhere else. thanks anyway.
Glad you got it sorted.
And for those who struggle with the same question, and don't find "I found the solution elsewhere, kthkbye" useful: you measure with a multimeter set to continuity (aka "beep on short") and figure out which to pins don't make contact when the button isn't pressed, but do make contact when it is. You solder your wires to these two pins.
Boosted Media
Wow very rude reply followed up with kiss ass these are the people who help put food on your table as such.
btw how would you go about mounting something like this? would you drill more holes or just tape it etc?
I am going to mount it using some metal brackets and try and use a factory hole on the rig.
I like these for a reasonably priced, adjustable holder. The button box isn't the most secure in it, but something similar or some slight modifications might work well: www.amazon.com/gp/product/B00O4VAGR8/ref=oh_aui_search_asin_title?ie=UTF8&psc=1
Were you happy with this wheel or does it lack in any way compared to the new V2 you have? Wanting to have an F1 wheel, and I have one of these available for cheap. But dont want to drop my money on it unless its okay - if the new V2 are way better, i'd rather go that route.
The thumb encoders on the V2 are great for F1 2018/19. Otherwise not much difference.
Arduino bution program dosyasını da link olarak koymanız iyi olurdu tesekkurler
how can I do to add one more rotary encoder????
Good vid
Creating the matrix. Is this random? Or is there a purpose in the sequence to add wire to the buttons?
A matrix is just a circuit within a circuit to save ports. If you are cool with using more micro controllers then you could just run each switch connection to a different set of ports.
Keep in mind, you can always stack grounds since they are travel to the same place….ground lol.
I know this video is old as hell. But how did you get the code to open in the arduino program? When I try to add the .ZIP file it says "installed" but no code comes up on the screen. I have watched the orginal video countless times, I even baught the 19 page guide for this build. Nothing I do seems to work. I have dumbed almost $80 into what is supposed to be a "SIMPLE" buttonbox but yet the only simple thing was wiring it. The software side of things is far far from simple.
Cant find "keyboard.h.... and (I erase the line of the code, and then....
'buttbx' was not declared in this scope... that error while the compilation...
any advice???
Need to instal the keyboard.h library - github.com/arduino-libraries/Keyboard/blob/master/src/Keyboard.h
I went to jaycar to and got the same 3 way toggles. Do you just wire them to one side/3 poles?
2 way toggles I mean on/off/on
Correct. You can leave the second throw blank.
I use 3 way momentary toggles. Up counts as a button and down counts as another button. The center pole is basically the ground.
hi bro. I don't know to connect where. I use Arduino Leonardo driving. please help me (i DIY all)
help please. what shall i do regarding this error ARDUINO_BUTTON_BOXV2:95:1: error: 'Joystick_' does not name a type; did you mean 'Joystick'?
Joystick_ Joystick(JOYSTICK_DEFAULT_REPORT_ID,
can i make that buttonbox with arduino uno?
good ol jaycar
Bro I went to jaycar n I couldn’t find the encoder did you buy all the stuff needed from jaycar. I got few things but no encoder
Yep I bought them at jaycar.
@@boostedmedia i ended up getting encoder from ebay the rest ill get from jaycar
Cool. Am going to try this!:)
Let us know how you go :)
thx
do you happen to have a copy of the sketch the one from the other vid isn't working for me :(
Unfortunately not. AMSTUDIO is charging for it now so it’s not right for me to distribute for free.
@@boostedmedia i ended up buying it and it turned out great! Thanks for the reply
Is this working for the playstation 4?
19:15 its most realistic AI first bump other out then get 10 second penalty
I suspect that someone has modified a line in the program cause I get an error "Joystick does not name a type" when I hit verify or upload.
Joystick_ Joystick(JOYSTICK_DEFAULT_REPORT_ID,
JOYSTICK_TYPE_JOYSTICK, 32, 0,
false, false, false, false, false, false,
false, false, false, false, false);
void setup() {
Joystick.begin();
rotary_init();}
Anyone know the solution to that error? Please
Has anyone done this button box or a similar one? Would love the ability to ask some questions as I’m new to electronics for the most part.
Nice just needs labels!
interesting Idea , I mostly play NFS Underground 2 so I suspect that something like that would do the trick .
Use the buttons to change neon colours?
Once the sketch is loaded, the device does not detect me ...
some help???
Good video
Try unplugging it and plugging it back in again. Sometimes it needs a power cycle to reboot after flashing the sketch
How did you mount your button box to the f-gt rig?
Haven’t yet. Will look into that for the next video. Should be pretty simple. Just gotta figure out the best spot.
Boosted Media check out the CSL Elite Panels from Derek Speare Designs. Maybe try build a similar mounting bracket from your box to the Shifter holes.
Will definitely check it out. I have a 3D printer so was thinking I might design something if I can’t find something off the shelf.
@@boostedmedia I was thinking about drilling the deck and bolting on some 80/20.
Likewise. But I want to try and keep it off the wheel deck if possible as it obstructs my view for open wheeler racing.
No entiendo yo descargo la librería del arduino y no me sirve me da error al instalar
I want to make something like this to use in BeamNG, specially to use the hydraulics, need to confirm if i can use those silver thingis(english not my first language), but the ones that return to the middle.
How tall is your setup?
How it’s currently configured its 1m to the top of the seat and 1.2m to the top of the screen.
Svp le lien arduino box2 svp
'Joystick_' does not name a type what should i do ?
same here. did you had any answer regarding that error?
@@RickStuff i have new code for this if u want
hello Refi. Yes dude would be awesome if you could share it with me!
If you want you can send me the zip file or the link at rickstuff9@gmail.com
Thanks Dude! :)
ofc you have to pay that dude for the sketch
Hi very good video, does this work on Ps4?
No
This button box is working with ps4?
No PC only.
Can you do gt racing videos?
Will get on to GT racing soon I promise :)
Hello can you send me library and sketch. I miss keyboard.h
github.com/arduino-libraries/Keyboard/blob/master/src/Keyboard.h
@@boostedmedia Please show me how use it? Copy or how?
Do you have a 3d file for the button box mount
i want to make this for my ps4 can anyone help me out if this is possible?
Not possible
@@boostedmedia and why is that if i may ask?
You need to install software to run it. You can't install software on PS4.
Actually it is possible you just need to upload a different aurduino code. You can find it here, forums.codemasters.com/topic/41266-diy-button-box-ps4-done-and-working/
If only I had more than 37 cents
F in the chat
F
Awesome job! If went this route:
forums.codemasters.com/discussion/141412/steam-deck-buttonbox-for-f1-2018#latest
I like that a lot, not much more expensive than the parts for this cost either.
What’s drs
man 140 dolars i can build this form aliexpress for 20€ max
Cool, can't wait to see the build video. Oh, don't forget to show how you spent 20 or less on it. 🙄
fermium257 im not joking in america they have all overpriced button that cost on china 1$ cost at ebay or amazon 10$ depent on country u live in how mouch u get payd and spend ....
3:26
140 for some normal buttons??? What lmao
Hmm, you paid AU$140 for the parts for this? Either the Australian Dollar is worth far less than I imagined, or you overpaid by a large margin. Haven't checked the entire video yet, but apart from the box, those parts should set you back about the price of a pack of cigarettes.
By which I in no way mean to say that the guys at amstudio are overcharging. The most expensive "component" in such kits is the labour. And I'm sure they'll make sure to use "proven quality" components because if you sell stuff like this, you don't source your parts from AliExpress like the rest of us DIYers. But even then, the parts are a negligible part of the total cost.
Yeah the components are expensive here unless you buy in bulk.
Yeah, just checked my local electronics shop for comparison, and prices for e.g. the rotary encoders are about 20x what I pay on AliExpress. At those rates the costs quickly add up.
Lol i just use my phone n tablet cause yh 😂
Scam doesnt work!
LOL. I’ve been using it for over a year now but ok.
It will work with XBOX one with this code if that's your issue. forums.codemasters.com/topic/41266-diy-button-box-ps4-done-and-working/