thanks very much :) For better or worse, I almost never focus stack. The last time I remember doing so it was for an image I was at 200mm focal length and I had something in frame at around 100 meters, then in the background a mountain a few km away
Nice one Steve. I've been using the enhance feature over the weekend and one or two of my landscape shots seemed to have artifacts in them. I think you've solved my problem by mentioning the default sharpening settings. I overlooked that. Thanks mate.
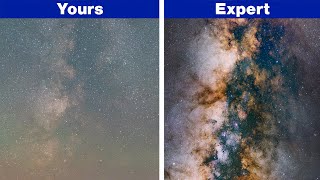
Matt Kloskowski demonstrated a 200% upsize in Photoshop with the Super Resolution enhancement in ACR. There is a very slight difference, with the edge barely going to Super Resolution. You really have to pixel peep to see the difference. Super Resolution also does a slightly better job of handling noise during the upsize.
That's interesting (and good) to hear. I would assume super resolution outperforms simple upsizing but haven't tested or compared it yet myself. There's undoubtedly more to come from this feature too, which makes it really exciting.
I tried it and yes the file gets really big but saving as a jpeg it increased only 3 megapixels. It was picture, , opened photoshop, saved got 3 megapixels more. Am I missing anything?
Yeah I agree. By making it part of the RAW process, adobe are ensuring it's the first thing that gets done in your end to end process. As far as I can tell, it doesn't "bake in" any RAW settings adjustments before super-resolutioning. It just applies whatever changes you've made to the new large version after converting. I guess having the ability to load non-RAW files just gives you an option if working on the RAW file isn't possible for some reason
@@SteveArnoldPhoto Perhaps not; the Fuji GFX100 would now be 400mpx ... The shot I used was a surfing shot from a recent competition. I know the shot was sharp because I could read the writing on the surfer's event vest. I'll have another try in the next day or so with a landscape perhaps.
This looks interesting, my PC isn't really up to it, over 10 minutes to process the image, I have a new rig waiting to be put together but I cannot get a graphic card, so I guess I'll have to wait to play with this properly! Edit: Finally finished one... Original file size - 37MB Enhanced File size - 474MB Gonna have to use that sparingly!
@@glennmitchell9420 I don't think it is that straight forward but I don't know how to make the calculation based on pixel increase, it is physically four times the size, the image dimensions are 16384 x 10928, so 179,044,352 pixels [almost 180 MP]? which makes sense, based on the original 45MP image, of course, image detail will make a difference too, I'm frightened to save it as a tif haha! I tried a 24MP [25MB] image too and that came out as 314MB, so that seems consistent, unless, of course, Windows is not displaying the file size correctly. All were .dng.


![[FULL EP.16] เซียนพาลุย "เผือก-ฟรอยด์" กรี๊ดลั่น จนปูหนี | เฮ็ดอย่างเซียนหรั่ง | One Playground](http://i.ytimg.com/vi/FsqUvwS3b-Y/mqdefault.jpg)


Great Photoshop advice, learned a lot!
Welcome back mate 👍👍
Thanks! It's been a little while :)
Well explained. Thank you and cheers from Seattle!
Interesting video but I have a question - how many of your images have to be focus stacked. The Juniper tree image is a real work of art Congrats!
thanks very much :)
For better or worse, I almost never focus stack. The last time I remember doing so it was for an image I was at 200mm focal length and I had something in frame at around 100 meters, then in the background a mountain a few km away
Nice one Steve. I've been using the enhance feature over the weekend and one or two of my landscape shots seemed to have artifacts in them. I think you've solved my problem by mentioning the default sharpening settings. I overlooked that. Thanks mate.
That's good to hear. I was ready to write the whole thing off until I realised the default sharpening thing!
Matt Kloskowski demonstrated a 200% upsize in Photoshop with the Super Resolution enhancement in ACR. There is a very slight difference, with the edge barely going to Super Resolution. You really have to pixel peep to see the difference. Super Resolution also does a slightly better job of handling noise during the upsize.
That's interesting (and good) to hear. I would assume super resolution outperforms simple upsizing but haven't tested or compared it yet myself. There's undoubtedly more to come from this feature too, which makes it really exciting.
I tried it and yes the file gets really big but saving as a jpeg it increased only 3 megapixels. It was picture, , opened photoshop, saved got 3 megapixels more. Am I missing anything?
I can’t see enhance when right clicking the photo in ps?
Sounds like it would be wothwhile inhancing the resolution before making any other adjustments.
Yeah I agree. By making it part of the RAW process, adobe are ensuring it's the first thing that gets done in your end to end process. As far as I can tell, it doesn't "bake in" any RAW settings adjustments before super-resolutioning. It just applies whatever changes you've made to the new large version after converting.
I guess having the ability to load non-RAW files just gives you an option if working on the RAW file isn't possible for some reason
Tried it the other day and it appeared to soften my A7RIV file. Increased the resolution to 241mpx! Will have to have another play.
The in-camera pixel wars are surely over now, right!? haha
I wonder if it works better with some types of image/subjects compared to others?
@@SteveArnoldPhoto Perhaps not; the Fuji GFX100 would now be 400mpx ...
The shot I used was a surfing shot from a recent competition. I know the shot was sharp because I could read the writing on the surfer's event vest. I'll have another try in the next day or so with a landscape perhaps.
This looks interesting, my PC isn't really up to it, over 10 minutes to process the image, I have a new rig waiting to be put together but I cannot get a graphic card, so I guess I'll have to wait to play with this properly!
Edit: Finally finished one...
Original file size - 37MB
Enhanced File size - 474MB
Gonna have to use that sparingly!
That's interesting. The 200% upsize should make a file roughly four times the size of the original, not more than 12 times. Wow!
@@glennmitchell9420 I don't think it is that straight forward but I don't know how to make the calculation based on pixel increase, it is physically four times the size, the image dimensions are 16384 x 10928, so 179,044,352 pixels [almost 180 MP]? which makes sense, based on the original 45MP image, of course, image detail will make a difference too, I'm frightened to save it as a tif haha!
I tried a 24MP [25MB] image too and that came out as 314MB, so that seems consistent, unless, of course, Windows is not displaying the file size correctly.
All were .dng.