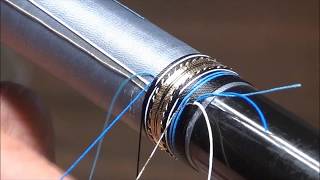
Saw Blade Thread Wrap (JTOB) - Multi Color: Custom Rod Building

ฝัง
- เผยแพร่เมื่อ 13 ก.ย. 2024
- Check out my eBook on Guide Wraps HERE reelbluecustom...
In this tutorial, I demonstrate how to conduct a Saw Blade Thread Wrap with multiple colors on your next custom fishing rod build.
Single and Multiple Inlay Wraps: Custom Rod Building
• Single and Multiple In...
Saw Blade Thread Wrap (JTOB): Custom Rod Building
• Saw Blade Thread Wrap ...
Join this channel to get access to perks:
/ @reelbluecustomrods
---- About ReelBlue Custom Rods, LLC ----
After 24 years of military service I decided to pursue my passion and build something I could call my own. That something is ReelBlue Custom Rods, LLC. Located in the great Pacific Northwest, ReelBlue Custom Rods is a Veteran owned company building unique, high performance custom fishing rods. I work with each customer one-on-one to ensure I meet their requirements with the goal of building you the rod you have always wanted.
This channel is where I will share my custom builds, travel experiences, how-to videos, and my fishing expeditions.
Please subscribe if you like what I am doing and stay tuned.
New content every Monday.
---- Follow Me on Social Media ----
Instagram: @reelbluecustomrods
Facebook: / reelbluecustomrods
Tag us on social media at: #reelbluecustomrods
Business Inquiries: info@reelbluecustomrods.com


Thanks for doing this with different colours, it makes it so much easier to see.
You are very welcome Darren and thank you for watching and commenting.
looking forward to the next video.
🙏 🙏🙏🙏🙏
I am a fan, looking forward to more videos.
Thanks again.
Awesome work, wonderful teacher, superb explained, John I sent you to you site Email some pictures of my work before I retired 12 years ago, I'm again updating on everything again, a little rusted and older but with you I getting a wonderful update little by little, great to had discovered your chanel, it is simply GREAT!, THANK YOU VERY VERY MUCH!
You are welcome Alexis and thank you for the kind words. I will look to see if I have your photos in my email.
@@reelbluecustomrods ok, if not recieved let me know please, I used size D Gudebrod thread but with size A it will have a lot more definition for sure.
@@alexisacevedo8016 - I received the email Alexis.
@@reelbluecustomrods ok,g-night
Thank you i will be trying this really soon on my rods to make them different than anyone's I've seen here in my location thank you again
Your welcome James and let me know how it turns out.
Thank you for watching and commenting as well.
Can't say it enough, you are an OUTSTANDING INSTRUCTOR, KEEP UP THE GOOD WORK. Really helps a 63 year old man like me.
Wow, thank you very much Terry. I really appreciate the positive feedback.
Thanks for a thorough explanation. Really helps a beginner like me.
No worries Kyle and thank you for watching.
Great work, very well displayed and explained, thank you Sir 🙌👏
You are welcome Gavin and thank you for watching and commenting.
John, great job on the explanation. Patience is key! Keep it up.
Thank you Jason, and thanks for always watching. Your continued support is much appreciated.
Thanks John great explanation of the saw blade
Thank you Greg and I’m glad you enjoyed it . Thank you for watching and commenting. Appreciate you the support.
Excellent, didn't know how to do this one. I have done olive tree before but never played around with saw blade. Looks good.
Thanks for the feedback, and glad you found it useful. Let me know how yours turns out once you try it.
Very nice work man and a thumbs up! Very well explained..
Richard from Kansas;)
Thank you Richard, and I appreciate the positive feedback and support. Thanks for watching.
Very instructive
Thank you very much Terry, and thank you again for watching.
Sure great video! Thank you sir!
Very welcome, and glad you enjoyed it. Thanks for watching.
Hasil pekerjaan yang sangat baik.
Thank you very much. Terima kasih banyak?
My english is not the best because I'm from Puerto Rico but if I can share some things by email, will be great my man, check your site email to see the photos, thanks for your time.
Will do and no worries.
It appears that your note thread is running through the “keeper” (spot on the rim of the spool. I have no clue what it’s actually called) part of the spool. Have I been routing mine incorrectly?
Send me a picture of how you run yours and I’ll give you some feedback.