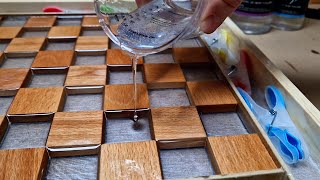
Instructions say, right there on the bottle, that proportions are by volume not by weight. Most epoxies also tell you whether you should add B to A or A to B. Finally, if you use an epoxy that dries fully clear, you can test pigments in water poured to the final depth to determine how much to use in the epoxy without wasting epoxy or waiting for it to cure. If your epoxy isn't as clear as water, that won't work as well. Just add a measured amount of pigment to a measured amount of water that will be the same volume as the epoxy you plan to mix, then pour the colored water into a pocket equivalent to where you will put the epoxy in terms of depth, color of backing material, etc. Repeat until you get the color you are looking for, then use the same amount of pigment in the epoxy.
I do colored epoxy inlays frequently. often with multiple colors. One of the things I have learned is that if you seal the pockets with a white pigmented wood sealer. This gives a much more accurate color (similar to the color in the mixing cup). Without the white background, the poured epoxy reflects the color of the wood behind it. This process also prevents color bleed of the epoxy into the grain of the wood.
It turned out great! I wish you had showed the whole process until it was finished. Maybe another video! Did you do a video of making that little box? If not, would you do that some time? I really liked it. Nice job.
The problem most resin users commit is using weight versus volume. The hardener and resin DO HAVE different chemical compositions that differ in weight.
@@cliffart7398 Dude, what he means is also that you fuck up the measurepent as the resin is fluid and a considerable amont stays in the container when you mix them! Much better do as bob suggests.
A couple quick thoughts; for us novices it would help if you showed (each of) the labels a tad longer so we can note the products used. Also you didn't show the turn out of the initials on the lid, much can be learned there. Your final coat/stain application was left out too. The end product does look real pretty. Altho' details make a better presentation... just sayin'.
An easier way to mix epoxy is to zero the cup, add #1, then zero again and add #2. Then add color if you like. I’ve used spray pain, testers model paint and food dye. Model airplane pain is my pref for small jobs. I also sit my mixes in warm water to make them flow easier. Mostly I do custom plaques
Nice finished box. I like to do my work with the pieces on parchment paper or a cutting board made of UHMW to keep my table clean. Also consider getting a pressure pot to take out the bubbles.
@@mykhelderian I use a paint pressure pot I bought at Harbor Freight. When you put the item in the pot and pressurize it to 40 # the pressure forces the air out of the epoxy. just search for pressure pot on TH-cam and you can find instructions on how to set it up.
Very nice job. Here a question that I haven't found an answer to. Could you have applied a stain to the box after you sanded the Epoxy flat and then apply a finish. I am making a Maple Table that I want a Black Epoxy Compass Rose ,CNC into, but I want the surrounding wood stained to match the interior of a RV Van. What do you think?
You could, but I think a stain would change the appearance of the epoxy even so lightly unless you wipe the stain off that portion. That was my concern on the recent boat table I built. See video on my channel.
Total weight divided by the mix ratio = weight of part A...to be followed by part B up to the full weight. Example....an epoxy has an optimal mic ration of 1:28 A/B 10 grams total weight of mixed epoxy desired. 10/1.28=7.8 Zero out scale WITH CUP on top. Pour in 7.8 grams of part A Pour in part B to bring it up to 10 grams.
For anybody attempting this, put the pigment into part A and it get it to the color you want before mixing A & B so that you don’t waste valuable working time while messing with the color.
Just wow ! Seeing part A go in with Part B ... I mean.. how cool is that ! and you painted it right onto the routed areas . Hopin I never forget how to do this !
Great concept, but did you keep the Origin and the work piece on the same level? I see the box is quite thick . I thought it might be possible to just add some blocks around the piece to allow the Origin to scan the dominoes without tipping over. Your comments would ne much appreciated. Thanks.
The 1:1 ratio is by volume not by weight. The two parts have different densities which means a pound of each will not have the same volume. Be careful when you measure quantities by weight.
I am wanting to try this on a game board. Your video answered a lot of my questions...thanks. I do want to know how you finished the epoxy after the sanding to bring it back to luster.
@@petebuehn7789 does the same weight not add up to the same volume, i was actually thinking why use 2 pot`s when you could have zeroed the scales then put the same weight of second one in saving all them pots.
video was great all the way till you finished sanding? no commentary or finishing and the letters.? Keep the quality of the video same start to finish with explanations. End result was nice. How did you get there?
After the sanding did you put a finish (top coat) on the entire box? If so, did the finish take evenly or did you have some problems to deal with? Thanks
I don't understand why anyone uses two cups to measure A and B and then mix- you lose some of the resin you are pouring from one cup to another. You can pour, for example, 50 grams of A into the cup and then just add another 50 grams of B while it is on the scale and get a better mix. the only time it is necessary to do separate cups is when they mix by volume and not weight.
I wondered that too ...and why using weight measurement not liquid measurement , if both are the same consistency it would be ok ...but anyway it does look nice , great idea


The inlays look like backlit jewels! Thanks so much for sharing your knowledge.
Instructions say, right there on the bottle, that proportions are by volume not by weight. Most epoxies also tell you whether you should add B to A or A to B. Finally, if you use an epoxy that dries fully clear, you can test pigments in water poured to the final depth to determine how much to use in the epoxy without wasting epoxy or waiting for it to cure. If your epoxy isn't as clear as water, that won't work as well. Just add a measured amount of pigment to a measured amount of water that will be the same volume as the epoxy you plan to mix, then pour the colored water into a pocket equivalent to where you will put the epoxy in terms of depth, color of backing material, etc. Repeat until you get the color you are looking for, then use the same amount of pigment in the epoxy.
I do colored epoxy inlays frequently. often with multiple colors. One of the things I have learned is that if you seal the pockets with a white pigmented wood sealer. This gives a much more accurate color (similar to the color in the mixing cup). Without the white background, the poured epoxy reflects the color of the wood behind it. This process also prevents color bleed of the epoxy into the grain of the wood.
You should wear gloves glasses and a mask. I heard people can get very sick from resin
It turned out great! I wish you had showed the whole process until it was finished. Maybe another video!
Did you do a video of making that little box? If not, would you do that some time? I really liked it. Nice job.
Very nice, beautiful green sets off well.
The problem most resin users commit is using weight versus volume. The hardener and resin DO HAVE different chemical compositions that differ in weight.
Yes. I have learned that over the last couple years. Although it did not seem to cause any problems. Likely because of the small volumes.
Good video. You can use a hair dryer to get rid of bubbles. Also, when adding part B to part A, Re-zero the scale and you can use the same container.
or just do math. double the weight of the first pour if the epoxy is mixed by weight.
@@cliffart7398 Dude, what he means is also that you fuck up the measurepent as the resin is fluid and a considerable amont stays in the container when you mix them! Much better do as bob suggests.
Why not tare the first container and just use one?
Next time use one cup measure one part then zero and measure the next part. Don’t have to scrape cups.
i squeegee mine off. less waste and lee sanding. i also use a torch for any air bubbles should i get any.
Did you realize you switched your screw on caps between part a and b containers? White and black caps switched on pre-coat.
Came up stunning! The box is extremely well made as well. Congrats! Cheers Sean
I use a pressure pot to minimize the bubbles, pressurize to 55 psi hold overnight comes out perfect each time
PSA: use a mask when sanding epoxy. The dust is extremely dangerous.
That looks really good
I keep my scales in a plastic bag so no spillage goes on the scales. Gets dirty, change the bag.
Smart!
A couple quick thoughts; for us novices it would help if you showed (each of) the labels a tad longer so we can note the products used. Also you didn't show the turn out of the initials on the lid, much can be learned there. Your final coat/stain application was left out too. The end product does look real pretty. Altho' details make a better presentation... just sayin'.
Looks great
Outstanding work.
Thanks!
Why didn't you measure both parts in one cup?
1:1 .... by volume. I hope I'm not the only one that was bugged by this.
Nice work otherwise though. Definitely going to use some of this advice
Nice, but why not use the router and 1/4” end mill to remove the epoxy instead of needless sanding?
An easier way to mix epoxy is to zero the cup, add #1, then zero again and add #2. Then add color if you like. I’ve used spray pain, testers model paint and food dye. Model airplane pain is my pref for small jobs.
I also sit my mixes in warm water to make them flow easier.
Mostly I do custom plaques
I was thinking that too, the cup used to pour into the other cup always have less because of what stuck to the inside of the cup.
Nice finished box. I like to do my work with the pieces on parchment paper or a cutting board made of UHMW to keep my table clean. Also consider getting a pressure pot to take out the bubbles.
Could you explain what you mean by a "pressure pot"? Thanks
@@mykhelderian I use a paint pressure pot I bought at Harbor Freight. When you put the item in the pot and pressurize it to 40 # the pressure forces the air out of the epoxy. just search for pressure pot on TH-cam and you can find instructions on how to set it up.
Thank you. Will check ot out.
It says 1 to 1 by VOLUME not weight ...
That's what I was going to point out :D
Turned out fabulous.
Thank you
Instead of mixing epoxy for sealing coat, could you not just use shellac and its quick drying
Very nice job. Here a question that I haven't found an answer to. Could you have applied a stain to the box after you sanded the Epoxy flat and then apply a finish. I am making a Maple Table that I want a Black Epoxy Compass Rose ,CNC into, but I want the surrounding wood stained to match the interior of a RV Van. What do you think?
You could, but I think a stain would change the appearance of the epoxy even so lightly unless you wipe the stain off that portion. That was my concern on the recent boat table I built. See video on my channel.
Total weight divided by the mix ratio = weight of part A...to be followed by part B up to the full weight.
Example....an epoxy has an optimal mic ration of 1:28 A/B
10 grams total weight of mixed epoxy desired.
10/1.28=7.8
Zero out scale WITH CUP on top.
Pour in 7.8 grams of part A
Pour in part B to bring it up to 10 grams.
For anybody attempting this, put the pigment into part A and it get it to the color you want before mixing A & B so that you don’t waste valuable working time while messing with the color.
Wow that is beautiful ❤
Thank you
Just wow ! Seeing part A go in with Part B ... I mean.. how cool is that ! and you painted it right onto the routed areas . Hopin I never forget how to do this !
Great concept, but did you keep the Origin and the work piece on the same level? I see the box is quite thick . I thought it might be possible to just add some blocks around the piece to allow the Origin to scan the dominoes without tipping over. Your comments would ne much appreciated. Thanks.
The 1:1 ratio is by volume not by weight. The two parts have different densities which means a pound of each will not have the same volume. Be careful when you measure quantities by weight.
Use a small torch to burst any bubbles in the epoxy
Hi great job what grit sandpaper did you use
220 grit he stated
I am wanting to try this on a game board. Your video answered a lot of my questions...thanks. I do want to know how you finished the epoxy after the sanding to bring it back to luster.
I used tung oil on it. Came back to life nicely. Also, do your final sanding as you approach the surface with a high grit sandpaper.
Nice
great technique and results!
That turned NICE!!
Great work man - looks awesome.
The amount of people I see on YT offering advice in their videos that dont know how to keep a sander flat amazes me.
Wow nice!
Why weigh when instructions say 1:1 by volume???
you are correct- they should not be weighed when it is by volume and not weight.
@@cliffart7398 No problem with doing it by weight provided you use the weight ration between the resin and the hardener
@@petebuehn7789 does the same weight not add up to the same volume, i was actually thinking why use 2 pot`s when you could have zeroed the scales then put the same weight of second one in saving all them pots.
@@ifonlyful Nope: see the response from Stuart Keith Guitars. .
The epoxy is marked to measure by volume, so why measure by weight instead?
Thank you Shirley. I’ll try to improve my YT skills. Woodworking season is coming quickly. (Winter).
If you're weighing on scale,just use same cup.
Its quicker to use a coat of varnish
Goooood...
Cool clamp table!! What type of clamps are those?
Hi, thanks for sharing. Good video, nice idea and pleasant results.Regards and best wishes. T.
Cool it almost looks like green MOP.
pretty lil things :)
video was great all the way till you finished sanding? no commentary or finishing and the letters.? Keep the quality of the video same start to finish with explanations. End result was nice. How did you get there?
Who made that green pigment?
Jacquard Products Jacquard Pearl EX Powdered Pigments 3G 1,Series 1 www.amazon.com/dp/B000BGSZ3M/ref=cm_sw_r_cp_apip_tPyxANy8F8MeI
Did you shoot a video of the box top routing? It looks great!
Thanks.
Wow, that's lovely 😊
Thank you!
Nice finish, question your 1 to 1 measuring. Lol
After the sanding did you put a finish (top coat) on the entire box? If so, did the finish take evenly or did you have some problems to deal with?
Thanks
Tung oil....no issues across the whole piece.
Hi man
great ,what grits of sand paper are used to sand?
Do you think you can use food coloring in the epoxy to color it?
You can experiment and try, but I would encourage you to use true pigments if the piece is important to you.
how do you finish the lid, after sanding the resin?
How did you make the box?
Shaper Origin.
Did you get you colored powder from a craft store?
Or Amazon. Pigment.
What kind of bench clamps are those please?
I don't understand why anyone uses two cups to measure A and B and then mix- you lose some of the resin you are pouring from one cup to another. You can pour, for example, 50 grams of A into the cup and then just add another 50 grams of B while it is on the scale and get a better mix. the only time it is necessary to do separate cups is when they mix by volume and not weight.
I agree and most commonly use one cup now. Live and learn...
What are you using to route these patterns?
Thanks for sharing. Looks good!
Does the base cost of epoxy you applied, actually prevent bubbles in the second fill coat, or was that done for another reason? Thanks
That came out a stunner! Any girl would be over the Moon to get that.
Turned out nice ,but wasted alot of resin..
What did you do after sanding?
Tung oil.
Gloves
Why you use two glass to weight and tranfer it to another.
I wondered that too ...and why using weight measurement not liquid measurement , if both are the same consistency it would be ok ...but anyway it does look nice , great idea
#
I think I know what you're keeping in that box 😏😏
Shhhhh
what grit did you sand to?
400
You should just add and mix and color in same container to ensure 1/1 ratio
Great results but cut to the chase edit your videos it was like watching the grass grow
maybe mix it a bit