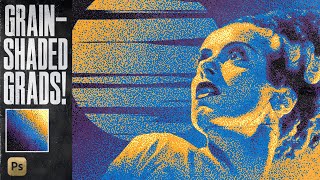
Grainy Xerox Grunge Effect Photoshop Tutorial

ฝัง
- เผยแพร่เมื่อ 20 ก.ย. 2024
- This grungy grainy style of image is often called the Xerox effect because of its similarity to old photocopied images. The image is given a high-contrast black-and-white appearance with shading generated by large grainy noise textures. Follow along with this tutorial to discover which combination of filters achieves the look and how you can customise the final appearance with my free duotone gradient presets.
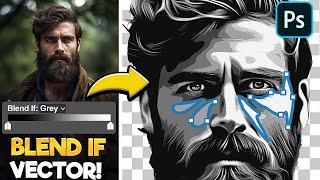
📺 WATCH THIS NEXT: Grainy Gradient Heatmap Photoshop Tutorial - • Grainy Gradient Heatma...
📦 Join my mailing list and get a FREE design resources bundle! - spoon.graphics...
🙏 I don’t have a Patreon, but if you want to support my work, consider becoming an Access All Areas member on Spoon Graphics - spoon.graphics...
► Woman photo from Unsplash - spoon.graphics...
► Skull image from Pexels - spoon.graphics...
► Download my FREE Duotone Gradient Presets - spoon.graphics/...
► Download my FREE Xerox Grunge Smart PSD to easily recreate this effect - spoon.graphics...
Deals & Discounts:
⭐ Get 20% off ANYTHING in my Spoon Graphics Shop - spoon.graphics...
⭐️ Get 10 FREE Images from Adobe Stock - spoon.graphics...
⭐ Save 70% off the Heritage Type Vintage Fonts Bundle - spoon.graphics...
⭐️ Download this Month's FREE Files from Envato - spoon.graphics...
Tools & Resources I Use:
⭐️ Get Photoshop and other Adobe CC programs here: spoon.graphics...
🛠️ Where I download the creative assets I need - spoon.graphics...
✍️ The graphics tablet I use: amzn.to/2GYNYEc
🎙️ The microphone I use: amzn.to/3AdkJsp
📢 The email newsletter service I use: spoon.graphics...
📈 The tool I use to help grow my channel: spoon.graphics...
Watch more of my content:
📺 See all my Photoshop tutorials - spoon.graphics...
📺 See all my Illustrator tutorials - spoon.graphics...
📺 Watch my most popular videos - spoon.graphics...
#Photoshop #PhotoshopTutorial #AdobePhotoshop
Adobe Photoshop & Adobe Illustrator design tutorials from Chris Spooner of Spoon Graphics. Subscribe to learn how to create stunning artwork as I share my tips and tricks in video format.
Join my mailing list: blog.spoongrap...
Visit my design blog: blog.spoongrap...
Follow me on Twitter: / chrisspooner
Join me on Facebook: / spoongraphics


![PURPEECH - นี่ฉันเองคนที่... (It's me) [Official MV]](http://i.ytimg.com/vi/NuhHd0hOOg8/mqdefault.jpg)


Download my FREE Xerox Grunge Smart PSD to easily recreate this effect - spoon.graphics/3YZd1z6
📺 WATCH THIS NEXT: Grainy Gradient Heatmap Photoshop Tutorial - th-cam.com/video/kjKfz9KXgPo/w-d-xo.html
📦 Join my mailing list and get a FREE design resources bundle! - spoon.graphics/freebundle
Well done Chris, a great fun idea for when I create flyers for local shows and events. Much appreciated.
I use this technique with a regular noise filter instead of reticulation. Trying out your method I feel like reticulation maintains a bit more detail than noise and the style is visually more appealing too. Great tutorial
I originally used normal grain too but discovered that Reticulation had a really nice organic look to it!
Incredible job Chris.
Brilliant as always and straight to the point. Cheers Chris!
Thank you!
Always great, Sir. Thank you!
This looks amazing, I will definitely try it out
Awesome video! Can you show how to add this kind of effect to a simple white design?
Ideally it should be applied to a photo, but I wonder if it's possible to manually paint some gradients to apply the effect to a illustration or logo. I'll have to experiment!
This is GREAT thank you!
Muy buen tutorial Chris!!
la verdad es que con un par de filtros que has usado y otras técnicas has conseguido un efecto muy bueno, ¡¡Mis felicitaciones! se aprecia que tienes experiencia y haces experimentos en PS y salen buenos efectos. Un saludo.
Beautiful
Cool thanks!
you are genius!
Thanks
Thanks!!!!!!
Very nice
great tutorial! I had fun with it and created some nice things.
One question: if I export the image to jpg it smoothens out the noise, also if I first make a copy of merged layers. Can you send me in the right direction to an export setting which doesn't smoothens things out?
Help very appreciated!
Are you sure the JPEG compression isn’t too high? (Or in other words the quality too low?)
An image like this with minimal colours would be ideal for a PNG24 file for high quality use on screens
Minute 2:20 the magical moment :)
how do i install this design in my photoshop?