See the Annacis Island Barge Slip (Google Earth) I plan to model here: earth.google.com/web/search/Annacis+Island,+Delta,+BC/@49.15999397,-122.94839203,18.63569626a,295.70342834d,35y,5.60432502h,79.21217999t,-0r/data=CoQBGloSVAolMHg1NDg1ZDhjMGVmZmUzODY5OjB4NGMyNThiMjcwNDNiMmI0ZhkvoYLDC5ZIQCETY_Q3fLxewCoZQW5uYWNpcyBJc2xhbmQsIERlbHRhLCBCQxgBIAEiJgokCdZtEtDEskhAETL0rzTIiUhAGSnXw4zwl17AIR046mE7117A
Boomer, I found your channel and like what I see. I believe I will learn a lot from your channel. Thank you for doing this channel. David { F & B Railroad)
Thank You for the sub Raymond! Number 2 is framed. Number 3 is being built. Finishing begins very soon on the initial benchwork like curved facia, etc. Cheers ~ Boomer.
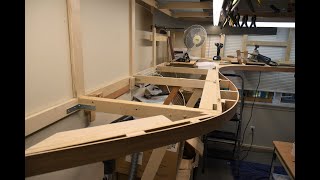
The lower deck (benchwork) is built a little heavier than the upper valance canopy. The upper section is much lighter due to the suspension (cantilever) of the lighting hood (shadow-box) cabinetry. The top gets sheeted with scrap 1/8 board, etc. to prevent light "bleed" onto the ceiling. You would be surprised how rigid everything becomes after completion, yet remain very light weight. Furthermore, 2" plywood frames saves on plywood as well with good shear resistance for longer spans. Cheers ~ Boomer
I am in the starting process of building a small switching layout here n Switzerland but with US trains of course ;) this helps me a lot, also the tree building and scratch building, can‘t wait for your videos with this project, thanks for all your work and effort!!! Cheers and regards
My dentures almost fell out. Then I remembered I don't have them (yet). Just a few days ago I drew a sketch of how I might fix the uppper frame using galvanized chain (have it at hand) and here you are using cable. Same dimensions of wood etc. Totally agree with you on using what you can. Looking for work at the moment, therefore I'm more frugal than a Yorkshireman. Also renting a place in a 250 yrs old stone built house in the middle of town means there's a few additional challenges when it comes to drilling holes in somewhat wonky walls and such like... So I need to consider my options carefully. Anyway, it is good to see you're sailing along so wonderfully, it truly is. And I am taking notes. With pleasure.
The man is on a mission. Excellent mock up…gives a real impression of the actual build. I used CAD but it’s two dimensional and is somewhat lifeless in terms of proof of concept. I can see the theatre background in terms of your approach. Great video content….have fun.
And so it begins... I wish I could contribute comments on the technical side of the build however I can barely drive a nail into wood lol. So appreciative of you taking the time to go through the process step by step.
Some people like the tips etc. Some people seem top get bent out of shape if you don't do it their way, or at their speed. Oh well. Cheers Peter. ~ Boomer
@@boomerdiorama well I am just grateful that you have taken the time and incurred the expense of sharing your remarkable skills with the broader community.
@@PeterTillman3 I like to pay it forward to the community. I was fortunate to train under masters as well. They would agree with my philosophy in terms of passing on the torch without charge. Cheers.
Unbelievable! You work at warp speed and still you build in the quality. Your experience shines through. Somehow I knew you would build across that large window. You just couldn't resist. Lol I used the LED ribbon lights on my last layout and based on your lights, they seem comparable. A 10 ft strip only set me back about $30 CND. Really looking forward to watching this story come alive. Thanks so much for sharing.
Thank You Ted. I thought about the cheaper strips. They work great as well. I decided to go with the 4000K coupled to diffuser shades for the purposes of photography. Don't underestimate the cheaper T12X Fluorescents as well, if you can fit them in. The options (interchangeable bulbs) are a great asset for this kind of visual work. Cheers ~ Boomer.
It's hard not to take a vocational approach to things since I did it for so long. Nevertheless, I am really enjoying the bench work,. On the other hand, I want to get it out of the way so I can really sink my teeth into the layout. Cheers.
It been so long since i seen river st. Last time i was there was 1993 and BC Rail still around and the New Westminster yard use to have green BN switchers
Really fast progress. Your experience must really make that a breeze! I will look forward to your updates and any tutorials on your new project :) take care!
@@boomerdiorama That's what I was getting at when mentioning your experience. I recalled you discussing that during your build videos on the cold storage facility. I do hope you do more videos like that one in the future!
@@boomerdiorama I also have a question: you mentioned using code 70 track for the branch behind the barge. Do you know of a reliable source for code 70 or 55 track in Canada? Otter Valley and both my local hobby shops don't seem to stock anything below code 83. I want to try out some thinner rail on a spur on my project layout, so I don't need bulk, just 5 feet. Thank you.
@@Panzermeister36 Otter Valley in Canada has tons of code 70 Flex Track. It's micro engineering fine scale track (it is stiffer than Atlas though), but I will be using some as well: www.ovrtrains.com/Micro-Engineering/ Get the six-piece pack, it's cheaper than any tank model . . . lol.
I'm new to your channel and REALLY enjoying it; thank-you for devoting so much time to doing these videos. I really appreciate your artistic approach to scene composition; I'm not a trained artist, but it's something I intend to try to incorporate in my new layout. Your use of the airbrush for adding colour variation, highlights, and shadows to scenic elements was very inspirational; it's an approach I will definitely be adding to my scenicmodeling. I first took note of your channel when I noticed that the bridge facade on your Glover Road reminded me of the Burrard St bridge (before I realized it was called Glover Rd I thought you might have been recreating the old lines that existed through the Kits/Creekside area). That was just a couple of weeks ago, so now I've begun to go back and explore more of your work. If I may offer a suggestion, in your schematic, to avoid the lead issue at the industry tracks on the left , you could flip them so that the spur starts between your runaround and the industry spur at center (if this doesn't conflict too much with the sense of the prototype). Best wishes for the new diorama; I'm looking forward to following along.
Thank You Karl! The bridge façade is inspired by the Burrard Bridge where I used to play as a kid in the sixties and seventies. I also agree with the "lead" issue. It will be revised or deleted. The schematic is from the prototype of the area. Cheers ~ Boomer
I'm loving it! So many possibilities. Great progress already too! I just googled Annacis Island and used satellite view to follow the tracks from the dock around the island. Wow, so many operational possibilities on a compact area. Car carriers for the far tip of the island. Covered hoppers for the Gypsum company. Boxcars for the building systems siding. Endless supply of cars on and off the island. What do they do with all those logs they float up to the island, what industry?
Loads of industry for sure. The raw logs usually get shipped to Japan. I believe there is only one log sort facility on the river now. Not entirely sure though.
Interesting upload, cleats are something I have seen on other railways but never explained as to how useful they are. You put that all together in 'jig time' as they, nice one Boomer, man on a mission indeed. :) All the best. Brian @ The Angels
Great start! Per lighting, on one of the ending Glover Road vids, you hadda spring clamp spot shining thru under the bridge giving an almost sunrise effect. Had Glover Road survived still, it might’ve been nice to try and simulate a sunrise ops vid. For River Road, a sunrise option might be worth considering and planning/building it into the architechure at this early stage of things. 👍🏻🙂
Fluorescents are not warmer than LED's by default. You can cheat them to lower K (color) value, but then you loose the Lumen factor. Fluorescents are much cheaper, but they are not near as efficient, and they lack the Lumen which LED's rule in my experience.
Thanks for this great content. Really inspiring. Now that you will add curves, any decision about their minimum radius and how close to the prototype they will be?
Again poking through the archives for tips. The benchwork is much simpler than my last layout and other than ripping plywood seems a faster build . I may have missed it but each module , is it a general length? Do you use a minimum/ maximum length based on transport or storage perhaps? I had initially planned 4 foot sections but I'm interested in your thoughts on limits of module size .
These are not modules. Modules refer to a standard. These are custom size sections where there is no standard. You make it work according to your build style to fit the space. ;-)
@@boomerdiorama after watching a couple more of the benchwork oriented videos this morning that become very apparent. I now have a better notion of the overall philosophy. Thanks Brother!, looking forward to the next video.
Maquette = Model... LOL. You built a Model model? ;) Great videos series! Looking at recreating your layout in the Trainz 2019 Rail Sim. Do you have perhaps, a scaled trackplan with the building footptint locations? If so I can import that into the Basemapz app for Trainz, which will generate a flat map that can be imported into the sim layout editor.
Sorry. I have no scale track plan. It's all based on a "napkin" design based on photo interpretation, etc. Check this "Google Earth" link for the prototype plan: earth.google.com/web/search/Annacis+Island,+Delta,+BC/@49.1603844,-122.94783801,4.24973108a,646.18952323d,35y,-38.3988852h,12.16676751t,-0r/data=CoQBGloSVAolMHg1NDg1ZDhjMGVmZmUzODY5OjB4NGMyNThiMjcwNDNiMmI0ZhkvoYLDC5ZIQCETY_Q3fLxewCoZQW5uYWNpcyBJc2xhbmQsIERlbHRhLCBCQxgBIAEiJgokCdZtEtDEskhAETL0rzTIiUhAGSnXw4zwl17AIR046mE7117A
No constraints on the room. I find 55" to be a good compromise between viewing and working on it. 55" inches puts me at a comfortable viewing height. The track level will actually be a little higher. Cheers.
Glad to hear it. I had friends who lost fingers. Often times it finished them in their careers. Sad but true unfortunately. I was always deathly careful of a table saw. I milled thousands of board feet as well. I count myself fortunate. Cheers.
Whaaaaat!? I do the same thing with 7/8 inch ply. I only have that size...long story...anyway i call mine L girder. And i use it alot in building my layout. Its just easier
Canada went metric long ago but I didn't . . . lol. Maybe for models but not for framing and cabinet work. Even then, I often wing it at times . . . lol. Cheers.
This is what working in the film industry does to a carpenter. They don't care about the money so much. Economy of time, in terms of production, is more important. Cheers ~ Boomer.
Good start. I do have the same table saw. I use similar techniques since I am a finish carpenter. You, apparently don't have a definite view on your project. You modify as you go alone. I have a more clear view on what I want, even if it take longueur (money wise) to do. Let's move on.


See the Annacis Island Barge Slip (Google Earth) I plan to model here: earth.google.com/web/search/Annacis+Island,+Delta,+BC/@49.15999397,-122.94839203,18.63569626a,295.70342834d,35y,5.60432502h,79.21217999t,-0r/data=CoQBGloSVAolMHg1NDg1ZDhjMGVmZmUzODY5OjB4NGMyNThiMjcwNDNiMmI0ZhkvoYLDC5ZIQCETY_Q3fLxewCoZQW5uYWNpcyBJc2xhbmQsIERlbHRhLCBCQxgBIAEiJgokCdZtEtDEskhAETL0rzTIiUhAGSnXw4zwl17AIR046mE7117A
I knew it was all familiar! I worked on Annacis island for the better part of my 20s.
@@JustinH72 It's cool area along the tracks and River down there.
Boomer, I found your channel and like what I see. I believe I will learn a lot from your channel. Thank you for doing this channel. David { F & B Railroad)
O.K. Thank you for taking the time to share. I hope it inspires you!😁
Great start,waiting for number 2
Thank You for the sub Raymond! Number 2 is framed. Number 3 is being built. Finishing begins very soon on the initial benchwork like curved facia, etc. Cheers ~ Boomer.
This will be exciting to watch. Good luck.
I love doing it . . . luck is keeping all the digits at the end of the day . . . lol.
That is a great looking scale model of your upcoming layout.
Soon to be installed once the "North Shore" and River is finished. Cheers.
great start..pretty simple technique for mounting the benchwork .. and the valance.
The lower deck (benchwork) is built a little heavier than the upper valance canopy. The upper section is much lighter due to the suspension (cantilever) of the lighting hood (shadow-box) cabinetry. The top gets sheeted with scrap 1/8 board, etc. to prevent light "bleed" onto the ceiling. You would be surprised how rigid everything becomes after completion, yet remain very light weight. Furthermore, 2" plywood frames saves on plywood as well with good shear resistance for longer spans. Cheers ~ Boomer
I am in the starting process of building a small switching layout here n Switzerland but with US trains of course ;) this helps me a lot, also the tree building and scratch building, can‘t wait for your videos with this project, thanks for all your work and effort!!! Cheers and regards
Great to hear! Thank you for the sub as well! Cheers ~ Boomer.
Outstanding update!
Glad you think so! I am very happy with the benchwork.
My dentures almost fell out. Then I remembered I don't have them (yet). Just a few days ago I drew a sketch of how I might fix the uppper frame using galvanized chain (have it at hand) and here you are using cable. Same dimensions of wood etc. Totally agree with you on using what you can. Looking for work at the moment, therefore I'm more frugal than a Yorkshireman. Also renting a place in a 250 yrs old stone built house in the middle of town means there's a few additional challenges when it comes to drilling holes in somewhat wonky walls and such like... So I need to consider my options carefully.
Anyway, it is good to see you're sailing along so wonderfully, it truly is. And I am taking notes. With pleasure.
Build it free standing with hidden strong-backs.
The man is on a mission. Excellent mock up…gives a real impression of the actual build. I used CAD but it’s two dimensional and is somewhat lifeless in terms of proof of concept. I can see the theatre background in terms of your approach. Great video content….have fun.
Auto Cad is another great tool. As you can see, I am old school Allan. Cheers mate ~ Boomer
Are there apps that render 3D graphs?
And so it begins... I wish I could contribute comments on the technical side of the build however I can barely drive a nail into wood lol. So appreciative of you taking the time to go through the process step by step.
Some people like the tips etc. Some people seem top get bent out of shape if you don't do it their way, or at their speed. Oh well. Cheers Peter. ~ Boomer
@@boomerdiorama well I am just grateful that you have taken the time and incurred the expense of sharing your remarkable skills with the broader community.
@@PeterTillman3 I like to pay it forward to the community. I was fortunate to train under masters as well. They would agree with my philosophy in terms of passing on the torch without charge. Cheers.
Unbelievable! You work at warp speed and still you build in the quality. Your experience shines through. Somehow I knew you would build across that large window. You just couldn't resist. Lol I used the LED ribbon lights on my last layout and based on your lights, they seem comparable. A 10 ft strip only set me back about $30 CND. Really looking forward to watching this story come alive. Thanks so much for sharing.
Thank You Ted. I thought about the cheaper strips. They work great as well. I decided to go with the 4000K coupled to diffuser shades for the purposes of photography. Don't underestimate the cheaper T12X Fluorescents as well, if you can fit them in. The options (interchangeable bulbs) are a great asset for this kind of visual work. Cheers ~ Boomer.
Just saw Google Earth. I see your Idea. I do love the that transfer barge.
It is cool for sure. I will feature this in the layout but the layout won't be "Annacis Island" centric. If that makes sense . . . Cheers
Wow.... can't wait to see the new track plan.
Should be cool . . .
Heck yes!! Oh I am so excited and happy for you! Can't wait for the progress!
Me too!! Thanks for commenting. Cheers ~ Boomer
Wow! You put me to shame! Already you’ve built a maquette and the framing and lighting for the first module! Great start!
It's hard not to take a vocational approach to things since I did it for so long. Nevertheless, I am really enjoying the bench work,. On the other hand, I want to get it out of the way so I can really sink my teeth into the layout. Cheers.
Looking good my friend 👍
Thank you! Cheers!
Good start. I like using brackets or Kreg pocket screws for my butt joints as well. Looking forward to the next installment. Cheers - Larry.
Yup. Whatever floats the boat.
Thanks for sharing. Looking good so far.
Thanks for watching!
It been so long since i seen river st. Last time i was there was 1993 and BC Rail still around and the New Westminster yard use to have green BN switchers
Yes! I was hanging around there then as well. Cheers.
So far, so good, cheers!
Thank you! Cheers!
Excellent start!
Thanks!
Thanks Boomer! You also are enjoyable to listen to :>)
Thanks for listening John. I appreciate your comments as well. ~ Boomer
Looking good! Cheers
Thank you! Cheers!
Really fast progress. Your experience must really make that a breeze! I will look forward to your updates and any tutorials on your new project :) take care!
I trained in the film industry. It does that to a person. Production economy is everything in the film industry. Cheers.
@@boomerdiorama That's what I was getting at when mentioning your experience. I recalled you discussing that during your build videos on the cold storage facility. I do hope you do more videos like that one in the future!
@@boomerdiorama I also have a question: you mentioned using code 70 track for the branch behind the barge. Do you know of a reliable source for code 70 or 55 track in Canada? Otter Valley and both my local hobby shops don't seem to stock anything below code 83. I want to try out some thinner rail on a spur on my project layout, so I don't need bulk, just 5 feet. Thank you.
@@Panzermeister36 Oh yeah! There will be two or three major Warehouse builds (early) on Module "A" behind the slip and further down the road.
@@Panzermeister36 Otter Valley in Canada has tons of code 70 Flex Track. It's micro engineering fine scale track (it is stiffer than Atlas though), but I will be using some as well: www.ovrtrains.com/Micro-Engineering/ Get the six-piece pack, it's cheaper than any tank model . . . lol.
I'm new to your channel and REALLY enjoying it; thank-you for devoting so much time to doing these videos. I really appreciate your artistic approach to scene composition; I'm not a trained artist, but it's something I intend to try to incorporate in my new layout. Your use of the airbrush for adding colour variation, highlights, and shadows to scenic elements was very inspirational; it's an approach I will definitely be adding to my scenicmodeling.
I first took note of your channel when I noticed that the bridge facade on your Glover Road reminded me of the Burrard St bridge (before I realized it was called Glover Rd I thought you might have been recreating the old lines that existed through the Kits/Creekside area). That was just a couple of weeks ago, so now I've begun to go back and explore more of your work.
If I may offer a suggestion, in your schematic, to avoid the lead issue at the industry tracks on the left , you could flip them so that the spur starts between your runaround and the industry spur at center (if this doesn't conflict too much with the sense of the prototype).
Best wishes for the new diorama; I'm looking forward to following along.
Thank You Karl! The bridge façade is inspired by the Burrard Bridge where I used to play as a kid in the sixties and seventies. I also agree with the "lead" issue. It will be revised or deleted. The schematic is from the prototype of the area. Cheers ~ Boomer
I'm loving it! So many possibilities. Great progress already too! I just googled Annacis Island and used satellite view to follow the tracks from the dock around the island. Wow, so many operational possibilities on a compact area. Car carriers for the far tip of the island. Covered hoppers for the Gypsum company. Boxcars for the building systems siding. Endless supply of cars on and off the island. What do they do with all those logs they float up to the island, what industry?
Loads of industry for sure. The raw logs usually get shipped to Japan. I believe there is only one log sort facility on the river now. Not entirely sure though.
Interesting upload, cleats are something I have seen on other railways but never explained as to how useful they are. You put that all together in 'jig time' as they, nice one Boomer, man on a mission indeed. :) All the best. Brian @ The Angels
I have probably used a few thousand during my film/theater days when building sets. They are invaluable and quick to attach with two screws. Cheers.
Great start! Per lighting, on one of the ending Glover Road vids, you hadda spring clamp spot shining thru under the bridge giving an almost sunrise effect. Had Glover Road survived still, it might’ve been nice to try and simulate a sunrise ops vid. For River Road, a sunrise option might be worth considering and planning/building it into the architechure at this early stage of things. 👍🏻🙂
Loads of great ideas! I like it. Cheers.
Excellent progress already agree you don’t want a huge car park in the first module may need some creative compression 😊
Very true!
I was eating right off the hop&half tuned in.Thought you were doing Z scale for half a second🤣🚂🚃🇨🇦
I tried "Z" scale once for fun. It's pricey stuff. Sold it all to a buddy who didn't want it . . . lol.
That LED lighting looks nice a warm in the video. I'm having a personal struggle with the idea that florescent is warmer.
It depends on the Lumen rating, etc. LED's are warmer for sure. In some cases, I prefer fluorescents over LED's for (blue) color.
Fluorescents are not warmer than LED's by default. You can cheat them to lower K (color) value, but then you loose the Lumen factor. Fluorescents are much cheaper, but they are not near as efficient, and they lack the Lumen which LED's rule in my experience.
Your doing great! ok
Thanks!
Thanks for this great content. Really inspiring. Now that you will add curves, any decision about their minimum radius and how close to the prototype they will be?
As close as I can get it. There will be large "curved" turnouts for sure to save space.
Again poking through the archives for tips. The benchwork is much simpler than my last layout and other than ripping plywood seems a faster build . I may have missed it but each module , is it a general length? Do you use a minimum/ maximum length based on transport or storage perhaps? I had initially planned 4 foot sections but I'm interested in your thoughts on limits of module size .
These are not modules. Modules refer to a standard. These are custom size sections where there is no standard. You make it work according to your build style to fit the space. ;-)
@@boomerdiorama after watching a couple more of the benchwork oriented videos this morning that become very apparent. I now have a better notion of the overall philosophy.
Thanks Brother!, looking forward to the next video.
Maquette = Model... LOL. You built a Model model? ;)
Great videos series! Looking at recreating your layout in the Trainz 2019 Rail Sim. Do you have perhaps, a scaled trackplan with the building footptint locations?
If so I can import that into the Basemapz app for Trainz, which will generate a flat map that can be imported into the sim layout editor.
Sorry. I have no scale track plan. It's all based on a "napkin" design based on photo interpretation, etc. Check this "Google Earth" link for the prototype plan: earth.google.com/web/search/Annacis+Island,+Delta,+BC/@49.1603844,-122.94783801,4.24973108a,646.18952323d,35y,-38.3988852h,12.16676751t,-0r/data=CoQBGloSVAolMHg1NDg1ZDhjMGVmZmUzODY5OjB4NGMyNThiMjcwNDNiMmI0ZhkvoYLDC5ZIQCETY_Q3fLxewCoZQW5uYWNpcyBJc2xhbmQsIERlbHRhLCBCQxgBIAEiJgokCdZtEtDEskhAETL0rzTIiUhAGSnXw4zwl17AIR046mE7117A
Looks great! How high is your benchwork? Never mind I just heard 55".......Is this your optimal height or were you constrained by the room design?
No constraints on the room. I find 55" to be a good compromise between viewing and working on it. 55" inches puts me at a comfortable viewing height. The track level will actually be a little higher. Cheers.
I still have all my fingers too. LOL
Glad to hear it. I had friends who lost fingers. Often times it finished them in their careers. Sad but true unfortunately. I was always deathly careful of a table saw. I milled thousands of board feet as well. I count myself fortunate. Cheers.
Whaaaaat!? I do the same thing with 7/8 inch ply. I only have that size...long story...anyway i call mine L girder. And i use it alot in building my layout. Its just easier
"Strong-back" is the Film Industry term for L-girder. Same principle really.
@@boomerdiorama cool! How many have you done included trains or tracks?
@@needs2quit1atgmail87 Not sure what you mean? Do you mean how many layouts have I built?
I'm glad all the measurements & sizes aren't in metric.
Canada went metric long ago but I didn't . . . lol. Maybe for models but not for framing and cabinet work. Even then, I often wing it at times . . . lol. Cheers.
Dang Boomer, you work fast.
This is what working in the film industry does to a carpenter. They don't care about the money so much. Economy of time, in terms of production, is more important. Cheers ~ Boomer.
Good start. I do have the same table saw. I use similar techniques since I am a finish carpenter. You, apparently don't have a definite view on your project. You modify as you go alone. I have a more clear view on what I want, even if it take longueur (money wise) to do. Let's move on.
Cool, thanks
Building materials are outrageously expensive, have you considered setting up a Patreon account?
No. Never thought about it actually until you brought it up.
A
;-)