Yes, something my novice skills can handle. Thank you! Prior YT videos had me defeated, they may as well have been Step.1 Be a Carpenter Step.2 Have an unattainable array of tools, unless you’re carpenter. Appreciate your unassuming simplicity for the average person to follow, cheers!
Adam. You legend mate. I told the old ball and chain that I was gonna landscape the garden at the weekend. Cor blimey she was chuffed when she saw this. Creme de la creme. Top banana you're a top lad. Great bants. Ever in the UK, I'll take ya out for a cheeky nandos boyo!
Just made one ......not a carpenter at all and didn’t have any power tools ....so all cut by hand .....but once you’ve cut the pieces .....easy to put together ......quite happy with .......great clip
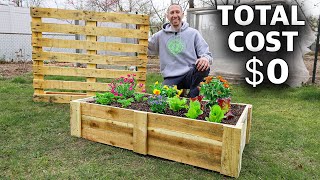
Built this and turned out great. Lumber used: 6 x 4' 1x4 cedar boards 2 x 8' - 2x2 cedar brown deck screws varathane satin to protect the wood Instead laying the 2 - 3' deck boards on the bottom, I cut them the other way in 12" sections. This gives an extra 1.5" of soil depth in the planter
I was thinking about the soil depth aswell. I wondered why he didn’t just go ahead and put the boards on the bottom. Sometimes functionality beats pretty😂
I did the same thing for the extra depth but was a bit worried about it being less stable. Did your bottom ever start bowing down over time? Without the extra cross section support rails, the weight distribution isn't as good so more pressure on the center of the boards.
Gosh this looks super easy and super cute to make it even myself. I got all those tools so why not. New project on my list! Thanks for the video 😊 another thing, why must people always scrutinize every video and pin point unnecessary things? So what if he wanted to wear an empty tool belt? It gives essence to the video. And yes, he didn't wear all the protective safety gear, he's just saying for YOU to wear it. Learn how to just be thankful for someone taking their time to do this.
I built one last year and it turned out great!!!! I plan on building 2 more this year. By no means am I a skilled craftsman, but these instructions were easy to follow and the finish product turned out great. I am even going a little crazy this year and looking to try to add an elevated back for a glass panel to cover and create a little greenhouse out it.
I just built a planter using these instructions but I used wood from free pallets, apart from the legs and horizontal supports at the bottom. Super cheap. I had to watch the video as I went along but it looks great!
nice easy and efficient. i would still opt for anti-rot chemicals and put a foil barrier between the wood and soil, to prevent leakage of chemicals into the soil.
Just did my first ever project, kinda followed your build, but changed dimensions up a bit. Turned out super sturdy and i am amazed I managed to do it, thanks to you :) Got the bug now. Thanks
This is why im afraid of posting videos of myself or my family because there is people who can be so hurtful. I wish my husband did projects like this. Awesome job! I want one for a fairy garden for my daughters play house.
Very good video. Perfect demo. Just a few improvement suggestions for the viewers: - Place the long side planks over the short side so the edges do not show - To make it look more professional, either put the legs 5 cm lower so the top end get buried in the soil or make a frame and place it on top edges to cover the edges. - Stones are good but placing a small plastic cup upside down with holes is better as the stones may drop in the hole and block it. - Use treated wood that does not rot - You can paint the outside - I think putting heavy plastic lining inside would make it last longer. I just bought enough wood to make one larger one for the first time. Cost me a fortune. Wood is really expensive.
I made one today, but after putting the 2 rails in between the legs on both side I just use 11 inch slats along the Tao. Left some area between each one. I’ll put garden fabric on top.
Thanks for this simple how to. I think I'm going to make 2 of them half the size that you made lol. I suck at using power tools so I'm just gonna give the measurements to the guy at the home improvement store and have him cut them lol. Tip for viewers: If you don't have a power saw you can write the measurements down and take them to your local home improvement store and they'll cut the wood for you (if you buy the wood from them they might even do it for free!).
Get a handsaw for 10 bucks you can cut it urself in about 2 minutes. Good work out. Or you can get a jigsaw for like 30 dollars and it makes it alot easier. Look up jigsaw videos and how to. Ull thank me later
Thanks for the plan layout! I just had someone a fence recently and hope to upcycle the old pickets and 4x4 poles. As a novice, I don't have all the necessary tools here (no bench, no vises), but I'll see if I can make by with a borrowed reciprocating saw, a tape measure, and some nails.
That looks really cool👌 I just made plant tubs with 5mm steel. I welded it together and after I applied vinegar. It started to rust after. Looks also very beautifull.👌
Andy Merrett honestly I think a better solution would be to use a smaller drill bit, line the bottom in fine gravel and THEN staple cloth in there, you could just lay it in there but I think you’d want to go up the edges just so you don’t get dirt falling through.
Thank you for sharing your knowledge and am now proceeding to build my box....I also have to agree with comment regarding nothing in tool belt etc, guess you should watch video again, he did have a hammer on belt, I thought that was a tool? Was when I went to school....Great video, nice easy instructions and step by step guide..keep it up..cheers
Thank you, I was worried about the quality of my workmanship, now I feel much better and my design a bit easier as I need no bottom as they will stay put.
+Cottage Life DIY Thanks for sharing, makes it very easy to make with this video! One should consider using un-treated lumber due to the harsh chemicals. Perhaps Cedar or Redwood could be a good choice? Cheers
For those using this for herbs keep in mind what pants your putting together. A quick Google will give you tons of information. But an example is mint is a vine and will tend to choke out other plants around it. Rosemary is extremely potent and sometimes will cause other herbs to smell and take on its flavor.
Since you have the rails running along the sides, wouldn't you gain in planter depth if, instead of putting the bracers across, you put the fence board directly onto the rails, perpendicular to how you have them? That is, the fence boards take the place of the bracers. It looks like the unsupported length of the fence board would actually be less running rail-to-rail than across the bracers.
Hi folks. I have a question. I see he did not use anything before putting a soil. On some videos,I see some ppl stich the plastic inside the box,other stich the fabric. Plus drilling the holes. Which you would suggest,plastic,fabric,or none? Big thanks!
Thank you for the video. I was just in the need for herb boxes. I found all the material saved from scrap pile. The only thing missed is the length of the end boards (3ft long x ? wide). Would ya mind sending that my way? I know I should be able to figure it out. I 'll re-watch to see if I can.
great video - you make it look easy. One question: what brand is the support you use in addition to the Black & Decker work table? I'm really interested in getting one like yours...
***** Ha! It's not pointless to Bell-Air Direct apparently. Cottage Life doesn't pick and choose who their sponsors are, they take whatever money is given to them.
Except now Bel-Air has two people (and God knows how many people reading this little exchange) talking about Bel-Air Insurance. TH-cam advertising is a heckuva lot cheaper than TV. Cottage Life is Canada based and so is Bel-Air. Makes sense to me.
That's not cedar, that's pressure treated. Also you should not use pressure treated to plant vegetable plants. Also, the way you are set up to cut your boards, you are looking at a possible bind with your circular saw. You shouldn't be cutting between two supports.
There is no issues with pressure treated when used outside. Pressure treated is not to be used inside where it is warmer than outside and shares a personal space with humans.


![🎤 จับฉลากร้องเพลง x P’ #XXSIVK [EP.1] (2/2) เพื่อนจับได้คำไหน..ต้องร้องคำนั้น เริ่ม! 💓🎶 #MXFRUIT](http://i.ytimg.com/vi/1bJvMJXmeS4/mqdefault.jpg)


Thank you!... after watching 7 videos, this is the best...
Just finished building this! It’s my first time ever building anything, so it turned out kinda bad, but I’m pretty proud of it nonetheless.
Thanks for this video. This is the simplest and strongest planter box I've seen. As a novice this is something I think I can build
thanks. made one in a couple hours for a neighbor. She was very happy.
Yes, something my novice skills can handle. Thank you!
Prior YT videos had me defeated, they may as well have been Step.1 Be a Carpenter Step.2 Have an unattainable array of tools, unless you’re carpenter.
Appreciate your unassuming simplicity for the average person to follow, cheers!
Adam. You legend mate. I told the old ball and chain that I was gonna landscape the garden at the weekend. Cor blimey she was chuffed when she saw this. Creme de la creme. Top banana you're a top lad. Great bants. Ever in the UK, I'll take ya out for a cheeky nandos boyo!
Absolute legend
Just made one ......not a carpenter at all and didn’t have any power tools ....so all cut by hand .....but once you’ve cut the pieces .....easy to put together ......quite happy with .......great clip
Built this and turned out great. Lumber used:
6 x 4' 1x4 cedar boards
2 x 8' - 2x2 cedar
brown deck screws
varathane satin to protect the wood
Instead laying the 2 - 3' deck boards on the bottom, I cut them the other way in 12" sections. This gives an extra 1.5" of soil depth in the planter
daxos72 do you remember how much it cost you?
I was thinking about the soil depth aswell. I wondered why he didn’t just go ahead and put the boards on the bottom. Sometimes functionality beats pretty😂
I did the same thing for the extra depth but was a bit worried about it being less stable. Did your bottom ever start bowing down over time?
Without the extra cross section support rails, the weight distribution isn't as good so more pressure on the center of the boards.
Good job thaks so much
Thanks bro. Just finished making one for my lady. She really loves it.
Gosh this looks super easy and super cute to make it even myself. I got all those tools so why not. New project on my list! Thanks for the video 😊 another thing, why must people always scrutinize every video and pin point unnecessary things? So what if he wanted to wear an empty tool belt? It gives essence to the video. And yes, he didn't wear all the protective safety gear, he's just saying for YOU to wear it. Learn how to just be thankful for someone taking their time to do this.
Lily Rose With confidence and the right application. It is easy.
Great to see that... I made it too. Using stodoys handbooks :)
@ Darbin Orvar Here are a ton of great woodworking plans if you're interested: LukeWood.xyz
I built one last year and it turned out great!!!! I plan on building 2 more this year. By no means am I a skilled craftsman, but these instructions were easy to follow and the finish product turned out great. I am even going a little crazy this year and looking to try to add an elevated back for a glass panel to cover and create a little greenhouse out it.
I just built a planter using these instructions but I used wood from free pallets, apart from the legs and horizontal supports at the bottom. Super cheap. I had to watch the video as I went along but it looks great!
nice easy and efficient. i would still opt for anti-rot chemicals and put a foil barrier between the wood and soil, to prevent leakage of chemicals into the soil.
Just did my first ever project, kinda followed your build, but changed dimensions up a bit. Turned out super sturdy and i am amazed I managed to do it, thanks to you :) Got the bug now. Thanks
This is why im afraid of posting videos of myself or my family because there is people who can be so hurtful. I wish my husband did projects like this. Awesome job! I want one for a fairy garden for my daughters play house.
Very good video. Perfect demo. Just a few improvement suggestions for the viewers:
- Place the long side planks over the short side so the edges do not show
- To make it look more professional, either put the legs 5 cm lower so the top end get buried in the soil or make a frame and place it on top edges to cover the edges.
- Stones are good but placing a small plastic cup upside down with holes is better as the stones may drop in the hole and block it.
- Use treated wood that does not rot
- You can paint the outside
- I think putting heavy plastic lining inside would make it last longer.
I just bought enough wood to make one larger one for the first time. Cost me a fortune. Wood is really expensive.
Thanks for the tips - I used them and really like how it turned out!
Better than the plastic cup would be to add landscaping cloth across the bottom.
Alternatively, screw the ends flush to the legs first so the front boards cover the ugly end grain.
Just done this - thankyou buddy your help was invaluable as I worked my way through it. From Yorkshire, UK
Nice planter and the video helps a lot ! 😀
Built this and worked/looked great!
I made the long edges 4 ft instead of 3 ft and worked just as well.
Thanks!
I have made four already... Everyone loves it... Thanks man... Gonna make some more... :)
Would someone be able to offer exact supply list for items needed to create this box?
Just made this! Gunna build another this weekend now that I know what I’m doing better. Thanks for the ideas!
How many fence boards did you use
CMotor23 I believe 3 for one box, but it’s completely dependent upon how large you wish yours to be.
I made one today, but after putting the 2 rails in between the legs on both side I just use 11 inch slats along the Tao. Left some area between each one. I’ll put garden fabric on top.
Thanks for keeping it simple
You are awesome!! Indeed!! Thanks a million
Brilliant ✨.. Watching from Sudan
Thanks for this simple how to. I think I'm going to make 2 of them half the size that you made lol. I suck at using power tools so I'm just gonna give the measurements to the guy at the home improvement store and have him cut them lol.
Tip for viewers: If you don't have a power saw you can write the measurements down and take them to your local home improvement store and they'll cut the wood for you (if you buy the wood from them they might even do it for free!).
Or you can cut then all with a handsaw, it wouldnt be too hard with how few of cuts there are
Get a handsaw for 10 bucks you can cut it urself in about 2 minutes. Good work out. Or you can get a jigsaw for like 30 dollars and it makes it alot easier. Look up jigsaw videos and how to. Ull thank me later
Thanks for the plan layout! I just had someone a fence recently and hope to upcycle the old pickets and 4x4 poles. As a novice, I don't have all the necessary tools here (no bench, no vises), but I'll see if I can make by with a borrowed reciprocating saw, a tape measure, and some nails.
Excellent job …. thank you .
Awesome thanks for sharing🥰
Thanks! I built one of these today, this was the easiest guide I could find, cheers!
Finally, a great plan for novice DIYer, thank you!!
That looks really cool👌 I just made plant tubs with 5mm steel. I welded it together and after I applied vinegar. It started to rust after. Looks also very beautifull.👌
simple and elegant! Thank!
I just made this, an exact replica. Thanks for the walkthrough!
how was it ? does it gave long durability ?
Yes its a very strong planter box
You could use hardware cloth stapled to the bottom instead of using all of that extra wood. Then line that with landscape fabric.
Thanks for the tip. Valuable info.
Andy Merrett honestly I think a better solution would be to use a smaller drill bit, line the bottom in fine gravel and THEN staple cloth in there, you could just lay it in there but I think you’d want to go up the edges just so you don’t get dirt falling through.
Great video, gonna get to it in my own garden. I'm hoping to make a longer one , aiming at 2m.
Be sure to add wheels on one end so it is easier to move if necessary. A handle on the other end would not be a bad idea either.
Beautiful ...love this 😊
Excellent, going to make some a planter box at the weekend 😀👏👌🏻
good job! I also like how you emphasized safety. :)
Great video
Thanks
Thank you for sharing your knowledge and am now proceeding to build my box....I also have to agree with comment regarding nothing in tool belt etc, guess you should watch video again, he did have a hammer on belt, I thought that was a tool? Was when I went to school....Great video, nice easy instructions and step by step guide..keep it up..cheers
Thank you, I was worried about the quality of my workmanship, now I feel much better and my design a bit easier as I need no bottom as they will stay put.
+Cottage Life DIY Thanks for sharing, makes it very easy to make with this video! One should consider using un-treated lumber due to the harsh chemicals. Perhaps Cedar or Redwood could be a good choice? Cheers
ok believe I found it this is a 3ftx1ft box. got it. Off to make my boxes. Thanks for the simple plan.
Gertrude was right all along, I downloaded Woody Hyezmar’s woodworking plans, and boy do I have a great plan to build one of these!
Nice and simple! Cool!
For those using this for herbs keep in mind what pants your putting together. A quick Google will give you tons of information. But an example is mint is a vine and will tend to choke out other plants around it. Rosemary is extremely potent and sometimes will cause other herbs to smell and take on its flavor.
What does what kind of pants you wear have to do with anything.
hahaha
Great Tip! I will look into this further!
I find that wearing corduroys gives me the best herbs although some have gotten good results wearing wranglers
Bragh, Thank you so much for this video! Planting rows of white sage for spring & summer! Fannkks.
Ok this is definitely the sexy side of gardening!
These came out really well. Thank you!
I made it by myself. I used woodprix scripts for that.
Do you need to put some sort of plastic covering the inside of the planter to prevent wood rot?
*Thanks
Broken Butterfly you can use landscape fabric or a garbage bag
Awesome plans!
My adventure with the tree began with projects from Woodbex.
Add hinges and a top and you have a toy box or storage bench
just what i'm searching for... you make my day
thanks for sharing your great techniques' nice one :)
keeping it nice and simple thanks
Love it, love it, love it!!! Thanks for the video 😊
Thank you, I think I will build 3 of these!
Sure you don’t want to throw in some hurricane straps and some TJIs just to make sure those Herbs and flowers can withstand wind sheer and snow load?
Since you have the rails running along the sides, wouldn't you gain in planter depth if, instead of putting the bracers across, you put the fence board directly onto the rails, perpendicular to how you have them? That is, the fence boards take the place of the bracers. It looks like the unsupported length of the fence board would actually be less running rail-to-rail than across the bracers.
i like how he glossed over the hard parts :)
Great build mate! Keep creative! 🔧👌🔨
Hi folks. I have a question. I see he did not use anything before putting a soil. On some videos,I see some ppl stich the plastic inside the box,other stich the fabric. Plus drilling the holes. Which you would suggest,plastic,fabric,or none? Big thanks!
beautiful
Is very simple
Bu i Love it
I made it smaller
😛
thanx
yeah. . looks so easy. love your tools tho. thanks
Nice job!
I like that idea you the man
Iama try on a small scale for indoors
You are the best 👍🏻
I like this plan
Obviously there is no set number, but what price range would you figure this project costs for the wood part only? Thanks for the great video!
What about the spacing in between the wooden planks? Will the water not leach out?
eye protection shouldn't involve sunglasses that basically dim your vision of the tools and wood you're working with, but you look cool !
Yeah, Adam, if you could just build a few for me, I’d really appreciate it. Thanks. 🤣
THANK YOU SO MUCH .!! TY TY TY!!
Thank you for the video. I was just in the need for herb boxes. I found all the material saved from scrap pile. The only thing missed is the length of the end boards (3ft long x ? wide). Would ya mind sending that my way? I know I should be able to figure it out. I 'll re-watch to see if I can.
1 foot wide at the ends
Εύγε νέε μου...!!! BRAVO...!!!
You might want to line the inside of the box with some plastic. It'll keep the wood from getting moldy
Should we be coating it with polyacrylic to keep the wood from water damage?
great video - you make it look easy. One question: what brand is the support you use in addition to the Black & Decker work table? I'm really interested in getting one like yours...
Safety first 💪
Good job!
how many people watching actually live where bell-air direct insurance is available? seems like pointless commercial to throw in
***** Ha! It's not pointless to Bell-Air Direct apparently. Cottage Life doesn't pick and choose who their sponsors are, they take whatever money is given to them.
Scott Taylor I'm saying it's pointless for bel-air, with such a broad audience on TH-cam, the ad might just be a waist of their time, but I don't know
Except now Bel-Air has two people (and God knows how many people reading this little exchange) talking about Bel-Air Insurance. TH-cam advertising is a heckuva lot cheaper than TV. Cottage Life is Canada based and so is Bel-Air. Makes sense to me.
Scott Taylor remind me not to get bel-air insurance then
They sponsor him. He gets paid to mention them, he's gonna mention them.
Like that!
What kind of screws do you use? I saw 1 5/8” length but not sure “what kind”. Construction? Deck? Tried matching the color but can’t determine...
What are the dimensions of the fence board
First one saying Thank You!
first one saying fuck you
Very nice ♥ :) I'm inspired to make one myself. Just need experience ;)
what is that thing called thats to the side of your workbench that keeps the wood supported while you cut it?
Do you need to varnish the wood to protect it from rotting ?
Berkly Ng yes. Or plastic inside.
Hi, will the wood not rot?
Cool video! Should you not put the soil in a plastic container? Will the wood not rot, being in contact with soil and water? Please advise.
Careless Whispers you can buy something called landscape fabric. It's what most gardens and planters should be lined with
Adam, what was your build time for this planter box. Just curious how many I can roll out in a day 😀
How far apart should the screws be?
So, I've been curious. I'm no DIY expert or wood expert, but is there no additional protection needed for the wood to stop it from rotting or molding?
It's pressure treated fencing board, pretty resistant to all that. Should last 5-10 years with ease without any additional protection.
@@Avboden Whenever I go to make one I'll keep this in mind. Thank you, a ton. :)
Wouldn't it have been jist as fine to use some mulch on the bottom and then soil?
That's not cedar, that's pressure treated. Also you should not use pressure treated to plant vegetable plants. Also, the way you are set up to cut your boards, you are looking at a possible bind with your circular saw. You shouldn't be cutting between two supports.
There is no issues with pressure treated when used outside.
Pressure treated is not to be used inside where it is warmer than outside and shares a personal space with humans.