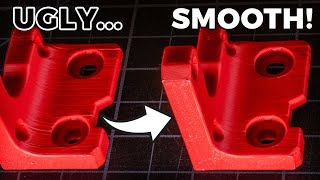
printed WITHOUT support

ฝัง
- เผยแพร่เมื่อ 4 มี.ค. 2023
- This is a short video on how to combine 3dprinted parts with printed parts during printing. The result is a better surface finish in spots that would normally have to be bridged or supported.
- วิทยาศาสตร์และเทคโนโลยี


Great idea until overnight print, a little support will save you a lot of effort.
there's a pause feature... it would just wait for you. not much effort to do what he did.
if you did this method you might not care about the time wasted or plan accordingly.
@@lupusk9productions it's good if the print was multiple color but one colour. A 8 hours print will be completed in the morning without waiting for you to put parts in and resume.
Using support will be able to estimate the time and planning. Cutting part sometimes ruins your print.
It’s still a good trick to have up ones sleeve I think, depends on the part, some will be easier with support but this could also save a lot of work for certain parts where removing support would be tricky
@Enchanted Goose I don't get my point. Ex. 8 hours print overnight, pause at 12am wait for you to put the part in the morning. If you use support, the print would be completed in the morning.
I don't get it. You print the part to attach first then attach it when the base part pauses for you to add the attached part. Besides that it's not very different than a normal print. Either get a printer with a reliable power resume feature or get a UPS.
Omg I was seriously thinking you hacked the P1P haha
hack what? gravity?
Bro thought he hacked physics
@@rubendariovelez Thats not what he meant
@@08B6 what he meant?
@@rubendariovelez this made me laugh more than I care to admit
A very interesting idea... I've inserted magnets, weights, etc before, but not other plastic parts! Why not! Thank you for the great tip!
This part has a great tip.
yeah, same here. Although " as strong as if it had been printed in one go" is technically not correct, I think, because the inserted piece is only held in place by one layer.
@@jannsander isn't every layer?
@@QiwiPear no, if you look at 0:30 you can see that he inserts the part into a pocket. After that the printer puts a couple of layers above. But the only force resisting the part to break out of the top is the adhesion of one layer. If you had printed this in one every layer would extend into the bottom part and fuse like this.
@@jannsander I see. I forgot that the slots themselves aren't fused
Ah, that bamboo anti-gravity add-on kit was well worth the investment. 👍
They have extra employees where watch 24/7 all cams of the printers and send a guy just in time when you sleep. Just leave a key under the doormat😅 😅
Astronaut 3d printing on the ISS, "I see no problem here"
@@OnyDeus now you got me wondering
Great idea, I have paused prints in the past to fill them with sand and epoxy resin to add weight to the part, but I never thought of dropping another part in to match the level and then having it bonded by the next layer, you have done the community a great service by sharing this method and I salute you for it!
That is actually an old hat
👏🏼👏🏼👏🏼
I tried sand once and forgot the fan was on high (probably at 100%). Never again 😂
@@tylers2889 Thats the exact reason I added epoxy over the top of it
@@tylers2889 lol, would like to have seen that.
I read people use Rice in the infill to make prints heavier lol
I'm actually looking into using plaster to weigh printed lamps down
What about lead shot or metal BBs?
I have used sand with great results
@@schizophrenicgaming365 there's a good maker called Cloakfiend that uses plaster to weigh his printed sculpts, then copperplates his sculptures, I recommend his channel he does lots of new and interesting techniques and tests materials for us.
@@skaramicke good idea
This is the 3d printer equivalent of "if you shine a yellow light on a blue wall, what colour is the wall? Blue."
This is honestly a really good idea
Solvents work well for fusing sure
I’m sure we all love avoiding those fumes where we can - after years in o-chem labs and working as a pharmacist, I think I’ve probably copped too much already hahahahahahaha
Why did you stop being a pharmacist
@@Verzula health reasons mostly
My spine isn’t the best so can’t do the long days standing anymore
I sometimes use a soldering iron to fuse parts. Sometimes pushing a staple between them for strength, and loose filament to fill gaps, but it's tricky trying to keep a uniform surface and isn't good if you care about aesthetics. Also you are limited with the parts the iron can reach, which is just the outside surface.
@@ArcanePath360 you should try a 3D printing pen, they are very cheap now. Then rather than just melting the parts together you can add extra material too, which is good for filling gaps.
@@conorstewart2214 Thought about that many times, but many just don't get up to temperature. They are like 190c at the tip. No good structurally and when you use PLA+ which works better at 205c+
A known concept integrated with clever thinking. Nice.
I’m not sure itll have the same strength as if printed normally. There will be a definite weakness at the interface between the old part since they are not bonded. Thus, the strength will decrease proportionally to the size of this interface.
Yeah for strong functional prints, everything about the design and how it's sliced/printed is a different mindset. Depending on the material, using a suitable adhesive or solvent to bond the parts or even melt them together at the contact points could end up comparable but I'd avoid this as much as possible.
In this case, I doubt it would be substantial enough to matter simply because it's not designed for strength to begin with.
Throw some gluestick on top of the inverted cone to increase strength…right?😂
@@Aquaponic0 Not a bad idea. A bit of hot glue to fill in the gaps of the infill would make the part even stronger than if it were printed normally.
I wonder if adding thin, shallow ridges on interfacing plane would make the connection stronger (depth being same as print layer height)
It always depends on the design and function.
He has created keys to insert the part which will make it way stronger. For many designs this is the fastest and best way, just not for all.
Nice looping edit.
I like insetting G10 for strength enhancement. Magnets is another cool one.
Not sure why but I feel violated.
Thats actually really clever. I appreciate your creativity, it makes perfect sense and that’s hard to find on TH-cam Shorts.
Pretty cool ill have to give it a shot
Bambu owners discovering the ancient ways of FDM
not a bad thing
This is absolute genius.
Very cool. Implanting other 3d printed parts into the print. Adopted!
Well, I usually just ignore the laws of physics
The bond is weaker due to the lower temperature in the preprinted part
Idk. If you have 100% part cooling on, the previous layer shouldn't be that hot anyways. Having the Gcode stop the print for 10 seconds to drop in the top part shouldn't make that much of a difference.
The point is to consider this and other methods as options. Here it's not a functional part, so the strength difference doesn't matter.
If you need to consider this for a functional part, there are mods you could make to the design that would compensate for the lack of solid bonding like making the support arms wider, etc.
How about heating the part on heating plate in controlled temp before joining them..
Ahah nice trick! I'm used to embedding magnets and nuts this way, but indeed, embedding printed parts might allow nearly seamless fusion
Ur idea is also Brilliant
It's not as strong. If you pause a print 15min or so, depending of the material, and you resume, you don't get the same layer adherence. It doesn't matter for this part for sure but keep that in mind.
Love how you make your voiceover loop, too! ;-D
nice job and i like how the voice over loops
Very underwhelmed by this "solution" to not using supports. Print two pieces? Uh, yeah.
I expected him to print one side upside down and then flip it
I mean if you're going to be completely reductive to the point of ignoring the point of the video, sure.
@@snickerdoooodleNah he's right. The only part he "ignored" was imbeding it back into the print but that's no different from just gluing them or melting them together
And yet, I don't see you posting a better one. Guess that means you're even more underwhelming and are only good at critiquing from a false ideological perspective, which makes you basically worthless in reality. 😂
Yeah the video title and thumbnail suggest some elaborate or novel solution, creating a difficult piece out of multiple easier pieces has been done since humans built things. I thought he did something like moving the z-axis down to print with a free hanging string.
Inserting a the part during the print is newish I guess (but I've seen it before with things like nuts) but this isn't even really necessary here. Using glue would probably be easier and just as strong.
"WITHOUT SUPPORT" Sees 2 HUGE support columns used to support the insert of second part.
I usually cut M3-M5 threads directly in my PETG parts and this holds up perfectly
Like hiding the threads internally?
Or threading it to facilitate that connection?
Not the best at the CAD side yet, but holy shit thank you for the reminder that I need to learn how the extruding (mb if thats not the right term) features work
CAD is such a useful tool I wish I’d taken the chance to learn it in highschool or had started earlier
@@BirnieMac1 Nothing to model in CAD. For example a M3 just make a cylindrical d2.5 hole and then cut the M3 right into the printed part with a thread cutter. Works best with through holes but works also with blind holes.
That's actually very smart for parts that can be difficult to remove supports on. A little effort in meshmixer would go a long way! Maybe even making use of acetone or some super glue to increase the strength of the bond to more than a few surface layers for parts that could make better use of the extra strength!
Don’t use acetone for PLA though - it’ll weaken it
THF iirc is the one to go for there? But I’m not sure how neccesary it’d be if the hotend is ironing the surface too
It achieves the same thing, turns the plastic layers into a liquid phase and then as they dry/cool they’ll solidify as one homogenous phase (at least I think it’s homogenous if the temp goes above glass point?)
okay that freaking brilliant, i thought this was a click bait scam video, but i left pretty impressed.
Composite 3d printing is awesome, i fused some hex nuts into one of my prints once to have a more sturdy screw base
I was going to say it's obviously 2 parts, but inserting it mid print is genius
this is so smart
This is an ingenius idea. Now I want to see how to design this.
I love seeing videos like this. Now I have a ton more ideas for 3d models.
Great idea. I think a tutorial explaining how to add whatever the necessary g code to a more standard printer would be a great follow up. (If this already exists on your channel I apologize)
Totally agree, I’m still learning the CAD side and specifics of g-code so those more in depth explanations are invaluable at times
There's no special g code here, and it can be done on any printer. He kind of explained it... you model this as two parts that happen to fit together. Slice them separately. Print the upper cone first. Then, when printing the lower cone and posts, pause it at the right height to insert the upper cone. Then continue printing. So the only non-routine part is you need to insert that pause at just the right layer. You could do that by editing in a pause in the G code, or I think some slicers allow you to insert a pause.
To pause the print is very simple, actually
If you're using cura, all you have to do is go to extensions in the top right bar and select post processing
After that you can enable a filament change and it'll pause and make beeping sounds (iirc) at the right layer
@@WithDaBoiz pausing with cura can be a pain in the ass if you use klipper though
This also works if you want to embed a magnet into your models. Great advise.
I love stuff like this because it takes an idea that may well have been considered by many people many times, but puts it into a context that effectively says “cool idea, now DO IT.”
Way too many ideas never make it past the concept stage for no better reason than “meh, don’t feel like it” when all it would take is a handful of supposedly “meh” ideas to make something brilliant - for example somethin like, oh I dunno… strapping together a few hobby motors and a funky resistor to make some doohickey that leaks hot plastic into weird shapes.
I can't believe I never thought to do this. Brilliant.
What a great idea with huge potential. I'm going to rethink the way I slice from now on. I'm often wondering about orientation and this might solve some issues I've often had
The loop is so so perfect," and this is how"
I haven't thought of something like this. Very interesting I may have a project I could use this for. Thank you for posting.
This gave me an idea - for something not so pointy, one can insert some support ramp. But it has to be heated and fixed to be stable 💁
This is simple but brilliant! I'm honestly a bit upset I didn't think of it myself haha
Great content you earned a subscriber
🤯So simple, yet still hard to implement. I will try it sometime.
One of the best techniques I've seen for the past years, Chris! Thanks for posting. I'll subscribe. You could also print the top cone in a different colour ( same material ) way faster than doing it with supports.
I tend to oversupport my prints but my fail rate is really low.
Id rather have 10 minutes extra cleanup time other than a 5hr failed print
Feels like someone smart could embed this in the design program so it detects where this is a strategy that works! Really cool idéa!
The loop transition is SO SMOOTH.
It almost looks like your video doesn't have a cut, until you go back and replay.
Besides the useful tip, I love how this video is made into a perfect endless loop!
sealing it after like this is SO cool.
Very nice idea!
Very good work, stress risers are still present at the joints and the structure isn't isotropic but still a usefully method.
That's brilliant. What a brilliant idea for smooth overhangs on neat designs like this. Great job.
Very clever idea 👍🏼
What an awesome idea! Congrats bro! 👏👏👏
was actually thinking that you added a removable support part that is directly implemented when you designed it.
Very clever idea 💡
great idea.can print in separated time frame.dont hv to wait the whole night to finish.
Nice idea!
I never even thought about doing this. This is genius
Now we need the machines to think of this themselves
Nice idea, it’s always very useful to pause prints tonight insert parts
Sadly not many people know about this technique. I frequently see questions like "how do I print this without support". Keep in mind that it makes waterproof connection while still looking good.
I made rear light for e-bike this way - printed black case, paused and inserted red transparent piece to print on top of it. Earlier i tried glueing red piece, using silicone, but this is the only aesthetic solution, which works perfectly.
Also it's a way to have overhangs without this rough texture that support leaves
Super clever idea 💡
You are a genius!
Sneaky sneaky!! I love it
At first I just assumed it was made in two prints but this is actually really cool. Might have to try this out.
Im trying this today
pretty great hack! 👏😎
this wasn't a click bait, im surprised !
I used this method to place a cylinder weight inside of a closed egg so it can wobble. I got it to the right layer where the cylinder was the support and doesn't shake around inside.
That is a really good idea.
Great. Pause at layer is perfect for this. I have known about magnet inserts and such. So this falls into that category. So impressed 😮
This is a very clever technique O hadn't thought of. I'll add this idea to my 3D printing toolkit. Thanks for sharing.
Very creative!
Well done!
Brilliant idea!
This is a nice idea thanks
Nice idea, I will keep it in mind for future prints. In the model you show in the video I particularly like that you will not have any signs of supports on the cones! Big plus in my opinion... Cool!
That's awesome! Like a boss! U Made my Day
What filament is that? Looks
Awesome!
Smart!
You won a subscriber!
Dumbfounded... way to find a solution without overthinking it! The answer really was in front of us this whole time.
Almost clickbait but I completely allow it. Great short!
Slick hack. Love it
Great idea!!! Definitely wanna try it!
Ooooohh man it's very amazing, you genius
Super clever!
that's a trick!...
a very useful trick 👌🏼 i would like to try
CEO? Heck no! CGO, chief gigachad officer.
Nice idea, how did you pauze it?
On the specific layer you put "m600" or "m226" code on your gcode file with a text editor. Print pauses, you insert the part and send the m602 code to your printer again to continue with the gcode.
@@berathan5569 how do you manually send the m602 code to restart? (Have an X1C and haven’t looked into this prior to this vid)
@@bmickle I don't know your specific model and I am nowhere advanced user but my approach was using octoprint printer is connected via usb. And I send the commands over the terminal. There are multiple codes experiment with them and use the one that works. Different printers have different codes(due to version difference)
@@berathan5569 EDIT: for Bambu it must be done in the slicer. Figured it out.
That's wicked smart! Thank you for sharing!
😮nice
Wow, I am using this from now on.
this is mind blowing
Great thinking outside the box.
Very clever! Nice move!
I only watched it to say cap! But in the end i was impressed! Wow great idea!
Awesome trick!
That's friggin great!