You filmed it very well, including the sweat-inducing bits! Must have been fantastic to get all these old pieces once again talking to each other as intended, plus to have the feel for another skill. Welding is, I feel, in your future.
Greasing the hitch is a must to prevent rust and ease friction. Preventing rust is the more important. You edit video quite well. The work pace always keeps my interest. 👍👍👍
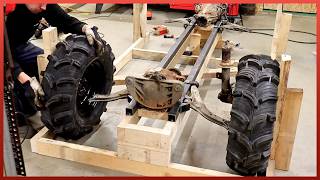
Ex-Army here. The Defender only locks the centre differential, forcing equal power to front AND rear differentials on front and rear axles. As a result, the individual axle differentials still allow wheels to spin at different speeds. The effect is that your front left and rear right wheels could spin whilst the front right and rear left are stationary - or vise versa. Knock the range lever over to the left (diff lock) early to give it all chance to lock up. Put it in low range (big mechanical advantage / hard to stall). Right foot on gas (makes it go) Left foot on brake (half-shafts being fed with power and are spinning have to overcome brakes, and power is forced to stationary half-shafts) With the above, you should have MUCH reduced wheel slip. That little wagon absolutely WILL go places that modern tat could only dream of.
"Oh, Lord, my kingdom for a ...drill press!" You deserve it! The precision you command! It's always reassuring to me to know that you're planning & maintaining all the accuracy that's needed in the world!
This might come too late for you, but here's my trick to drill straight holes. I use a bosch PBD 40 benchtop drill press. The trick most people don't know: The column can be mounted 180° off its normal position. That is, opposing the base, which essentially turns this fairly cheap drill press (I got mine for 150€ barely used) into a makeshift "magnetic" drill for wood. You just clamp the base and drill, and since it's less than 12kg, which is as light as bench drills go, it's not a hassle to move around. It just takes a minute to loose a screw and return it to its normal position. It its first gear is has enough power to use up to 60mm forstner bits if you do it gently.
@@Lukas-sv1rp It worked well for me. I didn't try on oak anything bigger than a 35mm forstner drill bit, but I did use a 60mm one on birch ply, which is on the hard side of things, and it managed it. That's a size that it's almost impossible to drill freehand. Granted, to drill a straight hole the most important part is the beginning, so as long as you can drill 4cm or 5cm into the wood, you could then change to a manual drill and it should continue straight.
Sometimes it looks a bit scary but nonetheless you press on and overcome difficulties. When in doubt proceed with confidence! Good luck, your pleasant disposition and the kindly eagle eye of ‘senior’ will bring this project to a successful conclusion.
You are amazing ,the creativity that comes out of your brain just excites me to no end, I know your father is as proud as a peacock at his amazing son and I couldn't be prouder myself. Be safe on your journey. I get so excited when you pop a new video, it just makes me smile from ear to ear. The progress is coming along fine and soon it will be a home to be proud of. Lots of love.❤ Afriend. 😮
there's a good chance that eyelet on the tow bar will begin to splay out after a while. You should consider welding the eye where it meets or perhaps a bolt through the metal to hold it together. Also, the eyelet bolts work fine on gates and such where there is not a lot of weight pressure on them. That wagon is going to be very heavy when finished so a 2 part metal plate bolted through top and bottom, with a notch for the tow bar to ride in, would be much stronger to handle the weight of the wagon and give you a proper way to install a grease nipple so the pivots of the tow bar can move freely
I agree, I'm not sure one eyelet is enough to handle the loads, particularly side loading. But then it's not designed for road use and it will only see basic moving around.
@@JohnnyMotel99 dragging it through a field will probably put more pressure on the eye bolts than towing on a road. There is no side to side give in that tow bar, my guess is those eyebolts will break off eventually.
Oh no! One of my very favorite channels and only now this one month old video popped out. And there's another, 6 days old. Anyway, excellent video, love the camaraderie and the good advice in the comments section by folks in the trade. On to the next!
Someone said it on the last vid, but getting a ball/pintle hitch combination is pretty dang necessary, especially on bumpy and off camber hills. Wouldn't want that tow bar popping off.
@@azmrl Fair enough, I made my comment just before he mentioned where it would be going. It's still not designed for any kind of speed, but a backup chain and a hook with a latch on the Land Rover would be enough to stop it coming loose
I love the way you work with both metal and timber, with calm, precision and also with very good taste. You could have been a good watch maker. Keep up the good work. 👍💪💪
Well done! We all knew you had the blacksmith ability and perseverance! 😄 The tow bar fit fine! The only thing I might change is the hitch on the Land Rover - consider a clevis hitch so it cannot bouch off and damage the Land Rover.
Brilliant work and video, as always, Carl!! Your work is always perfect. You demand so much from yourself. I hope you are well. Thank you so much for sharing your projects.
Excellent video, as always with your channel, thanks a lot. I would strongly recommend you to try welding, this is a very handy skill to master. Plus, it is pretty easy these days to start doing good stuff with a welder. There are lots of good tutorials available, and the welding machines are really affordable, easy to use and efficient. A whole new world opens to you when you can create complex pieces of metal from basic stuff.
On uneven ground, with no suspension what is going to stop the whole body twisting. The front axle has no up and down travel? One wheel will be off the ground? Sorry if I am missing something.
Yes huge loads will be put into the chassis and the parts attached to it. A much longer bolt with a strong rubber ring,say 2" wall diameter will allow some twist and reduce the strain on the rest of the chassis etc.
I don’t remember did you say anything about the lack of a suspension? I can’t help but think that with no rubber on those wagon wheels and no suspension that the wagon will break pretty quickly once you try to tow it anywhere. Not that it will break in half or anything but the living space on top will likely become cracked and weakened fairly quickly and structurally unsound. Unless you plan to pull it at a snails pace only.
Great video. You might want to replace the eyebolt nuts with castle nuts that would ensure they don't come off in a field, at nite, in the rain, at 40 below 😂
If you have a hole like that, just take some cheap epoxy (the type that just becomes plastic at the end of the run, nothing hard) pour it in the hole, and then drill the hole again with the larger bit. You'd be done within a few hours (a day) once all the materials are in your pocket, with super clean results. You wouldn't even know after, that you had to drill through epoxy to make the cut.
Pintle hitchs typically have a half loop cover on the vehicle side to cage the hitch loop so it does not come off the vehicle at a random point going down hill etc.
Spectacular film work and excellent problem solving. I was honestly surprised at the amount of movement you were able to create simply by pulling on the tow arms. Perhaps they are longer than they appear on my little youtube screen. Your workmanship is beyond my skill set and your design appears very well researched, but the racking of the frame as you exited the shop at 11:53 has me stressed out for the future of a rigid hut. I remain eager to see how your build turns out.
Looking forward to future episode where you attach safety chains for added towing connection. Wishing you and your family a blessed week. Peace brother
I’m enjoying this build. Beautifully done. Still need your project workbook when you are ready to release. I still need to measure myself to see if the coat will fit me. Good job!
You’re becoming a gypsy Carl. Great skills being put to use. Those beams are heavy and made you work hard I know. I hope you will fashion up safety chains as used on trailers in case the ring coupling jumps up while negotiating some rough traverse. Cheers from Oz. 👍🏻🙏🦘
Nah then. Put wood in t'hole 😂 I'm currently just over the Pyrenees myself. Stunning part of the world. Great vid as ever, Carl. Looking forward to seeing it all come together 💪
lol @7:01 - man with thumb wrapped in packing tape opens blister pack with a chisel. So relatable :) Excellent work overall, thanks for the great videos.
Wonderful work. It seems to me that the i bolt is pretty small compared to what it is pulling. It seems to me that friction would wear it out quickly. I'd sure want an extra strap of steel on each side in case of breakage. Hope that this helps.
Success!! Very well done. Lots of hard work and learning new skills on the fly to bring your idea to fruition has paid off. Not complete yet but definitely a big step forward and one that was rewarding. Great job! Looking forward to your next video. Safe travels
You may want to consider adding a bar across the splayed section to prevent twisting or bending when in use, if one wheel gets in a hole when turning it may result in damage to all your hard won efforts.
11:53 Not sure if you took this into account or not, but as you were driving around with it, I noticed that when the rear and front wheels were on different inclination it looked off. kinda like the whole thing bowing (example: rear left going up and front right going up) you could have a twisting stress on the structure and I am kinda concerned if that could cause issue in the future for anything built on top?
You’re doing a great job. The approach I might have taken to enlarging the hole would have been to position your circular hole template as you did, but run around inside it with a router and a top-bearing pattern-makers’ cutter. You’d get a nice clean hole that way. You could lock the big nut by drilling a small hole 50:50 between the nut and the stud, and threading a grub screw vertically into that hole, with locking compound. Oh, btw, Mercedes g-wagens have differential locks that work, every time!
Not sure if you've already drilled a grease point into the axle, but might be a bonus long term! All the best from rural Portugal @HowardsPortugal Cheers et bien fait! Steve
just wanted you to know that i'm using your laser trick everytime i'm on a construction site and i have to drill a perfectly straight hole ! thank you Carl !
How will you deal with twisting of your wooden chassis along the long axis and its impact on the structure on top? Be careful that torsion does not destroy the building frame and skin the first time you attempt to move it on some uneven ground. If you think this may be an issue, consider some form of suspension/isolation between the superstructure and the chassis. It can be on four car suspension springs concealed by the bottom edge of the galvanised corrugated skin as a skirt.
I look for your videos every week and gave a silent thumbs up when you trundled the chassis out of the workshop. Not sure I can wait another 4 weeks....
I would definitely change the hitch on the Landrover to the ball and pin type. They are only about £50 new. I've not watched the first video so I assume you have checked the legality of this trailer in France. It wouldn't be allowed on a UK road, firstly for not having its own brakes (assuming it will be over 750kg) and secondly because we aren't allowed to build our own any more. Love it, my kind of engineering!
May I suggest a remote mic system for speaking while away from the camera? Otherwise fantastic film work and relentless pursuit of perfection in the jobs you do.
Re the lock not on the top of your axle pivot , consider belts and braces by peening or use a punch to upset the thread a little so no chance of loose nuts in the future that could drop the pivot out. Nice video work as always.
as soon as you put a load on the rear axel and the rear end gets strained, say a rock gets in front of the rear wheel, that will put an extreme load on the kingpin and it will fail at the bolster. that is why old wagons have axel hounds and the box is mounted to the bolster
Great series, I think you need a pin hitch on the Landy though or the hitch will pop off on any rough ground. Separate pin and ball rather than one where the ball is on top of the pin as those are iffy for ball towing.
4 carriage bolts per plate are the old fallback with wagon making here in the US. Your solution seems a tad bit better. Gives some adjustment to the mounting with the nuts on both sides of the beam.


![[UNCUT] ฝันรักห้วงนิทรา | EP.3 (1/4)](http://i.ytimg.com/vi/zVXAFD1OLZg/mqdefault.jpg)


this may seem inconsequential, but thank you so much for not adding background music.
Thanks for the beautiful nature shots. I probably will never see those mountains otherwise.😊
You filmed it very well, including the sweat-inducing bits!
Must have been fantastic to get all these old pieces once again talking to each other as intended, plus to have the feel for another skill.
Welding is, I feel, in your future.
Your narration and process of work are exceptional
Greasing the hitch is a must to prevent rust and ease friction. Preventing rust is the more important. You edit video quite well. The work pace always keeps my interest. 👍👍👍
Ex-Army here.
The Defender only locks the centre differential, forcing equal power to front AND rear differentials on front and rear axles. As a result, the individual axle differentials still allow wheels to spin at different speeds.
The effect is that your front left and rear right wheels could spin whilst the front right and rear left are stationary - or vise versa.
Knock the range lever over to the left (diff lock) early to give it all chance to lock up.
Put it in low range (big mechanical advantage / hard to stall).
Right foot on gas (makes it go)
Left foot on brake (half-shafts being fed with power and are spinning have to overcome brakes, and power is forced to stationary half-shafts)
With the above, you should have MUCH reduced wheel slip.
That little wagon absolutely WILL go places that modern tat could only dream of.
No traction control?
"Oh, Lord, my kingdom for a ...drill press!" You deserve it! The precision you command! It's always reassuring to me to know that you're planning & maintaining all the accuracy that's needed in the world!
Blown away by the quality and execution of your work. Looking forward to seeing the next stage.
This might come too late for you, but here's my trick to drill straight holes. I use a bosch PBD 40 benchtop drill press. The trick most people don't know: The column can be mounted 180° off its normal position. That is, opposing the base, which essentially turns this fairly cheap drill press (I got mine for 150€ barely used) into a makeshift "magnetic" drill for wood. You just clamp the base and drill, and since it's less than 12kg, which is as light as bench drills go, it's not a hassle to move around. It just takes a minute to loose a screw and return it to its normal position. It its first gear is has enough power to use up to 60mm forstner bits if you do it gently.
Thank’s for this tip. I also have the PBD40, but didn’t know…
Yeah I also use this technique, however I'm not sure on hardwood with bigger diameter drill bits
@@Lukas-sv1rp It worked well for me. I didn't try on oak anything bigger than a 35mm forstner drill bit, but I did use a 60mm one on birch ply, which is on the hard side of things, and it managed it. That's a size that it's almost impossible to drill freehand. Granted, to drill a straight hole the most important part is the beginning, so as long as you can drill 4cm or 5cm into the wood, you could then change to a manual drill and it should continue straight.
Great tip, I had never noticed that
Are those cracks on the right side by the drawing eye significant?
Sometimes it looks a bit scary but nonetheless you press on and overcome difficulties. When in doubt proceed with confidence! Good luck, your pleasant disposition and the kindly eagle eye of ‘senior’ will bring this project to a successful conclusion.
You are amazing ,the creativity that comes out of your brain just excites me to no end, I know your father is as proud as a peacock at his amazing son and I couldn't be prouder myself. Be safe on your journey. I get so excited when you pop a new video, it just makes me smile from ear to ear. The progress is coming along fine and soon it will be a home to be proud of. Lots of love.❤ Afriend. 😮
there's a good chance that eyelet on the tow bar will begin to splay out after a while. You should consider welding the eye where it meets or perhaps a bolt through the metal to hold it together. Also, the eyelet bolts work fine on gates and such where there is not a lot of weight pressure on them. That wagon is going to be very heavy when finished so a 2 part metal plate bolted through top and bottom, with a notch for the tow bar to ride in, would be much stronger to handle the weight of the wagon and give you a proper way to install a grease nipple so the pivots of the tow bar can move freely
I agree, I'm not sure one eyelet is enough to handle the loads, particularly side loading. But then it's not designed for road use and it will only see basic moving around.
@@JohnnyMotel99 dragging it through a field will probably put more pressure on the eye bolts than towing on a road. There is no side to side give in that tow bar, my guess is those eyebolts will break off eventually.
@@jamesc7526 a double U on each leg would work maybe.
Well done Carl filming is great. You make it look so interesting. Xx
Really looking forward to the video of you crossing the Pyrenees with the finished hut on the back of the Land Rover! 😄
You must be extremely proud of what you have achieved so far. Looking forward to watching the rest of the build.
Oh no! One of my very favorite channels and only now this one month old video popped out. And there's another, 6 days old. Anyway, excellent video, love the camaraderie and the good advice in the comments section by folks in the trade. On to the next!
Someone said it on the last vid, but getting a ball/pintle hitch combination is pretty dang necessary, especially on bumpy and off camber hills. Wouldn't want that tow bar popping off.
Speaking of uneven ground...how does that axle design not spring the fittings loose when going bump to bump
@@jotterson1156 It's designed to be moved relatively short distances at very low speeds, it's not a modern trailer for open road use
and, in the US, we need a backup chain setup.
@@helplmchoking across those Pyrenees to Spain is open, steep and winding.
@@azmrl Fair enough, I made my comment just before he mentioned where it would be going. It's still not designed for any kind of speed, but a backup chain and a hook with a latch on the Land Rover would be enough to stop it coming loose
Your woodworking and video skills are a true pleasure. Bravo!
You could mount some stops to the axle beam to lock the tow bar from shifting sideways. Maybe wooden blocks or beefy metal L brackets.
I love the way you work with both metal and timber, with calm, precision and also with very good taste. You could have been a good watch maker. Keep up the good work. 👍💪💪
Well done! We all knew you had the blacksmith ability and perseverance! 😄 The tow bar fit fine! The only thing I might change is the hitch on the Land Rover - consider a clevis hitch so it cannot bouch off and damage the Land Rover.
Looks good Carl. coming along nicely .
As soon as I see your video is out... I drop everything. Why? Because your videos are so unique, creative and your work is simply gorgeous.
Thank goodness you managed to find those bolts It looks great! 👏👍
You Carl and your channel is simply astonishing. A true inspiration that anything is possible. ❤
Awesome video. Excellent craftsmanship.
I need a refresher: What is the grand vision for the farm, wagon, etc? Love your commitment.
Brilliant work and video, as always, Carl!! Your work is always perfect. You demand so much from yourself. I hope you are well. Thank you so much for sharing your projects.
All i have to say is: Thanks! Thanks for all of your Videos and sharing this stuff with us. i wish you all the best!!!!!!!!!!!!!!!!!!!!!!!!!!!!!!!!
Excellent video, as always with your channel, thanks a lot.
I would strongly recommend you to try welding, this is a very handy skill to master. Plus, it is pretty easy these days to start doing good stuff with a welder. There are lots of good tutorials available, and the welding machines are really affordable, easy to use and efficient. A whole new world opens to you when you can create complex pieces of metal from basic stuff.
On uneven ground, with no suspension what is going to stop the whole body twisting. The front axle has no up and down travel? One wheel will be off the ground? Sorry if I am missing something.
Yes huge loads will be put into the chassis and the parts attached to it.
A much longer bolt with a strong rubber ring,say 2" wall diameter will allow some twist and reduce the strain on the rest of the chassis etc.
I don’t remember did you say anything about the lack of a suspension? I can’t help but think that with no rubber on those wagon wheels and no suspension that the wagon will break pretty quickly once you try to tow it anywhere. Not that it will break in half or anything but the living space on top will likely become cracked and weakened fairly quickly and structurally unsound. Unless you plan to pull it at a snails pace only.
Great video. You might want to replace the eyebolt nuts with castle nuts that would ensure they don't come off in a field, at nite, in the rain, at 40 below 😂
Great idea with the length of broom handle, I cant wait to see you sweep up later and complain the handles too short!!
If you have a hole like that, just take some cheap epoxy (the type that just becomes plastic at the end of the run, nothing hard) pour it in the hole, and then drill the hole again with the larger bit. You'd be done within a few hours (a day) once all the materials are in your pocket, with super clean results. You wouldn't even know after, that you had to drill through epoxy to make the cut.
Another awesome video from you guys. Thanks and keep them coming soon. 👍
It's looking so awesome. I kinda see why people restore old equipment like this when all the bold are so hard to find now
When I was your age I was a fully time served tradesmen however, I could no way come anywhere near your skill level - kudos!!
Pintle hitchs typically have a half loop cover on the vehicle side to cage the hitch loop so it does not come off the vehicle at a random point going down hill etc.
Loving these frequent uploads. Great work too Carl!
Spectacular film work and excellent problem solving. I was honestly surprised at the amount of movement you were able to create simply by pulling on the tow arms. Perhaps they are longer than they appear on my little youtube screen.
Your workmanship is beyond my skill set and your design appears very well researched, but the racking of the frame as you exited the shop at 11:53 has me stressed out for the future of a rigid hut. I remain eager to see how your build turns out.
Looking forward to future episode where you attach safety chains for added towing connection. Wishing you and your family a blessed week. Peace brother
many thanks Carl for this vidéo. it's always a pleasure to learn and appreciate your effort. have a great holiday back in the UK cheers
Impressive work! Especially for someone with no blacksmithing experience. And the video was well made and informative. 👏👏👏
Nice. I have enjoyed watching this build..
Always amazed at your videos! Ant wait until the next one and the progress of your project.
I’m enjoying this build. Beautifully done. Still need your project workbook when you are ready to release. I still need to measure myself to see if the coat will fit me. Good job!
5:00 For free drilling, correctly mount a bubble level on top of your drill so you will always be perpendicular to the ground.
carl! we need a part 2 to refurbishing your moped!
Love these films Carl and evidently I’m not alone.
27K views in 4 hours, impressive. 👏🏼
You’re becoming a gypsy Carl. Great skills being put to use. Those beams are heavy and made you work hard I know. I hope you will fashion up safety chains as used on trailers in case the ring coupling jumps up while negotiating some rough traverse. Cheers from Oz. 👍🏻🙏🦘
Looks great. Can't wait to see the next steps in the build. For any kind of towing your going to need a single hook instead of the standard hitch.
I really like your problem solving skills! Something goes wrong, but you think about it and try other things!
Nah then. Put wood in t'hole 😂 I'm currently just over the Pyrenees myself. Stunning part of the world.
Great vid as ever, Carl. Looking forward to seeing it all come together 💪
Carl awesome job! Looks great. I am enjoying the project! 👍👍
lol @7:01 - man with thumb wrapped in packing tape opens blister pack with a chisel. So relatable :)
Excellent work overall, thanks for the great videos.
Another high quality vid of a high quality process to create
“Put le wood dans l’hole,” was my father’s best French translation of that particular expression.😂
Wonderful work.
It seems to me that the i bolt is pretty small compared to what it is pulling. It seems to me that friction would wear it out quickly. I'd sure want an extra strap of steel on each side in case of breakage. Hope that this helps.
Spectacular job! It’s beautiful
The full term is "Put bloody wood int hole". 😆Great vid .
Success!! Very well done. Lots of hard work and learning new skills on the fly to bring your idea to fruition has paid off. Not complete yet but definitely a big step forward and one that was rewarding. Great job! Looking forward to your next video. Safe travels
As a fan of wagons… this is an excellent build 😎
You may want to consider adding a bar across the splayed section to prevent twisting or bending when in use, if one wheel gets in a hole when turning it may result in damage to all your hard won efforts.
11:53
Not sure if you took this into account or not, but as you were driving around with it, I noticed that when the rear and front wheels were on different inclination it looked off. kinda like the whole thing bowing (example: rear left going up and front right going up) you could have a twisting stress on the structure and I am kinda concerned if that could cause issue in the future for anything built on top?
You’re doing a great job. The approach I might have taken to enlarging the hole would have been to position your circular hole template as you did, but run around inside it with a router and a top-bearing pattern-makers’ cutter. You’d get a nice clean hole that way. You could lock the big nut by drilling a small hole 50:50 between the nut and the stud, and threading a grub screw vertically into that hole, with locking compound. Oh, btw, Mercedes g-wagens have differential locks that work, every time!
Not sure if you've already drilled a grease point into the axle, but might be a bonus long term! All the best from rural Portugal @HowardsPortugal
Cheers et bien fait!
Steve
Brilliant! Looking forward as always, to your next episode. 🫡
Another awesome video Carl. Thank you! It will be a long 4 weeks😢
just wanted you to know that i'm using your laser trick everytime i'm on a construction site and i have to drill a perfectly straight hole ! thank you Carl !
In Yorkshire it’s “put wood in’t hole” meaning shut the door or be quite 😅 great video
Superb work!
Brilliant video of so many skills on show.
Great video as always! There’s loads of videos on how to reverse a dolly trailer on here. Once you understand the principle of it, it’s a doddle.
Thanks Carl!
I knew that new roof you put in would eventually come in handy!
Maybe use a washer with the B-pins, between the pins and the eyelets? Enjoying your progress and the things I am learning from your travails.
Well done Carl,
How will you deal with twisting of your wooden chassis along the long axis and its impact on the structure on top? Be careful that torsion does not destroy the building frame and skin the first time you attempt to move it on some uneven ground. If you think this may be an issue, consider some form of suspension/isolation between the superstructure and the chassis. It can be on four car suspension springs concealed by the bottom edge of the galvanised corrugated skin as a skirt.
I look for your videos every week and gave a silent thumbs up when you trundled the chassis out of the workshop. Not sure I can wait another 4 weeks....
I would definitely change the hitch on the Landrover to the ball and pin type. They are only about £50 new. I've not watched the first video so I assume you have checked the legality of this trailer in France. It wouldn't be allowed on a UK road, firstly for not having its own brakes (assuming it will be over 750kg) and secondly because we aren't allowed to build our own any more. Love it, my kind of engineering!
May I suggest a remote mic system for speaking while away from the camera? Otherwise fantastic film work and relentless pursuit of perfection in the jobs you do.
Thank you!!
Thanks Carl
Looking really good we'll done mate it's been hard work for youn
Great work. 👍👍😊
Very nice work.
Re the lock not on the top of your axle pivot , consider belts and braces by peening or use a punch to upset the thread a little so no chance of loose nuts in the future that could drop the pivot out. Nice video work as always.
Definitely look into a pintel hook. Nice work.
awsome work!
THANK YOU. KEEP UP THE GOOD WORK
You should use a pintle hook instead of the ball hitch, much safer towing on rough ground. Thanks for sharing. Charles
Well done!
Very enjoyable video !!! thank you
as soon as you put a load on the rear axel and the rear end gets strained, say a rock gets in front of the rear wheel, that will put an extreme load on the kingpin and it will fail at the bolster. that is why old wagons have axel hounds and the box is mounted to the bolster
Great series, I think you need a pin hitch on the Landy though or the hitch will pop off on any rough ground. Separate pin and ball rather than one where the ball is on top of the pin as those are iffy for ball towing.
Lovin your work
4 carriage bolts per plate are the old fallback with wagon making here in the US. Your solution seems a tad bit better. Gives some adjustment to the mounting with the nuts on both sides of the beam.
I am not sure if they ship internationally, but if they do, McMaster-Carr would likley have any hardware you might want.
that's brilliant idea! smart