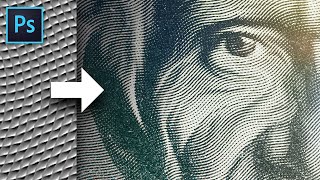
Photoshop: Create a Pencil DRAWING from a PHOTO

ฝัง
- เผยแพร่เมื่อ 21 ก.ย. 2024
- Photoshop CC 2022 tutorial showing how to transform a photo into the look of a gorgeous pencil drawing.
Paper texture: 1drv.ms/u/s!Ar...
Cross Hatch Scatter Brushes: 1drv.ms/u/s!Ar...
www.shuttersto...
Royalty-free stock photos provided by Shutterstock
ID #: 225455959 by Ysbrand Cosijn
Royalty-Free Music provided by www.beatsuite.com
High quality, copyright-free music for TH-cam.
Music track: "The West Field"
#photoshop, #Pencilsketch, #photoeffect
All of my Patrons and Channel Members receive VIP Early Access Passes to watch my new Photoshop tutorials one week before the public can see them! 😊💙
Join my Community of Patrons on Patreon!: www.patreon.co...
Become a Channel Member!: bit.ly/2J3fP8c
To become a Channel Member on IOS & other "unsupported devices": bit.ly/2OoJnwO
Support Blue Lightning TV on Patreon for as little as $2/month!
www.patreon.co...
Subscribe to Blue Lightning TV!: bit.ly/2WkFbkj
BLTV MERCH @ Redbubble: BLTV.redbubble.com
TeeSpring: teespring.com/...
Society6: society6.com/bltv
TH-cam Channel: / bluelightningtv
Website: bluelightningtv...
Facebook: / bluelightningtv
Facebook “Subscriber Page”: bit.ly/2WmWIbw
Instagram: / bluelightningtv
Tumblr: / bluelightningtv
Twitter: / bluelightningtv
Pinterest: / bluelightningtv
LinkedIn: / martygeller


One very easy thing to watch your tutorials is, I can always hit the like button before i start watching and you never failed me once, (cannot hit the Subscribe button because I have already done it long ago with bell icon turned on).........Marty, you are one hell of a guy........love your work......bless you.........keep on surprising us with your wonderful work.
I appreciate that! Thank you! 🙏
I am always amazed how simple steps add up to a complex result. I am also impressed that you figured this out, and then explained it simply so that even I can follow along. You are an excellent tutorial creator. THANKS! I look forward to future tutorials. (Plus I always remember to go back and look at past tutorials.)
Sir, may God bless you more, I learned about many techniques in photoshop because of your unselfish sharing of knowledge, my parents are happy that i can help them providing our family.Our viand today is adobo!!! much love from the republic of the Philippines!
Hello Marti, thanks for sharing your work. Staysafe and healthy.
This is great. I've seen quite a few different techniques for creating this look but most rely too heavily on the filters to do the work and end up looking far too unnatural, but not this one. Thanks Marty!
It blows my mind how any human can know fully what PS can do. I think I admire your ability to use it more than your ability to produce the art itself :)
Am loving this tutorial - Thanks Marty
Awesome! The kind of tutorials i love! Thank you! ❤
you have the best tutorials!
This is a wonderful video, Marty! There are so many actions out there to purchase, but none of them look as good as what you've demonstrated here. This is perfect for getting the image just right and can be customized to fit any subject. Thank you for sharing.
Glad you enjoyed it!
Marty, thank you so much for your easy to follow and understand tutorials. Appreciative Subscriber
This is GORGEOUS. Thank you!
excelente como siempre, muy buen efecto , gracias Blue Lightning Tv Photoshop... Saludos!
Thank you for the brushes and awesome tutorial Marty!
Thanks Marty, you Rock!
You are brilliant! Thanks for this amazing tutorial. You're an incredible human. This tutorial made my day. Good vibes your way!
You're so welcome!
hi,really impressed with this and the finished picture,Thank you for the brushes, loving this tutorial - Thanks Marty
Thank you very much Mr marty your tutorial every time be very helpful to me 🌺
I really wish you do tutorials about premiere pro and after effect.this is the best photoshop tutorials channel on youtube platform so far.keep up the good work.
This guy's voice reminds me of Bob Ross. So comforting and relaxing to listen to. "Let's add a happy little adjustment layer here..."
Been told many times! 😉
Thank you ,one word God bless you
Thank you for uploading this video.
really impressed with this and the finished picture
This is awesome, thank you for posting this!!
Thanks Marty!!!!!! Great work.
one of my fav yt channels thank you
Liked this. I added a bit of the original colour to mine, which worked well.
Your work is awesome, the pace of the voice over, really this encourage me to request to fill an empty area which is creating tutorials about designing posters, flyer , because all the tutorials without voice narration
Regards
thats an awesome tutorial im glad you made this video ....
This is absolutely excellent Marty. It took me a while to work out why I was doing what but once I got the hang of it I loved the technique. Best of all is being able to explore the different brushes, cahnging their sizes, etc., and not having to worry about mistakes on the layer masks since I can simply fill them with black and start again. Thanks so much!
Glad you like it! 👍
Great work😃Beautifully done👍
Best sketch technique! thanks sir. :)
absolutely amazing.
Incrediblie ! Many thanks !
Thanks, Marty!
Love it great look!
Fantastic sir
This is an update to the tutorial that BROUGHT me to BLTV!
Awesome!!!!
Great Video and you are doing great job love from india
Great Thanks!
Excellent sir
That is amazing! Thanks.
Thanks for this video.
Can I save the project as a template and change any photos?
Or is it necessary to redo it from the beginning every time with a new photo
Yes. At 2:49, I explain how to convert your photo into a Smart Object, which will allow you to replace the photo without having to redo the effect.
Awesome!
Excellent. .......
Amazing!
Ficou lindo, parece real.
Awesome....
very beautiful!....
Amazing..I wish you could do one with ps elements….
Thank you
I dont know if I can do this but im going to try to make one of my dad for my mom 🙏
I don't know if bltv or his students makes the editing.. But if it's him, then he's got a modern touch for all of his works, very amazing for such a senior man..
Thanks! I 'm a 1-man band.
@@BLTV_Photoshop thanks too. you're so cool Sir!
Thanks
Indeed a very good tutorial, I must say. But I have few queries: 1. If I want to change the pencil stroke colour, how is it possible? 2. Is it possible to convert those pencil strokes into pen stroke finish? Thamks for your useful tutorial.
1) You can change the pencil stroke color by applying a Hue/Saturation adjustment layer to the layers with the pencil strokes. 2) No.
Thank you Sir, for your reply. Then, I, like many of us, am to wait for another amazing tutorial on ink pen effect. Well, waiting ....😃@@BLTV_Photoshop
i love it and i wil do it
Excellent! Btw, who is narrator in this clip?
I always narrate my videos.
Super tutoriel.Merci pour le partage.
👍
This is just an amazing demonstaration of your abilities!
Thank you so much for all your videos so far...they have helped me a lot!
I have one question... can you make all this into an action for Photoshop?
Thank you again!
Sine each photo is different, creating a general action wouldn't work.
@@BLTV_Photoshop Thank you for your time sir!
Keep up the good work!
tyle lat pracuję z PS a ciągle mnie zaskakuje - super patent
Many steps>
Fantastico, grazie
Excelente trabajo amigo gracias
Question: It appears that you are using a tablet and/or stylus, what brand are using or do you recommend?
Wacom Intuos. estore.wacom.com/en-US/tablets.html
어떤 사정이신지는 몰라도 좀더 도와주심은 어떠하실련지요.
설명을 명확하게 해주시니 참고해봄에 많은 도움이 되네요...
브러쉬 링크도 해주심에 감사드립니다. ^(^
기꺼이 도와드리겠습니다. 또 어떤 상황을 말씀하시는 건가요?
@@BLTV_Photoshop
배우는 입장에서 볼때 설명을 편하게 하심에 쉽게 따라해볼수도 있는데 이 제목의 글도 2여년전에 올리신듯한데 더 많은 충분한 기교(실력)이 있으실듯해서
Blue Lightning TV Photoshop 선생께서 아시는 만큼 더 보여주실수 없을까해서였읍니다. 요즘 AI 시대라고도 하지만 그것은 대중적인것이고 제작자하고 똑같은 결과물을 얻을수 없고 또한 하나 하나 하다보니 성취감도 느끼곤핮지요. 감사합니다. ^(^
Please sir bring ONE topic on pen tool
How to make picture via pen tool.
th-cam.com/video/zmBIOvnQJZo/w-d-xo.html&t=
th-cam.com/video/yqi5x-CXj_U/w-d-xo.html&t=
good tutorial, but I kept the latest version without monthly payments of photoshop CS6 Extended, I don't know if I can do it with this version.
You should be able to do it with your version.
I cannot find the link to download the brushes and paper backgrounds. Where do I go to find these?
The links are located in the video's description which is below the title of the video. Click "Show More" and scroll down.
where's the link to the brushes and background? there's nothing in your description.
I just checked. The links are there. Click "Show More" and scroll down.
Can I do it in mobile phone?
Not exactly. helpx.adobe.com/photoshop/using/mobile-apps.html
I don’t see a link to download the images and the brushes. Can someone tell me where they are?
The links are located in my video's description which is below the title of the video. Click "Show More" and scroll down.
Or get a pencil and learn to draw, it's more rewarding and more fun👍👍👍👍
Thanks for the tip. 😉
it says no properties for me :(
I still can't understand what's the idea behind all those duplicated layers.
THE Brushes DONT WORK ANYMORE?
?
Didn't work good on my brown skinned subject AT ALL! Tried different blends and it just didn't look good.
You first have to adjust the tones of the image. Go to Image > Adjustments > Shadows/Highlights.
@@BLTV_Photoshop ok. I’ll give it a try. Get back to you. Thanks.
Thank you
Thank you
thank you