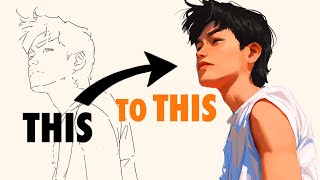
Portrait Rendering Tutorial

ฝัง
- เผยแพร่เมื่อ 26 มี.ค. 2022
- Interested in leveling up your art? Consider checking out my Patreon! I host weekly live workshops and post all my work including original character design sketches, illustrations, academic figure drawings, portraiture, and plenty of study guides!
/ christopheyoung
Olivia Ciarfella Reference Photo:
/ cw6tduylq4m
Brushes:
app.gumroad.com/christopheyoung
To see more of my work:
Instagram
/ christophe_young
ArtStation
www.artstation.com/christophe...


![แฟนแนวใด๋ - ยูริ โตเกียวมิวสิค [ SyncVersion ]](http://i.ytimg.com/vi/Fm8oDwos2uc/mqdefault.jpg)

![พาแม่บินครั้งแรก..เกือบวูบ! ให้เกาหลีเยียวยาใจ I Korea Ep.1 [Seoul] x อุงเอิง](http://i.ytimg.com/vi/waL3__dEQBU/mqdefault.jpg)

You see the whole process and then in the end you still think "how is this possible?" because the result looks like magic. Amazing work and thanks!
Art is a real form of magic imo. Spot on.
I still find it amazing when I myself do art and I’m like god this looks ugly and when I finish it looks decent and I’m like…. How the hell that happen?
@@Bororm gghhhhhhhhhjhhhjh6hhhhhj
@@Corruptedkiwi This has been my main take away from art in a life lesson sorta way. You start out on something and it looks like crap but you power through till it turns out ok. Hopefully lol
yes
I've ALWAYS hoped I'd find a video of someone just DOING what I thought I could never do. No cuts or skips or anything; just the entire process altogether. This is so helpful. Thank you!
MY NOTES (numbers do not correlate with one another)
Questions/ my own tid-bits:
1 How did you open the background menu to adjust the white background to grey?
2 what's your shortcut for making the brush bigger and smaller? (Comma and period keys! you answered it)
3 how do you pick your highlight color?
4 how can we practice identifying lighting angles? (I was totally wrong when you said the light was coming from the top down at an angle. I thought it was coming from bottom left heh)
5. what exactly did you do to the eye to make it "fixed" ??? because damn was that a good job. roughly before the 40 min mark.
6. HOW TO LIQUIFY! I will google it but was that super helpful omg you moved the whole nose lol. ((I use clip studio))
7 personally my skills cannot get me passed the 40 min mark (if I'm lucky) so my notes may be a tad off in terms of language used or just general understanding, so help me out if you can!
8 can you explain your layers and how exactly you are adding/merging and why particularly after the 50 min mark.
9 if you could critique your own piece what would you say? it looks 100% beautiful to me but I am curious if there are any "errors" or things you could do more.
10 similarly, how can you keep rendering forever? what exactly more would you add- this looks so nice as is. and how do you keep from mudding everything by the end?
11 this is a dumb question but can you see every stroke that you do? towards the end when you pulled out the orange ( 1:09:16) I could not see any strokes that you added but I know you was doing something and I know that it looked better after it!
Things to Remember:
1 Curves have softer shadow transitions while sharper contrasts have sharper shadows.
2. Cast shadows can have harder light (sunlight) as opposed to form shadows
3 small brush to make a hard edge and then make it bigger to get a nice "fade-out"
4 no need to make shadows super detailed. Eyes focus on lightness.
5 merge layers as you go
6 putting in saturated colors softly transitions (hair to forehead area) are more fluid.
7 highlight color looks almost like lighter skin color! (who knew! for some reason I didn't know that??)
8 LIQUIFY is a great tool to help move things after they've been placed.
9 each time we move a step further into the piece we allow ourselves to use a smaller brush than the last smallest size we used to add details.
10 adding some of the lighting from the background to the face is how we can show how the background affects our character.
11 everything has a purpose (adding shadow under the eye because some of the eyelashes can cast a shadow)
12 eyeball anatomy- the cornea is round. highlight on one side and major eye light on the other side)
13- rendering can apparently go on forever hahahaha
14- easier to de-saturate than saturate.
Order of things:
1 Line Sketch in orange/red
2 color in skin color
3 block in shadows and merge (pay attention to hard and light castings) 10:00
4 add the general red for color on cheeks/nose (24:50)
5 add darker and more saturated red to the sharp lines (nose, mouth, eyes, jaw line)
6 highlights! (32:20)
7 at 36:20 we have all basics down and are ready to move onto...
8 pulling out and pushing in certain places by manipulating light. (i.e. nose bridge highlight to make it look more "3D")
9 editing everything in general?
10 liquify tool to edit further.
11 fixing the ear to hair transitions
12 50:35 understanding the lighting of your piece further
13 adding the background blue to the portrait "glazing"
14 hair that surrounds the face
15 designing the final small detail shapes.
16 eyeball lighting/shapes/highlights
17 final liquify - checking relationships between features/angles/sizes
18- more rendering ? final checks!
14 toning things with saturated orange color to un-mud things and add that umph.
15 vibrance and saturation filter -- color balance -- other filters.
FINAL COMMENT:
I came into this video as someone who has been practicing clip studio for just over 2 years now and practicing art as a lifetime hobby. The piece is beautiful and to start I was very motivated. But..... quickly humbled! I am not sure I can achieve all that you have but I will keep trying and eventually I hope I can grow. (IG is MaieBearArt if you are curious *sweat ) Thanks for posting the video, and I hope my comments are able to help someone out there too.
I am an artist practicing drawing. and enough knowledge to answer any questions you may have.
1. How did you open the background menu to adjust the white background to gray?
= Shortcut Keys by pressing Ctrl + u and reducing the light intensity or
if it's clip studio, just double click on the paper, it can change the color as you want.
2.what's your shortcut for making the brush bigger and smaller?
= { }
3.how do you pick your highlight color?
= I don't know how to answer this one, sorry.
4.how can we practice identifying lighting angles?
= Sort my training to practice By using Blocking in > Core shadow Cast shadow > Shading Light and Shadow >Overcast Lighting > Portrait > Hair > Figure Shading.
5.what exactly did you do to the eye to make it "fixed"
= to be corrected The shape of the face looks more stable. If you're interested in proportion, check out Andrew Loomis' book or proko's TH-cam channel.
6.HOW TO LIQUIFY!
= photoshop click filter in the top bar and click on Liquitfy
= clip studio press J button and look at subtool [blend] there will be Liquify (if yours doesn't have it, you may need to press update clipstudio to the latest version)
7. (:w
8.explain your layers and how exactly you are adding/merging
=
0.Adding a normal layer shortcut key (ctrl + shift + n)
1. All merging into a single layer. (Ctrl+Shift+E)
2. Selecting only the layers that you want to be a single layer, click on
“Layer”, right click and then select “Merge Layer”
3. Combine layers into the same GROUP (Ctrl+G).
9. if you could critique your own piece what would you say?
= You try to study the reference of your favorite artist. or exercises that you want to practice using comparative pictures. and set a goal that you want to gradually practice step by step
10.how can you keep rendering
= You may need to group the tasks you do or the thinking process. Going step by step, for example starting with Drawing > Shading > Color, will help keep the work from getting too cluttered.
11. towards the end when you pulled out the orange ( 1:09:16)
= Increase image freshness by adding saturation using shortcut (ctrl+u)
(All answers are expected answers that Christophe Y would use this technique. There may be some correct answers or there may be other methods. I only answered the part that I knew. and compiling various vocabulary Maybe it's weird or wrong because I use google translate to help translate all of them. If there's a mistake, I'm sorry. Have fun drawing :> )
@@nack4097 Hello ! i have a question for the 2. How can i make those symbol, i press the keys to get: {
but the brush don't became bigger or shortes.... and i don' t understand why...
Sorry for my english
@@lucamaretti that you will increase or decrease You will need to use Brush before you can adjust the size. An example from a channel
(Photo Feaver)
th-cam.com/video/bMviu-aXO18/w-d-xo.html&ab_channel=PhotoFeaver
Or is there another way,
shortcut (Alt + Right Click + Drag Horizontally.)
1.In order to increase or decrease the size of your brush, you need to:
Click and hold the Alt key.
(On Mac, this would be the Ctrl and Alt keys),
2.Click and hold the right mouse button,
3.Then drag horizontally from left to right to increase, and from right to left to decrease the size.
Imo you shouldn't bother yourself with all these small questions/"tidbits" and focus on fundamentals if you want to improve.
@@nack4097 Thank you so much! I super appreciate it, I will review it all and put it to good use! Wow, this is a lot- thanks! Do you have an art insta? I would like to follow you :) you do know more than me after all hehe
Oh my god bro i literally yelled NO WAY! Thank you so much for posting this! I've been really lost about rendering portraits. Keep up the great work !
When I read this comment I laughed so hard because when I saw this in my recommends I went "No???" In a very confused and shocked way 😂😂
Hola buenas noches soy un hombre de la telenovela que me gusta mucho el trabajo que me ha pasado y que me ha dado un poco de tiempo para que me haga sentir que no soy un buen hombre para mi vida y que no lo quiera hacer nada en el mundo que no lo quiera hacer nada en el mundo que no lo quiera hacer nada en el mundo que no lo quiera hacer nada en el mundo que no se
Jesus loves you! Accept God’s gift of salvation and freedom from the eternal consequences of sin and death! Repent and be saved. Because everyone is a sinner fallen short of God’s glory, we all deserve just punishment for our sins. But God so loved the world, that He gave His one and only Son, so that whoever believes in Him may have eternal life! Instead of giving us what we deserve, God loved us so much to send Jesus (the Word of God become human) to take ALL of our sin and punishment into Himself, forever defeating sin and death for US! By living in Christ, we are forgiven, redeemed, have the gift of the Holy Spirit who comforts and helps us live holy lives, and have eternal life in heaven being reconciled with God our Father! God’s love for us is more high and long and wide and deep than we can comprehend, but I pray that you will understand and rest in the love of God and the riches of His grace in Christ Jesus. The Holy Spirit and the right of being adopted by Him as an heir of the Kingdom of Heaven is a beautiful gift and I plead that you accept it. Give up your life, take up your cross and follow Jesus! I love you, Jesus loves you!
It feels illegal watching these tutes without paying for them omg. Best teacher ever! Thankyou so much!
Your channel is a goldmine, thank you so much for doing this work!
agreed
Berserk is the best woo
well said bro
@@ahmedhussain9095 fuck yeah
I love how amazingly clean your entire workflow is, and how it remains aesthetically pleasing in every stage of the process.
i genuinely can't believe i can watch this for free... your content is wonderful, i sincerely appreciate all of the work and effort you put into your videos, as well as your decision to make your knowledge so accessible! 🙏
really thankful for explaining everything you do and the process as well. I'm really amazed by your works, they're gorgeous
Your commentary is SO HELPFUL! Thank you with all my heart, you‘re a hero for art babies! ❤
thank you for the fantastic in-depth tutorial. It's really hard finding good tutorials on this stuff for the digital medium, and I think your doing the best stuff out there.
I'll be returning to this video time and time again, you're incredible.
this is the video that I've been looking for my whole life! Step by step guide and detailed explaining are things that can't be found in a time-lapse speed painting tutorial. Thank you so much for making this video.
You truly have a natural talent for explain deep and complex subject about art and rendering. Keep it up, Chris !
Man, your channel is really exellent, I hope life rewards you for putting this professional content for free.
the brush size change for tapered lines is so useful! thanks for sharing something so in depth
You can't believe how much you're helping
I loved watching the whole process for this video. I usually don't watch all the way for long videos but I didn't want to miss any detail you explained. I am so glad I watched this whole thing because I know so much more about portraits now. I'm also very motivated to draw again thank you so much
I've been wanting to get back to painting but it had been difficult because I couldn't find a video process I would understand or appeal to me. Thank you so much for this comprehensive video it gives so much direction without being too strict about a lot of things. I can't wait to follow along when I have the time. Keep up the good work and I hope you have a great day!
Found this video right after dropping one of my portraits out of frustration, and now I have the knowledge and motivation to continue! Thank you, that was really helpful❤️
oh this is a godsend! i keep coming back to this video, it's such a help when you're stuck on a piece
Total beginner here and the steps you easily explain here helps me out a lot in finding my own process. Thanks!
Ok I had to sub, there really isn’t much videos in like a full rendering process so thank you so much. And I love the fact that u talk into it, that’s really great and very helpful
IT’S CRAZY HOW PERFECT THIS IS!
Best, most in depth tutorial I’ve seen, answered so many questions, thank you so much!!
Thank you so much for this video! Ive been really struggling with my depth of values, I tend to color block in the darkest and lightest, then smudge it to create value, but have been unhappy with it. This gives me a whole new way to think and change things up! Much appreciated!
Feel like I've just won the damn lottery. This is amazing. Best tutorial/walkthrough I've seen so far. Thank you for sharing every single step. Looking forward to more of your videos
Thank you for your labor. This is a very good detailed tutorial. I'm one of those people who need long, leisurely lectures to really understand the material. So this channel is a real treasure!
I'm not even an artist but I was very fascinated the whole time. Incredible video 👍
Not only the result is gorgeous, but the process is so interesting and useful. Thanks!
Such a beautiful piece! Thank you for the whole process!
I love you. Best teacher ever!
thank you, rendering was always hard for me. Especially detailing process because other youtubers always say, now add details etc, and you actually explained it. Love yaa
This is insane.. Thank you for the detailed explanation and walkthrough of the process.
Thank you for dropping this absolute gem exactly when I needed it. ❤️
Most helpful tutorial I watched in a very long time - thanks a lot, Christophe!
Thanks so much for this! Your tutorials are always packed with top quality info.
This was very helpful and I like that your design process is very simple. Some artists have a very complicated rendering method that makes it hard to follow or learn. Also appreciated your voiceover.
This is one of the few tutorials on youtube that actually helps a lot! I really appreciate that you explain in a relatively slow way. Thats really cool and helpful for me as a foreigner! I learned a lot today thanky to you! May god bless you
THIS CHANNEL IS ABSOLUTE GOLD
I've been struggling with face rendering and this was SO helpful, thank you!! I would also love to see your process for male faces.
So many great techniques! Thanks for sharing your process with us. Your explanations were very helpful.
Beautiful work! Really inspiring…
Wonderful. I'm gonna come back from time to time to this.
Man your videos have been a blessing. Thanks for sharing
Christophe, what an amazing tutorial. Well explained, simple and to the point. For a new comer like me this is invaluable. Thank you so much. Pedro, from portugal.
This is so beautiful and so marvelously explained. Thank you soo much!
Thanks for the helpful tutorial. It was worth the watch for the quick eyeball tutorial alone. As many times as I learn, that always escapes me in practice.
Best channel for art level ups!
Simply amazing. Thank you for sharing your process! Will try to find a way toincorporate this into my own style!
Finally I can this kind of art style 😭
Thank YoU VERY MUCH!!!
definitely the best skin rendering tutorial on youtube
This is gold! Thank you so much for sharing. Really insightful and helpful. Very glad I stumbled across your channel today 👍
I love the concept of tutorials
Dude, your channel has saved my aspiring artist broke ass! I'm serious, it's been sooo helpful, thank you so so so much!
Awesome tutorial! In-depth explaining of more settle aspects
Your stopping and explaining and still manage to do this in an hour. This would take me a whole day to do :(
Thank you CHristophe, you're a godsend!
i love watching you paint soo damn crisp.
This is such a wonderful tutorial, thank you so much for this
heroes dont wear capes, thank you so much for doing this!
Thank you!! keep uploading more videos we love how you explain
Im so happy i came across this YT channel. You have amazingly useful videos and very good at explaining as well
I love your genuine personality. A lot of the other tutorials I've encountered so far are made by people with overbearing comically large personalities which get too distracting.
Oh my goodness. This is worth the 1 hour watch for sure. Keep it up 😊
Thanks so much for sharing your knowledge! Would you do a tutorial on how to render characters in different lighting environments? Like indoor/outdoor. This was extremely useful!
You can check out the book written by James Gurney, and a light book for visual artist by Richard Yot
Last one would be how to render by Scott Robertson
@@pinkcheng8188 Tysm! Will be checking out all of your recommendations
Thanks fot taking the time to do this. We aprecciate it a lot!
I thought you wouldn’t upload another tutorial anymore, thank you so much
Yay another video, you can make the videos as long as you want i watch the whole video and try learn thanks for sharing :)
THANK YOU SO MUCH !!!! WISH EVERY GOOD THING HAPPEN IN YOUR LIFE AND YOUR WORK REALLY REALLY WONDERFUL !!!!!!
your channel is so coolll, thank you so much, Christophe
Really really helpful!! This is amazing!!! Hope u do more vids like this! Big thanks!!
você é muito bom nisso!! to passadaaaaa!! amei!!
你的每个教程对我的启发都非常大,可以说你是我的启蒙老师了。希望多出视屏,在我眼里你就是最好的老师。
thank you for the video and thank you again for show the all process.
Pls give more tutorials like thiss, this is soooo helpful :D
Hey Christophe, thank you for this amazing tutorial gonna buy your brush sets to show some support ;) Maybe a video about brushes and how you use them would be nice for some future tutorials. Thanks one more time! Amazing work!
Oh how long I was waiting for new content ! Thanks for sharing :)
Free valuable art lesson! Thank you so much!
the sound of the pen against the drawing tablet is sooo relaxing
Shadow mapping is such a good idea!
23:30 - very valuable information. I usually make a delicate gray on the lower part of women's faces, but I explain it to myself by the reflection of sky light from the ground, clothes (if dark or cool), etc. also from observation - in lower part of my own face there is always a cooler shade
Here are a few notes for myself, but feel free to add on
1. Pick a good reference photo, high resolution to see the fine details, like shadows around the lips.
2. A reference with clear lighting is important, I picked one that had a very soft diffuse lighting over the whole thing and the lack of clear shadows made this process difficult.
3. Do not go into detail too quickly, large details into small, soft into hard. and hard edges into soft edges with the brush size.
4.Find graphic reads, and don't be afraid to stylize.
Ok so i've had issues with note #1 & 2. So many people say these points, but i ask myself, what if i want to choose a reference that has bad lighting? Is it never recommended at all? Or are those notes supposed to be just for learning portrait rendering.
@@anaversary- for me those notes are just for learning. Picking a reference with soft/unclear lighting simply makes it more difficult. It is a good idea to start out with well lit reference and then work your way towards less traditional lighting arrangements.
@@jackneblung8287 Thank you Jack. That's what I was thinking. It's like playing guitar, don't start with crazy riffs and instead play songs with simple chords to get used to the feel of the guitar. I assume when people said don't choose references with bad lightning I thought they meant always. Even 30 years into your art journey. But it's just for learning :)
@@anaversary- Yep! I wrote it down because when I was following along I chose a picture with bad lighting and It made things difficult, but I still think it came out nice!
@@jackneblung8287 that's good. Notes are so important
Great video. Super informative and easy to follow!
This tutorial was very helpful! Thank you so much and keep going!
Great artist and great person ❤
Thank you. May need to rewatch.
I always waiting ur video Chris!!! All of ur video really helps me for drawing, especially drawing women, girls, that's really hard for me 😂😂😂
Thank you so much for the video ❤️ 💖
thanks for posting your amazing totorials bro
gracias por el tutorial! aun estoy aprendiendo ingles, pero me gusto mucho el proceso que se muestra en el video.
so so helpful, thanks
just amazing! thanks for sharing 🙏
Amazing work.
OMG i love all your videos 😍
Yaaayyy ur back!
im definitely going to study this many times.
thank you ,You are very proficient with brush size,direction and effect.very helpful
Amazing work! it helps a lot,thank you so much.
This is awesome! Thank you! 🙏