Thank you for taking the time to put this video together! You did a great job and was very easy to follow along. Also really appreciate putting together the parts listing / links. Many thanks again👍
No problem 👍 Let me know if you have any questions. I've upped the element wires to 12 gauge due to the 14 gauge wires burning up where the terminals are crimped on. I also used a hydraulic crimp tool for the terminals and it has been great ever since. I run the oven for hours at a time multiple days a week so it's getting a lot more than "hobby" use.
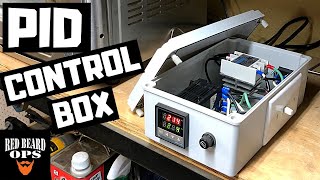
I'd recommend a PC fan and vent inside the control box. Pull air through a filtered vent (fan blows from inside to outside). May want to look into using a Contactor/Relay. And don't forget the thermal paste between the heatsink and the SSR block. Have a couple of SSR's in your back-up parts. They can fail. The Inkbird PIDs work and they're cheap. But I use my oven every other month and have gone through 3 of those PIDs in a year. I switched to a Love Controls brand and it's been working fine for 2+ years.
Strange that yours have gone bad. I use my oven 2-3 times a week for around 6 hours at a time and I’m still using the original SSR and PID. Only issues I’ve had were with the wires going to the element so I’ve upped them to 12ga and used a hydraulic crimp tool for the terminals.
I'm running a BlueM model DC-336C oven cabinet with my own controls, rated for 650'F. It's 240v 1ph with 1 SSR, 1 coil and a blower. I got the cabinet with the controls in disarray for like $150. Then $50 of electronics later I was running. I've got a monster heatsink on this SSR. I added the fan and the LOVE controls and it runs like a timepiece. You may want to look at adding a second PID/TC for overtemp protection too. @@LucidAutowerks
@@LucidAutowerks Are the element wires the only wire upgrade in the box? Did you change your blue crimp connectors to yellow when you switched to 12ga wire?
Thanks! Let me know if you have any questions. I run it all day a few times a week and it’s been working great so far. I just wish I made it a little bigger.
On the Barly and Hops video "240 volt pid wiring", George ran 1 SSR 40 DA and said it could power 2- 20 amp elements. I noticed you ran 2 SSRs 40 DA one for each element. Do you think it is better to run one bigger SSR like a 50 DA or 2 - 40s like you did? I have two 3600W elements, load draws for each should be (3600 divided by 240) 15 amps. Thank you!
Could you recommend a different fuse holder? That particular one is no longer available. Dont want to buy the wrong one. Thanks for the awesome video, this will help me complete my wiring!
Is the outside metal hot to touch, when on working temp.? And how bad is the smell. I want to make one to use in the back of the house. Will the neighbors complain?
The outside gets pretty warm, but I can hold my hand on it no problem. It smells a little bit but mine is in a garage so I’d imagine that outside you wouldn’t notice it. It’s only when I bake a lot of large parts I’ll get a puff of smoke when I open the oven to take the parts out. I’m guessing that’s where the smell comes from. If I’m baking a bunch of small parts it’s not as smoky. I also run it for hours at a time and coat a ton of parts in a day so with lighter use you might have different results.
Oke, so normal spraypaint/cans make more smell than powder coating? And how much space should you have extra on the sides in the oven next to the biggest object? It will mainly be tubulair frames. @LucidAutowerks
Great set up! Literally copied this for my setup, however, when running one element (just wired one) itll heat up for a minute or so and then trip the breaker....any suggestions? Thank you!
So it’s tripping the breaker on the circuit that the oven is plugged into? That sounds like the wiring from the breaker to the oven is undersized somewhere. Check for any wires getting hot to start out with.
@@LucidAutowerks correct. The incoming power is 10 gauge and every wire inside the control box is 14 gauge. I'll have to see if something is getting hot.
@@LucidAutowerks I think I figured it out.....I don't have the same switch and mine is rated for 10amps....one element is rated at 10.7amps so that would cause the trip
Thanks for the video! What power cord are you using for two elements? Is your power source 240? Also what size breaker are you using for your main home breaker panel 30 or 50 amp?
It’s a 10 gauge 3 conductor equipment wire. They used to carry it at Home Depot but locally they only seem to have 4 conductor nowadays. I had an electrician buddy get me some from a supply house. It’s a 240v 30a outlet. I actually sized the outlet wiring for 50a and used a NEMA 6-50 receptacle but it has a 30a breaker at the moment. I did that so I can swap in a 50a breaker and use it for my welder if need be. I’m no electrician so take my advice with a grain of salt. My electrician buddy suggested it when I said that I wanted the option of running a welder off that outlet in the future.
I think if you run it with a neutral you’d be able to use 120v components by using one hot, the neutral and the ground. I didn’t have a need for that but if you wanted a light or a fan it would be an option. You can also buy four conductor cord by the foot and then cut back the extra wire and not use it.
Have you had a chance for the second heating element to work where both are on?... Great explanation. Are you using a 2 20 amp breaker or a 50amp from your breaker panel?
Thank you! I haven’t found the need for the second element. Maybe if I was doing bigger things like wheels it would make a difference but with small parts and thin 14ga signs the finishes have been coming out great. I only wish that I made it bigger. I’m already planning on building a bigger oven as soon as I finish my spray booth. I used a 30a 240v breaker since the elements were a total of 27a combined. I actually wired the circuit for 50a and used a 50a plug but put in a 30a breaker. If I need to use my 240v welder in that room I can pop out the 30a breaker and swap in a 50a. This was suggested to me by me electrician friend. Hope that helps.
@@skylarmcgregor2452 you can just cut the extra wire short and not use it. I had to do that with my wife’s industrial heat press when I replaced the cord since Home Depot only carries 10ga equipment cord in 4 conductor nowadays.
I tried doing that with the white natural wire. But was only getting 120v to elements, wasnt even kicking them on. Only other thing I think it might be is the switch im using.
Yup, dialed in. I run it all day a few times a week. No fan needed with this size oven. I did have the element wire break right at the connector a couple times but I see that happen sometimes in the powder coat groups. I upgraded the high temp wire to 12ga and used a hydraulic crimp tool and so far so good. My only regret is not going a little larger with it.
@@gregcelaya955 I didn’t end up doing that only because I had buried mine so far into the back wall it will be tough to change it out. I did get some good PID settings from a viewer and while the short one does have a bit of a delay when opening and closing the door, with the new settings it doesn’t vary the temp as wildly while trying to hit the set temperature. Once the door is closed for a couple minutes it does a really good job just staying at the programmed temp without having to overshoot like it used to.
I believe you can run all four off one PID but you’ll need larger fuses, a larger breaker and a heavier power wire. Add up the total amps of the 4 elements and get components that are rated for that amperage.
Pretty much. One side of the element is always seeing voltage and the other side gets its voltage from the output of the SSR. The PID tells the SSR when to turn on and off based on the temperature reading that the PID sees from the thermocouple.
So I'm not sure how your oven has been running, but that one leg is constantly trying to turn your elements on. I'd be surprised if you aren't blowing fuses. Long story short to do this correctly, you should be running on leg of power through the ssr, then the other leg of power through the other ssr. So since you have to hots on 240v. You run line 1 to ssr 1, and line 2 to ssr 2. Then you run line 1 to one side of each element, and line 2 to the other side of each element. This way one side isn't constantly energized and under load trying to turn on your elements with no where near enough power to do so. Almost every single build on these controllers I see guys doing the same exact thing. Either way, that's the proper way to run these elements.
Are you sure it was done the exact same way? I’ve had mine running for over a year problem free. I also know a few other people that have used my video and have working ovens. Otherwise it may be an issue with your PID itself.
Sure you could do that but I like to have an extra layer of power options. The box should be located somewhere nearby though just in case like mine is. My switch only shuts off the PID so if there is a problem somewhere on the hot side I'd have to shut it down at the breaker. If it were in another room I probably would have wired in an industrial style switch that attaches to the wall and breaks the connection.
I would use 3, but I’ve heard of people using two elements per SSR. You’ll also need a fuse holder with a higher rating. You may have better lucking finding a DIN mounted fuse holder with a higher rating. If you check out my newest video I use on in my VFD control box.
I think you can as long as the elements consume a lower amount of amps than the SSRs are rated for. It’s pretty cheap to add the second SSR but it does mean you need a larger control box.
The switch that I used is - www.newark.com/eaton/7576k2/switch-toggle-spst-30a-250v/dp/11M1796?ost=11m1796 Everything is linked in the description but I forgot to include the switch so I just added it to the list.
The ground comes in from the receptacle and the control box is grounded in the top left corner with the green wire. Then I ran an additional wire from that location through the conduit and into the box where the element mounts. Since all of the conduit is metal, theoretically that would make the whole conduit system grounded as well since it’s all metal and all connected together.
@@ZwithTheCutlass the elements aren’t grounded. Just 2 hot wires. The oven is supplied with 240v so one of each 120v wires goes to each side of the element. Those little red and black junction strips are each powered with one leg of the circuit (120v each)
The ground is there incase a wire comes loose and touches something metal. Rather than energize the metal parts (which would shock you if touched) it would be a dead short and the circuit breaker would trip.
I don’t understand, you have like a 6awg wire going in and using 14awg in the board going to your elements. The average oven element is 16 to 30 amps running threw the wire. How the heck is it not getting hot.
Internally I used the wire that came in the oven. I figure if it worked for the parts oven it would work for my powder coat oven. IIRC it’s all 14ga including the main power wire from the oven to the outlet. The two elements combined total around 27a but I ended up only using the broiler element. Control box all stays cool. I did just have a connection at the element burn up but it seems kinda common by posts I’ve seen in the powder coat fb group. I bought 12ga high temp wire and spade terminals to redo it with after talking to my electrician friend. He said that it might just end up being a failure point because of resistance at the crimp. I have the oven running 6-8 hours straight a couple times a week and it’s been great other than that one terminal burning up.
Okay that makes sense, I’m working on one at the moment, is there a way I can talk to you directly and show you what I have , I bought everything from your video


Thank you for taking the time to put this video together! You did a great job and was very easy to follow along. Also really appreciate putting together the parts listing / links. Many thanks again👍
No problem and thank you!
thanks for the parts list man, I really do appreciate it and the very depth video!!!!!
No problem 👍 Let me know if you have any questions. I've upped the element wires to 12 gauge due to the 14 gauge wires burning up where the terminals are crimped on. I also used a hydraulic crimp tool for the terminals and it has been great ever since. I run the oven for hours at a time multiple days a week so it's getting a lot more than "hobby" use.
I'd recommend a PC fan and vent inside the control box. Pull air through a filtered vent (fan blows from inside to outside).
May want to look into using a Contactor/Relay.
And don't forget the thermal paste between the heatsink and the SSR block.
Have a couple of SSR's in your back-up parts. They can fail.
The Inkbird PIDs work and they're cheap. But I use my oven every other month and have gone through 3 of those PIDs in a year. I switched to a Love Controls brand and it's been working fine for 2+ years.
Strange that yours have gone bad. I use my oven 2-3 times a week for around 6 hours at a time and I’m still using the original SSR and PID. Only issues I’ve had were with the wires going to the element so I’ve upped them to 12ga and used a hydraulic crimp tool for the terminals.
I'm running a BlueM model DC-336C oven cabinet with my own controls, rated for 650'F. It's 240v 1ph with 1 SSR, 1 coil and a blower. I got the cabinet with the controls in disarray for like $150. Then $50 of electronics later I was running. I've got a monster heatsink on this SSR. I added the fan and the LOVE controls and it runs like a timepiece.
You may want to look at adding a second PID/TC for overtemp protection too.
@@LucidAutowerks
@@LucidAutowerks Are the element wires the only wire upgrade in the box?
Did you change your blue crimp connectors to yellow when you switched to 12ga wire?
Great explanation. Everyone else just glosses over it, I really appreciate it,
Thanks! Let me know if you have any questions. I run it all day a few times a week and it’s been working great so far. I just wish I made it a little bigger.
@@LucidAutowerks I surely will. I will take your advice and make mine slightly larger.
By far the most descriptive I've seen yet well done!
Thanks! I appreciate it.
Excellent description on electrical setup. Will be useful for my double oven build to convert over to a PID setup. Thanks.😀
Nailed this build! Working on mine currently, thanks for sharing!
Thank you and thanks for watching!
I got a double pole single throw switch at Lowe's.
On the Barly and Hops video "240 volt pid wiring", George ran 1 SSR 40 DA and said it could power 2- 20 amp elements.
I noticed you ran 2 SSRs 40 DA one for each element. Do you think it is better to run one bigger SSR like a 50 DA or 2 - 40s like you did?
I have two 3600W elements, load draws for each should be (3600 divided by 240) 15 amps.
Thank you!
nice work
Thanks for the upgrade for the tire changer. I ordered one and was wondering what kind of time were we looking at for shipping. Thanks.
I just sent you an email.
Perfect you answered my questions go to make my own
My head started to hurt untill I realized the one side of the relay was DC ..thank you soo much ! Great video
Could you recommend a different fuse holder? That particular one is no longer available. Dont want to buy the wrong one. Thanks for the awesome video, this will help me complete my wiring!
Thanks for watching! This one should be the same fit according to the description - amzn.to/3BBXtEM
@@LucidAutowerks right on! appreciate the response. I just ordered everything up, i'll be following this guide. thanks!
Is the outside metal hot to touch, when on working temp.?
And how bad is the smell. I want to make one to use in the back of the house. Will the neighbors complain?
The outside gets pretty warm, but I can hold my hand on it no problem. It smells a little bit but mine is in a garage so I’d imagine that outside you wouldn’t notice it. It’s only when I bake a lot of large parts I’ll get a puff of smoke when I open the oven to take the parts out. I’m guessing that’s where the smell comes from. If I’m baking a bunch of small parts it’s not as smoky. I also run it for hours at a time and coat a ton of parts in a day so with lighter use you might have different results.
Oke, so normal spraypaint/cans make more smell than powder coating?
And how much space should you have extra on the sides in the oven next to the biggest object? It will mainly be tubulair frames. @LucidAutowerks
what exactly do i need to upgrade from the list that you left on the description to make it into a 40amp i wanna run 3x 2600 watts elements
Great set up! Literally copied this for my setup, however, when running one element (just wired one) itll heat up for a minute or so and then trip the breaker....any suggestions? Thank you!
So it’s tripping the breaker on the circuit that the oven is plugged into? That sounds like the wiring from the breaker to the oven is undersized somewhere. Check for any wires getting hot to start out with.
@@LucidAutowerks correct. The incoming power is 10 gauge and every wire inside the control box is 14 gauge. I'll have to see if something is getting hot.
@@LucidAutowerks I think I figured it out.....I don't have the same switch and mine is rated for 10amps....one element is rated at 10.7amps so that would cause the trip
Use a 220 breaker 30 amp for your main switch
The sub panel is right next to the oven so I turn the breaker on and off when turning the oven on and off.
How many watts have the resistors?
Good video but , I think you forget a little detail like install 2 switches that way u can control each element separate
I planned on only having both elements run at the same time. It’s actually been doing great with only the one element though.
Thanks for the video! What power cord are you using for two elements? Is your power source 240? Also what size breaker are you using for your main home breaker panel 30 or 50 amp?
It’s a 10 gauge 3 conductor equipment wire. They used to carry it at Home Depot but locally they only seem to have 4 conductor nowadays. I had an electrician buddy get me some from a supply house. It’s a 240v 30a outlet. I actually sized the outlet wiring for 50a and used a NEMA 6-50 receptacle but it has a 30a breaker at the moment. I did that so I can swap in a 50a breaker and use it for my welder if need be. I’m no electrician so take my advice with a grain of salt. My electrician buddy suggested it when I said that I wanted the option of running a welder off that outlet in the future.
@@LucidAutowerks Awesome thanks currently building mine now, Do you think I could use a 4 wire heavy duty range cord?
With a neutral wire.
I think if you run it with a neutral you’d be able to use 120v components by using one hot, the neutral and the ground. I didn’t have a need for that but if you wanted a light or a fan it would be an option. You can also buy four conductor cord by the foot and then cut back the extra wire and not use it.
Have you had a chance for the second heating element to work where both are on?... Great explanation. Are you using a 2 20 amp breaker or a 50amp from your breaker panel?
Thank you! I haven’t found the need for the second element. Maybe if I was doing bigger things like wheels it would make a difference but with small parts and thin 14ga signs the finishes have been coming out great. I only wish that I made it bigger. I’m already planning on building a bigger oven as soon as I finish my spray booth. I used a 30a 240v breaker since the elements were a total of 27a combined. I actually wired the circuit for 50a and used a 50a plug but put in a 30a breaker. If I need to use my 240v welder in that room I can pop out the 30a breaker and swap in a 50a. This was suggested to me by me electrician friend. Hope that helps.
How did you run the main power wires. I have a 4 cord plug set up. Been trying to see how you ran yours but can't see them.
Mine is a three wire cord. One hot leg to each junction block and the ground went to the ground screw in the metal enclosure
Thats where I am having my issue I have a 4 cord set up.
Have pretty much same setup exact
@@skylarmcgregor2452 you can just cut the extra wire short and not use it. I had to do that with my wife’s industrial heat press when I replaced the cord since Home Depot only carries 10ga equipment cord in 4 conductor nowadays.
I tried doing that with the white natural wire. But was only getting 120v to elements, wasnt even kicking them on. Only other thing I think it might be is the switch im using.
Is the sheet metal galvanized?
Yes
Were u able to to get this dialed in or did you have to add a fan?
Yup, dialed in. I run it all day a few times a week. No fan needed with this size oven. I did have the element wire break right at the connector a couple times but I see that happen sometimes in the powder coat groups. I upgraded the high temp wire to 12ga and used a hydraulic crimp tool and so far so good. My only regret is not going a little larger with it.
@@LucidAutowerks thanks, appreciate it
Question - in the video u mentioned that you are going to switch to the long thermocouple - where and how did you mount it?
@@gregcelaya955 I didn’t end up doing that only because I had buried mine so far into the back wall it will be tough to change it out. I did get some good PID settings from a viewer and while the short one does have a bit of a delay when opening and closing the door, with the new settings it doesn’t vary the temp as wildly while trying to hit the set temperature. Once the door is closed for a couple minutes it does a really good job just staying at the programmed temp without having to overshoot like it used to.
can I run 4 heating elements with 1 pid box and 4 ssr? or do I need to controllers with two SSR on each
I believe you can run all four off one PID but you’ll need larger fuses, a larger breaker and a heavier power wire. Add up the total amps of the 4 elements and get components that are rated for that amperage.
hello, why put two contactors? one for each resistor, I put 4 resistors, you think it will not be good thank you in advance.
It depends on the amp draw from the heating elements. With too much load on one single SSR you can run the risk of damaging it.
Did you run one 120v wire to heating element (constant) and the other 120v wire through your pid controller
Pretty much. One side of the element is always seeing voltage and the other side gets its voltage from the output of the SSR. The PID tells the SSR when to turn on and off based on the temperature reading that the PID sees from the thermocouple.
Thanks, I’ll have to check that out. This project already pushed the limits of what I know about AC wiring but I’m always up for learning more.
So I'm not sure how your oven has been running, but that one leg is constantly trying to turn your elements on. I'd be surprised if you aren't blowing fuses. Long story short to do this correctly, you should be running on leg of power through the ssr, then the other leg of power through the other ssr. So since you have to hots on 240v. You run line 1 to ssr 1, and line 2 to ssr 2. Then you run line 1 to one side of each element, and line 2 to the other side of each element. This way one side isn't constantly energized and under load trying to turn on your elements with no where near enough power to do so. Almost every single build on these controllers I see guys doing the same exact thing. Either way, that's the proper way to run these elements.
What size fuses did you use? It looks like they say 32a in the video but the link leads to 2a. Thanks
Yeah they were 32a 10x38 fast blow fuses. Looks like they're out of stock on Amazon. I'll see if I can find another source.
Closest I can find is this amzn.to/3KtMvG9 Looks like the Zephyr are out of stock everywhere except straight from China on ebay
@@LucidAutowerks Right on, thanks!
Hi so I mounted all my electrical just like ur when I turned it on the pdi blew up
Are you sure it was done the exact same way? I’ve had mine running for over a year problem free. I also know a few other people that have used my video and have working ovens. Otherwise it may be an issue with your PID itself.
where did you place the thermal coupler?
On the back wall about 6” down and 6” from the left side wall.
Can you eliminate the switch and just kill power at the box/unplug it?
Sure you could do that but I like to have an extra layer of power options. The box should be located somewhere nearby though just in case like mine is. My switch only shuts off the PID so if there is a problem somewhere on the hot side I'd have to shut it down at the breaker. If it were in another room I probably would have wired in an industrial style switch that attaches to the wall and breaks the connection.
@@LucidAutowerks Did you ever find a better switch? I know you said the lil toggle switch could fail
Why didn't you just use the control panel from the oven?
Size and a PID with SSRs is super inexpensive.
If I’m using 3 elements do I need 3 ssr?
I would use 3, but I’ve heard of people using two elements per SSR. You’ll also need a fuse holder with a higher rating. You may have better lucking finding a DIN mounted fuse holder with a higher rating. If you check out my newest video I use on in my VFD control box.
Where is the link on the p.i.d. programing
It’s at the bottom of the video description. You need to click “more” under the video title.
Thank you! Excellent video
Hey bro, can I use 2 heating element at 1ssr? Tnx
I think you can as long as the elements consume a lower amount of amps than the SSRs are rated for. It’s pretty cheap to add the second SSR but it does mean you need a larger control box.
@@LucidAutowerks tnx bro. Appreciated
What switch did you use
The switch that I used is - www.newark.com/eaton/7576k2/switch-toggle-spst-30a-250v/dp/11M1796?ost=11m1796
Everything is linked in the description but I forgot to include the switch so I just added it to the list.
Where did you get that panel? Link to it?
Links to all of the parts I used are in the description.
@@LucidAutowerks sorry I had check that out before making the comment but I didn’t see the “more” drop down button
No apologies needed. Let me know if you have any questions during the build. I actually enjoyed the wiring part of it.
The only thing I don’t understand is how your ground connected.
The ground comes in from the receptacle and the control box is grounded in the top left corner with the green wire. Then I ran an additional wire from that location through the conduit and into the box where the element mounts. Since all of the conduit is metal, theoretically that would make the whole conduit system grounded as well since it’s all metal and all connected together.
@@LucidAutowerks so the elements are getting the ground from the metal box to complete the circuit?
@@ZwithTheCutlass the elements aren’t grounded. Just 2 hot wires. The oven is supplied with 240v so one of each 120v wires goes to each side of the element. Those little red and black junction strips are each powered with one leg of the circuit (120v each)
The ground is there incase a wire comes loose and touches something metal. Rather than energize the metal parts (which would shock you if touched) it would be a dead short and the circuit breaker would trip.
@@LucidAutowerks got it. Man I appreciate this video. Very detailed. I’m building it as we speak!!
I don’t understand, you have like a 6awg wire going in and using 14awg in the board going to your elements. The average oven element is 16 to 30 amps running threw the wire. How the heck is it not getting hot.
Internally I used the wire that came in the oven. I figure if it worked for the parts oven it would work for my powder coat oven. IIRC it’s all 14ga including the main power wire from the oven to the outlet. The two elements combined total around 27a but I ended up only using the broiler element. Control box all stays cool. I did just have a connection at the element burn up but it seems kinda common by posts I’ve seen in the powder coat fb group. I bought 12ga high temp wire and spade terminals to redo it with after talking to my electrician friend. He said that it might just end up being a failure point because of resistance at the crimp. I have the oven running 6-8 hours straight a couple times a week and it’s been great other than that one terminal burning up.
Okay that makes sense, I’m working on one at the moment, is there a way I can talk to you directly and show you what I have , I bought everything from your video
@@Gregsadventure yeah shoot me an email at lucidautowerks@gmail.com. Happy to help 👍🏼
Awesome , sent you a email
120 volts for power?
240v.
@@LucidAutowerks Thanks man I appreciate it. Ordered everything the other day.
Zachery Virgilio awesome! Let me know if you have any questions.
I have a question..I see that 240v are needed but how did u achieve that with a regular house socket..thank you so much
Just finished mine I appreciate you man
👍🇦🇿
Would you consider building me a box like that?