It’s the same, but when I eyeballed the scrap pieces and added in my cross supports, it wasn’t long enough to get the full pass needed, so I just attached 2 new cross braces further apart, and removed the originals. I explained it in my full video. The point of this short was to show the idea of this jig, and how basic it is. 👍🏻
@@brewbuildsYou get a C- for effort. If you are not going to make the effort to make video properly, then don't make the video. It's embarrassing or maybe not for you.
@@really2345bro what? Are you talking about the small continuity error? Can you not just take the concepts used here and apply them to whatever application needed?
There’s always those people in the comments on these videos. 😂 just be happy you have the ability to comprehend the bigger picture, unlike some of the others. 😂👊🏻
@@donalexander4113 so when I setup my jig on the scrap piece of mdf, I eyeballed how far apart I thought the cross slots needed to be. They ended up being slightly to close together which wouldn’t allow my router to travel across the entire surface of my work piece do to the diameter of the router base. All I did was flip my jig over nailed on two more cross slats then removed the original to maintain the proper jig cutting width. It’s the same jig I started with just had to give my self a little wider travel distance for my router to cut across the entire work piece. The concept is the exact same, I just miss judged the width I needed because I was working with scrap lumber. Hope that makes sense.
Mdf is the worst! At least mdf is more true to size, this trick is perfect for plywood do to it being slightly undersized from its listed dimensions. 👍🏻
Absolutely, but sometimes you just have to improvise and come up with something easy and quick to get your through at a time of need. This was a part of a larger project, and I thought I would share an easy/cheap solution that I used.
@miltoncastro935 you’re more than welcome to email a pic, the best advise I could probably give though is just spending the extra time up on a jig that matches the exact dimensions you need. The router-ing out is the easy part. A well thought out jig can make the most inexperienced user look like a super star. 👌🏻 do you have anything that’s a known 3.5” you could use to set your jig up?
@@miltoncastro935 I would rip a piece of scrap wood on your table saw to the exact width you need then use the same jig layout as I showed and you should be solid then. 👍🏻
I would be a little more precise on squaring the initial 4 pieces, and paralleling each pair. There is a difference between a true parallelogram and just a quadrilateral, if you want precision fits.
Through my experience I’ve found that in some instances simplifying a task and removing unnecessary steps helps reduce the chance for error. Sometimes that can be math or excessive measurements. The simple mechanics of this jig does that by giving the user an accurate parallelogram to use as a guide. No math or measuring, simple assemble, and with scraps most people have laying around. A solution anyone could use. Most hobbyists woodworkers aren’t working in a Machinist’s environment or with their tight of tolerances. For a set of cabinets I don’t know how much time you would really want to invest in getting this joint to fit any better, or what the net gain would be by investing that time. At the end of the day the joint fit super nice it was to spec of my design. All said and done my goal is to give others inspiration, and solutions to a task they might already know how to do. Thanks for your comment. 👊🏻
@@brewbuilds Understood. I was pointing out an error potential. If for instance the 2 short pieces aren't parallel, by a couple degrees, then the two long's will not stay parallel when they are closed up to the desired width. That it fit well for you is a testament to your skill in eyeballing the initial positioning. Many will find difficultly in eyeballing it as accurately, and will likely find their tenon piece loose at one end, thinking they copied you but were unaware of the geometry being a harsh mistress. I didn't mention it before, but the simple jig is very clever, and great, and you did a really good job. 👍👍
@@johnrap7203 I truly appreciate your comment, and there are no hard feelings.👍🏻 The one thing I want to point out is by clamping the two guide rails to the material is establishing the to important parallel rails and at the proper width. I’ve found this to be way more accurate than trying to measure for that, and think it’s easier for someone to I guess eyeball to achieve those results. If his jig wasn’t a one time use item I would have taking the time to make it adjustable with hardware to use it on different thickness material and multiple times.
The jig it self is plywood, I used it on mdf. I did make it for a one time use for the project I was working on at the time. It could easily be modified for multiple uses.👍🏻
Why don’t you just clamp the two long pieces to a known thickness board, then nail the short cross members.. jig shown being made is not the jig used in final shot
Will you be making a separate frame for each other slot? Because this one is only for this specific width. In my opinion, it is much more universal to make an adjustable frame to the width of the cut channel. There are plenty of examples out there on how to do this. Also, using nails to create a jig doesn't give you dimensional stability.
This was just a quick jig made from scraps to get me through the 2 specific dado’s on this project. Spending more time on a nicer one that’s adjustable and to be able to use on multiple projects would be very handy. This was a late evening and I needed to make these cuts. For long term use using brad nails isn’t ideal, but for the 2 dados I needed it for it worked just fine. 👍🏻
@brewbuilds OK. It's important that you know what you're doing. And this is valuable today ;) I've been using an adjustable bezel for years and it saves me a lot of time. And the fact that it is one of the easiest methods to make cool connections. Regards


That’s genius, I’m definitely going to remember this for future projects!
It’s quick, easy, and very accurate! 🤘🏻
One of the best & short tips I've seen since the youtube came about🤝🏼🥃
Heck ya! 🤘🏻 It works so well! 👊🏻
This is amazing can’t wait to use this !
It works really well! 👌🏻
That looked like a different jig than what you just made
It’s the same, but when I eyeballed the scrap pieces and added in my cross supports, it wasn’t long enough to get the full pass needed, so I just attached 2 new cross braces further apart, and removed the originals. I explained it in my full video. The point of this short was to show the idea of this jig, and how basic it is. 👍🏻
@@brewbuildsYou get a C- for effort. If you are not going to make the effort to make video properly, then don't make the video. It's embarrassing or maybe not for you.
@@really2345 I don’t even know what you’re talking about. 🤷🏻♂️
@@really2345bro what? Are you talking about the small continuity error? Can you not just take the concepts used here and apply them to whatever application needed?
There’s always those people in the comments on these videos. 😂 just be happy you have the ability to comprehend the bigger picture, unlike some of the others. 😂👊🏻
This is THE BEST!!
Thanks Matt 🤘🏻
This is fantastic!
Holy crap I’m using this method! Genius!
Thank you!
Brilliant
I love this. Genius… I will be using. Thank you.
It works so well! 👊🏻🤘🏻
Giga brain! I love it
Nice!
Great idea!
Thank you very helpful
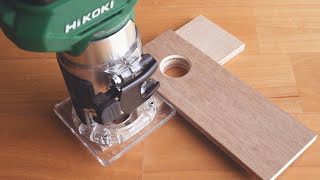
Did you use a pattern routing flush trim bit?
I used a top bearing flush trim bit.
@@brewbuilds thank you.
@groverreediii6487 you bet 👊🏻
Clever!
wow
Thank you! I don't have a full work shop or router table. Love this!
I’m glad you found it helpful! It’s super quick and accurate!
Pretty neat!
Come on bro ur overthinking this jig 😮😂😂😂😂😂😂😂👍
I mean I thought this was pretty basic. 😂🤘🏻
This was fairly simple, I'm not sure how much less "thinking" you can do for a dado jig.
Yoooo. Amazing.
🤘🏻
Very clever
Thank you. 👊🏻
Thank you Sir.🎉
Brilliant!!!!!
After you nail down the final cross slats the next part of the video shows straight cross slats. ???
@@donalexander4113 so when I setup my jig on the scrap piece of mdf, I eyeballed how far apart I thought the cross slots needed to be. They ended up being slightly to close together which wouldn’t allow my router to travel across the entire surface of my work piece do to the diameter of the router base. All I did was flip my jig over nailed on two more cross slats then removed the original to maintain the proper jig cutting width. It’s the same jig I started with just had to give my self a little wider travel distance for my router to cut across the entire work piece.
The concept is the exact same, I just miss judged the width I needed because I was working with scrap lumber. Hope that makes sense.
That’s so cool and easy ❤❤❤
Where is the link to the full video?
The full video is on my channel, but I’ll go back and link it in this short as well.
Hate working with MDF. However this trick is slick especially with Plywood
Mdf is the worst! At least mdf is more true to size, this trick is perfect for plywood do to it being slightly undersized from its listed dimensions. 👍🏻
Permanent, dedicated tables can be made.
Absolutely, but sometimes you just have to improvise and come up with something easy and quick to get your through at a time of need. This was a part of a larger project, and I thought I would share an easy/cheap solution that I used.
@@brewbuilds Your solution is keen.
any tips on getting the spacing perfect on a mail cubby
How wide is the opening? Or better question are you stuck with a specific size? Is there any flexibility with the sizing?
@@brewbuilds 3.5in we did a job but the jig we made ended up failing us very sad and disheartening. I can send a pic
@@brewbuilds not so stuck on size but needs to be consistent
@miltoncastro935 you’re more than welcome to email a pic, the best advise I could probably give though is just spending the extra time up on a jig that matches the exact dimensions you need. The router-ing out is the easy part. A well thought out jig can make the most inexperienced user look like a super star. 👌🏻 do you have anything that’s a known 3.5” you could use to set your jig up?
@@miltoncastro935 I would rip a piece of scrap wood on your table saw to the exact width you need then use the same jig layout as I showed and you should be solid then. 👍🏻
I would be a little more precise on squaring the initial 4 pieces, and paralleling each pair.
There is a difference between a true parallelogram and just a quadrilateral, if you want precision fits.
Through my experience I’ve found that in some instances simplifying a task and removing unnecessary steps helps reduce the chance for error. Sometimes that can be math or excessive measurements. The simple mechanics of this jig does that by giving the user an accurate parallelogram to use as a guide. No math or measuring, simple assemble, and with scraps most people have laying around. A solution anyone could use. Most hobbyists woodworkers aren’t working in a Machinist’s environment or with their tight of tolerances. For a set of cabinets I don’t know how much time you would really want to invest in getting this joint to fit any better, or what the net gain would be by investing that time. At the end of the day the joint fit super nice it was to spec of my design. All said and done my goal is to give others inspiration, and solutions to a task they might already know how to do. Thanks for your comment. 👊🏻
@@brewbuilds Understood.
I was pointing out an error potential.
If for instance the 2 short pieces aren't parallel, by a couple degrees, then the two long's will not stay parallel when they are closed up to the desired width.
That it fit well for you is a testament to your skill in eyeballing the initial positioning.
Many will find difficultly in eyeballing it as accurately, and will likely find their tenon piece loose at one end, thinking they copied you but were unaware of the geometry being a harsh mistress.
I didn't mention it before, but the simple jig is very clever, and great, and you did a really good job. 👍👍
@@johnrap7203 I truly appreciate your comment, and there are no hard feelings.👍🏻
The one thing I want to point out is by clamping the two guide rails to the material is establishing the to important parallel rails and at the proper width. I’ve found this to be way more accurate than trying to measure for that, and think it’s easier for someone to I guess eyeball to achieve those results. If his jig wasn’t a one time use item I would have taking the time to make it adjustable with hardware to use it on different thickness material and multiple times.
BOOM!
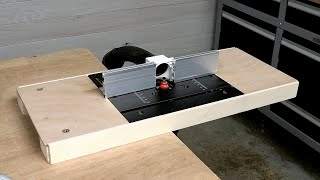
You say your jig is MDF? It diesnt look like MDF. It looks like plywood. Also, it looks like a one-time thing.
The jig it self is plywood, I used it on mdf. I did make it for a one time use for the project I was working on at the time. It could easily be modified for multiple uses.👍🏻
Sorcery!!!
Why don’t you just clamp the two long pieces to a known thickness board, then nail the short cross members.. jig shown being made is not the jig used in final shot
It is the same jig, I have a full video on it, and why it looks slightly different.
only if you have a router bit to match. learn about kerf makers
It doesn’t need to match, it just needs to be smaller than the size of dados you are cutting.
Will you be making a separate frame for each other slot?
Because this one is only for this specific width.
In my opinion, it is much more universal to make an adjustable frame to the width of the cut channel. There are plenty of examples out there on how to do this.
Also, using nails to create a jig doesn't give you dimensional stability.
This was just a quick jig made from scraps to get me through the 2 specific dado’s on this project. Spending more time on a nicer one that’s adjustable and to be able to use on multiple projects would be very handy. This was a late evening and I needed to make these cuts. For long term use using brad nails isn’t ideal, but for the 2 dados I needed it for it worked just fine. 👍🏻
@brewbuilds OK. It's important that you know what you're doing. And this is valuable today ;)
I've been using an adjustable bezel for years and it saves me a lot of time. And the fact that it is one of the easiest methods to make cool connections.
Regards
Really smart dam son
Thank you. 👊🏻
Nice!
Thank you.
Clever!
Thank you. 👊🏻