Using Sprites to Create an Arduino Speedometer | Beginner How To on Using and Compositing Sprites

ฝัง
- เผยแพร่เมื่อ 14 พ.ค. 2024
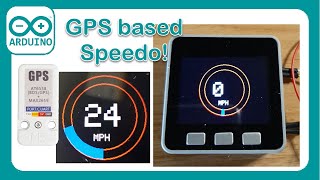
- In this video we are going to expand on the GPS based speedo by using Sprites. Sprites allow us to predraw images into RAM and then display them all at once. Using a technique of compositing sprites together we will be able to create a Sprite for the gauge dial and one for the needle that can be rotated and positioned. Using this method will help eliminate any flickering we see while drawing complex gauges on the screen in real time.
In the video we will explore the basics of using sprites for this type of design but we won't focus on the actual gauge shapes. That code is provided and we will review what is going on.
Here are some helpful resources. If you are not using an M5Stack you will want to explore the TFT_eSPI library and examples for how to set up the Sprite object. The M5Stack.h library calls on Sprite.h which is an adaptation of the same library. The main difference is how you initialize the objects and what libraries you need to include. Examples should get you there.
github.com/Bodmer/TFT_eSPI
github.com/m5stack/M5Stack/bl...
Sample program, note that angled brackets aren't allow in YT text so you will need to add them everywhere you see /\ This is less than in for loops and around the M5Stack.h library
#define WAIT 0
#define DEG2RAD 0.0174532925
const int minSpeed = 0;
const int maxSpeed = 100;
const int lcdWidth = 320;
const int lcdHeight = 240;
const int gaugeRad = 105;
const int gaugeWidth = 25;
const int gaugeWidth2 = 10;
const int xLoc = lcdWidth / 2;
const int yLoc = lcdHeight / 2;
const int gaugeDelay = 50;
#include /\M5Stack.h/\
TFT_eSprite dial = TFT_eSprite(&M5.Lcd); // Create Sprite object for the dial
TFT_eSprite needle = TFT_eSprite(&M5.Lcd); // Create Sprite object for the needle
void setup(void) {
M5.begin();
M5.Power.begin();
M5.Lcd.fillScreen(TFT_BLACK);
drawBackground(0);
createNeedle();
}
void loop() {
// put your main code here, to run repeatedly:
for (int rot = 0; rot /\ 270; rot+=5){
plotGauge(rot, "MPH");
delay(25);
yield();
}
//needle.deleteSprite();
//dial.deleteSprite();
}
void plotGauge(int16_t angle, String label){
//Draw the blank gauge
//M5.Lcd.setPivot(160, 120);
drawBackground(angle);
needle.pushRotated(&dial, angle, TFT_TRANSPARENT);
dial.pushSprite(0,0,TFT_TRANSPARENT);
}
void drawBackground(int16_t speed){
dial.setColorDepth(8);
dial.createSprite(lcdWidth, lcdHeight);
dial.setPivot(lcdWidth/2, lcdHeight/2);
M5.Lcd.setPivot(lcdWidth/2, lcdHeight/2);
dial.fillScreen(BLACK);
dial.drawRoundRect(0,0,lcdWidth, lcdHeight-2,10,WHITE);
dial.drawRoundRect(2,2,lcdWidth-4, lcdHeight-6,8,WHITE);
dial.drawRoundRect(4,4,lcdWidth-8, lcdHeight-10,6,WHITE);
dial.fillCircle(lcdWidth/2, lcdHeight/2, gaugeRad, WHITE);
dial.fillCircle(lcdWidth/2, lcdHeight/2, gaugeRad + 2, RED);
dial.fillRoundRect(lcdWidth/2, lcdHeight/2,lcdWidth/2 - 11, lcdHeight/2 -12, 5, RED);
dial.fillRoundRect(lcdWidth/2, lcdHeight/2,lcdWidth/2 - 13, lcdHeight/2 -14, 5, RED);
dial.fillCircle(lcdWidth/2, lcdHeight/2, gaugeRad - 3, WHITE);
dial.fillCircle(lcdWidth/2, lcdHeight/2, 5, RED);
dial.fillRoundRect(lcdWidth/2 + 4, lcdHeight/2 + 4,lcdWidth/2 - 21, lcdHeight/2 -21, 4, BLACK);
for (int i = 0; i /\ 271; i+=20){
float sx = cos((i - 270) * DEG2RAD);
float sy = sin((i - 270) * DEG2RAD);
uint16_t x0 = sx * (gaugeRad - gaugeWidth) + xLoc;
uint16_t y0 = sy * (gaugeRad - gaugeWidth) + yLoc;
uint16_t x1 = sx * (gaugeRad) + xLoc;
uint16_t y1 = sy * (gaugeRad) + yLoc;
dial.drawLine(x0, y0, x1, y1, BLUE);
}
for (int j = 0; j /\ 270; j+=2){
float sx = cos((j - 270) * DEG2RAD);
float sy = sin((j - 270) * DEG2RAD);
uint16_t x0 = sx * (gaugeRad - gaugeWidth2) + xLoc;
uint16_t y0 = sy * (gaugeRad - gaugeWidth2) + yLoc;
uint16_t x1 = sx * (gaugeRad) + xLoc;
uint16_t y1 = sy * (gaugeRad) + yLoc;
dial.drawLine(x0, y0, x1, y1, BLACK);
}
int speedU = map(speed, 0, 270, 0, 120);
dial.drawNumber(speedU, 190, 140, 7);
dial.drawString("MPH",210,198,4);
}
void createNeedle(){
needle.setColorDepth(8);
needle.createSprite(20,100);
needle.fillSprite(TFT_TRANSPARENT);
needle.fillCircle(10,10,5,TFT_RED);
needle.fillRect(8,2,4,100,TFT_RED);
needle.fillTriangle(6,4,14,4,10,94,TFT_RED);
needle.fillCircle(10,10,8,TFT_BLACK);
needle.setPivot(10,10);
}
00:00 Introduction
00:15 Introduction to Sprites in MS PAINT
12:56 Getting Started Discussion
14:00 Getting Started with Sprites in Arduino
43:08 Reviewing a Sprite Based Gauge
58:04 Next Steps and Conclusion - แนวปฏิบัติและการใช้ชีวิต


Fantastic video and great explanations. I just converted one of my gauges to sprites. No more flickering! Thanks a lot!
You are a scholar!
Great! I would love to see if you want to share. Support@caducator.com. Flickering gauges suck :)
I am working on adding more to this series.
Great video! I’ve been looking for a video explaining sprites and you’ve made an awesome one. Thank you so much! Keep up the great tutorials.
Thanks Antony! I have another video I am trying to put together on drawing images on the screen from BMP converted to bytes vs pulling images from SD cars and making sprites with them. I have a few more options to figure out then I will add that option as well. It may or may not be part of the gauge series, but its a topic that could apply.
@@LearnEverythingAboutDesign I have some gauges that I have drawn up and I’d be honoured if you would like to use them in your tutorial. I drew up several boat gauges to measure speed, RPM, oil and water temp and pressures along with battery bolts. I’m happy to send them to you as I was trying to use sprites to coordinate the dials and faces working together with alarm sprites. I can email them to you if you’re interested
I'd be happy to. Send them to support@caducator.com In the email let me know what board and display you are using and I will try to point out variations in the video. I can't promise I can get it to work but I will try.
Your way of explaining code is excellent!
Thank you…
You are welcome!
Great video! Thanks I have been looking for videos explaining about this topic and your explanation was great. Thank you for the video
You're very welcome!
I could never have figured this out . . the programing tutorials are excellent. There is so much you can do with these displays, and they are cheaper than vegetables.
Thanks Nicholas! I have some more planned using a different sprite library as well. These on the M5 stack don't make use of the entire tft eSpi library and my attempts to hack the library have not produced the results I wanted. Hoping to do more with warning lights and indicators popping up on gauges in the future. thanks for watching!
Great but sad comparison, 😢
A big help...cheers.
no problem
Oh cool, you do electronics too! Unlike the 3D modelling this is something I do know about and I've done a lot with micro controllers over the years. I've also done a lot with GPS as well, back when in car GPS was a new thing. When I worked in animatronics we used a lot of Teensy boards. I think my best Arduino based project was the Enigma machine in a pocket watch. I actually carry it as an everyday device. When you say you 'make' things and people ask what it's great to pull that out of a pocket and show them.
Wow that is very cool! The electronics is a side hobby for me, but when I come across topics that take a good bit of my time to figure out or the info out there is lacking I try to cover it. One of my first electronics projects many years ago was building an AF ratio gauge for my car and an LED based tach. These were just using chips. As I got into arduinos the possibilities opened up! I have been planning a new PCB design series with Fusion that I am hoping to start releasing in the coming weeks making a usb game controller. Showing the PCB design phase and 3d design phase. I got a new printer I hope is up to the task.
That enigma watch sounds amazing!
ESP32-Chimera-Core library is a substitute of the original M5Stack. I'm still learning TFT_eSPI and this tutorial is great for understanding how sprites work.
Thanks for the upload
Thanks for the info! This is the next GFX library I am playing with when I have the time. github.com/lovyan03/LovyanGFX Basically how they ported TFTeSPI to M5 stack they left out the ability to pushImage to a sprite. which means we can't display icons or speed or anything other than the needle(unless you use the full library). I am told the LovyanGFX is faster and gets around that.
@@LearnEverythingAboutDesign Great info. I like faster haha😄
@@LearnEverythingAboutDesign I'm just going through the examples now. WOW just WOW
👍 I really like your videos, Please continue doing Arduino ESP32 stuff.
Thanks! I have a video game controller series that I have been slowly working on with the pcb design, housing and code. hopefully over the holidays i can dedicate some more time to it. It will be an esp32 based qtpy www.adafruit.com/product/5325
Awesome video. But as a someone who's just new to this, I do feel that there's way too much interruption going on as when you start to explain something, you tend to branch off to the side (albeit to related info), and then possibly branch off further to something (info related to the related info) before finally returning to the original thing that you had started explaining earlier.
It can get pretty cryptic sometimes like multiple nested functions calls with references to references, if you get what I mean. I fell asleep a couple of times (my stack overflowed hahaha) on these two videos, but don't get me wrong. I kept coming back for more.
But I do really appreciate that you had put in this mammoth amount of effort into this topic. Big kudos and huge thanks from me.
I appreciate the comment! Sleep stories are pretty popular maybe I should rename it ;) In all serious though I am not a programmer and since my videos aren't scripted I do tend to ramble off when I think of something so 100% sure that is the case. I will take this feedback and try to be a little more pointed on my next programming video.
Again thanks for taking the time to write a comment and sticking it out lol
@@LearnEverythingAboutDesign Hope I didn't sound too critical but thank you for making the video. There's a bunch of info in there you're sharing with viewers. I even saved them in my video list so that I can come back to it again and again for guidance.
@@Schroeder9999 Not at all. good feedback!
a really cool video. very very well explained. it hopped me a lot i was having trouble in my own project and this video came to help me :) co0l
You're welcome! Glad to hear it!
Hello friend; Definitely a great lesson on Sprites, however, very difficult for beginners. However, 1) I would really like to make an RPM Meter for a small 775 Motor (Tachometer + Opto Interrupter), using this library, but I have no idea how to make the code for the Arduino. Do you or anyone here have a code for this?
2) If I have a 'Gauge' design ready, is it possible to attach it to the Sprite, if I may say so? Or, does it not work that way? My sincere thanks.
The first place I would start is learning to code with arduino. Do some basics because making a display and dealing with inputs, sprites and all that is going to be a task. There are samples out there for tachs on the arduino hub and places like instructables. projecthub.arduino.cc/PracticeMakesBetter/easy-peasy-tachometer-a629a4 If you are just getting started I would suggest just doing a numerical display and get the rest of your stuff working before worrying about doing a sprite. You can develop a sprite based gauge independent of the rest of the system and then combine them when you have it all working.
At the core if you have a sensor you are reading once a revolution and displaying that all you really need is that number to feed into a gauge. In my video we used GPS speed but you would just feed in your rpm value.
Thanks a lot @@LearnEverythingAboutDesign
Interesting but, wouldn't it be better if the 'needle' sprite was an odd numbered width then it would rotate about the pivot point symmetrically?
Sure. Since the sprite gets translated a bit when rotated on small displays it will always be a little chunky. On a larger display you might notice but yeah that is a good thing to do.