How to Fill a Shape with a Photo in Photoshop

ฝัง
- เผยแพร่เมื่อ 1 มิ.ย. 2024
- Newer version here ► • Fill a Shape with a Ph...
-------------------------------------------------------
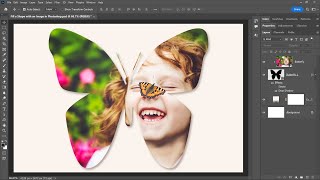
This tutorial shows you how easy it is to place an image in a shape with Photoshop, from a basic rectangle or circle to a fancy custom shape.
For this tutorial, we'll use one of Photoshop's custom shapes, but once you know the steps, you can start placing images into any type of shape you like!
► Join my Patreon for more videos: / photoshopessentials
► My complete written guide: www.photoshopessentials.com/p...
► Get Photoshop here: prf.hn/l/dlXjD2w
► Image used in this video: prf.hn/l/A3PwyY5
► Get the PDFs!
Join PhotoshopEssentials.com to support more videos on this channel and download all of my written tutorials as PDFs!
Learn more: www.photoshopessentials.com/p...
HOW TO PLACE AN IMAGE IN A SHAPE
Start by creating a new Photoshop document (0:43). Select the Custom Shape Tool (1:52), set the Tool Mode to Shape (2:19) and your shape color to black (2:47). Load Photoshop's custom shapes (3:01), choose a shape to fill with your image (4:17), and then draw the shape (4:49). Center the shape in the document (5:19).
Open a photo to place inside the shape (5:41). Select and copy the photo (5:43) and paste the photo into the document (6:11). To fill the shape with the image, create a clipping mask (6:27) and then resize and move the photo inside the shape (7:38). Change the background color (9:01) to better match the image, and then add a stroke around the shape (10:52).
To learn how to draw your own shapes in Photoshop that you can then fill with an image, check out my video where I show you step by step how to draw with the new Curvature Pen Tool in Photoshop CC 2018: • Using the Curvature Pe...
► My Photo Effects tutorial playlist: • Photoshop Photo Effect...
► Visit my Photoshop Essentials website for more tutorials:
www.photoshopessentials.com
#photoshoptutorial #photoshop #adobephotoshop


![[TH] 2024 PMSL SEA GF D2 | Summer | ร่วมส่งแรงใจ เชียร์ไทยไปพร้อมกัน](http://i.ytimg.com/vi/dN2gLsCJ0T0/mqdefault.jpg)


*How to DRAW CUSTOM SHAPES in Photoshop:* th-cam.com/video/r2XfiVXLyiQ/w-d-xo.html
*How to Place your Image in TEXT.* th-cam.com/video/YRFxm3IfrI8/w-d-xo.html
*How to PASTE an Image into a SELECTION:* th-cam.com/video/c8-6xgSwwow/w-d-xo.html
I calmed down to watch the ads in this video because you deserve to make money. Thank you so much for this tutorial
Thanks, Steve. Love the special effects.
THANK YOU!!! New skill unlocked. The magic happens about 6:30 in!
Thank you. This is very helpful. I love that you went into a detailed step by step explanation at a speed which is easy to follow.
Thanks for watching Dave, and for your feedback!
Thank you for great tutorial. It's really helpful for a beginner like me.
Thank you - easy to follow and taught me lots!
thx for such a clear and easy way to follow through!
fantastic walkthrough, thanks for the help!
Thank you Steve. I discovered your canal and i'm very happy.Thank you so much😘
SOOO helpful! Thank you!
You're very welcome, thank you for watching!
This is SUPER FANTASTIC. Thank you for this excellent tutorial.
This was brilliant! Thank you so much.
So helpful. Thanks for sharing.
Such a patient explanation..adorable..thankyou
This guy saves my photoshop editing every time. Thank you
I learnt something new. Thank you from India.
Very helpful, thanks a lot!
Really fantastic thank you steve
Super helpful, thank you!!
You're very welcome. Thanks for watching!
This was helpful thanks!
Thank you very much for the tutorial!
Thanks for watching!
Thanks, bro! It worked out ! Greeting from Tokyo !!!
Thank you! Thank you! Thank you! This is so simple compared to what I was doing. Geez!
Fantastic tutorial. Thank you!
Thank you for watching!
love this tutorial, underrated
I love your videos can you please make more -they are easy and love to learn
You are awesome man!!
Currently struggling in my graphic design class so this means a lot rn
You are so awesome the editing, the tutorial, the way you speak. You deserve more than a like
Thanks so much! I appreciate it. :)
► New Photoshop 2022 version here: th-cam.com/video/GnlD-kxfyXk/w-d-xo.html
Hi everyone, Steve here. Thanks for watching this video where I show you how to easily place an image into a shape with Photoshop. If you find my videos helpful, please Subscribe to my channel for new videos every week! You can click here to subscribe: goo.gl/2YahsG. Please leave any questions, comments or suggestions below. Thanks again for watching!
done
Thank you Steve!!!
you saved my life thanks man
The best tutorial I found on this subject. It actually saved me about $60. Great teacher. Yes, I have subscribed.
Great to hear it! Thanks for subscribing!
very helpful video tutorial Thanks for sharing friend.
Thank you!
Thank you,, Really Help full
Excellent
Thank You!
Thank youuuu, it worked with me
Very Nice, thanks
You saved my life. You teach better then any of my degree teachers. Maybe you should think about a career change haha. Thanks 👍👍👍
Sooooooooo much helpful thanks
You're very welcome, thanks for watching!
Thanks so much! I purchased a different photoshop, and the way to do this had completely changed. I used to be able to right click the layer and select "Group with Previous" and it was done. Now, they've removed that option in favor for going to "Layers > Create Clipping Layer" for some reason...
thank you so much i've been trying to figure out how to do this for an hour now 😭
Same
Thanks mate
great video
thankyou very much :-)
Worth A Sub
Thanks! The best video I seen. You helped me!!!
Great to hear it! Thank you for watching!
Well, you know what?, I subscribed to you!!!
The rest of your vids are sooooo helpful. My photoshop teacher told me how to do it, I forgot. You reminded me!!!
helpful 👌
Thanks! sir.
Help! At 7:00 I do everything explained but when I create clipping mask nothing happens. It does say it is clipped to the shape. The layer 1 disappears on the main workspace. It’s still above shape 1 but is gone and nothing was clipped. Any thoughts?
Thank you very much for youuuuu
thank you so much
Since the photo is in a vector shape, how much will it be affected when scaled up?🙂
How easy! ? Not from people like me a little slow on the uptake... I have been battling for a couple of days with this Once it was ok then could not replicate anymore! (not from your video) In the end I realised I was using the marquee tool instead of the shape one! Then I followed step by step yours and still had problem...I was using "place" instead of importing the normal way and somehow could never copy and paste from there? So I ended opening like you do with PS. And select all > Copy > paste on the shape finally worked again.
I also learned to create a clipping mask with the pointer between Shape and photo layer pressing Alt and click. that does the same thing. (Slow learner but love advanced stuff when I get it) Thanks a lot for your very clear and concise video. It is nice that some of you still share to some of us with CS4!
ThANK YOUUU
Thanks a lot
You're welcome, thank you for watching!
Hello. I hope you can help. I have a canvas size of 1m x 1m and inside of that I have 100 10cm squares which I'm going to fill with 100 photos to make a artistic mosaic print. I can do it but I'm trying ti make it quicker. So when I copy and paste an image (the image is also shot in a square format) into the 10cm square selection I'd like it to fit exactly into the selection but because the images is a bit bigger I have to bring up the transform tool and then resize it to fit. Its fine but it does take a very long time to do this a 100 times! I hope you can help.
12 minutes for that. Photoshop really does make doing simple tasks difficult and time consuming.
If you already know how to do it, it takes no time at all. Explaining how to do it is what takes time.
Thanks
Thank you but how do you make an already photo image into a shape instead of using the customized shapes.?
need to know this too
bruh
I'm assuming it also has to be black
Oh wow u posted this 3yrs ago oop
Thanks 😃❤️❤️❤️❤️❤️❤️❤️❤️❤️❤️❤️❤️❤️❤️❤️❤️❤️❤️❤️❤️❤️❤️❤️❤️❤️❤️❤️❤️❤️❤️❤️❤️❤️❤️❤️❤️❤️❤️❤️❤️❤️❤️❤️❤️❤️❤️❤️❤️❤️❤️❤️❤️❤️❤️❤️❤️❤️❤️❤️❤️❤️❤️❤️❤️❤️❤️❤️❤️❤️❤️❤️❤️❤️❤️
6:40 useful info
thank you very much
Thank you for watching!
I'm trying to do this with a cloud and an anchor is that possible?
I have an outline traced from illustrator
And I want to fill it with an image.
By creating clipping mask, i have the picture fit in the object, but it does not show the outline in it. Can you please help me with this.
@Photosop Essentials HOW???
thanks
Thank you
I hope it was helpful. Thanks for watching!
@@PhotoshopEssentialsChannel yes it was thank you
i have a shape that i made from illustrator and brought it over to photoshop, it doesent let me create a clipping mask with the shape i made. why and how can i fix this?
How would you remove the background so that it is just the butterfly?
pick transparent back ground 1st before you put butterfly
Hi, I want an apple with bite shape, but it's in the list of shapes, what to do?
perfect, that I just would
How to add photo in selected part...
Nice tutorial, but i want a transparrent background and its not working.
Is there a way to do this on a free app on ipad?
How do i move it afterwards
Tqq
will you PLEASE give us a tutorial of how to place an image on the background layer? 'cause when i paste an image it turns it into a new layer...
If you open an image in Photoshop (File > Open) it opens on the Background layer. You can also turn a layer into a Background layer by selecting the layer in the Layers panel and then going to Layer > New > Background from Layer.
What do I type into google to get this one ?
Thanks, kiss
Muy bueno.
Five 🌟 s
Thanks Marco!
Any idea how to make a male Shape (icon)
how.. if i want other shape not from photoshop
Fain
hello- pleae can you make more simple video in..2022 ?
NOTHING WORK
I didn't find this video useful at all because I have photoshop 2020 and some of the options aren't available to mee
Please see this updated video for 2020 and newer: th-cam.com/video/Wt3NlxX1_1E/w-d-xo.html
if your relatively good in ps already, the first half of the video is completely uselesssss
And if, like many people, you watch Photoshop tutorials because you are trying to learn Photoshop, then the first half is completely necessary.
Thank you!
Excellent