Love how the junk drawer had "most of the parts". Ya my junk drawer also has 3 random stepper motors lol. Add the CAD'ing time, 3D printing time, assembly time... Everyone without a 27k sub following would quickly realize this project isn't cost effective.
Yes, if you want to see from you, you can throw 200$, otherwise you will waste too much time on nonsense. only the first 550$ is somehow decent, the other 350$ and below are the same as hi do it, unstable as hell.
the cool thing about mills is that even when they are made from poor quality parts, you can use them to fabricate higher quality parts to upgrade it. mills and lathes are both tools that can be used to fabricate themselves, and i guess we can add 3d printers to that list too now.
3d printers have always been on that list. In fact, 15-20 years ago, thats how you got one. The first hobby use 3d printers were obtained by having someone else print your parts. Once you made one, you printed someone elses parts.
Not to mention that even if it was $100, was all the time he spent designing and building it really only worth 65 dollars to him? Because for 65 dollars more he could've gotten a ready made machine.
@@bzuidgeest The parts on Thingiverse were indeed designed by Hyperspace Pirate who posted this video. Really wouldn't have taken you much to check that before bashing. Plus, he's made those parts available free for everyone.
@@crabbycredenza there is more then just his parts on there and most are rather obvious. Copy paste tweak. But the main criticism is that he only counted the parts he bought extra in his price. I can build everything for a hundred dollars, I'll just grab the spares i bought earlier.
@@bzuidgeest The idea of Open Source or Open Hardware (Thingiverse) where one can take the ideas of others, build upon it and release that ... should be slapped around your cheeks left and right until you understand it too. (No violence ... just a proverb!)
@@dieSpinnt i do understand open source and open hardware, I have created both. (Nothing note worthy, but still). What you don't understand is that my big problem is with the price claim. You cannot claim something cost a hundred dollars to make, when you leave out all the parts you bought earlier. The total price of the build is really much higher. You are not defending open source or open hardware, your are defending the use of clickbait to attract viewers. Also you cannot call this great engineering when most of it has been done to death, by TH-camrs that where much more honest about the price of reproducing the device shown. You should be slapped until you understand clickbait, also a proverb naturally...
This isn't dilligent engineering, this is throwing somthing together for a video, those motors are going to last a couple months at best, they shouldn't be taking the axial loads, the rails and screws aren't covered and will fill up with dust. It's so focused on price that things that would have cost a couple of dollars extra and saved a lot in the long run have been ignored.
YT randomly dropped this in my queue and wow am I am glad. Love the humor! I worked 30yrs in precision machine tools (PCD, PCBN) and machining. Finish boring cylinder heads, contouring bearing races, L/D>15 ID drilling (cannulated bone screws)... utter mania, full-on salivation for the deity of "ultra" precision. Drives you crazy with frustration, every day. So I sure can relate to "strapping a beaver" to main drive. And 250$ CNC machine is "too much". :) I gotta go binge watch all your vids. Well done and thanks.
That is NOT a goofy abomination...it is the birth of the Do it yourself basic CNC mill. Translation... it is awesome. Great work. Thanks for taking the time to make this video
I think it would really benefit you to chop down the size of this machine. Every time you half the length of a beam, you get one eighth the deflection. This would be a huge increase to the rigidity of your machine, and would be fairly simple to do. The play in the leadscrews can be dealt with by good machining practices, and your Z axis jumping may be helped by counterweighting or adding a spring to keep it preloaded vertically. Shorter tooling and keeping the spindle as close as physically possible to the rails may make this moderately capable of acceptable aluminum parts.
Yeah shorter tooling was what I was looking at. The stick out on that endmill looks like a fast food straw trying to cut aluminum lol. Still amazing tho with how hes got 0 rigidity.
I’ve really enjoyed watching this video and it was already a project I decided to make for myself. You have provided me with the details for the electronics and the fact that you have 3d printed most of the joints while still use the aluminum 2020 profiles. Thanks a lot for these, the only thing that is still unclear for me is where to buy a wild beaver with a huge appetite for the materials. Well k figure that one out eventually. Lol. In return I would like to share a bit of my knowledge about CNC milling if it’s useful enough for you anyway. I have two decades of experience with metal shop working on several different brands and quality cutting machines and for the first one on my behalf comes the tool to cut bigger surfaces at a time on your DIY milling machine I would go for a wood cutting drill for bigger holes whereof the centerpiece drill is removed. Usually this is a pieces of hardened sheet steel leaving a little gap in vertical direction on it’s socket. (Excuse me if my choice of words is a bit vague and strange. Hopefully you’ll understand what in essence I would like to explain…. If not, please reply and I will send my best translation of the issue to read.) I was born in the Netherlands, a small country of huge contradictions in everything. Insanely well build, extremely difficult to learn the language, what immediately explains why i made my apologies. At second place I would like to point out the fact that this type of machine has possibly room enough for double stepper motors that moves the y-axle and instead of the use of the ball bearings i would prefer slide bearings of high density polymer material. Anti backslash nuts would also benefit the damping of vibration, as well as the diagonal gantry support on both sides in both directions too. At last when you got no longer made any errors (of whereas you probably already have arrived) it’s majorly beneficial to make use of tungsten carbide tools and lubricants witch drastically improving rigidity and lifetime (or less wear off) for your cutting tools. Sharp tools equals less vibration and it’s the same thing by the use of surface lubricants what prevents warping and changing the molecular structure of your metal (what can loose hardness by this creation of heat, unless you are cutting in steel that hardens up from the friction between your tool and your materials) lubricants reduce the production of heating up as well, even if you only use water to lubricate. Thanks again and kind regards, Raymon
Honestly, if you're someone who does things like this on a regular basis, it's not unusual to have to kind of stuff he uses in the video lying around. I have more spare electrical components, tools, and scrap than I know what to do with. What are you even planning on using this for?
It's never a waste of time to take on a project that's fun for you, and immensely beneficial if you learn along the way. I built my first 3D printer mainly because I needed one large enough for a particular prototype part. I could have maybe bought one, but could find none with the build volume I needed. It was way more work than I thought it would be. But, in the end, I got my machine, and the knowledge of how to fix or modify anything on it. Upgrades, of your own designs, is just more learning. Great video, and yes title is clickbait. Welcome to TH-cam. 🤪
A great build and fantastic video; I loved how you showed each step in detail. I made a similar one for less than 1$ because I too had most of the parts on hand too ;)
Yes indeed a very good guide, it inspired me aswell to look in my drawer and since that i got one literally for free because it was a fully operating miill in there
...thats not how that works, the fuck... if you bought the parts somewhere in the past then they weren't free, you still spent money on them; you just forgot about it
Jeez... you don't take prisoners! Having voiced doubts about your new baby's rigidity, you give it a hairy great chunk of aluminium, and tell it 'Go on, work your magic, show me what you can do'... AND IT DID! You surely have to be really pleased with this; if nothing else it must whet your appetite for the future. Thank you for a clear, informative, nicely paced, and entertaining video. Liked and Subscribed.
This is cool and clever for someone that has the bits laying around. I think I'd be further ahead to spend a little more and get a kit even if they need tweaking or whatever. Thanks for the video!
A lot of people complaining about the click bait title are forgetting this maker put in a lot of hrs and tech knowledge to pass this down to the rest of us. How does he get paid for this valuable time? By getting us here and by the sound of it, kicking and screaming. He baited us, google paid him for the time, and he gave us an actual valuable education. Outside of the temper tantrums, I would say win win for all involved. Ultimately, anyone that came here thinking they can build a CNC machine from scratch with $100 must be one of those people who thinks freebies are actually free. You set yourself up for disappointment. Sorry!
I know NOTHING about this or why the video came up as my preference. But it was both intertaining and soothing to watch. I want you on my team if there ever is a zombie apocalypse! 10/10, will watch again!
Your Arduino CNC hat *has* a spindle drive built into it and it can drive a spindle up to 48v, you didn't need the extra motor driver you built. And you could have then also controlled it through the UGS/Candle software (or whatever CNC GRBL software you're using. I have this system myself and it works fantastic.
First: SHOW us the spindle power driver on the Arduino-GBRL-Shield. Second: You can't ... there is none! The Logic-Level-DIGITAL(!) Z+ output can be used as PWM-signal. And that signal can be used to drive a driver stage or power amplifier. Hint: GRBL setting, $32 = 1 (Laser-mode enable, boolean)
The amount of explanation and understand of the underlying principals is just great in this video. This video is so much more useful than the typical "Look I built a CNC" video. Thanks!
many of these parts can be sourced from places like ebay etc for cheaper than you think. the stepper drivers he is using aren't exactly quiet but all of them probably cost $10 max i was able to find leadscrews with the brass nuts for about $8 a piece and you don't have to use extrusions, if you want the frame to be metal, you could go buy metal from a junk yard and have some basic shapes cut for the beams or you could look up a local company that sell their cutoff pieces of metal for cheap. seriously though, if you know where to look you could build something of better quality...
I love these type of DIY videos. I wish i had the toys you have to play with! 🤣 As the old saying, takes money to make money. The possibilities are endless. Would be the type of Hobby/ potential income source that i would love😊 good for you
Well here's a video I didn't need to see. I have almost everything I need to make this, including the 1/4" aluminum, arduino, and a 3D printer. And while you're fortunate enough to not have any CAD/CAM skills, it is my shame that there are entire buildings standing in the sun today that started on my screen. I think building this might just be my next Hopeless Project™, thanks for the video!
No matter what anyone says I'm not smart enough to make anything like this. I'm not smart nor genius let alone super genius! I wish I could make a CNC machine but my intellect is very limited to simple machines and not much more. However I just want to make small things. The plastic that you're using might have a lot of give in it so that might be part of your problem. That motor is only for small drilling machines not CNC where critical accuracy is required. Still this was entertaining and very interesting. Thank you for sharing this with us to enjoy!
I love the entertaining illustrations that you do for your project videos. On top of them being fascinating. Especially the super cooling series that's currently going. I've laughed a lot from the demonstration of where to get AC parts xD
We used spring loaded ball screws which eliminated most play on our machines which did nano materials testing. Plus every new positioning move came from the same direction.
Not bad for a first go. Looks pretty much like a homemade 3018 and has the same issues/limitations as the 3018's do. I used linear rails on mine (HGR20 rails with double trucks for x and y, 2x MGN12 for z) and it's a lot more rigid thanks to that. I overbuilt as I wanted a 480x480x120 build area that I can use as a laser cutter as well. The spindle mount I made works for the laser module and the spindle motor I went with. Just some stuff to think about. I'm sure mine could be improved as well, I originally built it with belts but I immediately redesigned it for use with leadscrews. I'm still playing with my design and am still using the belt driven model but may post a video of my build when I'm done. Happy tinkering.
You can build this cnc for FREE if you have all the parts just magically laying around! Isn't that fantastic? Why spend money on a cnc when you already have one?! Do you see how ridiculous this $100 claim is?
Jp Toto: Me too!... I have been watching every video I can find on this topic, for quite some time. It is great watching things evolve as people progress from their first design to greater things that become tools to die for! Some that come to mind are: Savvas Papasavva, iforce2d, and Nikodem Bartnik. Really looking forward to more from Hyperspace Pirate!
Good job! I ended up buying the $160 kit, it suited my immediate needs perfectly and I'm very happy with it. I haven't used it on aluminum, but I'm curious how it would perform with a spindle upgrade. What feeds and speeds did you use for the large gear?
0.2mm Depth of cut with 100 mm/min of travel. I was running the spindle at full which i think is around 18,000 RPM. The limiting factor isn't the force of the steppers or the power of the spindle but the fact that the cheap machines are so floppy they don't have the ridigity to cut deeper/faster even though it doesn't take that much energy
@@HyperspacePirate You know what the funny thing is? The first lil CNC I built was made out of floppy drives with those tiny stepper motors for axis movement and a Dremel as a spindle. And it worked. Primarily because it was made out of aluminum and brass, and I've spent a ton of time making it as rigid as possible and movement as effortless as possible. Remembering it now I'm actually pretty shocked it worked.
I'm surprised some of the first cnc projects were not for parts that would improve its rigidity. How cool would that be. Machine makes parts to improve itself.
The video is nice and the CNC sweet. But the title is pretty misleading, you used almost $100+ in "scraps". That said, you explain everything in details, so, kudos to you. Waiting for video 2
definitely not under $100, but a great video nonetheless. If I have most of the parts, I may consider making this instead of buying a more expensive CNC Mill. It would be a good starter CNC Mill that I could use in my apartment on my balcony. This may actually give me an excuse to use a wood panel on my project instead of a 3D printed plastic one. Side Note: Still don't have a 3D printer yet, but I plan to get one in the near future anyways, so that cost is arguably negligible for me when it comes to this mill.
The problem with 3D printed parts is that after awhile cracks start to appear and then total failure. I would suggest you use the CNC to quickly mill replacement parts for the 3D printed parts while you still can.
I went the beaver route to safe some money on the spindle, however I'm not sure how to bolt it to the machine. can you make a separate video for some instructions?
5 minute crafts be like “ we’re gonna make a CNC with parts in the drawer” *proceeds to pull out stuff only someone who (probably) has that as they’re job, or at least dedicated hobby, would have* Still a cool video.
Exactly my thoughts, like lets build this cheap cnc router for under $100, I have a $50.000+ Haas VF1 laying around we can scour parts from, and by the way, I just disassembled 100 $1000 CNC hobby machines , so lets start
I know this is quite old but can I suggest, for the wood milling, you use a down cutting spiral bit? This will stop the tear out, you will need to install a system to clear the dust though.
The video might be old, but something that sets TH-cam apart from TV etc. is that people DO read and respond to comments... Two year old video, and I found a useful nineteen hour old useful comment. 👍
You do realize, you could have just gone with two pins of the arduino to do the mosfet modulation, pot to Analog pin and via Gcode and have it via both, internal and external speed command of the spindle :) But EXCELLENT job :D
the aluminum extrusion is cheap, the nema motors aswell but that power supply? when you get powersupply with higher amps the price goes through the roof from what I've seen or is there some cheap source I don't know of?
Nice CNC mill. However, increase the flowrate on your 3D printer. The parts are lightly under extruded. Either calibrate the extrusion in the firmware or do it in the slicer software. :)
Suggestion: it would benefit you greatly if you reduce the length of the end mill. Especially when cutting aluminum sheet. It will greatly reduce chatter and vibration. It's always a good habit to keep end mils short to prevent breakage, chatter, bad finishes, and noise
With access to a drill press, a grinder and some steel (which I do) I would be very curious to see what kind of design upgrades could be done to increase rigidity to such a machine (or the 3018 kits out there). I believe these machines can be taken to a very nice spot for home gamers. Is that an avenue you will be looking into ? If so, let me order my kit before you get started haha.
Our maker space made a very nice CNC mill out of MDF and L-channel aluminum. If you have steel at hand, even better. You can definitely make something nice yourself if you're willing to put in the time to research, design, and fabricate.
Depends on what he wants to do with it. Gantry type machines are usually used more often for wood and sheet metal for more router style projects. For cutting blocks of metal, a vertical mill is better, in which the tool head only moves along the Z, and is fixed to a heavy solid frame. and the table moves along both X & Y. Stronger motors are usually used too. The more solid the machine , the less vibration there is.
In your defence. A good number of people watching this type of video would have a 3d printer, Could access great free cad software. This was a great effort. You have a really good skill set and have set out to inform and show your experience from beginning to end. All this is by no means an easy overall production. Ignore the keyboard warriors and keep doing what you do. Thanks.
Why don't you directly wire the spindle mosfet up to the arduino? GRBL has PWM spindle control on pin 11. No need for 555 circuit, and you can now control the speed of the spindle through GRBL, improving cut quality.
Dear concern, With all due respect may i know the castling all parts to make it at home or how much it takes to buy from Bangladesh with delivery cost. This is really amazing to have this one. If it comes on a budget then i will try to buy this item.
i need to look more into cnc machines... would love to get me one 30*30cm would be enough for me... are there machines where u can swap the cnc with a laser?
Isn't it a little redundant to make a pwm controller when you have an arduino inside already? I havn't personally used GRBL but have made similar systems with marlin and there is no issue with this


You've convinced me to spend $200 on a premade one.
You'll get just as good quality. They're all pretty bad from a rigidity standpoint.
Sometimes seeing someone go down the wrong road is just as valuable as having someone guide you down the right road.
Love how the junk drawer had "most of the parts". Ya my junk drawer also has 3 random stepper motors lol. Add the CAD'ing time, 3D printing time, assembly time... Everyone without a 27k sub following would quickly realize this project isn't cost effective.
Yes, if you want to see from you, you can throw 200$, otherwise you will waste too much time on nonsense.
only the first 550$ is somehow decent, the other 350$ and below are the same as hi do it, unstable as hell.
@@radoslavkefilev312 you can just screw in some aluminum profiles.
the cool thing about mills is that even when they are made from poor quality parts, you can use them to fabricate higher quality parts to upgrade it. mills and lathes are both tools that can be used to fabricate themselves, and i guess we can add 3d printers to that list too now.
3d printers have always been on that list. In fact, 15-20 years ago, thats how you got one. The first hobby use 3d printers were obtained by having someone else print your parts. Once you made one, you printed someone elses parts.
Ah yes, the old "under $100" nonsense where the video creator used $300 worth of material he had lying around but forgot to add that to the budget.
Let's not forget the 3d printer that made hundreds of dollars in custom parts that you will need as well.
Yeah I was like cool, I could do that!
Oh wait... no I can't. Guess the $165 one is the much better deal.
How to raise a child for under $100! Bill of materials: Baseball, Baseball Glove, Adult son you abandoned decades ago.
I was actually writing the same but I'm glad you did it for me.
Not to mention that even if it was $100, was all the time he spent designing and building it really only worth 65 dollars to him? Because for 65 dollars more he could've gotten a ready made machine.
While I agree with a lot of the criticism, I must say the engineering diligence to make this happen is impressive.
@@bzuidgeest The parts on Thingiverse were indeed designed by Hyperspace Pirate who posted this video. Really wouldn't have taken you much to check that before bashing. Plus, he's made those parts available free for everyone.
@@crabbycredenza there is more then just his parts on there and most are rather obvious. Copy paste tweak. But the main criticism is that he only counted the parts he bought extra in his price. I can build everything for a hundred dollars, I'll just grab the spares i bought earlier.
@@bzuidgeest The idea of Open Source or Open Hardware (Thingiverse) where one can take the ideas of others, build upon it and release that ... should be slapped around your cheeks left and right until you understand it too. (No violence ... just a proverb!)
@@dieSpinnt i do understand open source and open hardware, I have created both. (Nothing note worthy, but still).
What you don't understand is that my big problem is with the price claim. You cannot claim something cost a hundred dollars to make, when you leave out all the parts you bought earlier. The total price of the build is really much higher.
You are not defending open source or open hardware, your are defending the use of clickbait to attract viewers.
Also you cannot call this great engineering when most of it has been done to death, by TH-camrs that where much more honest about the price of reproducing the device shown.
You should be slapped until you understand clickbait, also a proverb naturally...
This isn't dilligent engineering, this is throwing somthing together for a video, those motors are going to last a couple months at best, they shouldn't be taking the axial loads, the rails and screws aren't covered and will fill up with dust. It's so focused on price that things that would have cost a couple of dollars extra and saved a lot in the long run have been ignored.
YT randomly dropped this in my queue and wow am I am glad. Love the humor! I worked 30yrs in precision machine tools (PCD, PCBN) and machining. Finish boring cylinder heads, contouring bearing races, L/D>15 ID drilling (cannulated bone screws)... utter mania, full-on salivation for the deity of "ultra" precision. Drives you crazy with frustration, every day. So I sure can relate to "strapping a beaver" to main drive. And 250$ CNC machine is "too much". :)
I gotta go binge watch all your vids. Well done and thanks.
That is NOT a goofy abomination...it is the birth of the Do it yourself basic CNC mill. Translation... it is awesome. Great work. Thanks for taking the time to make this video
I think it would really benefit you to chop down the size of this machine. Every time you half the length of a beam, you get one eighth the deflection. This would be a huge increase to the rigidity of your machine, and would be fairly simple to do. The play in the leadscrews can be dealt with by good machining practices, and your Z axis jumping may be helped by counterweighting or adding a spring to keep it preloaded vertically. Shorter tooling and keeping the spindle as close as physically possible to the rails may make this moderately capable of acceptable aluminum parts.
Yeah shorter tooling was what I was looking at. The stick out on that endmill looks like a fast food straw trying to cut aluminum lol. Still amazing tho with how hes got 0 rigidity.
Well, you can also go with different extrusions the sall rectangular profile obviously is not too stable for deflection.
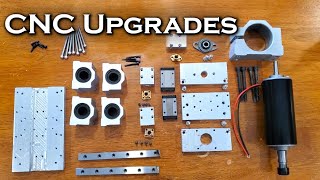
I’ve really enjoyed watching this video and it was already a project I decided to make for myself. You have provided me with the details for the electronics and the fact that you have 3d printed most of the joints while still use the aluminum 2020 profiles. Thanks a lot for these, the only thing that is still unclear for me is where to buy a wild beaver with a huge appetite for the materials. Well k figure that one out eventually. Lol. In return I would like to share a bit of my knowledge about CNC milling if it’s useful enough for you anyway. I have two decades of experience with metal shop working on several different brands and quality cutting machines and for the first one on my behalf comes the tool to cut bigger surfaces at a time on your DIY milling machine I would go for a wood cutting drill for bigger holes whereof the centerpiece drill is removed. Usually this is a pieces of hardened sheet steel leaving a little gap in vertical direction on it’s socket. (Excuse me if my choice of words is a bit vague and strange. Hopefully you’ll understand what in essence I would like to explain…. If not, please reply and I will send my best translation of the issue to read.) I was born in the Netherlands, a small country of huge contradictions in everything. Insanely well build, extremely difficult to learn the language, what immediately explains why i made my apologies. At second place I would like to point out the fact that this type of machine has possibly room enough for double stepper motors that moves the y-axle and instead of the use of the ball bearings i would prefer slide bearings of high density polymer material. Anti backslash nuts would also benefit the damping of vibration, as well as the diagonal gantry support on both sides in both directions too. At last when you got no longer made any errors (of whereas you probably already have arrived) it’s majorly beneficial to make use of tungsten carbide tools and lubricants witch drastically improving rigidity and lifetime (or less wear off) for your cutting tools. Sharp tools equals less vibration and it’s the same thing by the use of surface lubricants what prevents warping and changing the molecular structure of your metal (what can loose hardness by this creation of heat, unless you are cutting in steel that hardens up from the friction between your tool and your materials) lubricants reduce the production of heating up as well, even if you only use water to lubricate.
Thanks again and kind regards,
Raymon
If you want more stability add Height to the beams. Doubling the height will also make it 8x stronger.
or he could put gussets and stiffeners? or just buy thicker material that is rail shaped lol
Every sixty seconds you spend angry, upset or mad, is a full minute of happiness you will never get back.
cool truism dumbass
"How to build a CNC Mill for under $100 when you have over $1000 in spare parts to use"
... and also about as much in tools, like a 3D printer...
@@peka2478 And also A s-load of time...cost of 3d filament...likelihood of 3d part failure is high...
@@bobcanuso5800 and also a CAD Program for 5000$ (CATIA)
Honestly, if you're someone who does things like this on a regular basis, it's not unusual to have to kind of stuff he uses in the video lying around. I have more spare electrical components, tools, and scrap than I know what to do with. What are you even planning on using this for?
@@aaaa1111muffin Thats true, you can also take apart an old computer. I have like 10 old computers lying around with a good power supply.
It's never a waste of time to take on a project that's fun for you, and immensely beneficial if you learn along the way. I built my first 3D printer mainly because I needed one large enough for a particular prototype part. I could have maybe bought one, but could find none with the build volume I needed. It was way more work than I thought it would be. But, in the end, I got my machine, and the knowledge of how to fix or modify anything on it. Upgrades, of your own designs, is just more learning. Great video, and yes title is clickbait. Welcome to TH-cam. 🤪
It depends when you made your printer, but you could’ve gotten a Neptune 3 Max. It has a build area of 420x420x500
@@siegesouth It was 2014. Still, I think it's totally worthwhile to learn. Of course, learning can be amortized. ;)
@@ryanmacewen511 oh then then any printer you could buy was probably like 20k at that size
A great build and fantastic video; I loved how you showed each step in detail. I made a similar one for less than 1$ because I too had most of the parts on hand too ;)
Yes indeed a very good guide, it inspired me aswell to look in my drawer and since that i got one literally for free because it was a fully operating miill in there
@@Mercan1556 😂
But you still paid for that so you should still count the initial cost minus whatever you made from the rest of it.
🤣🤣🤣🤣🤣
...thats not how that works, the fuck... if you bought the parts somewhere in the past then they weren't free, you still spent money on them; you just forgot about it
Jeez... you don't take prisoners! Having voiced doubts about your new baby's rigidity, you give it a hairy great chunk of aluminium, and tell it 'Go on, work your magic, show me what you can do'... AND IT DID! You surely have to be really pleased with this; if nothing else it must whet your appetite for the future.
Thank you for a clear, informative, nicely paced, and entertaining video. Liked and Subscribed.
The reward, lesson learned, and experience of creativity.. priceless
Holy crap! Beaver technique is the funniest thing I heard today. Thanks for sharing and the laughs.
This is cool and clever for someone that has the bits laying around. I think I'd be further ahead to spend a little more and get a kit even if they need tweaking or whatever. Thanks for the video!
You made me feel the feels with the KSP music for your background music. Very fitting for an assembly video, good on ya!!
A lot of people complaining about the click bait title are forgetting this maker put in a lot of hrs and tech knowledge to pass this down to the rest of us. How does he get paid for this valuable time? By getting us here and by the sound of it, kicking and screaming. He baited us, google paid him for the time, and he gave us an actual valuable education. Outside of the temper tantrums, I would say win win for all involved. Ultimately, anyone that came here thinking they can build a CNC machine from scratch with $100 must be one of those people who thinks freebies are actually free. You set yourself up for disappointment. Sorry!
I know NOTHING about this or why the video came up as my preference. But it was both intertaining and soothing to watch. I want you on my team if there ever is a zombie apocalypse! 10/10, will watch again!
Your Arduino CNC hat *has* a spindle drive built into it and it can drive a spindle up to 48v, you didn't need the extra motor driver you built. And you could have then also controlled it through the UGS/Candle software (or whatever CNC GRBL software you're using. I have this system myself and it works fantastic.
First: SHOW us the spindle power driver on the Arduino-GBRL-Shield.
Second: You can't ... there is none!
The Logic-Level-DIGITAL(!) Z+ output can be used as PWM-signal. And that signal can be used to drive a driver stage or power amplifier. Hint: GRBL setting, $32 = 1 (Laser-mode enable, boolean)
@@dieSpinntthere is on some models of the shield
This is amazing and informative, I love that you’re transparent about the shortcomings , it helps a lot!
My only concern was the clickbait video title
The amount of explanation and understand of the underlying principals is just great in this video. This video is so much more useful than the typical "Look I built a CNC" video. Thanks!
Clever guy! You 3D printed the parts, and are very competent at operating CNC G- code software. Nice to watch. Thank you! ❤😊
Really well done! although, i might not call it a >$100 mill, since step 1 of building it was to pull half the components from your junk drawer ;)
And step 2 was to have access to a 3d printer.
yep, very clickbait title and kind of a straight up lie.
Very much "rest of the fucking owl"
@@gweedohatsis8404 Step 3 was "develop a custom working CNC mill from scratch..."
many of these parts can be sourced from places like ebay etc for cheaper than you think. the stepper drivers he is using aren't exactly quiet but all of them probably cost $10 max i was able to find leadscrews with the brass nuts for about $8 a piece and you don't have to use extrusions, if you want the frame to be metal, you could go buy metal from a junk yard and have some basic shapes cut for the beams or you could look up a local company that sell their cutoff pieces of metal for cheap. seriously though, if you know where to look you could build something of better quality...
I love these type of DIY videos. I wish i had the toys you have to play with! 🤣
As the old saying, takes money to make money. The possibilities are endless. Would be the type of Hobby/ potential income source that i would love😊 good for you
Now use the CNC mill to make Aluminium parts to replace the plastic parts of the mill. Perfect.
Well here's a video I didn't need to see. I have almost everything I need to make this, including the 1/4" aluminum, arduino, and a 3D printer. And while you're fortunate enough to not have any CAD/CAM skills, it is my shame that there are entire buildings standing in the sun today that started on my screen. I think building this might just be my next Hopeless Project™, thanks for the video!
Sir this is Arby's
@@HyperspacePirate Blast it, I was headed for wendys.
"I have $80 worth of parts in a drawer, so I'll just say I built it for $100, because, you know, clicks"
No matter what anyone says I'm not smart enough to make anything like this. I'm not smart nor genius let alone super genius! I wish I could make a CNC machine but my intellect is very limited to simple machines and not much more. However I just want to make small things. The plastic that you're using might have a lot of give in it so that might be part of your problem. That motor is only for small drilling machines not CNC where critical accuracy is required. Still this was entertaining and very interesting. Thank you for sharing this with us to enjoy!
I love the entertaining illustrations that you do for your project videos.
On top of them being fascinating. Especially the super cooling series that's currently going.
I've laughed a lot from the demonstration of where to get AC parts xD
I'm going to have to call BS that this was under $100!
All that work and you wire it like a cave man. I'm proud of you. j/k I loved doing diy stuff but this made me want to buy one.
We used spring loaded ball screws which eliminated most play on our machines which did nano materials testing. Plus every new positioning move came from the same direction.
Great job with the CNC mill! I look forward to part two coming later
how can a human be so intelligent i dream of this gift every day lol
really good first attempt - what you learned on this build is a great investment in your knowledge base - keep on building!
Not bad for a first go. Looks pretty much like a homemade 3018 and has the same issues/limitations as the 3018's do. I used linear rails on mine (HGR20 rails with double trucks for x and y, 2x MGN12 for z) and it's a lot more rigid thanks to that. I overbuilt as I wanted a 480x480x120 build area that I can use as a laser cutter as well. The spindle mount I made works for the laser module and the spindle motor I went with. Just some stuff to think about. I'm sure mine could be improved as well, I originally built it with belts but I immediately redesigned it for use with leadscrews. I'm still playing with my design and am still using the belt driven model but may post a video of my build when I'm done. Happy tinkering.
You can build this cnc for FREE if you have all the parts just magically laying around! Isn't that fantastic? Why spend money on a cnc when you already have one?!
Do you see how ridiculous this $100 claim is?
Agreed. It's a bit of click bait. Still cool, but click bait. 3D printing isn't cheap either.
@@Liofa73 its dirt cheap if you print yourself. Otherwise yes.
And it produces shitty rough parts all for free.
@@leventeszecsy6262 3d printer are expensive and tbh, you would be better off getting a metal ship to fabricate the parts out of something stronger
@@1aatlas nah you can get and ender 3 for $100-$150 and its pretty good, but yes, its better to fabricate the parts from metal
Thanks for sharing this. I don't think I will be trying to build one of these things, but I had fun watching the video seeing what you did.
As a cnc programmer/machinist, this hurt my soul...
🥲🤡
Whys that homie, teach me somthing
“Duct tape a wild beaver to the z axis” that’s probably the funniest thing I’ve heard this week
This is really well done. I'd be super curious to see just how good a CNC you could produce using what you learned from building this one!
Jp Toto: Me too!... I have been watching every video I can find on this topic, for quite some time. It is great watching things evolve as people progress from their first design to greater things that become tools to die for! Some that come to mind are: Savvas Papasavva, iforce2d, and Nikodem Bartnik. Really looking forward to more from Hyperspace Pirate!
I've never seen this channel before, so it's got me intrigued... will he make a more expensive compromise machine? Will he make something better?
16:59 nice , you can easily make Custom Magnetron with custum rf frequency cavity .will you do that ?
Good job! I ended up buying the $160 kit, it suited my immediate needs perfectly and I'm very happy with it. I haven't used it on aluminum, but I'm curious how it would perform with a spindle upgrade. What feeds and speeds did you use for the large gear?
0.2mm Depth of cut with 100 mm/min of travel. I was running the spindle at full which i think is around 18,000 RPM. The limiting factor isn't the force of the steppers or the power of the spindle but the fact that the cheap machines are so floppy they don't have the ridigity to cut deeper/faster even though it doesn't take that much energy
@@HyperspacePirate You know what the funny thing is? The first lil CNC I built was made out of floppy drives with those tiny stepper motors for axis movement and a Dremel as a spindle. And it worked. Primarily because it was made out of aluminum and brass, and I've spent a ton of time making it as rigid as possible and movement as effortless as possible. Remembering it now I'm actually pretty shocked it worked.
It may not be under $100 but i like this guy :)
I'm surprised some of the first cnc projects were not for parts that would improve its rigidity.
How cool would that be. Machine makes parts to improve itself.
Ah yes the old "buy a 3d printer, 3d print a 3d printer, return the 3d printer"
@@paolo69 really cool
I guess your house appliances car and food are all free too. Good job. You did it. Welcome to oz!!!
The video is nice and the CNC sweet.
But the title is pretty misleading, you used almost $100+ in "scraps".
That said, you explain everything in details, so, kudos to you.
Waiting for video 2
definitely not under $100, but a great video nonetheless. If I have most of the parts, I may consider making this instead of buying a more expensive CNC Mill. It would be a good starter CNC Mill that I could use in my apartment on my balcony. This may actually give me an excuse to use a wood panel on my project instead of a 3D printed plastic one.
Side Note: Still don't have a 3D printer yet, but I plan to get one in the near future anyways, so that cost is arguably negligible for me when it comes to this mill.
Insanely impressive work and dedication to the process
The problem with 3D printed parts is that after awhile cracks start to appear and then total failure. I would suggest you use the CNC to quickly mill replacement parts for the 3D printed parts while you still can.
Duly noted. I never liked time consumption of 3d printer anyway
I went the beaver route to safe some money on the spindle, however I'm not sure how to bolt it to the machine. can you make a separate video for some instructions?
CNC for under $100... start with $400 worth of parts...
LMAOOOOOOOO😂😂😂😂
Amazing build, you're a very skilled engineer.
@1:22 guess title is very subjective since not everyone has them parts laying around with a 3d printer .
With the rise of 3d printers, diy builds have become less creative😢
I did the version with the wild beaver, definitely works better
U created a master piece with scrap , really thanx for this great tutorial
5 minute crafts be like “ we’re gonna make a CNC with parts in the drawer”
*proceeds to pull out stuff only someone who (probably) has that as they’re job, or at least dedicated hobby, would have*
Still a cool video.
Exactly my thoughts, like lets build this cheap cnc router for under $100, I have a $50.000+ Haas VF1 laying around we can scour parts from, and by the way, I just disassembled 100 $1000 CNC hobby machines , so lets start
Watching you brush away the aluminum without gloves made me flinch. I just recently cut myself open on shavings doing that >_
But of course, you can use this one to make parts for the next one! Great job! Very informative!
I know this is quite old but can I suggest, for the wood milling, you use a down cutting spiral bit? This will stop the tear out, you will need to install a system to clear the dust though.
The video might be old, but something that sets TH-cam apart from TV etc. is that people DO read and respond to comments... Two year old video, and I found a useful nineteen hour old useful comment. 👍
You do realize, you could have just gone with two pins of the arduino to do the mosfet modulation, pot to Analog pin and via Gcode and have it via both, internal and external speed command of the spindle :) But EXCELLENT job :D
It might have cost you
$74.92 in purchased parts, $500 in spare/existing parts, $400-600 in labour/time, $1000 in tools/equipment.
yup, that's under $100.
why stop there? throw in the $ 50k student fees, $ 200 k house, $ 10 k hip replacement, etc.
@@Southghost5997 the electricity bill, daily food cost don't pay for themselves either 😂
the aluminum extrusion is cheap, the nema motors aswell but that power supply? when you get powersupply with higher amps the price goes through the roof from what I've seen or is there some cheap source I don't know of?
Nice CNC mill. However, increase the flowrate on your 3D printer. The parts are lightly under extruded. Either calibrate the extrusion in the firmware or do it in the slicer software. :)
Beautiful !!!
I definitely purchase this. 1982 my Cerritos college major was cnc programming. Also I was cnc milling machinist A .Why not ! wow !
Hobby CNC is pretty accessible today.
Suggestion: it would benefit you greatly if you reduce the length of the end mill. Especially when cutting aluminum sheet. It will greatly reduce chatter and vibration. It's always a good habit to keep end mils short to prevent breakage, chatter, bad finishes, and noise
You always learn a lot when you build it by your own , you could add some lubricant over the X axis
With access to a drill press, a grinder and some steel (which I do) I would be very curious to see what kind of design upgrades could be done to increase rigidity to such a machine (or the 3018 kits out there). I believe these machines can be taken to a very nice spot for home gamers. Is that an avenue you will be looking into ? If so, let me order my kit before you get started haha.
Our maker space made a very nice CNC mill out of MDF and L-channel aluminum. If you have steel at hand, even better. You can definitely make something nice yourself if you're willing to put in the time to research, design, and fabricate.
Depends on what he wants to do with it. Gantry type machines are usually used more often for wood and sheet metal for more router style projects.
For cutting blocks of metal, a vertical mill is better, in which the tool head only moves along the Z, and is fixed to a heavy solid frame.
and the table moves along both X & Y. Stronger motors are usually used too.
The more solid the machine , the less vibration there is.
Amazing I like very much but at 84 I haven't the courage enough to start. Congratulations
Maravilha, muito bom, vc é o cara; gostaria de receber o passo a passo para eu montar uma copiadora igual a essa, como faço para adquirir o projeto
It's possible the M+G code program overran some buffer. Perhaps canned cycles/GOTO would help
I would like to compliment the excellent vibraphone jazz you had playing. Oh, how I miss Brenda...
Call me simple, but I got the biggest kick out of the 3D-printed 'speed' label. 🤔
I recognize that Amazon lab bench power supply! Hahaha good to see someone else has it too.
Just wondering about the cheap router motor, if no matter how rigidly it could be held, whether its own shaft moves up and down within it.
This was cool because that ad in the beginning got me interested in the MR1 cnc...
In your defence. A good number of people watching this type of video would have a 3d printer, Could access great free cad software. This was a great effort. You have a really good skill set and have set out to inform and show your experience from beginning to end. All this is by no means an easy overall production. Ignore the keyboard warriors and keep doing what you do. Thanks.
Why don't you directly wire the spindle mosfet up to the arduino? GRBL has PWM spindle control on pin 11. No need for 555 circuit, and you can now control the speed of the spindle through GRBL, improving cut quality.
You are insane man XD. True Engineer. This is awesome. Keep it up.😀
I enjoy this "special".
I like the "castor-spindle"
Dear concern,
With all due respect may i know the castling all parts to make it at home or how much it takes to buy from Bangladesh with delivery cost. This is really amazing to have this one. If it comes on a budget then i will try to buy this item.
Can you suggest any good video for choosing all different type of spindles and it's chuck and milling bit typ similar Information ??
Wow. Good job. You made it look easy
See me personally would’ve just spent the extra $65 so I didn’t have to do all that 😂 Good work 👏🏻
all axis must be over v guiding slide at place of round shaft and the screw must be combine with ball at place of brass nut
Climbing cuts will have less tearout, but normal cuts may have less deflection.
Thank you
I am very happy to see that
Can you tell me pleas which app you used to generate g cade?
That was so amazing I subscribed!!
Did you happen to check your couch cushions? There may be parts for a new car laying around.
The real title should be I built a cnc under 100 dollars by used several thousand dollars worth of stuff I just happened to have
the arduino already has a vin pin that will take 12... no need to desolder the barrel jack
1:52 That's the music you should be playing in your sub when you're chugging along, watching the crabs & mermaids, lol.
How much is it if you lack all of the parts, materials, and machines to make some of the parts?
quite impressive...but where is the cost of materials/electricity? It definitely consumes a lot of pvc?
Most powerful is he who has himself in his own power.
i need to look more into cnc machines... would love to get me one 30*30cm would be enough for me... are there machines where u can swap the cnc with a laser?
Isn't it a little redundant to make a pwm controller when you have an arduino inside already? I havn't personally used GRBL but have made similar systems with marlin and there is no issue with this
may i know what is the name of the software you used to design the 3D printed parts? tks.
Congratulations, beautiful, reliable and cheap CNC..