02 - 06 toyota camry rack and pinion

ฝัง
- เผยแพร่เมื่อ 11 มิ.ย. 2017
- If a MECH A NIC video helped you consider donating to my patreon account to help support the channel. / the_mech_a_nic
or my paypal
paypal.me/jonathanrenteria1986
THE MECH A NIC’s amazon store ,here’s the tools I use
www.amazon.com/shop/themechanic
THE MECH A NIC’s Instagram page
/ the_mech_a_nic
THE MECH A NIC’s facebook page
/ the-mech-a-nic-1356996...
Thank you for watching my video, I appreciate the support ! - ยานยนต์และพาหนะ


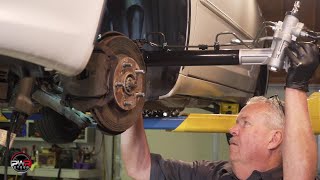


I just got into this job this afternoon. I totally get your frustration working under the vehicle. This job is actually pretty easy except the two bolts that hold the rack in. Man, are they ever tight! The one on the right side of the car is the easier of the two. All you need is a 19 mm box wrench on the bolt head and it will hold when you turn the 17mm nut. The nut came loose with my 1/2 flex arm, but it needed lots of heat (with map gas) and both my legs to get it to move. The other side is worse because you can't get a socket on the 17mm nut as the transmission is in the way. You need a long handle 17mm box end wrench (and the 19mm box end on the head of the bolt) and a pipe extension to move the nut. It took me 5 attempts and lots of heat to move the nut. I bent the wrench quite a bit, but it finally released. Not for the faint of heart. Tomorrow I get into the timing belt on this V6 with 220,000 miles.
+Philip deCatanzaro sounds like you had it worse than I did! Great work . It's the best thing ever when a bolt finally breaks loose. Thanks for sharing your experience.
Your video was very helpful. I was at the point of using a nut breaker or sawing the nut off,but I'm glad I didn't. There is only so much you can do in your driveway with the car up on blocks and it tries your patience. Thank you for showing us what's involved with this job. Much appreciated.
One more thing that I'd like to add. It is much easier to access the high (and low) side nuts and the steering U joint bolt from the top. On V6 models you remove the air filter assembly and there is open access to the nuts. The only thing is that if the car is already up on blocks you will have to stand on something to reach in. You still need the crowfoot (17mm flare) connection with a long handle flex head ratchet. Lots of tighten-loose tighten motion (with ATF or penetrating oil) will keep you from ruining the lines.
+Philip deCatanzaro I would imagine things are slightly different with a v6 in it. Glad you got it done.thanks for the tips for other viewers.
With the V6 you have to pull out the old rack and install it from the driver's (left) side. For those of you that took the trouble to remove the old unit ... don't worry, installing the new one will take much less time. I would have done a video, but our friend the "mech a nic" has done a great job here.
I know this is an old video, but I'm always amazed how people learn to do this shit(mechanical fixes). As someone who doesn't know anything about cars, People who do this work are Def really under appreciated. Nice job brother.
Thank you
I got into it cause I had no money to have it done for me.
There are no new steering racks for the 02-06 Camry's, all are rebuilt. When you get the replacement steering rack there are plastic block off plugs where the power steering lines thread in. Remove those plugs prior to installing the new rack and inspect the threads to make sure they are clean and not cross threaded or damaged. Any damage to the threads return the rack for a replacement. Put the plugs back in and install the rack.
Carefully inspect the power steering lines and hose fittings to make sure that the threads are not dirty or damaged. After disconnecting the power steering lines carefully use a pick or other pointed end tool to remove the old O rings, new steering rack comes with new O rings. Use the new O rings.
Remember to tie off the steering wheel so it does not turn using the seat belt.
Replacing the steering rack is not difficult, take you time and be very careful when putting the power steering lines back onto the rack. Use your fingers and check from the bottom and top views to make certain you have not cross threaded the fittings when putting the power steering lines back in place. A cross threaded power steering line will result in you needing to replace the line and the new rack you just paid a lot of money for.
You've done an amazing job with the camera angles!! Really clear and crisp
Thank you
Thank you so much sir for posting this video. I have a 2007 and all the bolts and hoses that were on the rack were just like the model you were working on.
You're welcome, glad the video helped you
I am not changing the rack & pinion myself--however this video was a blessing to let me know what a time my mechanic may have doing the replacement. Now I know to make certain to not squabble over the cost to have it done and I will also buy him a big Costco pizza to help him ad his helpers. On tough jobs I often treat them to lunch- It seems to be much appreciated. I did it because back in my youth if I was working on greasy cars I know I used to take those cars first and do extra steps because I felt appreciated. It seems to work the same with my guys. Always treat the help nicely- -- - always ! Not for personal gain, but because it is the right thing to do.
Thanks for the vid! Just so you know, the rack takes Dextron II automatic transmission fluid and not power steering fluid. Don’t know why but that’s what Toyota calls for.
Hey buddy I just want to say THANK YOU FOR THIS VIDEO. Literally went to get my car checked and was told it was rack and pinion and both cv axles, well I had an idea what the parts cost from previous encounters so I kinded added up a rough estimate of just parts and alignment and figured labor and all would be around 1700 but oh boy was I wrong, I was quoted 3 thousand dollars!!!!! Immediately I told myself no ill do this my Dang self and all thanks to your video pal 👍 👌 thank you again. Saved me tons of money
3 grand!! That's crazy. You can buy your own tools , do the work and pay for a wheel alignment and save a ton of money! Glad the video helped you.
I appreciate your efforts to catch everything clearly with your shots, and sometimes multiple angled shots. You go into detail but not crazy engineering service manual detail. It's concise, it's got torque specs, solid techniques, tool recommendation, and alot more effort than most. My friends Camry and i thank you.
Thank you. Thanks for noticing my efforts
Just watched like 6 videos and 3 articles yours is the only video that shows the u joint pinch bolt and how it connects and in clear video, thanks.
You're welcome.thanks for watching
Well oiled car = a rust free car 🤣😂🤣😂
Love your videos. Good work!
Thank you
Thank you for this video. It is hands down, the best video made on this model Camry!! All I need to do is replace the rack and pinion bushings and I’m still dreading it.
Speedy Banana bread
It is also very important to note that the new replacement rack should be centered before installing it on the car! Or else your wheels would turn further one way than the other screwing up your turning radius and causing the tires to rub possibly.
Aye thank you man, you have alot of information in your video that ALOT of other videos dont
Great video! Clear and concise. Video angles were spot on!
There is a trick for maintaining the alignment. After placing the car on jacks, the bolt to the tie rods can be measured with a tape measure without any obstructions in between the two points. As for myself, I measured outside thread to outside thread. It is recommended to have a helping hand to perform this measurement. For example, I measured 55-5/8". Otherwise, this is a very good video.
I really appreciate the video! Great camera work which is difficult to do when trying to get through a job. Thank you!
No problem.thanks for watching
Great video! I like the fact that you put the torque specs in the video instead of just showing a chart.
I'll be referring to this video when I do mine in a few days.
You're welcome.thanks for watching and good luck
This is a very good video. The detail is very helpful and much better than most.
+FatFendered39 thank you,I appreciate it
Thank You. When I was looking at AllData it said engine assembly and Transaxle removal. I said what? My customer wants the vehicle back asap and I am a one person show. Thank you very much. Your video was a great help. Richards Auto and Air. Thumbs Up
No problem thanks for watching. Now this method applies to the 4 cylinder model. I think you have to do all that work if you have the v6
I did it! Thank you for the great video! Everything was pretty simple besides threading in that high pressure line. I was finally able to get it once I removed all the brackets holding the lines together, then moving the line around till it was straight enough to threat in. It was actually real easy once it was in in the right position. I would say for those trying this to just be careful that you don’t strip the threads by forcing it in. If it’s not threading easy then it’s probably not going in straight.
Yes that's a very important step. It has to thread in nice and easy.if you cross thread it you're causing a world of pain lol
Where did you buy the steering rack?
Rockauto
@@themechanic6117 what brand is it
The one that went on this car is a (remanufactured) ultra power brand
Congrats on the new baby..great video
One thing I would add is check your rubber hoses from reservoir. Mine are sweating and look pretty bad, probably disintegrating from inside. I figured out this is a 5/8 hose, has to be rated for transmission/PS fluid. My local parts store has it by the foot and should be about $4.00. Lots of people say the short rubber hose hardens where it connects to the reservoir and starts leaking from under the clamp. EXACTLY what I'm seeing as well.
Also, they say to put in an inline filter, but Camrys already have a filter pad in the reservoir so no need. For my Dodge Caravan I put an inline filter in the return line to catch anything left in the system from the pump disintegrating. It's been like 8 years so that worked out well.
From TN: "Your PS reservoir already has a filter built in. Yes, the PS filter is integral to the reservoir, which also means you can't just change it out without using a new reservoir. If you draw out all the fluid and look into the reservoir, you'll see that little filter pad. That's all."
Great video. Pretty clear info. Thank you
Best video out there by far for camry.
Thanks for watching
Thank so much for your great details video
You're welcome
very heplful video man, I really appreciate including torque specs saves me alot of time.
No problem. Thanks for watching
I see right through when a vid is made by a pro mech or just a wannabe pro youtuber just by hearing the way they explain things and do the right stuff.. because it tells how experienced they are on their field of work..
+alister kellen I'm not sure where you're going with this..
The mech a nic lol.. im sayin that u r very good at this sir.. dont get me wrong..I knew u been on this field for a long time coz u r so cool talking about the "several ways" of doing something but u pick the fastest.. plus ur explaination is deep and really helpfull..
+alister kellen thank you, I really appreciate it.
Great job explaining,,,you rock
Trudy Brandes thank you
Disconnect battery as air bag might go off great vid thanks from Ireland
Great video!
Thank you
thanks very much for the video
You're welcome
Pretty good video: You need to remove the air box...you need to disconnect the sway bar lower links so the sway bar may be rotated to get the bolts holding the rack off, these bolts may be removed using a 19mm box wrench cut in half with a 24" 1/2" black pipe as a lever bar, the rack comes out the drivers side. Job is about 1 hour for removal. You may spend $150 to $300 for a replacement, but $30 for a seal kit...takes about 1hour to reseal...go for it!
Thanks!
I would suggest setting the toe-in at approximately 1/8 in. instead of zero for the temporary alignment setting. Since there is some slop in the suspension components, this setting should account for it.
I like the classic reach around manuver.
🤣👍
You ever rebuild one of these units. For around 30 bucks you can get a Gates rebuild kit which just a bunch of seals and save yourself a lot of money. Its a straight forward job just a little time consuming.
THANKS
I'm glad I've never had to do this, it looks like a frustrating bear of a job in a little car. Guys talk about being certain the steering wheel is exactly centered, but that would be difficult if one has to rotate the steering wheel to get at that universal joint bolt on the steering shaft. Maybe one should mark the splined joint so it goes back on exactly the same way? Is there a mark on the new rack to make it easier to insert the shaft in an exactly neutral position? Presumably if it is not perfect the guys at the alignment shop may be able to help. It would suck if the steering wheel wasn't perfectly straight when driving straight down the road.
Good video just remember that it uses atf as power steering fluid
How did you get a torque wrench onto the 2 bolts that hold the rack in?
Gracias. Muy bueno.
Gracias 👍👍
HAHA... nice intro! Back to watching. =)
+Thomas EXOVCDS thanks ,I knew someone would get a kick out of it lol
How many hours is this job all together and how much is it worth?
With the thread lock was it replace before?
I'm planning on changing the steering rack bushings in the rack on my '06 SE V6
With the sway bar links and bushings removed, and the two bolts removed that hold the rack in, is there wiggle room to lift the rack up an inch or so to change the bushings in place , without fully disconnecting all the hydraulic hoses, and without removing the rack from the car?
+Michael Luscher you can give it a try , I think the most important thing to take off is the steering shaft then you might have room to replace the bushings. Good luck
Did it work? I'm hoping same shit right now
🤣🤣🤣🤣🤣🤣🤣 I like ya opening of the Video 🤣🤣🤣🤣🤣🤣🤣
Thanks 😂👍
I want to do this to mine but I have 10x the rust. I think I'm just going to do tie rod ends until I get a bit more of a down payment for something new.
Anyone know if this is the same for a 1999 ES300?
Anyone experienced excessive play in their new rack? New rack n pinion, outer tie rods, and intermediate shaft. The unit was 150$ off ebay. Do i need to find oem? Any insight would be much appreciated. Im going crazy trying to find it!!!
"Focus you f*ck", nobody will beat our asses harder than ourselves. Great video!
Just finished the job, one more IMPORTANT NOTE: The Camry I have has a VSC (Vehicle Stability Control) which is like Stabil Track for GM. Basically it knows if you are in a slide and tries to stabilize by breaking... The car freaked out on the test drive as the steering wheel center had shifted with the new rack and pinion. One option I didn't try was to unplug the battery for 30 minutes to clear VSC memory.
There are videos on how to reset using a paper clip and shorting two of the ODBii connectors. Other options include using Toyota Tech Stream software in the VSC area inside utilities to a) ignition on + engine off then b) on a flat surface with the car still, which will recalibrate the sensors. The other option is to go into a shop and have them recalibrate it for you for some cost (maybe $50.00 not sure). You can also pick up a computer that plugs into your ODBii and reset yourself.
Excellent content …. So I have a question for you my man and I would love an answer from you !!! A local mechanic that I have been going to is trying to charge me 1250$ for the sterling replacement and the racking pinion that’s leaking ( replacement as well ) for 1350$, this price include labor and part!
This seems to be a lot man, I am watching the video and it downy seem a lot! I already just change changed the timing with them and water pump which was 115$. I feel like I am spending so much so such old car ( do t get me wrong tho I love the car and it’s running super smooth )
Anybody more than welcome to jump in 🙌🏿🙌🏿
Bro just took it out last night. Man you were right those 2 bolts holding the rack and pinion were the worst. I got another question when I refill and purge the rack and pinion do I leave the cap open on the reservoir?
+DevilleHtwn yes,I like to leave the cap off while purging. The air needs to escape.
Thanks. Do you know if this is the same rack that is in a 2009 Camry?
I don't know if it's the same part but the process should be very similar
Did you take off the reservoir and clean the screen filter? These get mucked up and prevent flow of fluid to your rack and eventually cause the new rack to fail
I did not notice any of that, if the customer ever comes back I'll check it. 👍
good job . i did for my car too ,
Glad you got it done 👍
Thanks for the video and explanation, but didn't you tear the rubber covering? At 10:56 it looks torn to me. It looks connected at 10:34, so maybe it happened during the purging process.
Yes it did. I didnt realize the boot was spinning as i was adjusting it. I had to replace that boot. 👍
should i get a rack and pinion replacement with outer tie rod ends or just the rack and pinion? does it matter? im replacing because of a steering fluid leak
thanks for your time
+Thomas Jaeger I'd replace the tie rods as well
With mine I found a bad inner and outer tie rod on one side. You should change both sides. For the $25-30 no point wearing your tires out later. Anyway your new alignment could be sketchy with old parts.
Yes get new rods. The age of rods and rack. Get all new as one person said, for $40 it is not worth an issue in a year
I can't seem to get the shaft off the u-joint even though I have used a flathead screwdriver to pry it apart (and hold it there) almost 1/2 inch. I've got it to move up a little bit using a crowbar and hammer but I couldn't even get it off half way.
I'm going to try a larger crowbar today to see if that could help. How big is the flathead screwdriver you are using to hold the joint open?
It shouldn't take much to pry it open. They can be rusted in there so cars are a pain in the butt. Make sure to use penetrating oil/pry bar/hammer where ever you can to get it off . What worked for me was to put the bolts back in the subframe to hold the rack n pinion down and hit the joint that you separated upward .It's the only thing that worked for me.
The mech a nic I managed to get the old rack out and the new one in but now I can't get the driver's side bolt back in (I got the passenger side). Im thinking of removing the sway bar bracket?
Sometimes you have to remove other parts into to go forward. Do whatever needs to be done 👍
What tools needed
If you were going to let a shop do this what national shop would you trust ?
How do you center the new rack and pinion? If I buy a new one should it be centered ? When removing the old rack and pinion should the wheels and steering wheel be looking straight ahead?
+DevilleHtwn it might not be centered , use vice grips on the shaft with a cloth over it. Turn the rack n pinion left to right and count how many turns it takes then just center it.using measuring tape to make sure it's centered. Yes ,try to keep you "wheels" straight and more importantly the the steering wheel . I think I went through this process in my rack n pinion video on the Toyota sequoia .
+DevilleHtwn th-cam.com/video/t5RzTnwy9mg/w-d-xo.html
Around the 9:00 min mark
Is it easy to put steering shaft join back?
+Lang Chaoyi as long as you pry the joint open it should slide right on.
Great video. How many hours did it take to do the removal and replacement?
I really can't say since I was recording it took many more hours than it normally would
I bent the ride side of the steering rack link that connects to the balljoint.
Would I have to replace the WHOLE STEERING RACK??
No you don't. You can replace just the tie rods alone
@@themechanic6117 thank you bro. I appreciate uu
What is the average cost to have this done? Rack & Pinion along with tire rods?
Average quote (3) was $875.00 which included Rack; Tie Rods; Alignment and Labor
Is this procedure similar to the 2007 v6 Camry?
Some things might be different but it's still the same general idea👍
The mech a nic book calls for 8.2 hours but I think removing the engine is included. How many hours you charge being that you don't use a lift?
Oh it's the v6,then yes that's a bit more work. I just charge my customers a flat rate and this was a friend's car so I didn't charge much. If you don't have the proper tools to do such a big job I'd just take it to a shop
If you remove air box it is easier to remove ps lines.... just my two cents did this job on v6 camry in 2hrs
Do you have a guide or video, I'm about to do this job on my 2003, v6 camry
Does this apply to rav4 2007 as well?
Same general idea but im sure some things will be different.im not sure if its more difficult
U guys and your rubber gloves crack me up,,guess your afraid of getting dirty...lol
Chemicals on your hands for years that leads to medical problems doesn't sound appealing to me . No need to be a tough guy or impress anyone. I also use safety glasses because getting rust / dirt in your eyes isn't fun. I leave that "tough guy" mentality at home. Safety first
At start Did you secure the steering wheel in any way? Or was steering wheel centered and key removed / locked ? Had one installed a year ago and once completed the steering wheel was turned to far left. Another shop said the initial installer missed a step. 🤔🤔🤔
I just center the steering wheel and be sure to not move it while doing the job
ok. That steering column horn ribbon is another bonus when it becomes unspooled 🆘. And As assigned to the steering shaft coupler- another camry part infamous for wear and play in steering and the related click click in the wheel feel and another reason the steering wheel is tied straight before fully releasing coupler - I believe they offer a column lock pin as well When screwed up the horn insert needs to be replaced
That sounds like a nightmare I'd rather not deal with lol
How about the rack's pre-load adjustment? A mechanic installed a new rack for me and the steering has MINIMAL resistance when turning.
Pre load ? I've never heard of this
Google
Just about to do this... it's just closing gap on pinion gear or loosening it so it's not too tight or too loose. I found an article on toyota nation for 99 Camry. Shouldn't have to mess with this from a new unit. People complaining about a light clunk have the pinion gear play too lose and need to tighten it up.
************
An update to this. Finally, was able to use a lift at a buddy's shop to work on this. By removing the big square looking nut on the rack, you can access the adjustment nut to tighten this up. Unfortunately, tightening this just a hair made it too tight. There was basically so much wear in it that it wasn't fixable. Time for a new rack....
Where do you get the torch. Propane?
Any auto parts store or menards / home depot
I cant replace rack and pinion n my toyota harrier
When you replace it do you have to replace the whole thing? The dealership told me there’s a tear on the passenger side but I’m thinking of having my dad fix the problem.
If the boot is just torn it can be replaced without replacing the rack n pinion
The mech a nic okay nice to know!! They did say a tear was there but I’m pretty sure if I would have done the work at Toyota they would have charged me for the entire rack and pinion!
Avoid the dealer... If youre concerned just take it to a regular shop. Itll be cheaper but a torn boot doesnt require a new rack n pinion
The mech a nic thank you very much!!
@the mech a nic do you have a video on how you replaced the sway bar link?
Sway bar link are pretty much the same on "most cars" you can watch one of my other videos and apply it to your car . I'll get a link for you
th-cam.com/video/nertWyjFhDA/w-d-xo.html
The mech a nic, thank you sir! I just have issues taking the bottom nut without removing tie rods
They're a real pain. Try a propane torch on the nut. Last resort but usually faster is just to cut the nut off. I did it in another video. I'll send you the link to the vid where I cut it.
th-cam.com/video/aPDBGNyo6QA/w-d-xo.html
Great, thank you sir. BTW, I just came across your videos and they are very detailed and clean work, just the way I like. Keep up the good work man!
Any body just changed the bushes in one of these racks?
Nice work. I hate this job. I'd rather replace a clutch.
Lol I hear you,this job sucks
Dose a ripped boot means I need a new rack? It doesn't leak any fluids the steering wheel isn't stiff at all but the boot has a big rip in it 2006 camry 4cy
You can replace just the boot. You'll have to remove the outer tie rod to do it.
@@themechanic6117 is it something I have too do asap?? Like is it safe too drive i put some grease in there too keep it lube up
Don't have much money right now was planning on doing it next cpl month I already had too put money in to the car every month for last 5 months
I did motor mount cv axle breaks windshield wiper an new hub caps only own car for 5 months drives great too me after I put all the work into it this is last thing I needed too do them a oil change in 800 miles
Just get it done when you can so it doesn't ruin the rack n pinion
4 cyl or 6?
I want to say 4 cylinder
How much would this cost for a used rack n pinion. I'm assuming its about 2 hours of labor fees?
Labor fees will vary depending on where you go
Latin Ace
You do not want a used rack. They have been determined not to last but about 8 months
Well what would be an estimated price for this job
Last time I asked here in northern indiana I got an estimate of $1,150…
Cuanto sale la pieza y el remplaso por todo cuanto cuesta
Dont turn the wheel, keep it straight, you will brake the clockspring if not.
Yes , I know that...
9:27 its a girl. That was funny
+Zubair Iqbal lol thanks for watching 👍
I thought it was a cat. Man what a great video!!
Thanks
What was wrong with the power steering rack?
Leaking seals
@@themechanic6117 oh ok. The reason why I asked is because when I'm driving straight, I can still can rotate the steering wheel left and right and when I make a hard left and right, it doesn't automatically return straight and I have to turn it myself. What could be the problem?
a few lines of my comment were edited out. I don't know why.
Easy job. But you didn’t lock the steering wheel.
It's not necessary but be sure to do it on your car of you want...
all Toyotas use automatic tranny fluid not power steering fluid
Hmmm
My 94 4 cylinder LE uses dextron type ATF as it reads on the reservoir cap.
TU on vid. that's a big miserable job.
Yeah it sucks lol
SERIOUSLY!? I'm an RN and endnotes I know that's not a camry!
What I DO know is that you keep your car a disgustingly filthy mess!
FYI, your car is a Corolla
It's not my car, just someone's car I was working on. I hardly remember the car.
Using sandwich gloves while fixing your car, looks sketchy.
Gotta protect your hands 👍
They're actually not food grade gloves. I think they're for cleaning. Doesnt matter. As long as they protect my hands thats all i care about. I have gloves for "mechanic" work but I have so many boxes of these type so I use them any chance I get. Thanks for watching.