I've never had a problem with the bisque fire (to cone 05), and rarely have a problem with the glaze fire (to cone 5). A couple of my students, whose projects were longer and flatter did have some drooping/sagging on the ends. I think as long as the sides go upwards somewhat, even at an angle, drooping shouldn't be an issue. If you're firing higher than cone 5, you may run into more issues as the temperature increases. I haven't used supports with this particular project.
I haven't had an issue with the ones I've personally created, but a couple of my students, whose projects were longer and flatter did have some drooping on the ends. I think as long as the sides go upwards somewhat, even at an angle, drooping shouldn't be an issue.
Dios mio me parece un sueño, es precisamente lo que tengo en mi cabeza desde hacen meses y no sabia como hacerlo, ahora estoy más clara , es un milagro , gracias por compartir el arte, saludos 🤗
Thank you. Sometimes it hard to preserve the pressed design on the first side, because sometimes flipping it over and pressing the other side, you lose the design from the pressing of the first side.


Such a good video! Many thanks for your explanations and your slow, steady manner.
You're welcome.
Excellent Thanks for your contribution
Amazing and so creative!
Thank you!
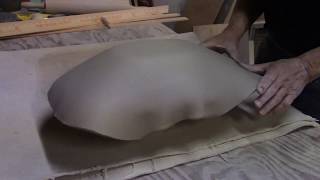
Amazing, question please how tick is the s an to make this bowl.. thanks so much , I hope you answer please🌷
The clay was either 1/4 of an inch thick so that I could still impress the clay without it getting too thin.
¡ felicitaciones! Quedó precioso mil gracias por compartir tus maravillosos contenidos. Saludos desde Cartagena Colombia
Thank you for viewing, and thankyou for the compliment.
Do you ever have problems with these pieces sagging in the kiln? Do you fire them without any supports? Thanks!
I've never had a problem with the bisque fire (to cone 05), and rarely have a problem with the glaze fire (to cone 5). A couple of my students, whose projects were longer and flatter did have some drooping/sagging on the ends. I think as long as the sides go upwards somewhat, even at an angle, drooping shouldn't be an issue. If you're firing higher than cone 5, you may run into more issues as the temperature increases. I haven't used supports with this particular project.
Well demonstrated. Thanks
You're welcome! Thanks for watching.
Very nice!
Thank you!
Many thanks
You're welcome. Thank you for watching.
Excellent. Gracias 😊
Thank you!
Where do you get those embroidered shirts? I like the patterns they make
Those particular shirts are embroidered Affliction shirts purchased from the Buckle. I agree, they made a really nice pattern.
Wonderful!
Thank you!
Does this droop any when it is being fired? Is there a best practice for putting it into the kiln?
I haven't had an issue with the ones I've personally created, but a couple of my students, whose projects were longer and flatter did have some drooping on the ends. I think as long as the sides go upwards somewhat, even at an angle, drooping shouldn't be an issue.
Dios mio me parece un sueño, es precisamente lo que tengo en mi cabeza desde hacen meses y no sabia como hacerlo, ahora estoy más clara , es un milagro , gracias por compartir el arte, saludos 🤗
You're welcome. I'm glad I was able to demonstrate it in a way that helps you.
lovely
Thank you.
I appreciate how you achieved decoration on both sides of the bowl.
Thank you. Sometimes it hard to preserve the pressed design on the first side, because sometimes flipping it over and pressing the other side, you lose the design from the pressing of the first side.
고맙습니다.
You're welcome.
Braxton P. 6
Thanks.
Calina Z. 6.
Thank you.
Kimberly V. 6
Thanks.
Ashlynne H 6
Thanks.
Tyler W 6
Thanks.
Jon D. 6
Thanks.
Ellie O. 6
Thanks.
Jace R. 6
Thanks.
You would have been better off rolling that slab directly on the stone bench top.
For my first attempt, it actually stuck to the countertop, so I used the cardboard so it would peel away more easily.
Olivia V 1
Thanks.
Gage G 1st
Thanks.