TH-cam
US
The simplest table saw crosscut sled on YouTube. Essential woodworking shop project.
16:12
Precision Saw Sled
25:39
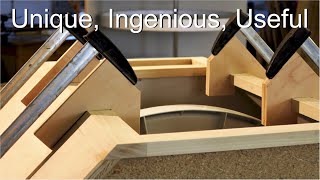
Six Ingenious Cabinetmaking Tips & Jigs
11:02
Call you half a day to cook, also ignore me, I come to Doby her......😂😂# Falling in love with Mo
00:17
ถ่ายทอดสด พร้อมบทวิเคราะห์ l International Exhibition Matches l ทีมชาติไทย พบ ทีมชาติเลบานอน
2:49:40
เล่นซ่อนแอบกับหมาหน่วยพิเศษ K9!! มนุษย์ vs สุนัข!! ใครจะชนะ?!
24:24
Crosscut Sled Plus
Workshop Companion
ติดตาม
702K
ดาวน์โหลด
โหลดลิงค์.....
มุมมอง 287 102
0
0
เพิ่มลงใน
เพลย์ลิสต์ของฉัน
ดูภายหลัง
แชร์
แชร์
ฝัง
ขนาดวิดีโอ:
1280 X 720
853 X 480
640 X 360
แสดงแผงควบคุมโปรแกรมเล่น
เล่นอัตโนมัติ
เล่นใหม่
เผยแพร่เมื่อ 17 พ.ย. 2024
ความคิดเห็น • 248
ต่อไป
เล่นอัตโนมัติ
16:12
The simplest table saw crosscut sled on YouTube. Essential woodworking shop project.
Steve Ramsey - Woodworking for Mere Mortals
มุมมอง 1.6M
25:39
Precision Saw Sled
Workshop Companion
มุมมอง 505K
11:02
Six Ingenious Cabinetmaking Tips & Jigs
Workshop Companion
มุมมอง 325K
00:17
Call you half a day to cook, also ignore me, I come to Doby her......😂😂# Falling in love with Mo
爱上莫小在
มุมมอง 2.1M
2:49:40
ถ่ายทอดสด พร้อมบทวิเคราะห์ l International Exhibition Matches l ทีมชาติไทย พบ ทีมชาติเลบานอน
ช้างศึก - ฟุตบอลทีมชาติไทย
มุมมอง 1.1M
24:24
เล่นซ่อนแอบกับหมาหน่วยพิเศษ K9!! มนุษย์ vs สุนัข!! ใครจะชนะ?!
My Mate Nate
มุมมอง 1.1M
00:26
حلوى علقت في حلقي مباشرةً 🫣
Buzzy Bug Arabic
มุมมอง 10M
10:58
Making A Router Plane
Workshop Companion
มุมมอง 366K
20:44
the FLAW with Ultimate crosscut sleds
Scott Walsh
มุมมอง 736K
15:57
Have a Table Saw? You NEED to do This!!!
Biscuit Tree Woodworks
มุมมอง 384K
12:13
Precision Tenoning Jig
Workshop Companion
มุมมอง 67K
28:10
74 - Mini Cross Cut Sled & Jobsite Saw Sled
Kings Fine Woodworking
มุมมอง 1.6M
17:26
Custom Saw Stand
Workshop Companion
มุมมอง 172K
12:59
your crosscut sled is way too big
Scott Walsh
มุมมอง 953K
23:06
7 TOOLS You Will Have To Make After Watching This.
Start Making (Woodworking)
มุมมอง 101K
12:01
How to Make a Table Saw Sled with Handles for Added Safety
731 Woodworks
มุมมอง 203K
4:18:11
MISS GRAND PHUKET 2025 | FINAL SHOW
GrandTV
มุมมอง 631K
24:27
เก็บกระทง 1 วัน! ได้เงินกี่บาท ?
Ajumma Nammy
มุมมอง 377K
24:24
เล่นซ่อนแอบกับหมาหน่วยพิเศษ K9!! มนุษย์ vs สุนัข!! ใครจะชนะ?!
My Mate Nate
มุมมอง 1.1M
00:59
Khi Liam Harrison cho đối thủ 5 lần đo sàn chỉ trong 1 hiệp đấu
Vietnam Martial Art
มุมมอง 813K
00:44
Incredibox Sprunki vs Inside Out 2 - Which team rescues the mermaid AnythingAlexia? #shorts
AnythingAlexia
มุมมอง 6M
00:22
SWING or SWIM 💦 NEW VIDEO live now ! #storror
STORROR
มุมมอง 18M
06:27
어쿠스틱 버전으로 새롭게 탄생한 베이비몬스터(BABYMONSTER) 파리타(PHARITA)·아현(AHYEON)의 'LIKE THAT'♬ |비긴어게인 오픈마이크
Beginagain 비긴어게인
มุมมอง 760K
00:35
ไม่น่าเชื่อว่าเธอจะฉลาดขนาดนี้ #negi #challenges
NEGI
มุมมอง 568K