I've never messed around with anything like this before, but was intrigued with the possibilities of creating something using circular screens. Thank you for showing everything you did clearly (and for even taking the time to write everything up for easy reference in your video description!) and including points of frustration that others may come across. Very informative video! It's too bad the phone you purchased didn't have a perfectly circular cutout-- that would've been a very cool idea.
Thank you very much, comments like this defiantly make me want to keep on doing videos like this :) I also wished the screen would have feet the phone ... I still think of ways to use them both :)
WOW. Great video. I've been looking for detail information for this display. Finally, your video was step-by-step and detailed and finally the display works. Thank you for that. Much appreciated.
@@talofer99ok obrigado eu comprei um monitor deste aí, e comprei um modelo de câmera; HD 700TVL Analog Mini Camera 960H CVBS CCD Mini Bullet Cameras Inddor Small Security Surveillance Video Camera Esse modelo de câmera eu encontrei no AliExpress. Creio eu que pode funcionar neste monitor, que funcionava vai dar para mim fazer um projeto muito bom. Mas eu tenho algumas dúvidas Será que eu vou ter que usar algum tipo de placa; poder intermediar entre o monitor e a câmera; ou será que eu conectar o monitor diretamente na câmera funcionará?
Hi there back, well, cables is what connects the data between the MCU and the screen. The only way to eliminate them will be to create a board that will connect to it without cable just with a connector. I'm pretty sure if you search google you might find one ready like this.
Connect the screen to the correct pinout, you will need some input for the image, you can do it by adding an SD card reader maybe, or can have the info as hex file. For the rest there is an example in the example section of the library.
@@talofer99 I already tried it with this library, which is also the only one I could find to control this screen, but I can't get a photo on it, text and stuff works, but it doesn't work with photos and I can't find anything else online either then this with the nano and this screen
Hi, I can guess you asked if its possible to shoe a video on this screen ? The answer is yes, but in order to do so, you will need to have process that will get the video frame and convert it to a frame the screen is capable of showing - like jpg for example. I'm not sure what will be the frame rate with the need to process the video into images and then to transfer each image to the scree. The closest I know of is an example of animated gif shown on the screen. Hope this helps :)
I did the same thing , but it may have to do with the fact that the Arduino Nano I am using was hand soldered. I’m thinking about getting a new one to try again. I was also wondering if you could help me soon with uploading gifs and JpeGs like you did in the video
Thank you very much, It's nice to hear that the video helps out people ! :) It never happened, I got very busy at work for the last year and half, I do not (unfortunately) even get to make new videos. I got an esp32 camera board with this screen attached to it, doing live stream from the camera, for over a year now on the table ... can not find the time and power needed to make a video about it I hope one day soon it will happen :)
Hello, great video. I got my display working but i would also like to control the backlight. I am using an esp32 to generate a PWM wave, it is 8 bits and on channel 0. I have tried varying frequencies but they all do the same thing, after a couple of minutes the display just turns off. Do you have any idea on what I can do or point me in the right direction? Thank you!
Hi, thank you very much. I actually did not look into the backlight at all. I got the setup on my table connected to an esp32 camera - and I stream the image to the screen . I will try to take a look at the back light and see what are the options. Did you follow a specific guide for it ? If so - drop me the link please :)
Hey, I might be a bit late but if I'm not mistaken the datasheet comments something along these lines. Specifically, it says " 4.4 Backlight Recommended Circuit Motherboard driver backlight is need constant current circuit, if threated voltage screen after sight brightness difference. Current and power consumption of the machine are inconsistent, so recommend a backlight driving circuit is best rated current, It is recommended to use IC (AW9364). The reference circuit is as follows: "
I'm not an Expert, but with another microdisplay i've connected the video cable of the camera to the av cable of the microdisplay and It works but this looks diffrent
@@MatteoMassaretto This display does not have an AV input. it has to get digital data to know what to display. It's basically a EGB LED matrix that you control with specific commands to tell it what pixel to light up in what color.
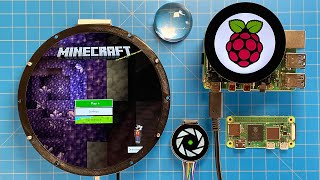
Hello.. great video, I was just wondering if you could guide me on how to use this screen on the raspberry pi 4? I have googled and tried myself but am struggling. I think I have connected it properly but the screen is just black so I guess it requires programming. Your help would be greatly appreciated.. thank you.
Thank you :) From what you wrote it seem that you are expecting it to work as a display for the rpi 4 OS ? instead of connecting it to a a screen ? If so - I doubt it will work - not out of the box like that. Here is a link to connections and I think there is an example there are as well www.waveshare.com/wiki/1.28inch_LCD_Module
That is a really cool idea :) I'm working on a camera and screen on the same esp and steam the video to it. Someone suggested in one of the comments to make a door viewport, just need the time to figure out how to install it and make a video about it. the setup is on my table for the last 2 weeks :)
@@b4by_dr1v3r4 Thank you very much. Yes I think it will be a cool one as well, hopefully soon I got some time off from work (holidays here soon) and I will be able to finally create a new video.
Hi! Can you please help me out? Been trying to do this project "DPNVG mk3 (DIY Quad Nod NVG, Night Vision) part2" on youtube but a lot of us facing a problem with no image and the creator is not going to share the source code, would you mind to have a look and create the code with Arduino IDE? The setup is similar, ESP32-CAM + GC9A01. Thanks in advance
@talofer99 I have the same problem have you had any luck with the coding I am using an esp32-s with these 1.28 spi screens using an OV7725 camera module.
@@talofer99 So when I supply power to my esp32-s cam with an OV7725 module camera attached and the spi LCD 1.28-inch screen I cannot get my esp to transmit video I only get the backlight of the screen. Any help would be much appreciated!
Hey, great vid :) I really want to show videos on this screen! I managed to show regular images but videos are hard. Tried to use fbtft + fbcp and fbcp-ili9341 to mirror the HDMI output to the SPI one, but this screen driver GC9A01 is not supported :/ Any ideas?
Hi thank you very much. I actually never done any thing with the screen after this video. I actually had to google half of what you wrote, since I never dove into video before. Maybe this will give you some ideas ? www.instructables.com/Play-Video-With-ESP32/ Please do let me know if you find a way to do it :)
Had the same problem, ended up buying the round Hyperpixel. Apparently those small displays have way too little bandwodth to actually mirror hdmi and the workarounds are a real stretch to begin with. Don't waste your time.
That is a great idea, I got it on the table for weeks now, finally managed to scream the esp32 camera directly to the screen, so planning on creating a door spy hole with it.
Hey, I manage to figure out how to get “Helloworld” sketch to work. For bus class Replace “Arduino_DataBus *bus = create_default_Arduino_DataBus()” with “Arduino_DataBus *bus = new Arduino_SWSPI (8/* DC */, 9/* CS */, 13 /* SCK */, 11/* MOST */, -1 /* MISO */) Replace the display class like you did normally expect replace the 7 with a -1 in front of /* RST */
@@talofer99 Honestly I've been trying for days to get a gif displaying on my GC9A01 using esp32 and thought maybe your code could help. I do not have an Arduino nano sadly, so won't work for me it seems. Thank you so much for replying!
@@ilos9883 It's your lucky day :) And it will work on esp32 for sure Take a look at this video th-cam.com/video/0s4Bm9Ar42U/w-d-xo.html and this is the link for the code github.com/talofer99/ESP32CAM-Capture-and-send-image-over-esp-now And let me know if it worked for you :)
Late to the party, but the clock example works for me if I use 5V VCC. 3V does not work for me. Maybe its the discrepancy of using 3V power and 5V logic? just my guess
@@talofer99 Yes the colours are amazing as you say, my suggestion about the phone, it looks like there is enough widgth but the hole will need to be enlarged and the edges remodeled, you could make like two wooden doughnuts that sandwich will hole the display in it's centre, then glue into phone, it will look so cool! bit of pain to disguise and Bob's your uncle.
You will need special board for it www.digikey.com/en/maker/projects/wireless-security-camera-with-the-arduino-yun/d73062bd2bbc4415a73f7446e624a9c4#:~:text=You%20need%20an%20Arduino%20Yun,sensor%2C%20and%20a%20microSD%20card.&text=The%20first%20step%20is%20to%20insert%20the%20SD%20card%20in,motion%20sensor%20to%20the%20Yun.


I've never messed around with anything like this before, but was intrigued with the possibilities of creating something using circular screens. Thank you for showing everything you did clearly (and for even taking the time to write everything up for easy reference in your video description!) and including points of frustration that others may come across. Very informative video!
It's too bad the phone you purchased didn't have a perfectly circular cutout-- that would've been a very cool idea.
Thank you very much, comments like this defiantly make me want to keep on doing videos like this :)
I also wished the screen would have feet the phone ... I still think of ways to use them both :)
WOW. Great video. I've been looking for detail information for this display. Finally, your video was step-by-step and detailed and finally the display works. Thank you for that. Much appreciated.
Awesome, thank you!
What are you building ?
@@talofer99 I'm first have to consistenly get it to work. But, If you could show...I would like to display a 'gif' on it. Do you know how to do this?
@@trauatsgg3809 I never did any thing more than shown in the video.
Did you try to google it ?
@@talofer99 yes, but it was not as detailed as your video. i did not get it to work
here is the link: th-cam.com/video/Y0BGnHFuYBU/w-d-xo.html
Tem como de usar esse modelo de monitor em algum tipo de câmera
In theory yes, but you will need the camera to know how to "talk" to the screen
@@talofer99ok obrigado eu comprei um monitor deste aí, e comprei um modelo de câmera;
HD 700TVL Analog Mini Camera 960H CVBS CCD Mini Bullet Cameras Inddor Small Security Surveillance Video Camera
Esse modelo de câmera eu encontrei no AliExpress. Creio eu que pode funcionar neste monitor, que funcionava vai dar para mim fazer um projeto muito bom.
Mas eu tenho algumas dúvidas Será que eu vou ter que usar algum tipo de placa; poder intermediar entre o monitor e a câmera; ou será que eu conectar o monitor diretamente na câmera funcionará?
Será que teria o senhor fazer, um vídeo ensinando como montar esse monitor em uma mini câmera bala, 🎥
It's a cool idea, maybe one day :)
@@talofer99 obrigado 🫂 Deus abençoe
Hello the circule screen,it can work without those cables?
Hi there back, well, cables is what connects the data between the MCU and the screen.
The only way to eliminate them will be to create a board that will connect to it without cable just with a connector.
I'm pretty sure if you search google you might find one ready like this.
THANKSSS you very much!!! i have a proyect of university and idknow nothing about this :(@@talofer99
How to display bmp images whit the nano on this screen
Connect the screen to the correct pinout, you will need some input for the image, you can do it by adding an SD card reader maybe, or can have the info as hex file.
For the rest there is an example in the example section of the library.
@@talofer99 I already tried it with this library, which is also the only one I could find to control this screen, but I can't get a photo on it, text and stuff works, but it doesn't work with photos and I can't find anything else online either then this with the nano and this screen
@@fabianboelens3899 did you try is with the use of external SD ?
@@talofer99 not yet I will try this tomorrow I will tell you if it works thanks for answering so quickly
@@fabianboelens3899 sure thing, let me know how it worked.
Just first make sure you can init the SD properly since both are SPI.
di you think it will be possible to read small video on this screen ?
Hi, I can guess you asked if its possible to shoe a video on this screen ?
The answer is yes, but in order to do so, you will need to have process that will get the video frame and convert it to a frame the screen is capable of showing - like jpg for example.
I'm not sure what will be the frame rate with the need to process the video into images and then to transfer each image to the scree.
The closest I know of is an example of animated gif shown on the screen.
Hope this helps :)
@@talofer99 thanks ablot for your developed answer ! It help for sure !!
Have you ever come across a larger version of this? Would really like one around 2"
No I did not, It would have been very cool.
Yea I just bought one just like it. I can’t get mine to work for the nano. I was wondering if you could help me?
which library did you try ? did you setup all the setting same as I did ?
is it the same exact board ?
I did the same thing , but it may have to do with the fact that the Arduino Nano I am using was hand soldered. I’m thinking about getting a new one to try again.
I was also wondering if you could help me soon with uploading gifs and JpeGs like you did in the video
@@stevenspencer2661 soldering issues can be a problem.
I did not use any images on the screen in the video.
I just got into the micro controllers and am learning. I learned a lot from your video. Thank you. By the way, if relevant how did the phone mod go?
Thank you very much, It's nice to hear that the video helps out people ! :)
It never happened, I got very busy at work for the last year and half, I do not (unfortunately) even get to make new videos.
I got an esp32 camera board with this screen attached to it, doing live stream from the camera, for over a year now on the table ... can not find the time and power needed to make a video about it
I hope one day soon it will happen :)
Hello, great video. I got my display working but i would also like to control the backlight. I am using an esp32 to generate a PWM wave, it is 8 bits and on channel 0. I have tried varying frequencies but they all do the same thing, after a couple of minutes the display just turns off. Do you have any idea on what I can do or point me in the right direction? Thank you!
Hi, thank you very much.
I actually did not look into the backlight at all.
I got the setup on my table connected to an esp32 camera - and I stream the image to the screen .
I will try to take a look at the back light and see what are the options.
Did you follow a specific guide for it ?
If so - drop me the link please :)
Hey, I might be a bit late but if I'm not mistaken the datasheet comments something along these lines. Specifically, it says " 4.4 Backlight Recommended Circuit
Motherboard driver backlight is need constant current circuit, if threated voltage screen after sight brightness difference. Current and power consumption of the machine are inconsistent, so recommend a backlight driving circuit is best rated current, It is recommended to use IC (AW9364). The reference circuit is as follows: "
Would you be so kind to also share a code for displaying an image? Thanks a lot!
All the code I used is in the examples of the library.
Is there a way to do the sketch with an esp32?
Sure there is
th-cam.com/video/0s4Bm9Ar42U/w-d-xo.html
Is it possible to connect this display directly to an fpv camera?
Good Q, never tried it, which fpv camera do you use ?
Night Eagle 3
@@MatteoMassarettoI do not see any type of output from the camera that will be able to feed directly to the screen
I'm not an Expert, but with another microdisplay i've connected the video cable of the camera to the av cable of the microdisplay and It works but this looks diffrent
@@MatteoMassaretto This display does not have an AV input. it has to get digital data to know what to display.
It's basically a EGB LED matrix that you control with specific commands to tell it what pixel to light up in what color.
Hello.. great video, I was just wondering if you could guide me on how to use this screen on the raspberry pi 4? I have googled and tried myself but am struggling. I think I have connected it properly but the screen is just black so I guess it requires programming. Your help would be greatly appreciated.. thank you.
Thank you :)
From what you wrote it seem that you are expecting it to work as a display for the rpi 4 OS ? instead of connecting it to a a screen ?
If so - I doubt it will work - not out of the box like that.
Here is a link to connections and I think there is an example there are as well
www.waveshare.com/wiki/1.28inch_LCD_Module
@@talofer99 ok thank you very much :)
@@talofer99 suppose I already had a python file could I just output that? Instead of displaying the raspberry pi screen? Thanks
@@Mikrod16 Yes you can - but you need to code it to do so
There is a library for it, you can see example for it in the link I placed before.
@@talofer99 ok thank you very much for your help
Digital navigation compass for the screen maybe, simple but nice
That is a really cool idea :)
I'm working on a camera and screen on the same esp and steam the video to it.
Someone suggested in one of the comments to make a door viewport, just need the time to figure out how to install it and make a video about it. the setup is on my table for the last 2 weeks :)
@@talofer99Ohh, that's a cool idea too! Will be very cool to see it! Nice video by the way
@@b4by_dr1v3r4 Thank you very much.
Yes I think it will be a cool one as well, hopefully soon I got some time off from work (holidays here soon) and I will be able to finally create a new video.
Cool project! Thanks for the info.
Thank you :)
Would be nice to use this mod on a AIO liquid cooler for the cpu
That would be cool!
did you ever get the adafruit library to work?
I never tried the adafruit library.
The one I tired did work on a Nano. Its in the video.
Hi! Can you please help me out? Been trying to do this project "DPNVG mk3 (DIY Quad Nod NVG, Night Vision) part2" on youtube but a lot of us facing a problem with no image and the creator is not going to share the source code, would you mind to have a look and create the code with Arduino IDE? The setup is similar, ESP32-CAM + GC9A01. Thanks in advance
Hi,
I'm not familiar with it , but I will try to take a look
@@talofer99 Thank you very much.
@talofer99 I have the same problem have you had any luck with the coding I am using an esp32-s with these 1.28 spi screens using an OV7725 camera module.
@@stephenopitz3106 what same problem ?
@@talofer99 So when I supply power to my esp32-s cam with an OV7725 module camera attached and the spi LCD 1.28-inch screen I cannot get my esp to transmit video I only get the backlight of the screen. Any help would be much appreciated!
Hey, great vid :)
I really want to show videos on this screen! I managed to show regular images but videos are hard.
Tried to use fbtft + fbcp and fbcp-ili9341 to mirror the HDMI output to the SPI one, but this screen driver GC9A01 is not supported :/
Any ideas?
Hi thank you very much.
I actually never done any thing with the screen after this video.
I actually had to google half of what you wrote, since I never dove into video before.
Maybe this will give you some ideas ?
www.instructables.com/Play-Video-With-ESP32/
Please do let me know if you find a way to do it :)
Had the same problem, ended up buying the round Hyperpixel.
Apparently those small displays have way too little bandwodth to actually mirror hdmi and the workarounds are a real stretch to begin with.
Don't waste your time.
Make a sweep tube shape starting with the target oval and sweep to the round Very easy in FREEcad , HTH
That is a great idea, I got it on the table for weeks now, finally managed to scream the esp32 camera directly to the screen, so planning on creating a door spy hole with it.
Hey, I manage to figure out how to get “Helloworld” sketch to work.
For bus class Replace “Arduino_DataBus *bus = create_default_Arduino_DataBus()” with “Arduino_DataBus *bus = new Arduino_SWSPI (8/* DC */, 9/* CS */, 13 /* SCK */, 11/* MOST */, -1 /* MISO */)
Replace the display class like you did normally expect replace the 7 with a -1 in front of /* RST */
Cool, You mean got it to work on an Uno ?
Tried this but it says DC was not declared in this scope
Replace it with 8....
@@talofer99 not really sure what you mean? replace DC with 8? So (8/8/,9/9.....
Oh! I got it! Thanks
This configuration works for arduino nano too. Thanks.
Hi. Are you asking if it can work on nano ?
@@talofer99 No, I can confirm it.
Hi this video was greatly helpful thanks a lot! Can you share the whole code with me please?
All the code I used is in the examples of the library.
@@talofer99 Okay thanks!!
If you still have issues with making it work, let me know which example you need the code for I will upload it for you.
@@talofer99 Honestly I've been trying for days to get a gif displaying on my GC9A01 using esp32 and thought maybe your code could help. I do not have an Arduino nano sadly, so won't work for me it seems. Thank you so much for replying!
@@ilos9883 It's your lucky day :)
And it will work on esp32 for sure
Take a look at this video
th-cam.com/video/0s4Bm9Ar42U/w-d-xo.html
and this is the link for the code
github.com/talofer99/ESP32CAM-Capture-and-send-image-over-esp-now
And let me know if it worked for you :)
Can you email me the code please? I have been trying to do the same steps but for some reason I can't find the library, please help:)
Did you try the links in the description ?
Which library are you missing ?
@@talofer99 the last one Arduino uno it's not available right now
@@lolaa_emo4916 this ?
www.waveshare.com/wiki/File:LCD_Module_code.zip
and now the wireing for an esp8266
Same SPI and choose the pins for the rst/bl
Late to the party, but the clock example works for me if I use 5V VCC. 3V does not work for me. Maybe its the discrepancy of using 3V power and 5V logic? just my guess
Never thought of that, it could possible that this is the cause.
It's awesome!
Glad you think so!
The colors are amazing - I hope to find a wat to mount it to the phone :)
@@talofer99 Yes the colours are amazing as you say, my suggestion about the phone, it looks like there is enough widgth but the hole will need to be enlarged and the edges remodeled, you could make like two wooden doughnuts that sandwich will hole the display in it's centre, then glue into phone, it will look so cool! bit of pain to disguise and Bob's your uncle.
Nice vidoes, can you pm me, i got the same LCD i know it works, but no clueless how to get it to work like a watch, new to Arduino, got a Arduino Nano
Thanks,
I'm sure there are endless example out there for a clock. I even think of the example in the library is a clock.
it looks perfect for a clone of the new Google watch
For sure !
There is alsort of pre-made hardware like that... for example this one I found on ali
www.aliexpress.com/item/1005002404207335.html
Could i marry this with say a runcam night eagle 3?
You will need special board for it
www.digikey.com/en/maker/projects/wireless-security-camera-with-the-arduino-yun/d73062bd2bbc4415a73f7446e624a9c4#:~:text=You%20need%20an%20Arduino%20Yun,sensor%2C%20and%20a%20microSD%20card.&text=The%20first%20step%20is%20to%20insert%20the%20SD%20card%20in,motion%20sensor%20to%20the%20Yun.
לפי המבטא אתה בטח מישראל !!
Chillan not that it matters :)
ok
Thank you.
Please do more video about this device.
Thank you. I do hope to make more.