GC9A01 Round LCD with ESP32 & Arduino

ฝัง
- เผยแพร่เมื่อ 12 พ.ค. 2024
- Learn to use the GC9A01 circular LCD module with an Arduino Uno and an ESP32.
Article with code: dronebotworkshop.com/gc9a01
More articles and tutorials: dronebotworkshop.com
Join the conversation on the forum: forum.dronebotworkshop.com
Subscribe to the newsletter and stay in touch: dronebotworkshop.com/subscribe/
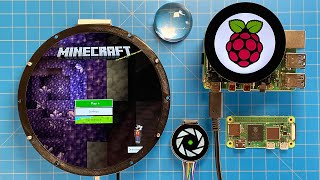
We have worked with LCD modules many times before here in the DroneBot Workshop, but this one is a bit different - it’s round!
Round LCD modules like this one are excellent choices for instrumentation and metering projects. They can also be used for special effects in robotics and animatronics, as we will see when we use two of the displays to build some animated eyeballs.
We will start, of course, by looking at the specifications of this display. It is an SPI bus device, and the Waveshare model I’m using can operate on both 5-volts and 3.3-volts. Note that there is another model of this display, also using the GC9A01 driver, that only operates on 3.3-volts (and also has some very confusing pin markings).
Next, we will use the display with an Arduino Uno. We will start by using the Waveshare sample code, but after that, we will switch to another library that is much better documented.
After that, we will use the display with an ESP32, which has better performance than the Arduino Uno as it’s much faster and has more internal memory.
Finally, we will build a set of animated eyeballs using the ESP32 and two of the GC9A01 modules.
Lot’s to learn, and there is even a bonus “riddle” in the video for science fiction fans - of course, I give you the answer in the end!
Here is the Table of Contents for today's video:
00:00 - Introduction
01:13 - GC9A01 IPS Display
05:11 - GC9A01 with Arduino
18:12 - GC9A01 with ESP32
33:12 - GC9A01 Animated Eyes
43:08 - Conclusion
Hope you enjoy it, and I really hope you pick up a few of these displays and build something cool with them!
And, for those of you who solved the “riddle”, congratulations - and for the rest of you, DON’T PANIC! (that was a clue, BTW).
Bill - แนวปฏิบัติและการใช้ชีวิต


![พรากรัก - เต้ย อภิวัฒน์ [ Official MV ]](http://i.ytimg.com/vi/ShT2ltn8GBE/mqdefault.jpg)


Hi everyone - It's come to my attention that there has been someone masquerading as myself, responding to some comments here with a link to a Telegram chat to win a prize from me. THIS IS A SCAM, I am not holding a contest, nor do I have a Telegram account. PLEASE DO NOT RESPOND TO THESE MESSAGES!!
It's happening on a lot of my videos, I'm taking steps to remove them manually, but as I have 162 videos, it will take some time. If you do run across a suspicious comment, I would appreciate you letting me know at info@dronebotworkshop.com.
Thanks!
Bill (The real one!)
It's the detail and care that you put into your videos that has over 500,000 people agreeing with me. Thanks, Bill.
Another great tutorial, Bill! Thanks very much for showing us how to use this display and the relevant libraries.
What a detailed video. I gotta say you absolutely have a fantastic presentation. Slow, detailed and easy to follow. The Bob Ross of microcontroller projects 😍 👌
These are always such well made and well produced videos. Thank you once again for some excellent content.
Many thanks for the very detailed introduction and overview of the round LCD display. I will also refer to your channel again when I come to my place to discuss the display. Great video.
What fun! I love this video, thanks Bill. Circular displays look good and I can see a lot of potential uses. I'm trying to work out how you would configure this display as a radio frequency read out.
This is a great tutorial, I'm planning to do a pc case mod and was looking for this exact display with ESP32. Thank you very much!
Perfect timing with the eyes tutorial. EXACTLY what I was looking for. Thank you, from a long time subscriber 👍
Your video episodes are always well made! I am using them often to get started with new tinkering gadgets.
Thank you so much !
I've been struggling for days to run my round TFT with ESP32.
Found your video, so clear and accurate, first try was a success !
Wonderful stuff again, (young) William. Your production values are enormous and I hope you understand we appreciate the effort.
I made the "Eyes" project using AdaFruit components including Arduino shield, square displays and their fantastic dome lenses. As usual, I hated turning the electronics into a physical device - you know cutting holes in boxes and mounting bits and pieces.
I didn't know about cat eyes :(. Having said that, I made it for my son's man-cave, and I don't expect it will ever be moved - or turned off.
Thanks again Bill,
Thank you!! I just bought my lcd a couple days ago. This is such a great coincidence.
I was just looking at these while watching your videos trying to accumulate enough knowledge on arduino to make a thermal data logger. Very glad you put this out before I put in my final BOM
Thank you.. Finally a simple example of using animations with this display, been looking for ever for some video examples. Was hoping for a smaller form factor board for this but it is close to what I need.. As an artist I have been searching for awhile to display some simple animations
Thanks for the excellent tutorial! You're such a good instructor.
and again a very useful tutorial. Thank you for all the effort!!
I absolutely love love love that you made this video. I am using them for uncanny eyes as well and do hope that you were able to figure out how to enlarge the eye images. The potential of these to be bigger eyes would be amazing. If you do sort it I do hope you update your blog!
Thank you, thank you, thank you! I jumped the gun and bought these off of amazon (no support) without having a clue how to use them - and I'm new to Arduino et al so I had a big challenge -but you've helped tremendously. BTW, I knew the poetry :)
Excellent tutorial! Thank you, Bill!
I find this video very much above the "usual stuff" - and I only watch the good ones! - it's really useful and exhaustive. My compliments. Given how "undocumented" the topic is I would have been nowhere without your help. Only pity is that it did not come out until I searched for "GCA901" instead of the product name and brand.
Cool, video, Bill. I am taking an entry level animation class this summer. But I am thinking of building a robotic puppet, for some stop-motion animation projects. These eyes would be a great addition to my animated octopus. I have some big lenses from a rear projection TV that the displays might look really cool behind.
THANK YOU for explaining that you need to edit the User_Steup.h file with the correct pinouts to get it running. This does not seem to be documented elsewhere for some reason. You rescued me after hours of frustration trying to get the display to run using an Adafruit Feather V2
Nice tutorial I absolutely like it !!
Of course you can always add an SD card to your project and fill it with indexed picture data so you can adopt your display to your own project.
The next level step would be interfacing the display with parallel interface without an SPI driver in the middle!!
Thank you for sharing this with the community!
I would like an example of that!
It would be fun to use a movement detector or an ultrasonic sensor to track someone passing by and make the eyes follow them
There is actually a riddle for science fiction comedy fans in this video at the 16:35 point, with the answer at the end. Unfortunately, I didn't have this released in time for National Towel Day (May 25th) but don't panic, at least it wasn't released on a Thursday (I never could get the hang of Thursdays).
That last sentence was a clue, BTW!
😎
Bill
I've always considered your videos to be harmless, but after this they should be updated to mostly harmless!
Never go anywhere without your towel.
Hyper space is unpleasantly like being drunk. What's so unpleasant about being drunk? You ask a glass of water.
You really are a hoopy frood. 🤖
Ahem ahem If you keep talking like that I might have to introduce you to some poetry.
Never let Biden read you poetry!
I got my display working with your help. Thank you so much.
Excellent interesting & insightful video as always. Thank you sir. 🇬🇧
As usual excellent, very informative, many thanks Drone Bot
I just love the eyes project. I can see some fun stuff with that.
Like, adding a "Gesture" sensor that could track a person as they move and the eyes follow.
I suspect, but not sure, that they eyes are sprites. If so, I don't know if there's a way to "enlarge" the sprite or if it requires, as suggested, finding bigger eye files.
I haven't even connected my 2 ESP32 boards as yet, but I guess I'll get to that during the winter.
Right now, I'm concentration on a couple of projects that I NEED to get done ASAP.
It's a networked monitoring system for our greenhouses, so that we can monitor things like temperature and humidity inside them as well as auto turning on/off the heat and exhaust fans. Fun stuff, but I got distracted and now it's urgent. LOL
Someday I hope to play with this as well... add the tracking you suggest and a light sensor to make the iris pupil adjust in size. I could see adding a simple printed "head" in a frame with these eyes to my door so when people approach to knock/ring they are warned they are being monitored! ;) Haha.
Was wandering in the dark when I stumbled upon your tutorial. Within a few minutes I had it running… Thank you! Huuuuge help.
Ah… some of the finest Vogon poetry I’ve had the displeasure to hear…..
I love how thorough your videos are, thank you.
I am wondering if you think it would be possible to have it as a clock and also a scroll left or right to a power switch by touch screen to start or shut down a device, ??
Cool project. Thanks for doing it!
Thanks for this! Superb as always.
LETS GOOOOO!!!!
IVE BEEN WANTING A VIDEO ON THIS FOR A WHILE NOW!!!
LETS GOOOOOOOO!!!!!!
Very detailed video! I'm thinking about building a diorama using a small LCD screen, which would simulate some sort of billboard advert thingy, to run some sort of gif animation, what do you think would be the best option to achieve that, in terms of the level of experience needed to work with and price?
Hi Bill. Thanks for the video!! Question: Are these display available in a slightly smaller size, i.e. about 1.00 inches? I've looked around and can't find anything.
Super Video - Question: I am looking for a tutorial for the very interesting 40x160 display with the GC9d01 driver - is there any information on this? Thanks very much
That’s cool. Thanks for sharing.
Bill, you're a good egg! Got into Raspi and 3D printing back in December of 21. I'm hooked....HARD LOL. I enjoy your videos. I typical check your channel first when I'm starting out in a new area. Like, ESPs, Pico (got my Pico W on order....woo-hoo!) Your videos are a good starting point to get the theory first? What is it, how it works ect. Then, you have some good simple projects to try to get hands dirty.
So, I hope you're making some TH-cam money...lol. Keep doing what ya do. A lot of people, especially noobs like me, really benefit from your work. Good on ya!
Further to my comment below, it is not an error in the code that cases the numbers to be erased or in some cases (like mine) to display a glitched rectangle.... looking at the code in the library and the documentation of the example, it is a result of the display not supporting readback of the graphics buffer. The code will attempt to read the buffer to restore the position where the old needle position was before drawing the new position but this only works on displays supporting the buffer read functionality. You can test your display's readback support by running the sketch under TFT_eSPI>Tests and Dignostics>TFT_ReadWrite_Test - the results are displayed on the serial monitor. I am trying to figure out a way to decode a JPG into raw program memory and rendering that to the screen buffer so that it can be read back without screen support. I have tried to do this by decoding the Jpg for the main gauge to a second sprite and drawing this to the TFT so that I still have access to the memory area.... but I have been unable to get a sprite loaded from the jpg decoder... I shall keep trying...
informative as always
I bought a few LCD's last week and just got my first ESP32 board today. I have been watching your ESP32 videos all afternoon. It was a rocky start but after getting the drivers and libraries sorted, it's been very pleasant. Late to the party as usual but the ESP32 is very cool. Thanks for helping us through all this.
Excellent video . . makes it all seem so easy.
It's a project that will keep looking back at ya
Nice Vid. as usual. I like the femaile pins more, is the can connect directly to the micro pins and no need for the issues bread board cause.
So incredibly cheap, Not to small nor too big, easy to control and all you need to connect is either a simple breakout OR a willingness to solder a flex-pcb.... Definitely going to buying a small army of these!
I believe I can explain the "disappearing act". It is occurring because the code is expecting to read the current contents of the block where the needle sprite is to be written, so that it can be written back when the needle moves on. The module does not have a connection for the required data line.
Very useful as always, thanks!
Who could forget Prostetnic Vogon Jeltz? Thanks 👍🏾🤓
what a great video! thank you! Could you have two needles showing on the single gauge to read from two input devices? Would this simply be a case of copying and pasting the code but altering to suit the correct input? Thank you!
Thank you I'm a really new to Arduino and you really make my life a lot easier I'm not so young anymore but I really love to play with raspberry and now Arduino
Thanks for this video I liked it very much!
Perfect timing with this video... I am using these right now as instruments in my flight sim cockpit.... I am pretty sure the disappearing numbers are due to the needle being draw over the numbers thereby erasing them. To draw a needle over the numbers as it would be seen on a normal dial, you would have to "restore" the pixels under the previous needle position and then draw the new position, of course you could redraw the complete background every time but this might be too slow for fast response dials. I will play with that as it is my projects use-case.
Chris Mulder- were you able to correct the disappearing numbers under the needle issue? I'd love to set this gage up on my RV to monitor transmission temps, but I need the numbers displayed and haven't figured it out. Lovely video though.
Love this!!
Very nice video, TNX.
Excellent. Thank you.
Really outstanding video... I was hoping you cold give me some advice.. I need to connect the display to an esp32 using the HSPI instead of the VSPI... any ideas ???
perfect
Thanks, would be great to make a gps speedometer. Any video planned of how to do that?
Thank you, thank you, thank you!
For calling the Hollywood movie adaptation of The Hitchhikers Guide to the Universe terrible.
Because it was.
I’m not going to say So long, but Thanks for all the fish!
42
ahhhhmmmm... not even my own operating system loves me anymore... sighhhh....
ohm operating system fish learn more (0,4).sry drone bot .
Awesome !
Love it. Can the touchscreen versions be programmed for counter type functionalities for end-user to use as timer/tracker for instance? E.g.. title glasses of water - value input to increment by 1
Very cool!
It's awesome!
Great idea
Thank you sir❤❤❤
great video -- at 40:57, you must also un-remark out those 2 lines 75 and 76
I noticed that to,he just forgotten to mention that he forgotten it to in the video.
hey great video i was asking myself if the round screen work on a esp 32 and the pin of the jetson nano are like the rasberry one so can i use this screen on a ketson nano ???
Wow ! perfect tutorial ! Now you are ahead of the game instead of following the parade ! High five !
Thanks Bill. could we possibly build an arduino based pwm solar charge controller.
great video. Have you seen any displays of only 0.50" or smaller in size?
excellent.
Bill, may I ask you a favor to confirm something?
First, I'm been fighting with this danged round display for several hours now trying to get the thing to work.
The ESP32 board that I have (well, one of a bunch) looks exactly the same as the board you were testing with the colors sketch, @24:55.
But no way it will work for me.
So then, I thought, I'll try one of the other boards, which is a 30 pin board, specifically marked as WROOM.
The only change that I had to make was to the user_setup.h file and change TFT_DC from 16 to 15 as this particular board doesn't have a pin marked as 16.
So in this case, when I uploaded the sketch to this different board, the display works. However, I think that it still has a problem because it goes all crazy with corruption/lines. I'll have to test all the wires as I suspect that's the issue.
Anyway, all that being said, would you please confirm with me, that when you are uploading to the board at 24:55, which board you chose?
I had also been using the WROOM board for this one (with 38 pins, looks the same as your board) and other sketches seemed to work fine. But perhaps I'm using the wrong board option.
Please do let me know which one you used.
Thanks so much in advance.
*[UPDATED HERE]*
I'd still like to confirm which board thing you use, however, I got it going on both boards.
What I THINK was the problem, is the USB hub that I'm using is only putting out 4.7V.
It's flaky when I plug into that.
However, when I plug into a solid 5.1V smart phone supply, they are stable.
Either these boards or those displays are super picky for voltage.
SUPPOSEDLY, these displays are designed to work on both 3.3V and 5V.
Oh well.
Bravo.....love the round......ok.......airplanes have a gyroscope design........can u do that........cheers.....
do you have a video on the arduino uno and the esp32 as a modbus rtu master slave rs485 to read input registers 30001, 30002, etc. with free forever PC windows modbus test software? Plus using hobby saleae software and decode oscilloscope for trouble-shooting? most modbus examples just work and if they do not show how to fix it, this would help a lot. 🤒 crc errors
now today on to this cool GC9A01 project 😎 thank you
I'd love to have an animation of a multi-axis Tourbillon, but it's a lot of work just to get the screen going.
My graphicstest insn't showing anything even if serial port is reporting the different steps to the end on Arduino uno. Up to here everything was going ok as you were saying. A difference, my sketch compile at the first time. I haven't tried the esp32 yet.
I wish you were my teacher in school, I learned so much in this one video then I did a whole semester in school, one I think I'm stumped on is I'm currently making a boost gauge and a oil pressure ,and I would like it to display the information to my phone via Bluetooth or wifi I have no luck trying to figure it out I have my pressure sensors working for a boost gaige up to 30psi
Can you make video abotu ANT+ usage? will be cool combine with this one
@DroneBot Workshop @Dronebotworkshop thank you. I have to use GC9A01 upside down as a circle gauge with number value displayed like 32:36. Is it easy do modify your code (and how) to display corectlly on display mounted upside down (rotated 180*)? Thank you for tips/code.Thank you
Man, I love you
Any way to get just the liquid crystal screen without the display features?
If you are looking for the cable without the female ends, Digi-Key part # 1460-1298-ND (Works Perfectly)
So, I emailed to join the forums. How often do you process registrations?
Thanks!
Thank you as well!
oh man this could be great for car gauges
Good job. I got a compiling error: 'eyeInfo_t' does not name a type; did you mean 'siginfo_t'? Wonder where it is defined? Thanks.
Hi l was asking if it is possible to send data from camera live and displayed on this screen ?
Is there screen like this but transparent?
can you do a project with a round dial and ESP32 to display car RPM from the W terminal on a standard alternator?
hey men thank u for make a good video..
can u help me. I wondering to know how to make SSD enclosure, what ic i use for that. and minimum components for build that. can u help me for got some reference for that.
Im sorry if my question is out of topic of your content.
The disappearing numbers, intentional or not, give a crude "highest reading" effect.
sir, can you make a smart watch tutorial that can be used for video calls, what components are needed and what is the schematic?
Do you know what is the highest refresh rate you can get for full screen images?
I know this video is about a particular display. I have an ESP32 gadget with a tiny 1.5" screen and what appears to be a 4-wire SPI bus interface. I'd like to swop out the display and install a 7" screen. I can imagine I will have to give that screen its own separate power supply.
.
Can I connect a larger 7" or 9" screen to my ESP32 gadget?
Vogon poetry for the win!
#include // Setup file for ESP32 and GC9A01 240 x 240 TFT works for me for an ESP32. So no special configuration must be created.
But I was unable to find a setup for the Arduino NANO ESP32. With selecting it as a board it does not upload and for ESP32S3 Dev Module the picture was just pixeled.
nice
Hey what ahout the all new lilygo s3 T-display board??