Wait wait wait, that scrap of fabric btwn bits of sewing to hang on to the thread... this blew my mind, I love it so much. Prob one of my biggest frustrations, solved. Bam.
I watch 3 or 4 tutorials and it’s just a foreign language to me. I watch you and listen to you and for some reason it penetrates my brain. Thank you for sharing your gift of teaching with us!
Hi Lisa, Was happy to see this video still available😀! Haven’t made half square triangles in a long time🫢. I was trying to make them one at a time w/o accurate measurements😮! Thank you, Mary 🍀
Wow thank you! You made this look so easy! I’m taking a BOTM class and signed up 2 months late so I missed the previous class where they did the HST. Thank you for making this so much easier for me!
Thank you for sharing the HST.I was looking for how to make a 4.78 "HST using your method. The way I do this size now is cut a 5" square and then cut it to size. All suggestions accepted.
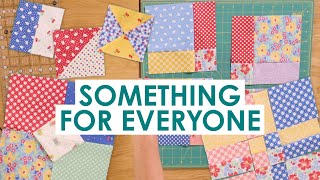
I just started quilting a month ago thru a group at church and I was able to follow this tutorial. Easy, straightforward, top notch tips AND the chart at the end is ** chef's kiss **. This isn't being taught in our class but I saw it in a quilting book and knew I had to include triangle squares in my project. Thanks so much for sharing this!! I appreciate you!
Triangles = panic, sweating, avoidance, thoughts of un-sewing-, biased edges aversion and projects left unfinished!!! I had a huge applique BOM quilt that I couldn't finish because of 23 light and 23 dark triangles!! The pattern, from a popular quilting design team was from 1999- (but I just recently discovered it) had a triangle template that said add seam allowance!! Would that let me stand in the way of not finishing this project, that I worked hard to hand applique over the last year?!? It sat unfinished way longer than it should have UNTIL I found this video. This is hands down the MOST PERFECT METHOD -- you can quote me and trademark it-- for making half square triangles! Thank you to infinity and back. This method is so perfect I may make an entire quilt using just triangles-- for an avid applique lover-- that IS turning to the dark side... lol. Love it!!
Thank you so much! I saw this on another site, but it was years ago. Thank you for giving such concise directions and even more for the fabulous chart at end!😃
You are too good in explaining, loved it . My request to you is , can you give the measurements chart for making 4 hst at a time , will be helpful. Thanks dear🤗🤗
I'm just getting started in quilting, and am looking for instructional videos. This was very, very helpful! I love the chart you gave. Thank you for sharing your talents here.
I am so glad I found this video - as the pattern I am using called for buying "recipe cards" for paper piecing the HSTs. I didn't feel that was necessary to purchase and that there had to be another way - and there IS. I need a little more practice as I don't have the precision quite down, any tips for that? Your videos have helped me so much. Thank you!
This method and your concise explication of it helped me enormously! I'm currently working on a wall hanging for Christmas and was falling behind but this evening I made 72 HSTs! Which is almost all I need. Thanks a lot!
Thank you! The project I am working on has 200 2.5 half square triangles. I will definitely practice this a couple of times and go for it. Sewing twenty five squares together will be much easier than 100 smaller ones. Now to find that info on sizes.
Lisa, I just love 💗 all the tips and tricks of sewing 🧵 quilting and creative things that You bring to Me on Your channel! Thank You so much 😊 Hugs and Smiles-Marie
It's now MY favourite way, too. Very helpful and precise. I'm going to cut out my solid fabrics to make Postcards from Sweden quilt. Many, many thanks for your lovely demo and size chart. You rock, sista! :)
Smart as! Loved it, very clear and loved that u gave measurements to different sizes... totally newbie here n going to make cushion pillowcase covers (old ones look very nasty after years of torture) Thanks again!
Thank you! This is very useful. And seeing how it's done you don't really need a chart if your willing to do a little math. 2x ( size of finished HST) +. 75 = (size of starting squares), Wow, now I can calculate to make any size HST. I have subscribed. ❤️😁


Wait wait wait, that scrap of fabric btwn bits of sewing to hang on to the thread... this blew my mind, I love it so much. Prob one of my biggest frustrations, solved. Bam.
Very helpful, thanks! Just about to start a Carpenter's Star quilt and was boggling over the maths!
Wow! I have been watching HST video for 20 min! Yours is the BEST!!!! I'm saving you, my Friend!
Thank you so much for the tutorial and *the graph* for measuring. Thank you!
That is exactly what I’m looking for now to start
Thank you for the graphic that gives the different sizes!! 😊
I watch 3 or 4 tutorials and it’s just a foreign language to me. I watch you and listen to you and for some reason it penetrates my brain. Thank you for sharing your gift of teaching with us!
Awesome! Thank you!
Thank you! You made this look
So much easier!
thank you, I'm new to quilting and this and the guid is so help.
Glad it was helpful!
Excellent video. Thank you for providing extra sizing. That will be very helpful.
Thanks Lisa❤
Brilliant!!! I have a nasty aversion to HSTs and this video will help. Here goes😮
Hi Lisa, Was happy to see this video still available😀! Haven’t made half square triangles in a long time🫢. I was trying to make them one at a time w/o accurate measurements😮! Thank you, Mary 🍀
This tutorial just saves my life. Thanks for posting.
I’m making a witch with LOTS of hst…this will make it so much more fun. Thank you.
Wow thank you! You made this look so easy! I’m taking a BOTM class and signed up 2 months late so I missed the previous class where they did the HST. Thank you for making this so much easier for me!
So helpful. And not long winded. ;-) Thank you.
You are a genius!!!! Loved this tutorial-thank you, you just made my life easier!
Thank you for sharing the HST.I was looking for how to make a 4.78 "HST using your method. The way I do this size now is cut a 5" square and then cut it to size. All suggestions accepted.
thanks! the different sizes Chart was fantastic !
Appreciate the chart I have passed it around to quite a few of my Fabric friends
Great tutorial! I have to make many bear paws & this will help me finish them a lot faster. Thank you!
Thank you! Thank you! Thank you! This was such a game changer...
Thanks Lisa!
What should i cut for a final 12 1/2 inch block?
THANK YOU!!!! Just when I needed you the most you were here.
Soooo uselul. You made this very easy for me. THe chart is terrific!
Glad it was helpful!
Lisa, I have been shying away from anything bias as a new quilter. This makes me want to try it. Thank you so much!
Lisa, thank you, thank you so much!! I was trying to figure how to get a 2 1/2 hst for a project I was doing. You came to my rescue!!!😅❤
Thanks for using the terminology Half Square Triangles. I had no idea what an HST is because I’m new to quilting.
Thank you! This video truly helped. It's been several years since I have quilted triangles and this video helped my confidence!
THANK YOU! I am working on a custom quilt for my nephew and the middle section has 264 - 2.5" squares. This method IS PERFECT!!!!
ty so much for the graph at the end!!!!! very helpful....love your videos....well done
You are so welcome!
Awesome simple way to,thanks for sharing your favourite way….will be doing it this method today.
I just started quilting a month ago thru a group at church and I was able to follow this tutorial. Easy, straightforward, top notch tips AND the chart at the end is ** chef's kiss **. This isn't being taught in our class but I saw it in a quilting book and knew I had to include triangle squares in my project.
Thanks so much for sharing this!! I appreciate you!
Fantastic video. Thank you for sharing!
Triangles = panic, sweating, avoidance, thoughts of un-sewing-, biased edges aversion and projects left unfinished!!! I had a huge applique BOM quilt that I couldn't finish because of 23 light and 23 dark triangles!! The pattern, from a popular quilting design team was from 1999- (but I just recently discovered it) had a triangle template that said add seam allowance!! Would that let me stand in the way of not finishing this project, that I worked hard to hand applique over the last year?!? It sat unfinished way longer than it should have UNTIL I found this video. This is hands down the MOST PERFECT METHOD -- you can quote me and trademark it-- for making half square triangles! Thank you to infinity and back. This method is so perfect I may make an entire quilt using just triangles-- for an avid applique lover-- that IS turning to the dark side... lol. Love it!!
What a time saver!!! Thanks.
You just made my life so much easier! Thanks so much.
Thank you , helpful 😊
Exactly what I was looking for. Thank you!!
Thank you so much! I saw this on another site, but it was years ago. Thank you for giving such concise directions and even more for the fabulous chart at end!😃
I loved this video! Thank you.
Brilliant and simple ! Thankyou !
Thank you for the chart at the end it is a keeper 😊
You are so welcome, thanks for watching!
You are too good in explaining, loved it . My request to you is , can you give the measurements chart for making 4 hst at a time , will be helpful. Thanks dear🤗🤗
Thanks Lisa! I have a book for making quilt blocks and they all have hst’s. This will definitely help me get them cut quickly.
Thanks for simplifying things! Looooove your haircut!!!
Thank you so much, my hair is so much easier to deal with being short :)
Ha! Wish I could wear mine short. My face is too round. :-(
Carol from Australia here thanks Lisa wonderful video as always ☺
Thanks so much! 😊
That's awesome, can't wait to try it! Thank you for sharing
thank you. you have explained it so well
Loved this video!! Thank you, Lisa!
That's so useful thank you, I see many HSTs in my future today
Glad it was helpful!
Thank you. I really needed the math chart, too!
You are so welcome!
Thank you. I increased the Starf size by 1/4' as I don"t seem to ever cut HSTs without the need for straightening.😍
I'm just getting started in quilting, and am looking for instructional videos. This was very, very helpful! I love the chart you gave. Thank you for sharing your talents here.
Lisa I just love everything you show us...thanks so much...God Bless
You are so welcome Jackie ♡
THANK you for the math in the end!
Understanding HST have always been elusive for me, this is so cool! Glad I found your video! Thanks so much, now off to sewing my Christmas quilt
Hi Lisa this is so wonderful thank you ever so much
You are so welcome!
Hi your skin looks amazing , and genius idea ,xx
This is just what I was looking for! TFS.
Thanks Lisa! I'm a new quilter and this is a great idea!
You are so welcome!
I am so glad I found this video - as the pattern I am using called for buying "recipe cards" for paper piecing the HSTs. I didn't feel that was necessary to purchase and that there had to be another way - and there IS. I need a little more practice as I don't have the precision quite down, any tips for that? Your videos have helped me so much. Thank you!
Thank you, Lisa. As a newbie to HST, all the tips given are useful.
You are so welcome!
Thank you. Didn't have pen and paper so will watch again to write down measurements.
You’re welcome 😊
Thanks. Working on a baby quilt
I not only enjoyed the tutorial but your method of keeping the thread from coming back at the needle is genius. Thank you.
Thank you for sharing on these
This method and your concise explication of it helped me enormously! I'm currently working on a wall hanging for Christmas and was falling behind but this evening I made 72 HSTs! Which is almost all I need. Thanks a lot!
Easy to follow, thanks!
Thank you! The project I am working on has 200 2.5 half square triangles. I will definitely practice this a couple of times and go for it. Sewing twenty five squares together will be much easier than 100 smaller ones. Now to find that info on sizes.
Love the help - I’m a newbie!
I'm so glad this was helpful, thanks for watching!
This tip will be my go to now
I'm so glad I could share and pass along the info :)
Great tip & love the size sheet
Glad it was helpful!
Lisa, I just love 💗 all the tips and tricks of sewing 🧵 quilting and creative things that You bring to Me on Your channel! Thank You so much 😊 Hugs and Smiles-Marie
Hey Marie, it's so great to hear from you, and I'm really glad you are enjoying these videos!
Thank you!
I've used your method three times now, and it's worked perfect every time! Thanks for sharing such a time-saver!!!
Thank you. The conversion was exactly what I was looking for.
Glad I could help :)
Thanks for the great tutorial and the wonderful chart.
you are so welcome Billi! Thanks for watching :)
Thank you so much, grateful for this clear information, from fiji
It's now MY favourite way, too. Very helpful and precise. I'm going to cut out my solid fabrics to make Postcards from Sweden quilt. Many, many thanks for your lovely demo and size chart. You rock, sista! :)
Smart as! Loved it, very clear and loved that u gave measurements to different sizes...
totally newbie here n going to make cushion pillowcase covers (old ones look very nasty after years of torture)
Thanks again!
you are so welcome!!!
Love this!
so easy peasy thanks
You're so welcome!
Love,love,love it❣️👍 Very helpful with excellent instructions alongside easy to view demonstration. Thank U 😊
You are so welcome!
Thanks great onfo
Thank you ♥️ I am a beginner and I love the way you explain this!😘
This video was very helpful. Thank-you So Much
You're very welcome!
So cool
Thanks so much for this helpful information.
You are so welcome!
Amazing tutorial..thanks for sharing
You’re welcome 😊
Thank you! This is very useful. And seeing how it's done you don't really need a chart if your willing to do a little math. 2x ( size of finished HST) +. 75 = (size of starting squares),
Wow, now I can calculate to make any size HST. I have subscribed. ❤️😁
You're very welcome!
Thanks to Pollyanna for the math calculations. It's easy. I subscribed as well.😂
Thank you thank you thank you for the chart!!
You are so welcome
Thank you
You're welcome
Many thanks!
Thanks so much!
You're welcome!
Thank you very much for the tutorial. What are the little pieces of fabric before and after the square for?
those are called leaders and enders :) th-cam.com/video/WjJ0QJSuxZg/w-d-xo.htmlsi=RpzI4kYAh71eJHPk
Here's a video telling why I love using them
I sure wish you had made that size chart a downloadable pdf
Great tutorial Lisa. I was planning on making a few today. Thank you and stay safe from the virus. 💗😊💗
You are so welcome, yes girl, stay home and work on some projects :)