
ฝัง
- เผยแพร่เมื่อ 29 ก.ค. 2012
- Be sure to stick around for the outtakes at the end!
amzn.to/2SCOuQa
This seemed like it was going to be impossible, but after I came up with a technique it was actually quite simple! Watch the end and you'll see why I was so excited when I got it to work in the first part of the video (which was after I'd failed a ton of times). :-)


I am a 71 yr old female with advanced arthritis in my right hand. I want to thank you for this youtube video. It gave me a good sight picture of what needed to be done with great verbal instruction. Replaced my dust cover this morning even with my physical issues. sv
+Sue Voorheis Glad to help Sue! I'm just glad/amazed that a 71yo female would either have an AR or be interested in changing the dust cover. :-)
+SnareMan New to shooting as of last fall and love it. Purchased a Glock 19 and the AR-15. I have added a red dot to my (our) AR and still learning much. Only wish I had discovered this hidden love many years ago. Thank you again for your video. PS Dust cover from my instructor ... I believe one he used in the military.
@@suevoorheis1096 good job sue... Glock 19is great be careful no safety
Sue, I have the utmost respect for you!! Love that you enjoy shooting! Big hugs and keep enjoying life and the thrill that shooting an AR (or guns in general) does for you!!
Sue I'm impressed and very happy to read your comment. Hope you're still out there shooting!
Literally tried for 20 minutes until I found your video and the “pull down and out”. 2 seconds later... it’s off!!! Thank you!!!
Glad it helped!!
Years later and your video is still helping people. Thank you! With this video I had the confidence to tackle it myself. I did as instructed and was questioning the tape and boy am I glad I listened. That rod is JAMMED in there TIGHT. The replacement dust cover i had purchased came with a new rod but that rod didn't have the retention clip. This video gave me the confidence to use the OEM rod and retention clip as SURELY its better than not having one with the new rod. ANYWAYS, thanks a ton! This video seemed to stretch on forever but once I was IN your shoes I'm glad it did. The process was super easy and clear to follow. Cheer brother :)
I'm glad it helped! 🙂
Nice! I have done this before, but it's been a while. With all the various calibers running around for the AR platform, I decided to mark all of my uppers with caliber specific dust covers. After receiving a number of dust covers in the mail, I checked out your video to refresh my memory on how to knock these out. About 20 minutes later, they were all done, thanks to your helpful video.
glad it helped!
Followed your tips and had the dust cover changed out in about 5 min., no problems at all! Thanks dude for a great informative video.
Great video-Thank you for your help! this took me less than 5 mins. it took more work to get the stock one off than putting the Magpul one on 😆
Glad it helped!
With all the videos and ways I’ve tried to get that seed from hell off, this is the only one that worked, 1st try! Thank you 🙏!
Glad it helped!!
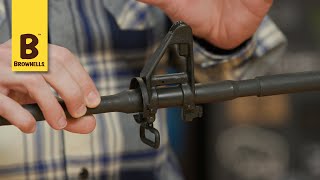
Take a small flat screwdriver. Rotate the E clip so the open side faces the receiver. Put the tip of your screwdriver under one of the "slots" in the E clip and then rotate the screwdriver. That will pop the clip right off without any pulling or damage to the finish. You can put a rag over it before you pop it off so it doesn't fly across the room. Easy. Pushing on the clip is a sure fire way to scratch the finish when your tools slip off.
Great tutorial man it helped a lot, thanks brotha
I knew this was going to be a beast. After about 30min of failing i remembered that i bough my wife a micro screwdriver set. Used the very small flat head and another that just came to a point. Three tries and that little C clamp flew off to never be seen again, haha. Forgot someone suggested putting ointment on it so it wouldn't fly away. I bought a UDC ultimate dust cover so I don't have to worry about this again. Thanks for the video. It really helped. Happy 10th year Anniversary!
Thanks! Yeah, it's been a surprisingly popular video. Good idea on the ointment part
This is definately the best video on changing out the dust cover I've seen and because of this, you've convinced me to do it for my daughters rifle. Thanks. You are the only one that really discusses and shows how to deal with putting the spring back on. Great video.
The spring was a bit of a pain, this is definitely the best video I've come across on TH-cam. The bar itself was challenging to clear the lower part of the forward assist, it took me about 20 minutes to do the whole job.
Yes I grew up with my dad refusing to pay anybody to do something he could figure out. Of course I was right there holding the flashlight and tools.
Always funny when you finally figure out the easy way. We broke a lot of things finding out the secret "tab" or hidden screw.
Cheers!
2024, this video came out as 1st displayed. I'm fighting getting the c clip back on my 2nd install, lol. 1st one went easily. # 2 is being a bee - yotch. Nothing like taking a break and watching how easy you get it done... now to find tweezers. Thanks 👍👍
Glad it's still helping after all these years
You sound like someone I'd regularly hang out with on any given day doing any old activity. You sir, sound like a friend I've had for years that I sadly rarely see anymore.
Am I?
@@SnareMan in a sense yes, as we are all 1in the same, just shattered into countless fragments experiencing itself but never knowing how to fully reassemble itself. And in a less like existential viewpoint I mean maybe we are maybe we have been at some point in this life and just maybe maybe you are. If you ever hung out with some weird funny white dude in the Southwest desert of the United States it could be me.
Yooooooooooooooo this made my life so much better. I lost the c clamp from watching another vid. Had to wait to get more, and then I found this vid and BOOM💥! Perfect!
Glad it helped!
Followed your instructions to remove and replace dust cover,awesome. No problems whatsoever. Thanks.
I'm glad it went smoothly for you! :-)
Your engraved dust cover door is 100% better than the 💩 I just received
9 years later... Thanks for the great video man!
You're welcome Cory!
Great instructional video. I just picked up a used Bushmaster upper missing the dust cover and thought the handguard ring needed to be removed, which meant the entire gun was going to have to be disassembled. Thank gawd I found your video.
Glad it helped!
I actually found it was easier to point the opening of the C-clamp toward the upper and pry up on it. It went flying but I was in a controlled environment and recovered it right away. Awesome video man. That was easy!
Glad you got it done easily!
Never find a more helpful video thank you I would have never figured this out on my own
Glad it helped!
Took me all of 7 min to do it. I watched your intro and was done by the out takes. Great video. For the tape use masking tape and fold it in half to fit. Its thick enough to slide behinf the guide rod and stay in place. Also it will catch the c clamp. I used a small flat head screw driver and a paint can opener to femove the clamp. Came off easy. Then used a pair of pliers with masking tape on the tongs to pull the guide rod. No scatches. And my AR15 "DANIELLE" now has her famous catch phrase "CASH ME OUSSIDE ....HOWBOW DAH!"
Great tips. Thanks!
SAVED ME ON THIS ONE BROTHER!! That spring had me so confused. The "C" clamp for me was as easy as 1, 2, 3
Modivation Design Glad it helped! :-)
Well done. Nice to see someone brave enough to show their failures. Enjoyed your honesty. Keep up the good work!!
They were so humorously frustrating I had to include them. :-)
Looked at a few videos for this. This was by far the easiest!!!!! Replaced two covers in the amount of time most videos spent looking for their needle nose pliers. Had some small flat end tweezers that fit over the pin and just pushed the c clip right off. Thanks for the video !!
Perfect. Ageless video for this modification. Much appreciated!
Great instructional video. Helped me get it done in 10 minutes. As a previous poster stated, the hardest part was nothing the little C clip and spring.
Well done sir.
+jr10 Glad it was helpful!
Thanks for your expertise into this video. I have a PSA AR-15 in 300 blackout. It was very difficult and time consuming process. PSA must push their dust cover pin on a press machine, because it was very close to the medal forearm. I couldn't even get a exacto blade in between to push the pin out a little bit. I had to use a brass punch rod with a hammer to get it to move. It was a pain in the wazzoo!!! Thank you So much for this very instructional video.
You’re the man. I can’t get that little guy on and I must have lost it 47 times 😅😅😅😅
Glad it helped!
I have had one of these sitting in my work bench for months dressing installing it. Watched your video and done deal within 5 minutes. Thank You!
I've never tried to replace my dust cover before. It didn't seem very complicated when I watched your video and it took me a whole 2 minutes maybe to complete the swap. I'm guessing from the comments that it has been a problem for alot of people so thanks for the great video. First try = perfect success..
Yes indeed. Did you watch the outtakes at the end of the video? You'll see my pain...
That little C clip was a booger though.
I almost lost it twice!
Thanks again. All good tips.
Booger is a nice way to put it.
I'll just come right out and say it....."it was a son of a bitch"!
First time changing a dust cover and was able to do this in about 10 minutes with the help of this video. Excellent stuff. Only thing that's missing is putting the c clamp back on, ended up being the hardest part. I suggest using tweezers and pushing it into the groove until it's sort of stuck on there. Then take a small flat head and push down hard on the top of the clamp. Should click in.
Thanks for the added. Tip. Glad it went well for you.
Broke like 3 pairs of tweezers while doing this but finally got it on! thanks man!
Easy like Sunday morning!! Thank you very much:)
"Surely there is someone I can pay to do this!" Haha I was thinking the same thing while watching other videos on how to change the cover.
I thought everyone should see the misery I experienced for all of you. :-)
If I knew it was this much of a pain in the ass I wouldn’t buy a cool ejection cover cool video loved looking for my c clamp in the carpet
Yea, I guess I should add that you should do it over a floor instead of carpet. ;-)
Much easier than the way I usually do it lol. Now I can order my custom dust cover that I've been putting off for the last year lol thanks bro.
No problem!
Man, thank you for your patience and very easy to follow video. I followed step by step and had perfect success. Thank you!!!
No problem. Glad it helped!!
Excellent advice! I'm about to undertake this very upgrade and I'm sure that you'll be saving me some heartburn!
Thanks a lot. I can finally replace that cover I bought over a year ago. You're the man!!!
No problem! Glad it was helpful!
Great vid, you made this super fast and easy clear to follow, had 0 issues and took just minutes
Glad it helped!
great method, successful on my first attempt, took less than 3 minutes start to finish, with no marred finish thanks to the electrical tape...much appreciated! :)
I'm glad it worked out so well.
Thanks so much for making this video! I replaced mine in under 15 minutes...never have done it before. I think the toughest part was getting that little bugger of a clip back on without losing it! Thanks again!
+UncleLoodis You're welcome! Glad you found it helpful!
Super easy. Fantastic video! I used this to change my 1st one over a year ago. Just used it again as a refresher.
+sribble1 Glad its still helpful! :-)
Well, that was after far too many failed attempts (as I showed at the end) so I was quite excited to finally get it. :-)
Thanks to your well done video, I followed your procedure and was able to replace my dust cover with no problem whatsoever. Thanks for posting it.
Allen Lucas I'm glad it helped! Thanks for watching!
This is the most helpful video I've seen on how to replace the dust cover. Thank you!
glad it helped!!
Thanks man! You saved me a lot of heartache! Less than 5min process....and most of that was putting the c clamp back on! [Note do this over a hard surface...not carpet! Trust me ;) ]
Glad to help!
great job. this video saved me a world of grief. switched mine out in maybe a quarter of an hour.
John LaRoe Glad you found it helpful!
Thanks a bunch for making this how-to!😊 I would have been afraid to tackle the job without your video.
Thanks for the video. Got my new dust cover installed in no time.
Dana MacLeod You're welcome! Glad it helped!
*EXCELLENT TUTORIAL! THE TAPE IDEA IS A GREAT SUGGESTION...THANK YOU!*
You're welcome! Thanks for watching
Thanks for the video, clearly showed up close of how to keep the port cover from being flimsy by rotating the spring to keep it in place.
You're welcome!!
I don’t know how you made it look so easy to put back on. I lost the clamp the 4th time I dropped it. Broke the second clamp. So decided to just slightly bend the distal part of rod. #RipJerk
Did you watch all of my frustration at the end of the video?
Thanks for doing the trial & error for me. After seeing it done once, I swapped my cover and think that was the easiest change I've ever made on my AR.
You're welcome!!
So, I did mine in literally 5 minutes. Instead of using tweezers for the c clamp, use the flat tab of a cheap bic pen cap. Worked on the first try with ease!
Glad it was so easy! :-)
Great and easy video to follow. Just watched and applied it. For a grunt, you brought it down to my level. Thanks for the technique.
+Brad Greenwald LOL. Glad it helped!!
Have a new dust cover and wanted to watch a video on how to replace. Your process was the best and easiest overall. The C clamp only flew on the floor once. Good job on explaining the small details it does help when you have never done this before.
Well done. This will come in handy next week for my 300 Blackout dust cover swap.
Thanks. Good luck with it!
Thanks for posting, it helped me out. That C clip was a pain, glad I did not have to reinstall it. The new dust cover was spring loaded and snapped in place easily.
Glad it helped!
That technique to remove the e-clip worked perfectly!
Excellent tip!
"C" clip. aka: "Jesus Christ Clips"
You're welcome! Glad you found it helpful and it made it easier for you!
I followed along step by step, easy with clear instructions, great video 👏🏻 very helpful 🙏
Thanks Bob! I hope I win the showcase at the end of the show.
Amazing how such a tiny piece requires 2 tools to work with it! 😆 I know the frustration as I just did my very first one yesterday! A booger it is for sure! And I really like that sharp needle nose tweezers you have! I need to find a pair like that. Looks like they come in very handy! So I can testify that in addition to those "precision" tools, this "simple" procedure does require patience, persistence and 2 STEADY HANDS!! WELL DONE!!!😊👍
Thanks!
They actually make a set of pliers specifically for these Jesus clips
Thanks so much for this awesome video! I just did one dust cover and have to do another. I actually ordered a dust cover kit in case I lost the C clamp but with your help I didn't need to use it.
Although old, still very helpful. Thank you sir for providing this info as I am working on a 300 Blackout build and wanted to know the process of adding a custom cover. Thank you once again...
Glad it helped!!!
Great info!! Used your technique and had my old cover off and the new dust cover on in less than 5 minutes. Wow, I agree that could have been a real nightmare if I had tried it without seeing your video. Thanks a bunch!
You're welcome!
Thanks alot for this video. Me and my friend were stripping some hydro dip off my ar15 and he didn't put the spring on correctly. I was thinking I had to take the barrel nut off again. This saved me a hassle. 🖒🖒🖒 thanks again friend!
You're welcome! Glad it helped!
Nice work. Appreciate you taking the time to help with this.
Thanks and you're welcome! :-)
Awesome video! Thanks to you it took 30 seconds to take the old dust cover off
Glad it helped!
Thank you man, great Job! Cheers from Athens
You're welcome! Thanks for watching!
i just could not figure out how the hell to put the dust cover spring back on. i didnt realise i had to twist it. thanks man, liked
Great instruction buddy! Done in 10 minutes with your help. Thank you!
Glad it helped!
Great video! Used this to put on my new engraved dust cover with no problems thanks to you!
Glad you liked it!
This video was perfect. I used some tape two punches and a pair of pliers and it took me about 5 minutes. Maybe I got lucky haha thank you!
You're welcome!
Glad your vid was the first one I chose. Had the horseshoe clamp off by the 3rd try. Appreciate the tip.
You're welcome! I'm glad too. :-)
Great vid and especially liked the bloopers at the end lol. Wanted to know what i was up against before i changed my dust cover and now i know. Thanks
Thanks! I figured everyone should see the 'fun' I went through with it. :-)
@SnareMan, I just found your channel and subbed. This video of the ejection port cover swap out was very informative. Even better than the Midway USA video, which says a lot! In looking at your other vids, it appears that we are kindred spirits in many ways.
Thanks!
thanks for the video it really helped me fix my spring without disassembling the entire thing... I almost lost the c clamp when i was putting it back in. Looked down and it was such a good thing that it had clp on it...it stuck to my shirt thankfully...
Glad it helped Chuck!
You're welcome! Glad you found it helpful!
You're welcome! Glad you found it useful!
"Peace through strength"
Cicero in his grave making the big Bugs Bunny face: "N O"
Thanks for the video! Your suggestions definitely helped!
+Kris C Sr Glad you found it helpful!
Glad you got it to work!
Thanks for the kind words and sub! :-)
Glad it worked well for you. Thanks! Good luck with those clips!
Thanks for this, Now I am going to go at it one more time, thank goodness I did buy the economy 3 C clip package
beelikestowatch You're welcome! Good luck!
Thanks alot!.i watched this video before my cover came in the mail so i was ready when i got it. it took me less than ten minutes using your trick ,thanks for sweating it out to show us tubers a better way!
Great job!! I followed your example and it worked out perfectly!! Thanks!
+kuahiwi82 You're welcome! Glad it worked out
This video really helped. After watching this I literally changed mine in three minutes using a pair of fingernail clippers and a pocket knife. Thanks for the vid.
Thanks for the video SnareMan! Really helped a lot.
YOu're welcome! Thanks for watching!
Thanks man! Your technique is definitely the way to go!
You're welcome! Thanks for watching
Nice vid. Was able to swap out dust covers with no problems. Thanks.
Rod Macedo Thanks! Glad it helped!
The bloopers was the best part. Lol. Great vid btw.
Glad you stuck around for them!
Great tip! Thanks for making it so easy!!
You're welcome! Thanks for watching?
Thanks bro I was trying to put my rig back together after a paint job and couldnt get the proper tension you solved the issue thanks!
No problem. Glad it helped!
Excellent video! I was thinking I would have to remove the barrel to replace a broken cover spring! Sure glad I came across this video had it replaced in under 10 minutes!
Glad it helped!
Good work on the video. This is the only tutorial I watched for swapping the ejection port cover and it was a snap. Had two of them changed out in 20 minutes or less. Thanks.
Thanks for mixtape idea, and for AHA!
Used method for my G&P airsoft rifle.
TheSaikek Glad it helped!
Best video ever. Especially the end with your narrative. LOL
I figured everyone should experience the same misery I felt. :-)