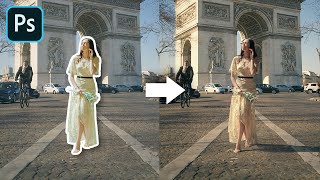
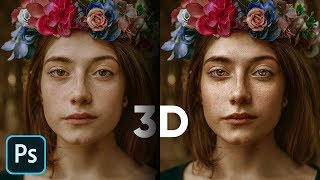
Make Flat Photos Look 3D with Photoshop!

ฝัง
- เผยแพร่เมื่อ 28 พ.ค. 2024
- Discover a simple Photoshop trick to add 3D effect to your photos! We'll learn how to create depth, dimension, and add drama to flat-looking portraits. With the power of Curves, Layer Style, and a unique Masking technique, we will automatically add realistic highlights and shadows to the subject to create an illusion of 3D.
In this lesson, we will learn how to extensively use the Blend If function to control the light and shape it according to your liking. I hope this video helps you. Thank you so much for watching :)
► TIMESTAMPS:
00:00 What We'll Learn
00:25 Most Important Step: Why 16 Bits?
01:20 Your Background Options
02:15 Create the Base
02:28 Add Highlights
04:09 Shortcut Trick
05:11 Highlights at a Glance
06:17 Add the Shadows
07:41 Shadows at a Glance
08:12 Make it Pop!
08:59 Spots and Marks
10:08 Confidence-building Tip
10:54 Quick Recap
► CHECK OUT THE OFFICIAL PIXIMPERFECT COMPOSITING PLUGIN: pix.live/compositing
► SUPPORT THE CHANNEL & GAIN PREMIUM ACCESS: / piximperfect
► RECOMMENDED SOFTWARE & CREATIVE RESOURCES:
✅ Official PiXimperfect Compositing Plugin: pix.live/pixcomposite
✅ The Best A.I. Powered High-End Portrait Retouching Plugins: pix.live/retouch4me
✅ Unlimited Photoshop Actions, Plugins, Brushes, Assets, etc: pix.live/envato
✅ The Best Professional Plugin for Color Grading: pix.live/infinitecolor
✅ The Best Professional Plugin for Skin Tones: pix.live/unify
✅ Best Plugin for Landscape & Astrophotography: pix.live/propanel
✅ Try Photoshop for Free: pix.live/photoshop
✅ The App I Use for TH-cam Growth: pix.live/ytapp
✅ Music Used in PiXimperfect Videos: pix.live/music
► THE GEAR I USE:
✅ My Graphic Tablet: pix.live/wacompro
✅ Recommended Budget Tablet: pix.live/wacomlite
✅ Primary Microphone: pix.live/mic1
✅ Budget Microphone: pix.live/mic2
✅ Audio Interface: pix.live/audiointerface
✅ Camera: pix.live/camera
✅ Lens: pix.live/lens
► PIXIMPERFECT MERCH STORE:
teespring.com/stores/piximper...
► PIXIMPERFECT ACTIONS:
gumroad.com/piximperfect
► SHARE: goo.gl/IUhnUl
► DOWNLOADS:
1. Sample Image: bit.ly/3Mq62sB
2. Starting PSD: bit.ly/3MqduUO
3. Finished PSD: bit.ly/3mo3Ua2 (Only for PiXimperfect Patreon Family)
► LET'S CONNECT:
Instagram: / piximperfect
Facebook: / piximperfect
Twitter: / piximperfect

![Create Highly Realistic SKIN TEXTURE In Photoshop! [FREE Download]](http://i.ytimg.com/vi/so-ZjeE2MuA/mqdefault.jpg)


![TREASURE - 'KING KONG' COMEBACK SPECIAL [THE TREASURE SHOW]](http://i.ytimg.com/vi/Jx1wyMaQzf0/mqdefault.jpg)

I love how there is absolutely no room for any doubts about the editing process... anything umesh says in the video is explained on the spot or another video is mentioned as reference.. a perfect teaching process. Respect 💯
I suspect he practices a few times before he ever hits the record button. It's like when Bob Ross had has painting show. He always did a version beforehand that he had as a reference so he'd have an idea of what he was going to do next. Wish more people did that.
10:42 whoever edited the video is a genius. I laughed. Hahahaha.
LOL, wanted to add a little fun there. Thanks :) - Unmesh
Your delivery and teaching style are just as great as the knowledge shared.
I smiled at the little adjustment of the video itself at the end ;-)
The best channel for photoshop learning in youtube🥰
WAOW !!!!
👍👍👍👍👍👍👍👍👍
This dude is THE Photoshop god! 🫡
07:33 This sentence is so true to me! Learning how to stop at the right time is not easy :) Thanks again Unmesh for the great knowledge you share.
100% Agree
Confidence-building tip is the reason I needed this video xD
Fantastic tutorial. Fantastic explanation. And it's always a good idea to watch your videos to the end.
Thank you for these tutorials. You the man! 😊
Simples e eficiente. Muito bom. Vlw 👊
Love this TH-cam Channel. You are truly a hero.
Simply awesome! Thank you, Amish👍 Really helpful
This is brilliant. Beats HDR and details extration by far. Thank you!
Been a subscriber for years, best touched up teacher ever!!!!!
You're the best. I love your work and your videos. Thank you for your lessons.
Every different video has differenrt lessons. ❣❣
One of the best tecniques tkankiuuu!!
man, I don't usually comment on videos here on youtube, but I've already learned so much from your videos! I just wanted to thank you for the quality content I've been consuming for years on your channel, since when I became a designer!
so amazing content sir I love your explanation skills, my all time favorite channel for editing & manipulation
Thank you so much 😍
Love watching your videos.
This will give me an edge. Thanks.
Thanks Brother You Are My Inspiration ❤
Thank you for your efforts
grate explain
Another amazing video.
Perfect👌🏼👌🏼
Thank you!
i thought i accidentally changed speed to 1.25, lol. amazing video as always! thanks!
This guy teaches photoshop developers what features to add !
I love the new outro!
Need more like this
Thanks for this lesson, I had fun using it on my toys lol! It does have a beautiful effect! I recommend trying it on Figuarts Dragon Ball toys to make them seem more macho!
The greatest Photoshop scientist I have ever seen.😊
Greatest*
@@manav.033 thank you 👍
@@bijugta pleasure 🙃
Thanks.
I've just been thinking about you. I remember when you were on the grind pumping out video after video a short while back but now you got me always wondering when the next one will be.
Umesh you are so perfect buddy... Thank you so much for that..
Like srsly you speak to well. You are made for having an audience 👌💪
Superb
Nice!
Awesome
First!! I’m excited for this one!
Fantastic tutorial. Loved it.Just a thought can this be achieved with help of masking with clarity slider inside camera raw. May not be right but when we play with clarity and texture slider I usually see images looking something like this. We may not have full control like this but it might help for quick Proof of concept. What is your thoughts?
That's wow
10:42 LOL!
Great
explanation 👍
At 2:10 Unmesh is like Dear Sir please receive from me my clipping path service sample free of charge! 😅
A little off topic but im wondering how i can also get the inner circle when using the brush tool? I have the same tablet as whats being used in the video
Great effect. Can same be done in gimp (or not adobe)?
is there any way to soften the patches? (highlights-shadows)
Unmesh gotta share where you get the soundtracks from! Always nice ones!
hi can you do this to landscape photo as well ? thx
Hey unmesh !! Plz make a tutorial on how to restore old photos in depth plz neutral filters are not enough
Is there a time saving photoshop action that can do something similar to this?
please do video about layer style 🙏
Genius 🗿
Do you recommend against just always using 16 bit? Any drawbacks?
❤❤❤❤
goooooooooooooooood
🤣 You lost me from the get go! 🤣
❤️❤️❤️
Amazing, can you turn the image back to 8bits after you finish or will it brake the image and start showing banding ?
If you export in JPEG, it is exported to 8 Bits anyway because JPEGs don't support 16 Bits. However, if you do want to convert it to 8 Bit for any other kind of document, even PSD, towards the end, create a Stamp Visible layer at the top (merged layer), and then convert it.
Anyone know if there is any advantage in using 32 bit over 16?
😍😍
Unmesh’s a WIDE BOI
That was so super fast 😮
Does it work with flat drawings? I want to make a flat drowning look like a Pixar 3d character. Is it possible on Photoshop?
I love watching your videos, could i ask if you could please talk a little slower, i know your very enthusiastic :) saves me rewinding
👍🏼👍🏼👍🏼👍🏼👍🏼👌🏼😎
When you overstretched yourself 😂
You’re literally the Photoshop Whisperer 😂
First cmnt done...
like even before I watch the video
I wish he would also make tutorials for Gimp, because Photoshop is too expensive.
Does anyone know a good TH-camr like him, which produce tutorials for Gimp?
🤗👍
Any PS tutorial is very difficult to keep remember and in practice nobody can keep crammed the different tools and technique used. It's very complicated and no short cut to retouch and edit an image. So, PS needs to invent more shortcut to work with it.
Is there a reason you create a path, make it a selection and create a mask from that instead of using a vector mask? I much prefer the latter solution when working with paths since I can still go back and change the paths if something's not quite right.
Yes, so that I have the freedom to do refine edge with the hair, blur the mask slightly so that it doesn’t look unrealistic. And finally, some areas can be slightly transparent and may have a fade.
Also, you can go back and change masks too. And if you want to make edits on the path level, you already have it in Paths tab.
Unmesh, would you be willing to guide us in learning 3D ? I feel that Photoshop has become limiting, and I am excited to explore the endless possibilities that Blender offers.
Unmesh: Great tutorial! But I get so hung up on all the technical details that I'm not sure this method will work for me. For example: in the areas that have more light, the darker skin features (spots, pores, etc) would also be lighter. I'm trying to think of how this technique could be used to combat that, but I can't think of anything. Maybe the only way around it is to use a painted mask??? ...but often painted masks LOOK painted. Thanks again for all you do!!
Hi Daniel, thanks for watching :) You can easily combat that by changing the balance of highlights and shadows adjustment layers in that area. If the spots are lighter, you can add a Curves layer for shadows, and use "blend if" to balance it. Hope it helps!
@@PiXimperfect thanks so much! I'm gonna give that a try!
thanks
1st comment ❤
Make video on Adobe firefly 😝
Can you please make a video on turning normal face pic to a professional headshot
:D "It's a very simple Photoshop trick."
11 minutes and 137 layers later:
1st comment
nice nice nice nice nice nice nice nice
i am the first one
First!
I don't usually comment on videos but thanks to this, I got a girlfriend!!!! Thanks so much!
ah banding
speed 0.75 rsrs
not better 23 bit?
Switches to 16bit, duplicates layer - every mac pre 2020 has a stroke 😂
I REALLY want to follow your tutorials but MAN! you do eveything so fast :(
Fun Fact : Unmesh only uses curves adjusment layer.
Curves supremacy !!!!
Yes sir!
I bet unmesh's bicep is bigger
2:32 It’s the persons left leg, not “whatever you want to call it”!
Right for me, left for the person :)
why shouldn't you always just work with 16bits then?