1/72 Airfix P-51D Mustang Build Feature

ฝัง
- เผยแพร่เมื่อ 14 ต.ค. 2024
- Turning the 1/72 Airfix P-51D Mustang into a show piece with extra detailing using simple and easy techniques.
Make sure to follow me online at:
★ / flyingsmodels
★www.flyingsmode...
If you are interested in seeing some of the building products used in this video or that are currently on my bench, you can check them out at the links below:
1/72 Airfix P-51, here's the link: amzn.to/2Wrnfr6
Dymo Tape: amzn.to/2Is1t28
Oil Paints: amzn.to/3gkn4pp
White Spirits: amzn.to/3456iHk
Brushes: amzn.to/3iGW4kz
Silhouette Cameo Portrait: amzn.to/3cwmaUO
Tamiya Cement: amzn.to/3ghZWbk
CA glue: amzn.to/2Mn67x1
Solder Wire: amzn.to/2AzclXM
Pewter foil: amzn.to/39XpxWg
Dental Resin Powder: amzn.to/2BSEz0o
Tamiya Fine Putty: amzn.to/36turX3
Tamiya Tape: amzn.to/2WZbxED
Solder Wire: amzn.to/2Yr5tEj
Airbrush: amzn.to/36tu5zH
Compressor: amzn.to/2A4vkt8
Tamiya Paints: amzn.to/2LTSmph
Tamiya Thinner: amzn.to/3cUxOZE
AK Gauzy: amzn.to/3dr4Lxf
AK Thinner: amzn.to/302UXFU
Mineral Spirits: amzn.to/2yu67bf
Tamiya Fine Putty: amzn.to/36turX3
Sanding Pads: amzn.to/3c5io3K
Copper Wire: amzn.to/3eGLPL2
Razor Blade: amzn.to/3d0OkqW
Olfa Circle Cutter: amzn.to/2Avly3V
Evergreen Styrene: amzn.to/2B4zJN2
Micro Drill: amzn.to/2Zw1Rmx
Straight Pins: amzn.to/3bVmlb7
The Camera I use to shoot the video: amzn.to/3bXlMxl


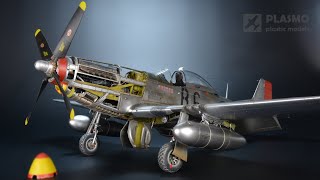


One of the best builds of a P-51 I’ve seen for sometime, a stunning model. You could just build Mustangs as the colour schemes and markings were interesting and varied.
Very much appreciate those kind words. It's a great little kit and builds up nicely. Like you said, so many different schemes and markings out there!
Brilliant. If you don't mind me saying you are the Bob Ross of scale modelling.
Thanks, David. You crack me up. My brother says the exact same thing. If only I had his hair...haha.
Awesome work.
Thank you!
That is pure class
Thank you, Don. Really appreciate the good feedback!
I think that is the finest 1/72 P51 model I've seen. The weathering really gave it extra depth. I'd love to see more about weathering with oils. Subbed. Cheers, Dan.
Thank you, Dan. I really appreciate the feedback and the sub. I'll try to make a more in depth video in the future showing the detailed weathering steps.
Gee, this modeling stuff looks easy! I think I may give it a try.
You have already mastered the modeling world. Time to get into the kit/conversion world.
Excellent work mate
Thank you. That little Airfix P-51 was a fun little build.
Beautiful build, definitely worth of a show table. Excellent work, the weathering looks fantastic.
Appreciate that. Another great kit by Airfix.
Amazing modulation you achieve with the weathering techniques, it gives the model so much character. Such a clean build! Stoked I found your channel keep em coming
Really appreciate the good words and the sub. Plenty more on the way! Just need more time to build 😀
@@FlyingSModels Don't we all haha
Excellent P51 build. I liked the technique discussion in the vid.
Thanks! I appreciate the feedback.
love it !
Thanks! It was fun little build.
Excellent, exact work. I think someone mentioned in a previous video comment that he found your weathering a little heavy. That’s down to personal taste, of course, but I think you make something that turns out visually stunning. Lots more to come I hope!
Stay well....
Appreciate the feedback. Yep, the finish may not fit everyone's style but that's the good thing about modeling...like art, we each have our own sense of what looks good. The other thing that is hard to appreciate is the difference between what the camera picks up and how the model looks when seen as a "whole" with the human eye. To me, all the extra highlights bring out the little details and add interest. But hey, that's just me :)
FlyingSModels ....I make you right there. I think they’re outstanding anyway 👍🏻
Prior to the addition of the white strips and decals, I found the appearance of this model overweathered in the extreme. The amount of time you devoted to layer after layer might please and inspire others, but not me. Sorry, but just using minimal preshading and good paint fading would have probably resulted in the same level of visual attractiveness you feel you achieved with all the other stuff you appled. I'm one of those people who appreciate realism more than attractiveness, and I keep seeing more and more obsessive weathering in current build videos. Try building the same aircraft without all the overlaying of this and that and compare it to this version. I wonder which you would find closer to real lfe? I learned the value of weathering from years as a model railroader. The most attractive engines and cars I had always seemed to be those that still had some evidence of their original paint gloss. Not only were the details more visible to my eyes, but the dead flat on everything approach finally lost it's appeal to me. If anything, railroad models have the greatest variety of finishes due to their widely different ages, uses, and geographical distributon. With contemporary weathering styles being what they are, military modeling lacks this sort of natural range.
how you doing sir
I really digging your style
you do some nice looking models they all look nice
I got a question for you I see that you apply white spirits to the model I went to Hobby lobby to get the same white spirit bottle you have they had different types of white spirits
I was trying to get the same one in your video they didn’t have that particular one so any white spirit will work as a filter to the model. Hope to hear from you soon I enjoy watching your videos i’m learning as I go
I’ve been doing this hobby for like a year and a half already and it’s so much fun to learn different things every day.
Hey Tony, appreciate the good words and glad the videos are helpful. As far as the white spirits, I think any artist grade white spirits would work just fine. I've used Winsor and Newton as well as AK brand and they both work well. I believe you can order it off Amazon if you can't find what you need at Hobby Lobby.
@@FlyingSModels I appreciate you reaching black to me
Oh k so any white spiritual
Now I know I will order the other products as well too
again thank you so much
for reaching out have a great evening......
Awesome build and weathering is yop notch!! Which decal sheet have you used?
Appreciate that. I think I used the old Super Scale sheet. Can't recall the number but should be able to find it with a quick search online. Thanks for the good feedback.
Nice job!
Thanks! It's a nice little kit!
Nice result on that Airfix Mustang. I will try your variation on the oil wash.
BTW were these the kit decals ? Nice colour scheme and a great looking model.
Thanks, Brian. The oil wash over flat paints is a really fun way to get some different effects. You have to practice just a bit to get the effects that I wanted but it's very handy and versatile. The decals were aftermarket ones since this was the Tuskegee kit release. Appreciate the feedback.
Another nice build. If I didn’t spend all of my time watching other people build I might actually get some of my junk built.
A question or two. Is 1/72 your preferred scale? I know the A6 was 1/48, but I seem to see a theme here. I’ll bet you can fit a lot more of the smaller ones in the old display case! I still think you need a 1/72 scale A6, hint-hint.
Also, realizing you edit, do you run into any problems with drying time on the oil paints? I’ve heard they take a while to dry, maybe a day.
Thanks for all of the modeling tips.
Thanks, David. That is a good point in that you definitely need to get a fair share of your own time building. I build all scales, really. I probably prefer 1/32 but I tend to build mostly 1/48. The 1/72 ones were good to show for TH-cam, though. I don't keep any of my models and there's not a huge market for 1/72 built models so I typically don't build many of those, despite what it looks like from my videos...haha. On the oils, I don't have any issues. The way I use them with the white spirits and blending/removing them, they are usually dry within a few minutes as they soak into the flat acrylic coat. Some of the washes I let dry for longer but no more than 30 mins to an hour based on how heavy the wash is. Hope this helps and I hope that the tips help. Now get back to building :)
Nice build and great video for some weathering techniques I need to try out! Thank you! Quick question, did you spray a gloss coat before decals?
Thanks for the kind words. I did apply a gloss coat using AK Gauzy before adding the decals.
I see airfix models have improved a bit. I remember when they looked like they were made of wax that someone left in the sun to long. Maybe time to give them another try.
Oh yah just a comment for the algorithm.
Keep those algo comments rolling :) And Airfix is light years ahead of where they were. You definitely need to give one of 'em a try. Plastic is still a bit soft but overall, very much improved kits.
I've just completed this kit as Little Joe out of the same decal sheet! Its not turn out anywhere near as good as yours though! Great work
Thanks. I'm sure yours looks great! Always enjoy seeing the work of other modelers. Feel free to share over on my facebook page if you want to: facebook/flyingSmodels! Nice little kit and decal sheet from Superscale.
What was your source for the decals? I've been looking for P-51D s home in Olive Drab
@@ericbeach9998 I got mine off ebay. There's an amazing shop in the UK called Hannants that has hundreds of P51 decals to chose from aswell. Check out their website
Can u do more of these types of videos amazing job would like to see a hawker hurricane
For sure. Always have more videos in the works. Was going to do a Typhoon but can look into a Hurricane for sure. Thanks for the feedback!
Wow Awesome ¡¡
Thanks! It's a great little kit!
Great build again buddy👍
Thanks, Philip. Another great little kit from Airfix!
FlyingSModels I only build 1/72 I did it since I was 9
Great build,new to your channel so thanks for sharing . What size of plastic card/sheet to you use for dials?
Thanks, James. Glad you found the channel. As far as the plastic rod, I used 1/16, 1/32, and 1/64 and I think the sheet is usually 0.010" and 0.015" depending on what I need. Hope this helps. Let me know if you have other questions.
.. nice work indeed. The decals look nice and appear to work well, do they come in this kit? What ‘box’ is this ?
Thanks for the kind words. The decals are from a Super Scale sheet. The kit markings were for the Tuskegee airmen. I have another video up with the kit review and it shows the boxing and markings.
When are you going to tackle the Mistel? I wanna be famous! LOL!
Soon enough. You are already famous...no wait...that's infamous 😆
Excellent build. Where do you get the decals I can't find that set
Thanks for the feedback. I got them off eBay and I think they are still available: www.ebay.com/itm/Microscale-Decal-1-72-Scale-72-907-P-51D-Mustangs-362nd-363rd-FS-357th-FG/390936237758?hash=item5b059d96be:g:-ZsAAOSwd4tUHzXd
I have a question for you, when you applied the white spirits did you spray some kind off acrylic varnish like Future Flow wax. Very nice work!
Thanks. I actually apply the white spirits directly to the flat coat. If you use a gloss coat, like Future or other, the oils will not have a chance to weather the paint. They'll just wipe off and leave the wash in the panel lines (like a typical panel line wash). The white spirits allows the paint to be blended into the paint like a "filter". Hope this makes sense.
Excellent build!
I cant start Airfix Mustang..
I love that light gray colored styrene too much to ruin it..!
I rather just look at the moulds and
close the box again..
Thanks, Gendo. I say do whatever makes you happy and if that's looking at and admiring the plastic parts, than just keep enjoying models that way :)
Great video, like all your builds, thanks so much for sharing! One question: do you use a magnifying glass, especially for the 1/72 models? I am 52, recently started modelling again after more than 25 years and I was terrified to discover that even with prescription reading glasses, 1/72 detailing (especially cockpits and undercarriage bays) is stretching the limits of my eyesight. How do you you do it? :-) :-)
Thanks, Manos. I do use a magnifying visor for the detail painting in the cockpit although I can still get away with readers for most of the assembly work. Getting old is tough, that's for sure :) Glad to have you back in the hobby! Best wishes!
Ha, I'm 57 and having just returned to modelling myself I now find I need close up reading glasses to see what I'm doing. It comes to all of us, eh.😉
By the way, these models are finished beautifully, I love the amount of weathering you do, as you say, artist license.
@@FlyingSModels Thanks for the reply! Indeed, 1/48 and 1/32 certainly seem more attractive to me now, at least from an eyesight point of view :-) Best regards!
There are some great kits in the larger scale those of us that are becoming visually challenged. I appreciate the feedback on the artistic license I use on the models I build. Not to everyone’s liking, I know.
Nice! I've been watching some of your builds. I noticed one thing. Do you ever tape off the cockpit or wheel well interiors? Thanks
Sometimes I'll stuff some foam in there but most often, I just use a piece of card stock slipped in the side of the cockpit opening if I need to spray around the cockpit or a piece of foam for the wheel wheels. Most times, I can get close enough using a fine setting on my airbrush to not worry about much masking. Every once and I while, I'll have to come back and do a few touchups.
@@FlyingSModels Thank you for the reply.
Stunning!
Thanks! Really enjoyed this little kit!
I really like your stylistic approach. How do you thin you Tamiya paints? I'll use either their X-20A or their lacquer thinner, depending on if I want to have the paint to be opaque or translucent.
Thanks, Matthew. I used their X-20A thinner as well. I have not tried their Lacquer thinner yet, maybe I should.
@@FlyingSModels Tamiya Acrylics work well with their Lacquer thinner or with Mr Color's lacquer thinner. But when you use the lacquer thinner, the paint is more translucent. So it's good for gradually building up color. I learned it from this article in Hyperscale:
hyperscale.com/features/2002/gekkogc_3.htm
Is there a reason that you weathered with oils before putting down the recognition stripes and the decals?
Great intel on the lacquer thinner. Appreciate that. As far as the stripes, I only did that so the didn't get "over-weathered" with those oils. That, and sometimes I get impatient and do things out of order...hahaha.
do you remember what the raf green mix was?
Been a while so I don't recall. I'm sure it was Tamiya RAF green or some custom mix. Be the time I finished weathering, it no doubt shifted the color significantly as well. Sorry I don't recall more specifics.
Where do you like to get your Tamiya paints? Are you in the USA?
I'm in the US and just buy them at my local hobby shop.
What brand/model airbrush do you use? It looks very precise.
Thanks. Using a badger renegade velocity with a 0.2mm tip.
@@FlyingSModels Beautiful, what pressure are you spraying at? Subscribed. Recently retired and going to start building again after 50 years LoL
Thanks for the kind words. I'm spraying around 15-18 psi. Appreciate the sub and glad to see you are going to start building again. Let me know if you need any info/advice on anything. You can always message me over on my facebook page too: facebook/flyingSmodels.
@@FlyingSModels Thank you
I have two mustangs with no instrument sheets could you be kind to tell where I could buy the punch and die sets? Wonderful videos thank you for sharing.
I think you can still purchase an equivalent thru Micro Mark. Here's a link for you: www.micromark.com/Micro-Punch-Set
FlyingSModels thank you, but how can make the squares in the instrument panel, because the punch set is for round miniatures
Sorry I didn't address that. After I punch the circles, I just cut small squares around them. Of course, the do make some aftermarket etch items if you don't feel comfortable doing that. Here is an example: www.airmodel.de/product_info.php?language=en&info=p290_instrument-bezels-1-72.html
FlyingSModels thank you once more for your quick replies
Anytime. Let me know if you need anything else down the road.
What color did you use on the Cockpit floor, the Price lable was covering up the Numbers on the Bottle??? TIA!
Sorry about that. It was Vallejo's Beige Brown.
How did you get your canopy so glossy ?
I don't recall dipping it in Future but I may have. It was nice and glossy from the kit.
@@FlyingSModels Thank you responding. I appreciate the info. Happy modeling.
Just a comment for the algorithm.
Thanks and the algorithm thanks you as well. Got a kick out of the comment.
Do you gloss coat before decals?
I do but you highlight an important miss in the video. I didn't show that part. I typically use AK Real Gauzy for the clear coat.
@@FlyingSModels Thank you for your reply
@@gazzasb1 Thank you for noticing that omission.
What was your mix or ratio of paints for the Dark Green on the fuselage? Thanks
I used roughly 5:1 Olive Drab:Olive Green and faded it by adding a little Dark Yellow to that mix.