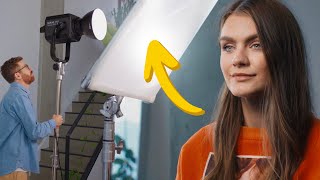
Advanced Documentary Interview Lighting - Step by Step

ฝัง
- เผยแพร่เมื่อ 4 ก.ย. 2023
- The tutorial is 1 of 60+ videos from THE CINEMATIC EYE, a brand new in depth cinematography course. It was one of five courses available this Sept 8th in our Documentary Academy: The Art of Documentary
Find out more about The Cinematic Eye and AOD
theartofdocumentary.com
Don't miss the chance to win our Fx6 Cinema package. For more details watch this video: • FX6 GIVEAWAY - Your Pr...
Graded with my Cinema Pro Luts: bit.ly/2UUKAjC
Big thank you to Set Ready Rentals for providing the gear for this course: setready.ca/ - ภาพยนตร์และแอนิเมชัน


![ไม่ต้องมีที่ที่ให้ฉันอยู่ แต่ขอแค่มีฉันอยู่ก็พอ (Spaceless) - getsunova [SHORT FILM]](http://i.ytimg.com/vi/MuT0d_cvJkc/mqdefault.jpg)


This is just 1 of 60 videos in our course. We get way more advanced with the lighting, but also show you how to shoot with only one small light or even none. This is the complete roadmap to advanced your cinematography no matter where you are at on your journey. I have loved making all these videos that you have requested!
Thanks Mark for this video. So grateful.
Mark, I've already emailed you about this, but I must say... I do not think you get "way more advanced" with the lighting in the course. This video here is as advanced as the course ever gets. I was very let down by the Cinematic Eye.
yeah apparently it doesnt get more advanced. and also, its a bold statement to say this is a complete roadmap "no matter where you are at on your journey". like, you got chivo teaching a course?
A note: Adding distance between the light source and the subject makes the shadows MORE harsh, and sharper, not less harsh and softer. I like this video and seeing the differences as you make changes.
I look so good ❤
😂 no one will argue that
🤙 thanks Kim for being our stand in all day!
lol - We're all in agreement with you @#$%^&
we all accept ❤
U fine
I almost clicked passed this video as it seemed a bit long and beyond my budget/scope. Boy was I wrong. I loved it. I do commercial interviews for counters and make commercials/adverts and it was so useful. I am making some short dog style mini films for my main client soon and really want to see more of you guys. Brilliant video, you have such a great way of teaching. You are giving new information but It feels like coaching. Awesome mate thanks. Might need to look at your course again….
I'm consistently thrilled to receive notifications whenever Mark shares a new video. Through his TH-cam content, I've gained a substantial amount of knowledge and insights. Thank you so much for these valuable videos dude!
Thank you brother !!
Hi Mark I just recently came across your channel and man do I wish I would’ve found your stuff a year ago when I first got in to video work. But since I came across your channel I have gained a huge interest in moving towards doing documentaries and can’t wait to get started. Thank you for all you do on here sir!
Thanks so much for all these videos and really taking the time to show and compare visual examples on screen with do's, dont's, and experiments. Incredibly helpful! 💚
The thing that always seems to get me stuck on set is, WHEN to use which set up. Seeing how you guys communicate in real time to carve out something that you’re both content with is dope!
This was incredible. Thank you so much Derek and Matt!
Awesome video with some great concepts.
Something that they didn’t touch on in this video (that will probably be covered in the course) is One of the most intimidating things when first coming to set is: where do I start? In this video, they went right for the key, but In general (after choosing your angle), you want to set exposure for what is hardest to control, and in this scene, that’s the window. How bright do you want that reLative to what you will want the lens to shoot at? From there you can go with your ratios for key:fill:backlight:background/ambient.
Then you can just set your ratios and there is a lot less guess work to get to a good starting point.
Hope this helps!
This is bringing up some deep anxiety memories from being on shoots and the director & producer would take TOO MUCH TIME deciding on how to light a scene that would only be 5 seconds of the entire program. All the options they had looked amazing lol
Correct, diminishing returns
Haha yes, when you have too much time it can spawn this weird psychological battle between the creatives on set. Someone finds a problem and the power dynamics and their insecurities/self doubt/egos all kick into play. Sometimes, having no time is actually the best thing for everyone's sanity.
TAKE MY MONEY!!!! I'm so stoked for this course. I don't think I've ever been this excited as a fellow AOD filmmaker/student. This course is going to test me and challenge me to ELEVATE my cinematography skills.
thx for this free content.
two things which you guys could have mentioned:
- colour temperature, your lamps are probably at 5600k, the light from outside is just a bit more cold. that also should be discussed when talking about why this may look light.
- when your subject seems to be too bright, compared to your background, you should try out to bounce one source in the ceiling an one throw the 8x8... just to brighten up the ambience
cheers
Hi! Many of you have pointed out how helpful a handheld light meter would have been on this video, and I agree it could have sped up things. That said, we do have many other videos in the course where people are using light meters, for a mid-level skill setup like this we don't often see cinematographers using one, although it's quite useful! Also, when i'm complaining about the light feeling "sourcey" a quick solve could have been backing up the lamps from the diffusion :). Love seeing all the feedback from pro DP's and gaffers in these comments!
I've never used a light meter. Light is my paint brush, so it would get in the way of the artistic expression. I never say never, but I'm not convinced it's absolutely necessary.
Love this series , hope you making more video like this❤
Great Stuff. Keep'em coming like this!
Lovely. Thanks for making this! Also, Im glad you have a course.
Pure gold thank you guys
Right-hand rule is ignored with the 4x.
Opened toed shoes on crew. Using #2 clamps when you have ties on your rag.
Incorrect leg placement of the hair light c stand
Your 'boom light' is also ignoring the right hand rule
Also, you can shoot a light into the ceiling to bring up the room.
I know this is a taste of a course, but this preview has so much of the basics that are incorrect, I can't imagine this course being worth it, lighting wise.
Knuckles on the right for safety.
Actually with the possible missteps, mistakes, and or anything in between, this course might be worth it. to teach what not to do.
This is being labeled as an "Advanced" course. The basics of stand setup and placement are being done wrong.
There's no indication that they're intentionally doing things wrong as a way to get engagement.
And if they are, shame on them
Yes. It was extra nerve racking that they are putting the light over talent…
This style of video are my favorite in AOD 🔥
This is fabulous!! You can have the best camera in world, if you don't know how to light it it will look like shit. In my opinion this is one of the most important things when it comes to video production. Always grateful for your content Mark.
Thanks mate! Glad it’s helping :)
Fantastic walk through! More of this please!
We have dozens in our Cinematic Eye course! You can find more there :) theartofdocumentary.com
Stoked for this release!🔥
The reason it looks sourcy almost no matter what you do is because the light is not motivated from the window behind her.
The strongest light should come from the direction of the window and then you could add in softer fill from the front. The best thing you did in this setup was turning on the backlight which made the lighting seem a bit more natural. But in the end it was turned off.
Yep, good feedback here. There are a couple big issues. For starters, at this time of day the light doesn’t come directly through the windows and light the subject and background much, but instead it softly returns off of the environment outside and in turn we are looking at very bright, front lit trees. This means we are fighting to reach a good ambience level inside the room, but also the room itself doesn’t have great light or shape. It also means adding a nice direction light from the windows won’t look natural either. You’ve also blocker he in a way where the soft light coming through the windows doesn’t reach her much and the key light doesn’t “wrap” the window. So at best we have to hope the key light can look like an additional window. I think all of this underlines how scouting and blocking based on knowledge and experience are the foundation of good lighting. If you do these two things well so that you pick the right location, schedule the day for best light, and then block your talent well, lighting becomes much easier and can look much more natural and dynamic.
@@scon1425Great point. It also depends on how long of an interview it is. Light changes, so this comes into play. If you're going to film later in the day to get softer light on the trees, you could have too much of a lighting change if it's a long interview. I'm a neg head, and I love negative fill. You could also use three quarter grid on the hair light to keep the light directed to your subject.
yeah. videos like this make me feel conflicted. on one hand, I appreciate that these guys are trying to help demystify lighting and filmmaking and make it easier for people to get some of the basics. on the other hand, I don't love that people who clearly have a very rudimentary grasp on these ideas themselves are sort of cosplaying as experts and ultimately leading people down the wrong path. I think this setup here is just fundamentally being approached from a lack of experience, and you can kind of feel that they are pretty inexperienced and likely kinda regurgitating things they have seen or heard other do/say. Though the location leaves a lot to be desired, there is a way to get a nice interview setup at this time of day, in this location if that is what you had to do. But ultimately I think it falls flat because in this case our "expert" is a little bit green himself and essentially misses some early steps that would get things on the right track. instead of taking the pth of least resistance, he kinda just tries to pump a bunch of light in and soften it as much as possible, without a core understanding of why taking that approach results in an image that looks "lit" and generally very flat / monotone.@@rickdeckardbladerunner2049
@@scon1425 The gear they are using is top notch! I would hope they are doing commercial work. My gear is not at their level yet! I've had my eye on the Nanlite 500 with the spot attachment. At almost $2k, it's an investment for sure.
My point exactly.
Can you tell me that that small red T-shaped object is at the top of the C-stand. can you share a list of the gear you used?
Loved this
Quick note: a silk is a type of diffusion. Not a generic term for diffusion. Just like grid cloth there are different types of silks and different densities. Also for the love of god never cut your tennis balls in X’s. Doing so makes it harder to put them on stands than if you use just one cut.
Bro those flipflops are next level
I guess you could always use the inverse square law to brighten the background interior if needed, by pulling the main light setup backwards and up the power. Getting the same exposure on her and brighter on background. Might flatten the light on her a bit, but that diffusion is so big that it might not make much difference on her face. Or you could pull the aputure and Nanlite lights back from the diffusion to spill more into the white ceiling and walls. Great vid, thank you!
loved this!
Awesome video!! thank you so much!
So much knowledge in this video!!!!!
glad you liked it!
Great Video!
This was awesome!
Amazing breakdown ❤ One question, light panels are already huge compared to a regular light, like your 2nd light. How would two regular lights work with this or should I use a softbox or 4x4 1/4 to create a larger key light before hitting the silk?
Thanks for sharing this information 🤙🏾
The principles introduced are stellar, thanks for the mini masterclass. I'm wondering if an Aputure 600d (or equivalent) and a light dome 150 (huge) pushed through 8x8 1/4 silk (or maybe not?) might have achieved a similar result...
Thanks guys!
Hey Mark awesome video! Please what light stands did you use there? The ones with the red.
Excellent job! An interesting thing you might try here if you don’t have the luxury of an 8x (former gaffer and current DP here) - you could bring the 4x to the very edge of frame and as close to subject as possible, depending on your final comp. This would make it wrap better and become less sourcey. The closer the diffusion is to the subject the softer it will be - and it usually helps the eyes pop.
Great video!
Good suggestion. And the OPPOSITE of the on screen text, which appears to be an error.
Very cool insight
Great stuff. I like the mention of using a power window. Maybe I missed it but what is the advantage or reason for adding more diffusion vs. just turning the power down on the light if it's too hot?
more diffusion softens the light even further
Thank You, Mark ❤
You’re most welcome
Got to take this course.
heck yeah!
Love it bro
Very nice tutorial!
How would you deal with change of the sunlight in this case? I found myself lighting an interview very nice but then the sun changes and the whole atmosphere of the room changes.
love it. ❤
hi and thanks for the video!
What is the name of the t-Bar?
Blessings&Greetings
Can you provide a course on the business side - pricing, negotiation, hiring a crew/how much to pay them, marketing & sales, etc?
greath video thank Mark
Thank you so much!
You’re welcome so much
Excuse me, may I ask what you think about the following light stand? I recently found a new light stand on top of Amazon, it has six sections of removable rods up to 8.2' long, it has two sliding arm pistol grips that allow me to quickly adjust the PLM and softboxes at the same time, my current studio is an 8 ' and I can adjust its height as I want, and at only cost $159 . Do you think it will do help for the lighting efficiency.
I would like to know more about the manufacturers of the products too. I love the cardeliini center clamp and painters pole hack! Its so time consuming to set up a giant silk on all four sides. Who makes your silk? 8' x 8' half many be up soon for my kit.
Amazing
There are also other varieties of diffusion fabrics made from different types of fabrics and plastics including but not limited to: muslin (very thick & can be used as a bounce or diffusion), natural silk, poly silk, highlight, soft frost, and many others. I lean heavily on grid cloth because the thickness of each is actually measured for consistency so you can know how many stops of light are lost through the diffusion. Generally speaking any opaque surface that can refract light can be used as a diffusion source. This includes clouds, smoke, atmospheric haze both artificial and natural, I’ve even used condensation on a glass window. Plenty of ways to do it and they all look and feel slightly different! Head to your local rental house or film school to try a bunch of variations if you want to find your favorites!
Great info
This is insanely valuable. I've been a DP for 3 years. Who exactly is The Cinematic Eye designed for? Beginner? Advanced?
We dig into the theory/foundations which is good for every cinematographer but then have a series of videos where the lighting gets more and more advanced and so this will be perfect for you as you can jump right into where you want to improve your skills most
I learned alot thanks
LFG!!!! Open the freaking doors already!!!!
I would consider some fill or bounce instead of trying to have a house-sized light source that "feels sourcy"
😊 thanks Mark
You’re most welcome
Hello. Very interesting and informative. I live in Quebec. Do you where online I can buy c-stands, silks, cloths, boards (everything that I might need to bounce or diffuse light) and everything to attach them on a c-stand? Thanks.
Sorry for asking but am curious, what's your intention when you put your fingers in front of the camera lens in relation to the light setup?
What brand are you glasses? I want some good glasses like you but I could not find any! Yours are dope! 🔥
Great video! Something confusing I’m seeing in here…isn’t grid cloth different than silk? I’m assuming that this was silent grid and not silk used in this video. The same strengths are available in silk as well but it’s a different quality in the type of diffusion.
Hey, yes grids and silks are different, and both have multiple diffusion options. usually it comes down to personal preference which one people prefer. I prefer grids over silks and so our package trucks have all grids. Early in my career I used silks a lot more and then made the which to grids. I think the comment I made at 4:03 was more that we had a variety of grids available on the truck package for testing for the purpose of this video. Both are great options; cheers!
@@DerekLamoureux I agree! I prefer the grid cloth as well. I was more talking about the text in the lower thirds calling the grid cloth silks. Just wanted to clarify this for anyone who ends up purchasing diffusion material based on this video. Fantastic teaching in this btw!
Nice job, but since you guys were trying to go all out, I definitely think you needed something to increase the ambient light in the room. Another 8x8 out of frame left, behind the subject, either as a bounce or adding a very small amount of light would have done wonders.
This also is why it looked source-y. You first exposed for outside. Great. You then lit the subject with soft light and tailored the amount of light to properly expose the subject. Great. Now outside and subject are well exposed. So why does it look source-y? The contrast ratio between subject and indoor ambience is unnatural. Would have been perfect if the ambient lighting was added.
Quick tip, Use tennis balls on the ends of your tripods in order to not scratch the floors instead of using huge sheets... Easy and inexpensive.. Edit, lol you mentioned it later on..
Lighting is probably the most important aspect to shooting anything. However it also highlights how far our cameras still have to go to see the world the way that we do. We wouldn't need half the lighting gear that we do if cameras had better light performance and higher dynamic range.
how do you guys paint your grip equipment? does it flake off really easy?
Wish I had a team to work and learn with
Why am I excited for something I won't get to be part of? lmao. Can't wait to see the documentaries that come from the students this year!
Leeroy! Be a part of it brother!!
@@markbone once the money is no issue then I’m in!💪🏾
Something that could have impacted how you light is whether or not talent is looking off camera or directly on. It seemed like this was primarily for looking directly at camera and are you shooting into the shadow side if off camera? Another factor to consider.. If off... you could have approached from the side more, brought in fill to lessen your contrast ratio and had it look more like light from the windows were lighting your subject. The COB light could have been the main key motivated by the windows and coming in more from the side, and your panel could have been the fill to keep contrast ratio low to match the environment.
The light you ended on definitely didn't look source-y but it also didn't look very motivated.
Just my 2 cents. I'm a student every day. I realize I sound preachy or whatever. I don't mean to.
How did you manage to get the exposure set so the natural light coming through the windows in the background was t blown out while keeping the subject perfectly exposed at the same time?
Neutral density filters. At a very basic level, it works like this: Step 1) Expose for the windows using an ND filter so you can keep your shutter at 180 degrees or 1/48 or 1/50, depending on your camera. Step 2) Blast enough light at the subject to make a convincing match between the level outside and inside. Step 3) Finesse the lights like you’ve seen in this video so it doesn’t look like you have a giant lamp shooting at the subject. - Also, if you don’t have a lot of lighting firepower, do not shoot with windows in the background.
Did you grip overhead light a little bit wrong or maybe you have counter clockwise screws in Canada? 🤔
My thoughts exactly. The hair light was rigged in an unsafe manner.
Very valuable explanation here 💯👀
Is this course about Lighting or Cinematography, Which aspect is focused more?
Both! We go into all aspects!
This is super helpful to me to know how DPs think as I move more and more into video. One observation, coming from a photography background, so I don't really know what I'm talking about when it comes to video... The screen you are using to judge these lighting changes seems much more contrasty than the final edit. The side by side scenes shown on the TH-cam video show much more subtle differences.
As I was watching this with my photographer's mind I was amazed at the effort to soften the edges of shadows and balance contrast. The concerns about contrast seems to me a little anachronistic. Today's modern sensors handle more DR than cameras from even a few years ago. Is it really necessary to flatten scenes so much? As shown in the post processing of the video shown here, in contrast to what we see on the monitor within the video, a lot can be done in post... not meaning major effort, just meaning adjusting highlight and shadow levels. To this point, you guys were walking around these super bright light sources during this shoot, we can observe as you move around the room the way the camera you shot this on handles high DR situations. It often looks great.
Yep absolutely agree man, the reality is the differences in the lighting are very subtle when using the different diffusions. The amount of this finessing would only really happen on big shoots when there is lots of time allocated for each shot. Putting a single soft source off to the side quickly will usually result in a great looking image for most run and gun situations. Ultimately it comes down to the intention of the video. Big Budget = More people seeing it, you want it to look the absolute best. Small Budget = A quickly positioned soft source is going to look just fine.
And it is true, DM range of cameras now is insane. You can simply shoot with natural light, employing the basic lighting rules (back lighting, diffusing the sun) and it's going to look great.
What kind of T-bar clamp are you using?
I'm hear for listening to that heavy Canadian accent. Makes me feel so warm and comfy inside. Sorey but I had to say it. :D
Hahahaha 🇨🇦🍁
what is the brand of that T Bar used?
Do you know what bar that holds the 8x8 fabric is called? Or the brand perhaps?
me too, I asked the same question 👍🏼
Somebody give her kudos for her patience please :)))
Quick question would using a grey card and a light meter make the process quicker?
Light meter for sure
Hey mark this has peaked my interest in buying module one AOD, I went to the website and while the price isn’t cheap, I am still very interested. However I am confused by the “waitlist” thing. I might ask for this as a Christmas gift so how would I handle that, should I go ahead and get on the wait list? A little puzzled how to buy it when it’s only open at certain times of the year and such. Let me know, thanks!! This video was great!
Hey Billie! We only “open the doors” for AOD to be available for purchase twice a year. So starting Sept 8th for two weeks the course will be available. Our early bird discount pricing is only available for the first 72hrs. If you’re needing it as a Christmas gift from family, please shoot an email to info@aodfilm.com and our team can help
Awesome thanks man!
2 ton grip package. I'd love to see lighting essential for traveling to a location. How can a one man team back a backpack and still have decent lighting options? 🤔
We have that video in the course! We also just emailed it for free if you’re on our waitlistb
@@markbone - I’m on the list. 👌
Id like to see with mark sitting in and how to avoid reflections on the glasses.
i would take them off hahaha
Doe anyone know where may I may purchase a T-Stand or T bar that you put up the cloth on?
What would happen if you used two 1/4 or 1/2 grids spread out. Set it up so the light hits one grid then travels a certain distance and hits the next grip resulting in double diffusion? I guess you would need lots of room & steps.
Lots of room. More would just cut the light more
The result would largely be the same as using the full grid, although it would likely be a bit softer because it would spread more evenly than have the source right behind a single frame. You would, however, need a lot of light because the further the light gets from the subject the darker it gets. This technique is referred to as “double breaking” a light. That said, it’s debatable that the light really would benefit from being softer as this setup is already basically a front lighting situation and is plenty soft.
I actually liked it with just the hard light at the end ha
lol , your “sourcey “ light was because your fixture was too close to your scrim. If you wanted a big soft light you should have pulled the key light source back till it filled the 8x8x space. If you did not have power then add your second light the same distance back . C;amping the fabrics is fast and easy but abusive to the silk. It’s the easiest way to tear your silk right at the edge . The clove hitch is your friend . It’s fast and easy. Use your pony clamps to contain the silk on the ends and have them pointed down not up this way you can get your bar close to the ceiling.
What's the name of the clamp holding the bar that the silk is on???
At 04:50, there is a fundamental error about how lights work. The closer the light, the SOFTER the shadow will be . Your caption effectively says the exact opposite.
I see this woman at every rave I attend.
Great video! If the window is visible within the frame, the key light and the window should be set to the same T-stop. The subject should not be exposed brighter than the window. Honestly, a light meter would make this process faster.
Certainly agree, and in the course we have even more advanced lighting setups where the DPs use light meters to dial in lamp power and exposure. For this video, the intended audience wouldn’t likely be using one.
I did not feel the back light but great job Mark
👍
Subtle back light ;)
What's the brand of this T-bar you are using? Looks solid!
It’s modern studio
Merci!
@@DerekLamoureux im not seeing T Bar on the modern studio site. Is it just the two pieces of square tubing and the ear for 1" Square Tube? Also who sells the knurled Baby pin you have to hang the tube light from the grip head?
@@mattseagle1957 yes, it's part of the 4' 8x8 breakdown kit, i dont know if you can buy it indivudually- may have to call and ask Modern; but having the full 8x8 breakdown kit is great
'' Cinematography is your preference''.....that's a good take away.
Silient.. doesnt flap in the wind and ruin sound?
Maybe bouncing it instead of shooting through diffusion would have reduced the "source" look of the light?
Where can I buy that T-Bar setup?
This…
Hey Mark! that was a Nanlux not that Aputture Nova! :)