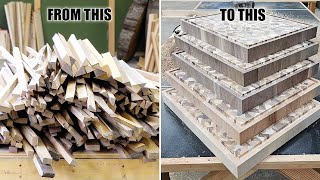
End Grain Basket Weave Cutting Board Tutorial

ฝัง
- เผยแพร่เมื่อ 7 ก.พ. 2025
- This is my method of making an End Grain Basket Weave Cutting Board
I do all my fine measurements in metric, but you'll hear me switch back and forth depending on context. You can make this pattern in imperial - but Metric is just way simpler when it comes to precision.
I am in no way sponsored by any of these companies - I bought these tools and supplies because I believe in the product and / or they were all I could afford. #notsponsored
Shop at any of the links below - If you have an idea for a custom item, send me an email.
Personal Website - www.muirheadph...
Wood Page - www.muirheadph...
Direct link to Walkthrough - www.muirheadph...
Etsy Shop: www.etsy.com/s...
Stay up to date on projects and videos on my Instagram: / photo_matt
Mandeville by Kevin MacLeod is licensed under a Creative Commons Attribution 4.0 license. creativecommon...
Source: incompetech.com...
Artist: incompetech.com/
Dub Eastern by Kevin MacLeod is licensed under a Creative Commons Attribution 4.0 license. creativecommon...
Source: incompetech.com...
Artist: incompetech.com/
Rhastafarian by Audionautix is licensed under a Creative Commons Attribution 4.0 license. creativecommon...
Artist: audionautix.com/
FAIR USE COPYRIGHT NOTICE
The Copyright Laws of the United States recognizes a “fair use” of copyrighted content. Section 107 of the U.S. Copyright Act states:
“NOTWITHSTANDING THE PROVISIONS OF SECTIONS 106 AND 106A, THE FAIR USE OF A COPYRIGHTED WORK, INCLUDING SUCH USE BY REPRODUCTION IN COPIES OR PHONORECORDS OR BY ANY OTHER MEANS SPECIFIED BY THAT SECTION, FOR PURPOSES SUCH AS CRITICISM, COMMENT, NEWS REPORTING, TEACHING (INCLUDING MULTIPLE COPIES FOR CLASSROOM USE), SCHOLARSHIP, OR RESEARCH, IS NOT AN INFRINGEMENT OF COPYRIGHT.”
THIS VIDEO AND MY TH-cam CHANNEL IN GENERAL MAY CONTAIN CERTAIN COPYRIGHTED WORKS THAT WERE NOT SPECIFICALLY AUTHORIZED TO BE USED BY THE COPYRIGHT HOLDER(S), BUT WHICH WE BELIEVE IN GOOD FAITH ARE PROTECTED BY FEDERAL LAW AND THE FAIR USE DOCTRINE FOR ONE OR MORE OF THE REASONS NOTED ABOVE.
IF YOU HAVE ANY SPECIFIC CONCERNS ABOUT THIS VIDEO OR OUR POSITION ON THE FAIR USE DEFENSE, PLEASE CONTACT ME AT PHOTOMATT.MUIRHEAD@GMAIL.COM
THANK YOU.


Thanks for demonstrating how to make this cutting board. I think I’ll put this under “projects to complete when my shop is completely free of other projects and absolutely organized”.
Haha… whose shop is ever free of projects and completely organized?! Not mine!
Ok, the whole putting your brand in the drill press trick, broke my brain! You, sir... Genius!!
lol - yeah, that's about all that drill press is good for. Not a big fan of the Ryobi DP.
Your channel must be youtubes best kept secret! Truly exceptional video. I hope more people will find your channel. This was superb!
@@atteljas lol. Thanks! I had to stop making content a while back as I get moved and get a new shop setup… expect more project videos in 2025!
Well done. The presence of the Vernier's and 1-2-3 block earned you a new sub. Stay well.
Matt mate, thank you for the presentation and the board looks top class. Thank you for the tip with the branding iron. So simple. Why did I not think of it.
Take care and be safe. Cheers.
Besides being absolutely gorgeous, I really appreciate the techniques you show and explain. Sharing that whole approach is very much appreciated!
Thanks for the comment! I appreciate the appreciation 😁. Thanks for watching!
And that's ONE cutting board. Wow!
Loved the picture of the Montana sunset by the way!
Thanks! Was from a spot at Two Medicine lakes on the eastern side of Glacier National Park. Hard to deny that view… my only concern was that a Grizzly bear and her cub were in camp a few hours prior so my head was on a swivel all evening 😂
Awesome cutting board. I can't tell you how many things I've purchased after drinking bourbon! I bough a set of your plans.
Haha… damn bourbon making bad decisions for us! Glad you liked the video - hit me up if you have any questions!
Your sense of humor is a bonus to this educational video! Thanks for posting.
Haha! Thanks - one tends to get kind of delirious spending so many hours starting at a monitor editing footage 😂😂. Glad you liked it!
I bought your plans and close to starting the glue-up. Thanks for the video.
I absolutely LOVE that you put that warning on. You’re the man.
Haha - because accidents don't take vacations! lol.
Like a few others, i thought you had lost your mind ripping after the first glue up. But once I understood why, i can see the genius in it. I never would have thought of it.
lol. It’s definitely a little unorthodox, but when using thin stock or multiple thicknesses of lumber or even scrap, it saves a lot of waste. You can skip the step altogether by using 8/4 lumber and not making the initial panel… I will generally resaw lumber and then use the fall off box box bottoms and other small projects. Thanks for the comment… I promise I’m no crazy 😂
Great video: great skills; great knowledge; great teaching skills; great design; great project; great wood selection; GREAT TOOLS. Thanks for sharing.
Thanks, David! Glad you enjoyed it!
The ultimate cutting board, so beautiful! Great work!
Seeing your assembly jig was great! I purchased your plans and have build one board and was pretty intimidated by the glue-up. I'm now ready to tackle this one again! Thanks for sharing the extra details.
Thanks Doug! I’ve altered the jig a little bit since I wrote up the plans - having the fences a little shorter than the board is key for me, but with nice parallel clamps it wouldn’t be an necessary due to the longer jaws - the flip is a little “extra” but it works with the tools I currently have.
Loved the video, thanks for sharing. Would love to make a few. Have some friend getting married soon would be a hood gift. Hope to remember the durections
Glad you enjoyed the video! It’s a fun project and I’m sure your friend will love the board. It’s fun to play around with different species for interesting color combinations.
Wow! Really nice board, and a great tutorial. I've been a long-time machinist, buy I only recently started making sawdust. I love making cutting boards. I wanted to make one for my sister, and this is the design she picked. I'm going to tell her she's going to have to wait until I get some more experience as this looks to be WAY above my current paygrade. lol
It’s a little intimidating at first? But as a machinist, working in metric and using the micrometer should e second nature.l, and that’s half the battle with this design. I’m sure you’re be fine - when you’re ready let me know - happy to answer any questions.
@@MattMuirhead Just DMed you from your website.
You got me with the man glitter! LOL!! So I had to sub! The board turned out beautifully man. Take care & God Bless!!!
Haha…. Careful dragging that man-glitter into the house after a long day in the “shop”. Lol
Beautiful - I was going to comment on the voids you had on the edge rows on your final glue up, but then you eliminated my issue with your final dimension trimming.
Thanks - yeah, doing it that way is the only way to ensure adequate pressure during the glue up. It I had cut the edge pieces down beforehand, not only is it more work, if the cut isn’t precise the pressure might not be even. Glad you enjoyed the video - thanks again.
Beautiful finish.
Thanks. Super easy to mix up and much less expensive than buying the pre-made stuff.
Beautiful piece. Nice work Matt.
Thank you! Once you have the method down, it’s fun to mix species to create different looks.
Ok, ok. You get a like. First the Man Glitter bit, but definitely for The Clamps! pop-up.
Haha.... thanks! Gotta do something to entertain myself while I'm editing lol
@@MattMuirhead Oh wow, came back after gettin' lost on random topics to see what other tutorials you made and was surprised to see ya don't have an entire library to pick from! All the more impressive editin', Mr. Matt! Ya did it like a pro!
@@PsyCoCinematics yeah, I’m a bit behind - got a new job, had my table saw die, got a new one, now I’m fixing to move houses and hopefully into a nicer, bigger shop. I’m not done; just had to take a hiatus - I appreciate you checking back in!
@@MattMuirhead Sure thing! Take your time and get stuff sorted, but subbin' to see whatcha got in store for the future too! Have a good one!
Well done Matt. I enjoyed your video and hope you succeed with TH-cam. Your basket weave pattern is amazing. I quilt and am familiar with this pattern so I had to see how you did it with wood. Whether with fabric or wood it is a complicated pattern. You are very talented.
Thank you! I'm still relatively new to woodworking but am working hard to learn! I've watched hours and hours of TH-cam videos to get where I am now - it's wonderful having all this at our fingertips.
A beautiful piece. Very informative
Thanks Wayne! Much appreciated!
wow! too beautiful to use as a cutting board!
Thank you! Cheers!
Awesome project and work sir. Great video 👍👍
Thank you! Cheers!
Very nice work!!
Thanks a lot!
Amazing outcome Matt, money shot is always well worth it!
Might be time to invest in that drum sander ;)
Thank you and I agree… I have an old Delta 16/32 but like most that are left out there, it’s not working properly. I have access to a wide-belt that I use sometimes, but I need a good machine in the home shop. When I get into a bigger space, a nice drum sander is on the short-list of must-have tools.
That is a beautiful piece of art.
Thank you!
Frigging gorgeous!
Great job, explanation, Most Important analysis, Cost of Materials!
Great Work, thanks for sharing
Much appreciated
Wonderful job. Congratulations on your competence. Marcus 🇧🇷
Thank you, Marcus! Agradeço você assistir meu vídeo!
Hi, what an amazing video. You make it look doe able but it’s very intimidating to me . Keep up the amazing work.👍
Thanks Mr B. The glue up was a little intimidating, especially the first time, but it gets easier with every one.
Lol, that Ralf "I'm in danger" got me laughing.
Instant sub.
Haha… thanks for the sub! Working at a cabinet shop FT now, so the videos will be a little slower than anticipated, but I have some fun projects coming in the next few months!
@@MattMuirhead
Sounds good, from what I've seen you put out quality content.
Informative, creative, and entertaining.
I'll be going through your content, and how that your channel grows.
If that's what you want anyways haha.
It's been a while since any channel had left this level of impression on me.
Keep up the good work.
Amazing job! Want to do similar top of table in livingroom
I have plans to do something link this for a table surface one day, but I think I might cut it into veneer and laminate it over a substrate. Would be a cool looking table for sure.
I am very impressed! I didn't see a single correction I would give you, and this was the best method for making basket weave pattern cutting board I have seen. You obviously have some some considerable practice time making end grain boards.
Thank you! I’ve made a few of these to be sure, but I’m still pretty new to woodworking (only about a year under my belt), so I thought i could share my methods to help other newbies to help us all grow through the process. I have another project shot, just need to find time to edit 👍.
@@MattMuirhead wow! Then you are an absolute natural in woodworking. I subscribed to your channel. I'm interested to see your projects in the future
Thanks - it’s been a lot of fun learning the process. Spending at least a few hours in the shop every day to keep pushing myself. Hopefully can get in a groove to post a few videos per month.
watching again I like your work lol
Thanks again! Lol. I have a few more projects recorded and I hope to find some more time soon to edit the footage and post most content - started a new job and have been too busy. 👍
Awesome board!!! Thanks for the tips!
Thanks Eric! I've had some fun with different species / color combinations to mix things up which is always interesting.
what a great design! you just earned a subscriber!
Thanks - glad you enjoyed the video!
Very nice pattern, one of the best I've ever seen.
Much appreciated! While it’s a little time consuming, I feel like the end-result is worthwhile.
@@MattMuirhead Definitely! I don't think I'll be doing this to sell, but I'll definitely make one as a gift for my wife. Thanks for the tutorial.
Very impressive ,thanks for sharing
Amazing board! Someone help me understand the point of the initial glue up. Why not cut the boards to the strip width initially?
This is explained in more detail in the plans, but that step is for people who aren’t started with 8/4 lumber. I created this walkthrough / method because a large percentage of weekend woodworkers only have access to 4/4 or 1” s4s lumber, so they won’t have the option to just resaw thicker lumber down to the thickness required. Personally. I skip the first step and resaw my lumber on the bandsaw and use the fall-off for box bottoms and other small projects. Though, even using 8/4 lumber, it’s still a feasible option if you are looking to reduce waste.
Well done.
Thanks! Glad you enjoyed it.
Subbed just because of the Futurama reference. Haha jk, this is a great tutorial!
Haha... thanks! Since it's Christmas, I should post an appropriate quote by Bender.... "Oh my god, I bet I can eat and go to the bathroom at the same time!" Have a great holiday!
Great vid! Liked for content, subbed for metric 😉
It’s all about the MM.
I work in a cabinet shop…. I wish they felt the same 😂
I like how sensitive you were to some people's sensitivities surrounding CNC. That was funny!
Haha…. Yeah, I’ve experienced first hand how triggered some people get over using a CNC in a shop 😂😂
Really nice board. Would you mind commenting on the pvc pipe set up jig and how and why is works? I see a few people using them, but I would have assumed that the PVC bows. Apparently not?
It’s just a simple way to lift the wood from the surface that is easy to clean and work from if you plan to use cauls. They are 3” pvc so they don’t flex under even heavy load. I don’t use them all the time - with the Bessy clamps with elevated feet, I often just use those as a base and still give me enough space underneath to attach cauls, albeit not quite as easily as when using the pvc.
I'd love to learn how you make the excel sheets for this
Thanks for sharing! I love this look!
Thanks! Glad you like it!
Amazing work and a great video! I purchased your plans and will try to make one of these soon.
Thank you! Hit me up if you have any questions!
Very nice and yes the glue up would give me high anxiety.
I also have to take a shot of bourbon before ordering from Woodpeckers... Great stuff but EXPENSIVE! Lol!
Did I see a Hot Shots reference in there on the second glue up?
Of all the missions in all the jungles you had to walk into this one.....
Beautiful board
Thank you!
Gorgeous 😍!
Imma take a shot hoping there's more woodworking/how to videos coming up. And I subbed lol 🥃
Thanks, Janie. I have another Project already filmed, I’m just trying to find time to edit. Started a new job not that long ago and it’s sucking up all of my time for fun stuff like my personal work 😂😂.
No rush at all. Take your time boss! "The two most powerful warriors are patience and time. You get the chicken by hatching the egg, not by smashing it.”
Gorgeous!!!
8:30 But why did you glue up the panels when you're cutting them apart again in the same direction as the glue up? 18:55 ->The (unnecessary) glue lines show up in your board...
This is discussed in more depth in the plans, but the object of this video was to demonstrate the technique no matter the thickness of lumber being used. If someone were to build this using 4/4 or even 6/4 lumber, this is a necessary step to ensure having enough material to get the proper final dimension. If you use 8/4 lumber, you can skip the panel step altogether if you don't mind the waste. If you're stingy with material, when you create a panel like this, you eliminate quite a bit of waste - I actually resaw 8/4 lumber and make thin panels with the fall-off and use them for box bottoms.
@@MattMuirhead 👍🙏
Hey! Great board and i loved every step of it. One question, why didn't you raise the grain with water and sanded it? Isn't it better?
I didn’t film any of the sanding because watching people sand is the most boring content on TH-cam…., but yea, I raise the grain between each grit of sandpaper from 80 up to 220. 👍
@@MattMuirhead Tyvm for the quick reply! You are the king boss
I stabilize boards on a known flat piece with shims to use my 12" thickness planer as a jointer.
This is almost 15” wide on the narrow - and sending end grain through a planer is very dangerous. Router sled, drum sander or CNC is much more desirable.
@@MattMuirhead No No. I was talking about the initial board that was too wide for your jointer and you used the jig to run it through the planer after the jointer.
@@ecocentrichomestead6783 ah yeah - I’ve used that method as well - this takes up a little less space in my little shop but it’s definitely a great option.
Hi Matt your video on your basket weave cutting board is spot on and your cutting board itself looks great. I’d love to know where did you get your branding iron? I’m very interested in buying one like that . The electric one that I have , I am having a problem getting the whole brand straight.
Thank you - The branding iron is something cheap I randomly found on Amazon searching for custom branding iron - An outfit called High Heat Stamp. Nowadays it mostly collects dust outside of using it on furniture and other large projects - I chose to simplify things and just engrave my logo with the CNC while the handles are being cut - kill 2 birds, but chucking it into the drill press makes all the difference.
I've made some other changes to my technique since making this video but the bones remain the same. I finally invested in Parallel Clamps which makes the glue up way easier (no more need to flip the jig) and have just become more efficient. I generally also resaw my initial stock and skip the initial glue up unless I am batching out a ton of them at once. I can use the fall-off for solid wood drawer or box bottoms.
@@MattMuirhead Thanks Matt .
Great video man! Is that cross cut sled built or purchased?
That sled is the Incra 5000.
@Matt Muirhead nice! Thank you again man! I just made my first end grain board and I'm 100% hooked. I will be building this one and utilizing this video. Very well done, easy to follow and a good bit of humor thrown in. Appreciate ya bro.
Parabéns pelo seu trabalho ficou linda a sua tábua 💯💯💢💥💫
Muito obrigado pelas suas amáveis palavras!
I would love to learn how you design the board’s.
I’m not great with a computer but I will figure it out to bring some ideas to life any help with this would be great thanks
I had an idea of what I wanted the board to look like, crew it up in excel as you can see in the video and then broke it down in my head as to how I could create strips and reverse engineered it. I just imagine each block I drew to be 24 inches long and what might be the best way to get it to that point. Unsure how others work out the details for their designs, but that's how my brain works.
Very cool! Thank you!
Thanks - Glad you liked it! Hoping to get back at it soon after I move into a new shop!
Matt, @ 6:50 are you giving the dimensions of the entire species slab? Also, why the initial glue up instead of ripping to rough final from the surfaced initial stock? ie you take the sapele to 6mm from the glue-up, why not just rip 6mm strips to start with?
You can omit the panel glue ups if you want - this process saves some waste but is not 100% necessary. This is explained better in the accompanying tutorial guide. I use 8/4 lumber for woods 1 and 2 and 4/4 for wood 3 and skip the panel steps. More waste but saves a day in glue ups.
So what's the point of the extra singular blocks along the edge at 16:35 if you're just going to cut them off? Seems like a waste of wood and if I was making two of these boards they could be used in the second one instead of scrapped from the first one. Also saves time during glue up....
@@MetroidMayhem These make a huge difference in eliminating gaps by adding clamping pressure to the inner blocks when in the jig.
Without them, the entire row they push against would not get equal clamping pressure compared to the pieces that sit proud of the final dimension board. The amount of wood and time saved by not doing this is negligible. It’s not efficient to cut the blocks on the edge to the tolerances required to ensure it is clamped properly.
@@MattMuirhead Ah, that makes sense. Thanks for the clarification!
Obra prima perfeição em cada detalhe 🇧🇷🇧🇷🇧🇷
Obrigada! Agradeço você assistir meu vídeo! Vou publicar outro vídeo quando terminar meu projeto atual! Espero que meu português faça sentido!
Matt, I am going to do this board and going to use 3 woods. 1 Walnut, 2 maple, 3 cherry. What is the materials list for each of woods. Your video only uses 2 woods so I am not sure how to easily figure it out for 3 woods
The plans differentiate Wood 1, 2 and 3 to make using 3 species easy. Wood 1 is the main block, wood 2 is the thin strips and wood 3 are the small squares to fill the gaps.
Funny, my branding iron is also my autograph surrounded by my home state
Ha - i think it adds a nice ‘made in the US’ feel to it, but just a little more specific 😉. I had a branding iron made up that I use a lot of the time, but I took the file and made a toolpath for the CNC that I use on smaller projects like these.
I’m curious about the purpose of the initial glue up…it seems after the glue up, you sliced everything in the same orientation. Is that to try to maximize wood utilization?
I discussed that briefly in the video, but in more detail in the plans. This method allows you to use any lumber you might have in hand - the reality is that a high percentage of hobbyists use nothing but 4/4 lumber. If you are using 8/4 like I am here, you can skip the first panel glue up, but you will have a lot of waste from each resaw. This method will also help reduce waste by quite a bit. Personally, I generally resaw my 8/4 and skip that first panel, but I use the falloff from the resaw for hardwood box bottoms, so it’s to my benefit.
Beautiful design and work...just bought your calculator...looks impressive. But I'm a little confused by what I see at 8:35 in your video. You've made a glue-stack of the cherry and are then ripping the stack. It appears you are essentially ripping down the glue joint. Can you help me with the rationale?
Yea - this method was mainly used as an example - if you are using 8/4 or thicker lumber, the first panel isn’t necessary. This tutorial will be good for people using any thickness lumber (most folks use 4/4 and therefore would be forced to make the panel to achieve proper thickness). When I make these, I use 8/4 and resaw boards close to necessary dimension and then plane it down until it’s dead on. This method also saves at least a full day of waiting for a glue up. That said, the panel method does save quite a bit of waste. Fortunately I can use the fall off from the resaw for other projects (box bottoms, inlays, etc).
Thanks for the clarification...with 4/4 stock it seems like one would clearly end up with "seams" in the end grain in the final product...correct? Wouldn't that also be true if any of the cuts when starting with 8/4 were not on the glue seam?
@@davidlynch7694 yeah, you’ll get seams if you cut your strips from a panel - but because it’s endgrain, it’s no very noticeable if you you take proper measures when glueing up your panels. I don’t find it takes away from the aesthetics very much. That said, I buy all my lumber 8/4 and therefore skip that step for my personal builds (this video notwithstanding).
@8:45 did you cut them up after you had glued them together? It looks like you cut in the same direction as the glue joins unless I’m missing something ?
This is discussed more thoroughly in the written walkthrough, this video was meant to help clarify that. This method is meant for people that either use 4/4 or multiple thicknesses of lumber, or for people that use 8/4 and want to maximize their yield with minimal waste. You can resaw your lumber and have a lot of fall-off if you’re ok with that - I generally go this route because I work with 8/4 90% of the time. I use the fall-off for box-bottoms. But if you want to have less waste, this panel cut to the proper width will save you quite a bit.
@@MattMuirhead thanks 👍🏻
Great video! Loved it. Any advice on other domestic wood species to use?
My favorite is a 3 wood combination - walnut, cherry and sapele, but maple could be subbed for sapele to give a different look.
Nice job
Thanks, Robert. Much appreciated!
Cool friend very good your work... friend lives in Brazil and in my region does not have these projects. could you please help me Where can I get the program any link that I can do the course for these projects. Thanks in advance
Thank you - as far as the link to the tutorial, it is in the video description directly under the video. If you are on mobile, you should only have to click the name of the video to expand the description. The programs needed to view / use the files are any PDF reader such as Adobe Acrobat, Microsoft Excel or any other clone of the program (I use Planmaker from Softmaker), and finally there is a SketchUp file that may help give some visual cues for the first panel glue-up. You can use it for free online or download SketchUp 2017 for free on their website. If you are unable to view the video description, you can go to www.muirheadphoto.com and enter the site - from there choose the “woodshop” menu option and you can find the plans there. Muito obrigado!
@@MattMuirhead ok ogrigado
amazing
Is this pattern plan available for purchase to make my own?
Thanks
The link to purchase plans is in the video description. Thanks!
Ciao Matt. Scusami, ho scaricato i tuoi file questa notte. Non capisco il motivo dell'incollaggio intermedio. Perchè incolli i listelli insieme per poi tagliarli la seconda volta? Avevi già i listelli fatti...dopo averli piallati in squadro potevi incollare il ciliegio da 4mm...cosa mi sfugge?
Ciao dall'Italia.
Hi Matt. Sorry, I downloaded your files last night. I learning well, thanks. I don't understand the reason for the intermediate gluing. Why do you glue the strips together and then you cut them again the second time? You already had the strips done... after planing them and square you could have glued the 4mm cherry... what am I missing?
Bye from Italy
Thank you for the comment. Since this is a tutorial, I added the lamination for people that don't have access to thicker lumber. Here in the states, it is common for people to buy 1 inch (~25mm) or thinner lumber, and the lamination step would be necessary to create the proper thickness. I buy most of my lumber 2" thick, so when I build these, I skip that step and use solid wood. The lamination step can also help to reduce waste when building larger batches, but if you plan out your cuts, there is not a lot of waste in this project. Good luck and enjoy! Let me know if you have any questions!
Grazie per il commento. Poiché questo è un tutorial, ho aggiunto la laminazione per le persone che non hanno accesso a legname più spesso. Qui negli Stati Uniti, è comune per le persone acquistare legname da 1 pollice (~ 25 mm) o più sottile e la fase di laminazione sarebbe necessaria per creare lo spessore corretto. Compro la maggior parte del mio legname spesso 2", quindi quando li costruisco, salto quel passaggio e uso il legno massiccio. La fase di laminazione può anche aiutare a ridurre gli sprechi quando si costruiscono lotti più grandi, ma se si pianificano i tagli, un sacco di sprechi in questo progetto. Buona fortuna e buon divertimento! Fammi sapere se hai qualche domanda!
nice dude!
Thanks!
Hi Matt, I loved this video and I'm eager to try my hand at making this myself. I have a question - do you have suggestions for another wood to use in place of sapele, as I'm in Australia and it's difficult to find here (and I'm new enough to woodworking that I'm worried about picking a wood with vastly the wrong characteristics!) Cheers.
That’s a good question a im not very familiar with woods that are native to AU, but I’ve made this with a number of different species. I use Walnut and Cherry quite a bit - hard maple is always a good choice. I try to stay away from open-grain woods like oak, but many folks will argue that it’s fine - I l prefer tighter grain woods for a number of reasons.
Your video is so clean .... Whats your video setup and what program your using....
Thanks - Aside from the intro teaser shot, I shot all my video on an iPhone 11. I use an Osmo gimbal mounted on a Manfrotto fluid head (my background is in landscape photography). The intro shots and the portrait images are shot on a Sony a7riii. I use Adobe Premiere for my video editing.
I am curios as to why did you do the first glue up, only to cut along the seams for strips?
I discussed that briefly in the video, but in more detail in the plans. This method allows you to use any lumber you might have in hand - the reality is that a high percentage of hobbyists use nothing but 4/4 lumber. If you are using 8/4 like I am here, you can skip the first panel glue up, but you will have a lot of waste from each resaw. This method will also help reduce waste by quite a bit. Personally, I generally resaw my 8/4 and skip that first panel, but I use the falloff from the resaw for hardwood box bottoms, so it’s to my benefit.
@@MattMuirhead sorry, missed that in the video
@@cristian13ytube no apology necessary - I think i glossed over it too quickly because I get that question a lot - it’s a fair question. Resawing takes up less time and is preferred if you don’t mind the waste. If you have a really straight stick of 6/4, you can just plane it down and call it good.
Matt Muirhead, how do you calculate your pricing of the cutting boards, or woodworking, etc.??? A short video would be cool. Thank you.
I look at the the price of materials, figure out how many hours I have into the project and do some market research on what similar boards are selling for in the area. Frankly, I need to start selling these for a lot more than I am lol. It helps to make more than one at a time to help cut down on the time I have into each one - milling the lumber to exact dimensions is the most time consuming.
Great video, thanks for sharing so many details. It’s a complex piece. You should have more subscribers so I just did. Cheers!
Thanks! I am filming another project now, but long hours at work and the 100°+ temps aren’t helping my productivity! Hopefully I can make a good dent on it this weekend and publish another video next week 🤞
Please, I'd like to know where to get one of the Splitters you used on the Powermatic 66.
You can order than from Sharkguard - they have a full array of splitters in multiple widths depending on your choice of blade, overheard collection with kickback pawls, etc. I ordered one after I had my first 5hp kickback... right after I cleaned my shorts!
Curious to know how much you charge as a joiner myself in england i bet its stupid money we cant do that over here and besides no one over here would want to cut on it !
Prices differ depending of wood species and the fluctuation of lumber prices, but these start at just over $300 USD. The great thing about end grain boards is that they show very little wear and tear if you aren't hacking at it like the Swedish Chef :)
Great video! Any chance you might share the Excel sheet?
Thanks Steven. The excel sheet is available on my website (see link in the description) - it’s bundled together with - 15 page PDF walkthrough that goes into a little more detail than the video and also includes a SketchUp file that better displays the panels for the first glue up.
@@MattMuirhead Just downloaded it. Thanks so much! Looking forward to trying it out.
Let me know if you have any questions!
for this board what lengths are you cutting to?
This info is in the plans linked in the description, but I tend to cut extra to allow for more options when choosing my layout, just in case there are a few abnormalities in any of the blocks - so I tend to cut 26", give or take.
Did you say that you share the spreadsheet you use to create this board?
The link to the plans on my website is in the video description. If you’re on mobile, click on the title of the video to expand the description. 👍
I see your responses on why you do the first glue up, but as you're cutting to length, don't the "seams" where to glued show?
They can if you aren’t careful about how you glue the panels - seams don’t show badly in endgrain if you orient them correctly. It’s very possible to make these without that first panel on the large pieces of you don’t mind either resawing 8/4 lumber or planing it down and having a lot of waste - those methods work just as well.
Can I get a copy of your spreadsheet? Excellent video and product.
I have the plans and spreadsheet on my website. There is a link in the description 👍
Very nice!!!
Thanks!
Bom dia, como no Brasil nós usamos as medidas em centímetros, gostaria por gentileza que transformasse de polegadas para centímetros. Achei maravilhosa sua ideia.
O plano que tenho disponível para compra online é métrico (milímetros) - não uso medidas imperiais (polegadas) em nenhuma das minhas pequenas peças de marcenaria. Espero que esta tradução do inglês seja precisa o suficiente para fazer sentido!
Reminds me a bit of the "duct maze" from the Aliens video game. :)
Stupid question here from a rookie. Why glue everything up (the first glue up) just to rip it down again? Is it to try and save wood?
Not a stupid question at all - yeah, depending on the thickness of your lumber, this ends up saving a lot of waste - but it also allows you to use any thickness lumber you want. You can even mix thicknesses if you have some 4/4 and some 6/4, for example. Honestly, because the 8/4 cherry I had was so twisted, I had to joint / plane a lot of material to get it flat and it would have been just as easy not to make the largest panel, but I decided to do it anyway just to demonstrate the process.
What is the point of making flat panels to being with?
It’s discussed more in the tutorial, but this saves a considerable amount of fall-off as opposed to resawing 8/4 lumber (or if you’re brave enough, 6/4….). It reduces waste by a considerable amount, especially when batching these out. I generally use 8/4 and resaw - then save the fall off to use for box bottoms and other projects.
@Matt Muirhead interesting. However you do have fine glue lines and different grain patterns in the middle of the block if you glue up a panel. I feel that de values the work you have done.
I think a better solution is to size the blocks to a 8/4 or 6/4 size.
@@backwoodsbaby9729 I generally resaw 8/4, but with endgrain, it’s not much challenge to orient grain direction where you can barely notice the glue line. It’s dealers choice - both methods work. At the end of the day, a high percentage of builders only have access to 4/4 wood and this method helps them create this pattern without having access to thicker stock.
This was a very enjoyable video. What was the music in the background?
Thank you - the music is just generic royalty-free beats available from TH-cam. Some of the music creators are listed in the video description.
@@MattMuirhead thanks!
Man glitter, funny!!!
Great!