(OUTDATED, SEE DESCRIPTION FOR NEW VERSION) Create Large Scale Oceans in Blender 2.8

ฝัง
- เผยแพร่เมื่อ 31 ก.ค. 2024
- THIS TUTORIAL HAS BEEN UPDATED FOR BLENDER 2.93. PLEASE GO HERE INSTEAD:
• Large Scale Oceans in ...
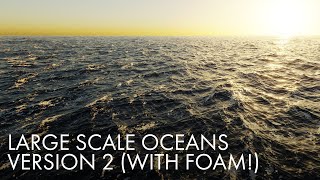
In this tutorial you'll learn how to use the ocean modifier in Blender to generate displacement maps which can then be combined into a custom ocean shader enabling you to render large scale oceans without breaking your computer.
Requirements
Blender 2.80+
Links
You no longer need to use the modified HDRI I created as PolyHaven now has free "Pure Sky" HDRIs. Take your pick from their selection:
polyhaven.com/hdris/skies/pur...
0:00 Intro
1:12 Setup
2:32 First Ocean Modifier
6:04 Preview shader setup
7:00 HDR setup
10:00 Camera setup
10:55 Baking the ocean
12:38 Scene cleanup
13:21 Ocean render surface
15:04 Render settings
16:26 Subdivision and shader setup
21:32 First test render
23:07 Tiling issue
24:52 Adding flat patches with noise
27:50 Second ocean modifier
29:50 Adding second displacement to shader
33:10 Camera animation
37:30 Final render setup and compositing
40:13 Outro - ภาพยนตร์และแอนิเมชัน


Hey since people aren't seeing the description I'll post it here too. THERE IS AN UPDATE TO THIS TUTORIAL: th-cam.com/video/n8PSS5HqC-Q/w-d-xo.html
Hey everyone, had heaps of fun making this tutorial so I hope you enjoy it. Don't forget to grab the modified HDRI from the description if you want to re-create the render from the video and thanks again for your support!
It's a great tutorial.
Thank-You!
I thought you were an Aussie but "heaps" of fun suggests Kiwi....
Hi there Dylan.
For some reason my laptop goes about saying that the file format in the link is not supported. Why do you think that is?
liking your own comment
IMPORTANT INFO: Hey everyone, Blender has had a bunch of extra features added to the Ocean Modifier since I made this tutorial. One of those is separate viewport and render resolutions. So at 3:18 when you're setting the resolution, you need to set the one called "Render" underneath the "Resolution Viewport" setting. The viewport one can be whatever you like as it only affects the display in the viewport. Also the way the wave settings work has changed so just using my values won't look the same. I suggest you play with the settings yourself to come up with something similar. I'm working on an update to this tutorial which will cover all this and more.
Thanks for this. Given I tried out your tutorial on the friday and had different results, I was about to message about something not looking right (for me its the larger ocean "disk" looking pixelated in the final render despite having the 2 subD modifiers on as per your video. Hope to work it out soon)
@@joeymilano4116 yeah, I still haven't worked out why this happens
THANK you for adding this comment lol.
@@meb8707 Remember to right-click and select "Smooth Shading" for this larger 'Ocean' plane too (The same as was shown with the 'OceanPreviewA' plane.
Also, make sure that once 'Cycles' has been chosen as the render engine, below it you need to change the Feature set to 'Experimental'.
Last but not least : Go to the 2nd of the two subdivision modifiers for the large 'Ocean' plane, and ensure that the 'Adaptive Subdivision' box is checked.
@@razeezar thanks for the suggestions. I'll double check those last few notes in my model and see what happens
Fantastic tutorial! One tip to avoid tiling even over very large scales: use prime number sizes for the tiles. 200 and 300 will repeat again at the least common multiple which is 600 (edit: I originally wrote 1200 here). 211 and 307 will repeat at 64,777!
That's a great tip!
Sounds like a great tip if I could understand it. By tile size do you mean the size of the original "Plane" that is 200x200.....?
Warwick Lambert Yeah, in the video, he mixes two sets of tiled planes... one plane is 200x200, and the other is 300x300. The idea is to avoid the obvious-to-the-eye short distance tiling by making the new repeat size 1200x1200. My suggestion is to tweak those numbers to be prime numbers instead (I picked n=211 and m=307, but the particular prime numbers don't matter). The tile edges will coincide at the least common multiple of n and m. With 200 and 300 that's only 1200x1200. With prime numbers, the least common multiple is the product n x m. n=211, m=307, you will get tiles that are non-repeating out to 64,777 x 64,777. It doesn't matter for the shot he does in the video, but if you plan on moving the camera way up high, the 1200x1200 tiles might become noticeable.
@@Malcolm___7 Thank you for the detailed explanation.
@@Malcolm___7 Brilliant!
I had never whatched a 40 min long video that felt so short. Amazing tutorial.
Holy heck I watched the whole thing and didnt notice.
@@alexmilo same when i read the comment i was like wtf tht was 40 min?!?!?
Great video Dylan. Nice optimisation techniques with the ocean tiling and mixing two different caches.
Dylan...Brilliant! By far the best "ocean" tutorial I have seen yet, and thank you! Subscribed!
Some seriously amazing techniques in here. I'm only halfway through and I want more tutorials from you.
A few parts could've done with a little more explanation, or maybe I just need to learn a bit more, but I really couldn't have gotten much more out of this. The idea to use a circle instead of a plane is so simple, yet it makes so much sense. Such little tricks are invaluable.
Really great, clear and concise tutorial and I like that you actually mention the shortcuts at all times - the more i hear them the more they all slowly burn in :)
This looks awesome! Once I get up to speed with the 2.80 interface I’ll have to give this tutorial a try. This is the first Blender ocean I’ve seen that actually looks *_REAL._* Great job man!
Best Blender tutorial I've seen. Followed along and created my own version of what you did in the video. Looks amazing. Thank you so much! Keep making videos like this!
Perfect timing. I'm actually in the process of making an animation that is TOTALLY in need of a Large Scale Ocean.
Thanks man
Now that's one impressive tutorial. Very thorough and detailed, with perfect pace and all the explanations needed.Astounding work, man, keep these up!
Learned so much, ocean modifier, camera movement, compositing, shading, and so on. Just loved it. I would love an additional video on how to tune settings for the final render. Much appreciated.
The fact that I was able to do this all means you're brilliant, mate! Now I just have to wait a few days for my render to complete haha
Thank-You! Your way of presenting your tutorials makes things so easy to follow. I wish all followed your example.
Very well done. I always struggled with this in 3D and I solved it in composting. In a similar fashion, by offsetting them and masking them procedurally in Nuke. I love how you did this all in blender.
Hi, as someone coming to blender from c4d I learnt so much. In fact in the first 2 minutes the F9(equivalent to c4d attributes manager) and right click to subdivide answered a question I'd vainly looked for answers for earlier today. I now have to watch all your other videos to see what else I can learn. Thanks.
Keep up good work Dylan, this tutorial was fun to do but most importantly not hard yet satisfying. Result like this from 40 min tutorial is for me hard to find so i look forward for next ones!
Just finished the tutorial. Build my render along with him. It absolutely melted my brain, but I made it through and got an animation at the end! So It was a success in my book. I'm going to do it again tomorrow to absorb more. You are a great teacher man. Blender is an insanely complicated program, but you make it possible to get a handle on it.
Fantastic tutorial and the result is so believable. I can’t believe I just watched a 40 minute video about a process I don’t need to do right now, haha. Must be a great tutorial! Your tutorial production quality is great as well - loved the flip between screen and on camera explanations. I feel like I picked up several tips from watching you work. Thank you for the time you put into this!
I didn't think the result would look so good. Awesome work!
What an informative, useful, and powerful tutorial. I've been searching for weeks on how to create a realistic "ground" for flyover scenes and this video did the trick and then some. I feel like I learned more about Blender in this video than weeks of watching blender tutorials. The pacing is just right, each step is explained and the end result is fantastic. Thank you and subscribed!
fantastic, best ocean in blender ive seen
Great tutorial and explanation of all the steps! Was not really planning to do an ocean scene/render but it looked interesting... i just watched the tutorial without actually doing it myself , just interested in how this goes, but i had a great viewing experience! Keep it up man!
Just to say that your presentation is very nice, and your explanations too. Great tutorial, keep it up !
dayuuum that was one nice detailed video
keep up the good work man
Great tutorial! Thanks for sharing this, and I can't wait to see what else you have in store.
Hello from a fellow Aussie
I've literally worked through this tutorial and made an almost exact replica of the ocean you've made for the first time in my life. I'm so happy with it! Thank you for this. I'm using it in my short film and I'm going to credit you for it in the end credits!
I was using 3DSmax to make this, now I'm learning Blender, I don't need 3dsmax anymore, this is way faster and easier to work with, with 3dsmax there was a lot of crashes and memory suck unnecesary! Thank you so much Dylan! BLENDER IS LOVE!
Best Blender ocean tutorial I’ve ever seen! Great work!
Thanks Dylan!
So many clever tips! Wow, I learned a lot! For example using the bake-cache as an image sequence! You really understand how Blender works.
And the video is well cutted. Never boring. And I like it, that you show your face once in a while. I like your humor.
Thank You for your work ! Could I ask about your system, as it seems to render very fast in Cycles?
Greetings from Germany
CreeYuWan
You Sir have earned a subscriber. Amazing Tutorial, very straight forward and simple and I am learning a lot from you. Thank you.
Thankyou so much Brother! Learning a lot through you and other blender artist, this community is lit ❤️❤️❤️
Super cool. Love the render. Thanks for sharing
Great tutorial. I have done large scale oceans using VRay and the The Phoenix Ocean texture which also creates infinite procedural oceans using vector displacement (like Houdini) to great effect but always wondered if Blender could ever get there. One difficult aspect in Ocean animation is figuring out dynamic displacement, so close up the ocean is very detailed with a lot of micro surface displacement and far out it transitions seamlessly without killing the machine. Subscribed to your chan.
Great job on this video! This is one of my favorite tutorials for Blender 2.8!
Amazing tutorial, I can’t believe you only have 3k subs and 3 videos, the production quality is far far higher than those numbers reflect!
Well, he made 3d graphics for Lord of the Rings and King Kong, so it's not surprising.
This is the most realistic ocean animation I've ever seen done in Blender!
This is amazing! All those other ocean tutorial brought me into dead ends. Now I can finally render an ocean with a convincing horizon!
subscribed from the 1st second, knew it was gonna be an amazing tut
What , when he said hey yall'
Ohh my god! Finally......... Thank you so much.... I've been trying this large scale ocean for months without success. Searched everywhere without solution.. Finally u did it thank you so much😊😊😊 subbed..👍
This is so amazing - what a great tutorial. Nice work and such a beautiful result!
Excellent tutorial, definitely production quality results. I just wish there was a cloud tutorial with the same degree of realism and expertise!
I absolutely love this tutorial! I’m a big fan of oceans and can’t wait to recreate this
Excellent tutorial, I did make one tweak purely for render speed. I switched the render engine to EVEE and removed the Split/Combine RGB nodes from the node workflow and got very good results.
One of the best tutorials I have ever seen. Hands down.
Great detailed tutorial! Thank you so much and keep them coming!!!
Really good tutorial mate, keep up the good work!
Fantastic! I've been trying to figure out how to make a larger ocean scene, but the traditional way was wayyyy too hard on my computer lol. Definitely going to try this out!
I Haven been only 2 min. in video and I already liked it cause you differentiated your video with others in the matter of what you are teaching here.
You really need to create a master class for this. That's the best large ocean animation I've ever seen. Would love to see your animation of boat wakes.
For people who are using blender 2.83 and above in order to make the displacement tile correctly to the circle, head to Object Properties tab (with the circle selected) and in Instancing change the setting from None to Faces.
Hope this helps this is truly a great tutorial!
its still not working
The displacement is not working its flat.
Man this fires off so many ideas. Awesome tut. I'm going to try and create a reaction to an object in the same way that the two oceans were combined, but on a much weaker PC so my house may burn down. Thanks for the tut.
Excellent blender tutorial I've seen hundreds Your way of explaining is excellent new sub.
I think I learnt more from this than from any other tutorial....many thanks :-)
I had to come back to this video to thank you! I learned so much and it came to be very helpful and just what I needed for a project. Subbed!
Dude this is so cool... two years or so later and it really helped me out! Thanks!
Just wow....I am nowhere near this level of understanding , I followed most of it and I learned so much...thank you !!!
Genius. Really classy results. Inspiration for a beginner Blender user. Thanks!
Amazing tutorial, thank you!
wow, this is such an incredible tutorial. THANK YOU SO MUCH !
You made it really amazing...I'll be waiting for more tutorial ❤️
Very, very, very smart tips here! Thank you for share this amazing tutorial!
Dear Dylan, I just watched it again. I really like your way of explaining. Thanks.
Greetings
Great stuff -- I appreciate the pacing of your tutorials very much.
Thanks! Pacing is hard to get right and something I really pay attention to so I'm glad to get this kind of feedback!
Your pacing is perfect. There is no waffle, no filler. You explain your techniques in a wonderful way and the quality of your work is second to none, so long form tuts are very welcome.
I love tutorials where the person doesn't have to edit his clip every three words because he/she can't talk to a camera. You're awesome! Thanks! I wish I saw this two weeks ago.
Thank you, thank you, thank you ... rendering big oceans has been a challenge for a long time, no longer!
Awesomess is here! Well explained! Keep up the good tutorial
AMAZING tutorial!! Thank you so much! Liked and subscribed!
Awesome tutorial, dude! Thanks a lot!
Really smart, thanks for all the explanations !
Oh yess, just what I needed. Thanks for the tutorial!
Woot! Lovely tuto!
Amazing tutorial, super detailed!! Love it!
Fantastic work and kudos for making this!
Had a couple of questions about my system so I thought I'd answer it here. I recorded this one on my work machine which I happened to have at home at the time. It's a Threadripper 1950X with 3xGPUs (1080ti, and 2x1070). I fast forward all the rendering in the video so render times were more like 30 seconds per frame instead of 2! Also I "potato checked" this tutorial on my old i7 home machine (which is what I usually record on anyway) to make sure the render times weren't too crazy.
what does this potato thing mean???
Interesting, why do you use 1070's in sli vs two 1080ti?
@@TheMediaPortal You dont need anything in SLI when GPU rendering, the software (Cycles in this case) just finds individual cards and uses them all.
@@afrosymphony8207 i guess it's related to stuff running on potatoe battery (less powerfull devices)..?
@@afrosymphony8207 It means he checked to make sure that people with worse computers could still follow along with the tutorial with out much issue.
So many good tips in this video! Thanks Dylan.
Great channel Dylan, keep up the great work!
Oh heck man! that was awesome!!! Keen to try it out!
Great tips! Thanks for putting this together!
Thank you bro! I was thinking about how to make this like oceans and then i found your video, great work!
Thanks!
Sir your making tutorial simple that's your specialty You are Genius....
Awesome walk through, thanks Dylan!
Thanks a lot! Looking forward to seeing more tutorials
That looks amazing! Really nice job and good video :)
Nice tutorial, the result is very good and the explanations very clear! Thanks
At 7:10 the most useful bit of information is given. I have come back to this video several times to remember how to set that shortcut. @dylan Neill you are a genius. Thanks.
Great tutorial!
I was wondering if you could continue a series from here, basically something like adding floating objects and interactions with the water.
This was my first contact with blender (I'm using 2.83) and I am in love!
I'm watching this at 4am - must watch tomorrow!!! :o)
That was truly a great tutorial. 100% Smart and efficient and to the point.
And a great voice too.
😀 Really awesome stuff! I can't wait to work through this tutorial 😀
ohhhhh Juicy tutorial right there sir, thank you very much, this is a step further down the line, really great !
Man this is a great tut! Thank you!
Oh my gosh! Thank you so much for this tutorial! Taught me so much!
Amazing Job on this ! Really easy to follow!
Absolutely beautiful!!
This tutorial is amazing!!! Thanks Dylan!!!
Great tutorial man! Keep up the food work!
I struggled a bit when mixing the two different displacement maps with still having visible tiling and lines in the scene, but it was pretty easy to fix that just by playing around with the colour ramp node until theres enough variance in the noise texture that you never actually have the same features visibly repeated