Home Automation using NodeMCU ESP8266 and Blynk 2.0 with real-time feedback | IoT Projects 2021

ฝัง
- เผยแพร่เมื่อ 2 พ.ค. 2024
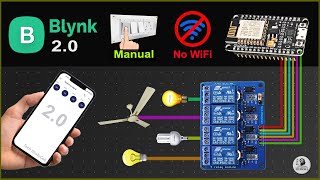
- In this IoT project, I have shown how to make the Home Automation using NodeMCU ESP8266 and Blynk 2.0 to control 4 relays with real-time feedback. For this smart home project, I have used the FREE plan of the new Blynk IoT platform, so you can easily make this simple IoT-based home automation system to control the appliances with WiFi and manual switches.
$2 for 1-4 Layer PCBs, Get SMT Coupons: jlcpcb.com/RHS
Download PCB Gerber file for this NodeMCU IoT based home automation project
drive.google.com/uc?export=do...
Visit the following website to get electronics components, modules at a very reasonable price
utsource.net?source=TH-cam
During the Blynk tutorial video, I have covered the following topics:
00:33 How to control NodeMCU ESP8266 from the New Blynk IoT app.
01:16 Required Components for this Blynk NodeMCU project.
01:33 Circuit of the NodeMCU ESP8266 control relay.
02:54 How to set up NEW Blynk 2.0 Web dashboard for ESP8266.
06:00 How to set up NEW Blynk IoT App.
07:26 Program NodeMCU with Arduino IDE.
08:02 Install New Blynk library in Arduino IDE.
09:20 Adding WiFi credentials Over Air (OTA)
10:24 Controlling appliances from Blynk App and switches.
Required Components for this NodeMCU home automation project
1. NodeMCU
2. 4-channel 5V SPDT Relay Module
3. Push Buttons or Switch
Amazon India Affiliate links:
NodeMCU : amzn.to/3fJA4EG
4-channel 5V Relay Module : amzn.to/2BQ5Y3o
Amazon United States Affiliate links:
NodeMCU : amzn.to/2WoR2A2
4-channel 5V Relay Module : amzn.to/3r2HuJ4
Required Components for the NodeMCU control Relay Module PCB:
1. Relays 5v (SPDT) (4 no)
2. BC547 Transistors (4 no)
3. PC817 Optocuplors (4 no)
4. 510-ohm 0.25-watt Resistor (4 no) (R1 -- R4)
5. 1k 0.25-watt Resistors (5 no) (R5 -- R9)
6. LED 5-mm (5 no)
7. 1N4007 Diodes (5 no) (D1 -- D5)
8. Push Buttons (4 no)
9. Terminal Connectors
10. 5V DC supply
---------------------------
⚠️ This video took a long time to make if you would like to buy me a coffee to say thanks, link below: ☕
PayPal: paypal.me/sdaspay
Patreon: / techstudycell
---------------------------
Project on NEW Blynk + ESP8266 + IR + Sensor: • ESP8266 Project using ...
Download Code for this NodeMCU Blynk smart house automation project from the following article
iotcircuithub.com/home-automa...
Create an Account in Blynk Cloud
blynk.cloud/dashboard/login
For the ESP32 Blynk 2.0, please refer to the following video
• Home Automation using ...
Important points:
**In code, you have to update only the BLYNK_TEMPLATE_ID & BLYNK_DEVICE_NAME as shown in the video.
**Keep all the 9 files (.ino & .h) in the same folder.
**You can only control the appliances if the WiFi is connected.
**Please take proper safety precautions while working with high voltages.
During this internet of things tutorial video, I have explained all the steps to configure the new Blynk 2.0 platform for any ESP8266 home automation system. Also explained how to create templates, and add Datastreams (Virtual Pin) in the Blynk IoT cloud account. If the NodeMCU connected with WiFi then you can control the relays from anywhere in the world. And you can also monitor the real-time feedback in the Blynk IoT applications. So with this smart house project, you can convert any appliance to IoT devices and control them through the internet.
#homeautomation #esp8266 #blynk
-------------------------------------------------------
Thanks For Watching...
✅ SUBSCRIBE ✅LIKE ✅SHARE ✅ COMMENTS
Find out more such projects: iotcircuithub.com/
Facebook: / techstudycell
Instagram: / techstudycell
Telegram: t.me/techstudycell/
-------------------------------------------------------
-------------------------------------------------------
WARNING:
This video is for demonstration and educational purposes only.
Each demonstration presents risks and hazards that must be fully understood before attempting.
And should be performed only by professionals
------------------------------------------------------
Other useful IoT projects:
Latest NodeMCU projects playlist:
• NodeMCU Projects
Latest ESP32 projects playlist:
• ESP32 Projects
ESP32 Smart Home System with Amazon Alexa app & Manual Switches
• ESP32 Smart Home Syste...
WiFi Door Lock using ESP32 CAM & Blynk
• WiFi Door Lock using E... - วิทยาศาสตร์และเทคโนโลยี