How to Patch a Bike Tube Like a PRO! (Avoid These Mistakes)

ฝัง
- เผยแพร่เมื่อ 13 ม.ค. 2021
- Repairing a tube? Avoid these five common mistakes.
SHOP: pathlesspedaled.bigcartel.com/
Help support independent reviews: / pathlesspedaled
Favorite Patch Kit of ALL TIME!
amzn.to/3nMP8V7
SUPPLE PATCHES pathlesspedaled.bigcartel.com/
PATREON: / pathlesspedaled
SUPPLE SHIRTS: pathlesspedaled.spreadshirt.com
**NEW ROUTE GUIDE** www.pathlesspedaled.com/routes/
INSTAGRAM: pathlesspedaled #thesupplelife #gravelbike #biketouring #bikepacking
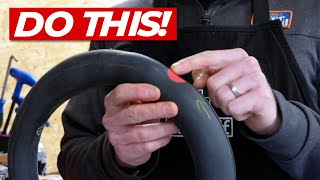


My most important tip is to remember to feel around inside the tire and on the rim to be sure whatever caused the puncture isn't still lurking.
You make it sound like a monster 😅😅 😅
@@ya00007 More like a troll
Super glue and cellophane works well too
Use your fingers to check and clear the inside of the tire for the guilty thorn before re-inserting the tube
Very much this
Identifying why you got a flat in the first place is very important, no use fixing the innertube, but not eliminating what caused it.
If you do the old roadie trick of lining up the tyre label with the valve stem, you won't have to search the whole tyre.
Yes! But be cautious and visibly look, as well, for more harmful culprits like glass! You don't want to cut your finger!
@@ZeroP0int yeah I've ran my hand around in a rush and got a wire inserted thoroughly into my finger.
I’ve been patching tubes for 40 years and had good success . In the last 3 years I’ve been having trouble with patches not holding 🙄. It turns out I had started using too much glue so even though I let the glue become tacky it was still not holding. I’m now using less glue and things seem to be working 😀
It is an art to get the perfect patch.
Sorry for my bad english,in my country i have glue named syntelan and i bought patches in bicycle shop,after 7 to 10 days i had puncture when i try to fix i saw that my patch was deformed and this was problem and i pealed off this patch so easy i think these patches are trash now i create patch of old tube and works perfect
Nowadays I use the absolute cheapest patches and cheapest vulcanising solution I can find. We're talking cheap Chinese aliexpress 100 patches for £1.99. Likewise, the glue is usually like 5 tubes for £1!
I've literally never had a failure in the last decade.
I think the most important parts are cleaning and sanding the surface, then using a blob of rubber cement slightly smaller than a pea, rub it in *thoroughly* with a finger over an area larger than the patch. It will very rapidly lose its shine and appear dry and matte. Then leave that matte area for 2 minutes.
Now, repeat with a smaller amount of rubber cement, again rubbing it in with a fingertip until its matte, then waiting 2 minutes.
Finally, I put the patch on, and I press *really* hard with my fingers, squeezing the tube/patch for about 2 minutes again, being thorough with all parts of the patch.
Ideally, after that you'll want to leave it overnight before using it, which is what I usually do (it becomes my new spare tube), but even when I've not been able to do that I've never had a failure.
This is the very cheapest patches and 'glue' that money can buy. Practically a lifetime supply for a tiny amount of money. A tube of glue lasts for a few years after opening, and decades before being opened!
If your patches aren't holding, rest assured its probably because the vulcanising solution isn't effectively adhering the patch to the tube. Just bear in mind that the rubber cement kinda 'melts' the surface of the inner tube so that your patch can bond with it. This means that grease or dirt can upset the reaction, making cleaning and sanding very important. It also means plenty of time for the solution to be in contact with air to chemically soften the rubber, and lots of pressure to 'merge' the two pieces of rubber together.
If you just think about getting that chemical softening agent to work its way into your innertube, and 'merging' your rubber patch with the chemically softened area of tube, best practice becomes intuitive.
@@ranborenbo884 Every time I try using old tubes as patches it fails %70 of the time.
Use super glue and receipt paper I promise its the best life hack I've ever learned
Newish cyclist here. Just wanted to let you know I really enjoy your channel.
If I'm home I use a silver Sharpie that I can actually see. Tricia's tip for Roadies: Tie your flat tube in a loose knot so you'll know you haven't patched it yet when you get home and toss it on your pile of whatever stuff.
Mind blown lol
Ok, who is Tricia and where do her tips reside? "Loose knot tube = flat" is pure genius. About once a year I have to blow up a ton of random tubes to see if they'll hold air. Of course then they get deflated and thrown back into my whatever stuff pile, which I'm ashamed to say is most of my garage. :)
I use a sharpie paint pen that works on the wet tube after dunking in water.
This video was great I’m still running tubes over here. Love your new background!!!
Russ, the “glue” is actually vulcanizing fluid which serves as a catalyst for the rubber (actually butyl) patch to vulcanize with the tube. The purpose of sanding is mostly to remove any mold release compound that facilitates the release of the tube from its mold when manufactured. Although it is useful to remove any raised seams (a razor blade work better for that). Also, I recommend a quarter used on edge for burnishing the newly installed patch versus the tire lever. It provides a much firmer and concentrated force. It also will help heat the patch with vigorous rubbing which speeds the chemical vulcanization reaction (same reason that back in the day they commonly used a match or lighter to heat a newly installed path).
I get the clear plastic off by folding along the centre of the patch and giving it a good pinch. Splits the plastic down the middle and let's you peel it from the centre out and not lift the edges.
the plastic isn't even meant to come off. Its there to rub against your tire while instead of you rubber patch rubbing against it and coming off
@@kcarch25unkown27 i believe i saw the ppl from Park tool Saying the same about their patching kits
Thanks so much; this was good; makes sense and glad I watched it… :)
Never thought about leaving the plastic on. I've always struggled to peel it off with lifting up a bit of the edge of the patch.
Need your logo up on the backdrop, but overall don't get carried away. less is more.
Good tips. I've learned that erring on the side of waiting too long for the glue to dry works fine. I once forgot about a drying tube for an hour. The patch held just fine.
I have wondered about that, so thanks for the anecdotal evidence. Just yesterday I got distracted fixing a puncture and thought the glue got way too dried out. However, it worked fine. So we have “proof by two examples”, the highest order of scientific proof.
The banana shirt is definitely a modern classic now. You really should put that up. 🙂
Your forte: explaining 'how to' in easy to understand show & tell. That's...why we watch you!!! Thanks!! Just keep doing this!!!
Looks like your new space is going to be way more versatile. You keep making we'll keep watching!
All best wishes
It’s great to see you in your new space, I hope 2021 is a year of joy for you and your loved ones. Hoping to see you in Wales sometime for some epic riding!
The space looks amazing. Super cool lighting too.
The set and lighting is already awesome! I'm digging the new space.
Love the new pegboard backdrop and lighting, Russ! Quality advice here.
My wife and I enjoy your channel. Glad things are going in your favor. We have been sending positive thoughts your way. We enjoy your content and have purchased gravel bikes because of it. Keep up the good work
Looking great! Congratulations on your new studio Russ!
Loving the new space. Excited to see how it develops!
New set looks great, Russ, well done! Really good lighting.
Hey, the space looks great. Thanks for showing the patch demo
New backdrop is hole next level. Good tube tips Mr. Russ. You pegged it! Enjoy the new studio.
Oh nice!!!! The lighting and background definitely make a huuuge difference! Thanks for the good tips!!! 👍🏼
Your advice on patching is right on the mark. I've watched people impatiently putting the patch on a still fresh glue surface (after suggesting they wait a while), and then having to do the whole thing all over again moments later. Also, going tube-less is great. I love it. But even then you can still get damage that requires a tube to get you home; and even then you could still get yet another flat and need to patch the replacement tube (it's happened to me). So, though tubeless is fantastic, the skill of patching a tube isn't something to assume you don't need to know. Thanks, Russ. I like your new setting! Lots of options for changing the background when you want to. I think the whole lighting you have creates a nice ambiance. It's warm and inviting, not harsh.
Digging the look of the new studio! Good work! I can't wait to see how it evolves!
New setup looks great!
These are the tips I needed. I got my first flat last week, patched it to get to work. Once I got off work my tire was waiting flat for me... aired it up and it got me home but when I pulled the tube to check for leaks... yep, my patch was BARELY leaking from the edge. Replaced it and today, flat again...
Thank you for the tips. I've only ever replaced tubes, but could have patched them if I knew how. This was very helpful. Love the new studio setup. Well done.
Love the new work space...congrats!!!!!!!!!!
Great little video, Russ. You are a master at making the mundane actually interesting. And I learned something!
If the rubber dust that remains after sanding is not removed, the patch will not stick as well. I always clean the sanded zone with isopropyl alcohol and paper towel after sanding. Thumbs up on marking the hole with LONG crosshairs (like a rifle scope).
The new set is great. Beautiful lighting.
Love the video as I was the patching master. Definitely recommend the REMA TT patch kit! I've been using for nearly 30 years and even though I haven't actually needed to fix a tube in years, I'm glad to see it's still in production. I grew up on this patch kit. In my youth, I had a tube with 20+ patches on it before I ended up retiring it! All the tips are spot on; however, I always removed the plastic film. After waiting for the patch to cure, I folded the tube at the edge of the patch to lift the film away so that it didn't also lift the edge of the patch. Thanks for this--brings back memories.
love the new backdrop! looks like you've step up the game! amazing how you've grown since ive followed you years ago.
After a long time I found one youtuber whose pronunciation was understandable from beginning till the end,nice informative video,keep it up.
Excited for you and your new space Russ. Keep the great content coming and the community conversations going! Oh, and yes, one of your watercolors absolutely belong on your backdrop!
Excellent tips! Despite being a long time rider with plenty of patching experience, I found this helpful! The cross hairs are super good idea! I have heard that the cellophane on the patch helps it slide against the inside of the tire so it won't peal off.
thanks for that video!.......good luck on the new set!!!
Thank you for making this video! I've been riding for years and have recently set up both my bikes tubeless. No one ever showed me how this should be done, and I have never successfully patched a tube. This video 3 years ago would have saved my skin.
Great job I patched tires on bikes and car’s. Learned the hard way. Hopefully people will do as you well explain and be back riding in a short time. New studio is looking good.
On the wall: The wheel of comments. Leave room for a silver play button. One of your paintings.
Love the new space!! Also, I run tubeless but still care a dynaplug, a tube and patches just in case. And I can always help out another person if they are in need!!
Love the new space!!
rad little tutorial I like it. just found this channel and it seems chill
Russ the new space looks so nice, very gravel specific. Also great tips 👌
Pretty solid advice, which I've found to work. In 2018 I got a road bike for commuting and was never convinced that a high pressure 25mm wide tube could be patched the same as my lower pressure 2inch MTB ones. With practice I've managed it. The trick is to be calm and don't rush the job. If I get a flat while on a ride I now swap for a brand new tube but at home I'll patch the broken tube at leisure and re-fit it.
Great tips! The set looks great!
Nice studio setup, good lighting and sound.
Great tip about leaving the plastic on. New set looks good - the lighting is looking good, perfect at many points but you drift in and out of the perfectly lighted pocket, but really, it’s mostly terrific.
Good tips! Great new space. Well done as always Russ. Best wishes to Laura.
New space is looking awesome, Russ!!!
Excellent review… after the video, I realized I was missing a step, or two.
Thank you 🙏🏻
Sets coming along nice thanks for the tips, nice spot to hang some tools.
Great tips. Good job on the new background, it looks great.
This is the exact same way I do it, so it must be right :)). Also, once the cement is tacky it can sit almost indefinitely before applying the patch. I once prepped a tube, applied the glue, then taught a class on canti brakes for an hour, and then finally applied the patch.
Great vid. Yes. Made some of those mistakes. Too eager. New location looking cool. Thanks
the studio looks great!
Loving the new background! It looks great!
Love the new set!! ✌🏻
I run both tubes and tubeless setups and the tips were spot on. I too leave the clear cover on the patches till the next time I am patching that tube. As soon as I got a tube patched it goes into a rim and tire combo that has been retired from riding to make sure that it holds pressure and is good to go for next time. Then the next day if it holds pressure will go into the spares box.
Dannnng look at that profesh studio! Great job Russ!
Dude. Stepping it up! Right on. Love it.
Great basic skill any biker should know. The new set looks good!
NEW STUDIO LOOKIN GOOD
Cool backdrop. I like the items hanging there
Great video, great new space!!
Set is looking good dude.
Good tips Russ! The new studio looks good.
FYI, First time commenting. Discovered your channel a little while ago. I’m hooked. Binge watching during COVID. 😃👍
Great instructional video. I have a little tip regarding the nasty tendency for patches to pull away from the inner-tube while trying to remove the clear cellophane backing. I figured out a solution to this problem after finally noticing that some patches have a barely visible score line running down the center of the cellophane backing. Here’s what to do with them.
First, if there’s no score line, create one by delicately running a single edge blade over the midline of the cellophane backing. Next, pull each half of the cellophane away from the underlying rubber, starting at that midline point, such that it creates a tiny flange on each side, which you can grab onto later. Next, glue patch to tube per manufacturer instructions; let dry for 2-3 minutes. Now, carefully grab those cellophane flanges and pull each away from the center in a fashion that is nearly horizontal (not upward) until they’re fully removed. In this way, you avoid pulling up on the patch’s outer margins, where the rubber is most likely to peal up and away from the inner-tube.
That being said, I’m not sure there’s any great downside to just leaving the cellophane on the tube!
I agree- just leave it!
Great suggestions. I followed your method and washed out because the Rema kit though unopened was from the Bush era! I got a new, similar Park kit and it worked perfectly. My conclusion is either the glue or patches deteriorate over time.
Thanks Russ as always you have the best content. You made tube patching interesting and I learned some new tricks even though I have patched MANY tubes. This is why I never skip a video. I like the new background and that you went with a warmer theme. One suggestion I have is to leave the wall behind your head clear the saddle was a bit distracting. But maybe that’s just me in which case I apologize for being a weirdo.
Great tips. I also use a couple of clothes pegs to press the patch to the inner tube for a hour or two before packing the tube away.
New space looks great! Great tutorial (I've made several of the mistakes you'd mentioned). As someone who is just not going tubeless but would love to save a little rotational weight, I'd love to see your take on using Tubolitos or Schwalbe's Aerothan tubes at some point.
Great video. Gotta get me some of those tip top patches.
New background looks awesome, can't see a gap at the bottom where the board finished. Love the use of icons 👌🏽 maybe an old silver crank/chainring will add some additional classic flair.
Very helpful; thanks so mcuh! And your space looks great.
great video! the background looks clean!
For the background: the measuring tape;)!! Great new studio, congrats on the move:)!
Good tips Russ, thanks. I had convinced myself that with good sanding and burnishing, glue less patches could be permanent...nup. Last week here in Oz with temperatures above 100, one of my bikes suffered a flat on a patched tube...while static on a work stand. Doubtless the heat had ‘melted’ the sticky stuff on the clueless patch and it had delaminated. From here on I’ll be going gluey all the way.
Good tips. People love to avoid reading the directions, have the patch fail, then write negative reviews about the kit on Amazon. It really isn't difficult if you just follow these tips and/or the directions.
Once you open the glue, a small piece of plastic wrap between the tube opening and the lid will keep the glue from drying out.
Everything you say is right - i like to fold the clear plastic backing in the middle to the point where it splits and then remove it by pulling it from the centre to the outside edge. To speed up the glue drying time try putting the first coat on, THEN FLAMING IT WITH A MATCH. Blow the fame out and then apply coat 2 and do same. You’ll find the rima patch will stick perfectly. An old bike messenger hack. Cheers from the UK
how close do you get with the match? Or are you actually lighting it and blowing it out immediately?
Some good comments. My first patch experience was 1968. I have given up patching on the side of the road. It is just too dirty to get good results. Patch when you get home and clamp the patch for hours! A patch should be good for years. OK to have 7 or 8 patches in one tube! Switch known good tubes on the side of the road. If you run out of tubes, then patch with gorilla tape that you wrapped around your mini pump. When get home. fix tube properly. I have seen gorilla tape patches last months! Good patch lasts years!
Thanks! I carry alcohol preps and wipe the tube to remove any oils before sanding, and then immediately after to remove any bits. Stay warm and safe!
New set looks great! Only suggestion I'd have is to soften up your key light just a touch you're blowing out the highlights on your face just a bit, (your space looks like a booklight would work great as a really nice soft key!). But great info as always!
I really like the new set.
Super helpful Russ!
Good tip on the ink lines.
Seams are a flipping struggle, and it's pretty much always the leak is near a seam.
The peg board looks awesome
This is great, thank you!
Nice background n the light!
I dig the new space & backdrop. It might need a picture of a taco.
I think you missed an important step especially if the tube is going straight back on the rim, and that is to apply the chalk dust after patching to avoid any excess glue sticking to the tyre. And on that note, one mistake a lot of people make is to use the same sand paper on the chalk as on the tube which causes problems the next time you have to patch, on most kits there is a little square of rough plastic on the box for that.
RUUUSSSSS!!! The lighting tho!!! Very dramatic and applies to your style and environment so well.
No need to sand or other things. Just clean area with alcohol, brush on vulcanizing rubber compound. Clamp for 20 minutes.
I just use rubber from an old inner tube, no need for patch kits etc. Just be careful not to have any flame near by or breath the fumes, as the compound is quite toxic.
Old school, but it works very reliably.
Not a glue works by dissolving a layer of rubber, then rubber solidifies into 1 solid piece
Amazon has vulcanizing rubber compound for about $50. Enough to last several generations of riders.
Very good instructions
Stellar pegboard backdrop!
The lighting is ace
New space is starting to look good Russ! I agree with the less is more decor wise. Of course it should be flexible, changed periodically and maybe matched to the theme of video at times. The lighting on you seemed a bit narrow.