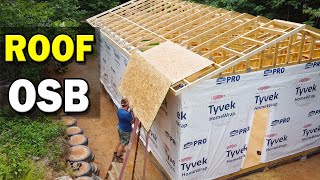
Roof Ladder Blocking and Sub-fascia - Build a 20x30 Workshop

ฝัง
- เผยแพร่เมื่อ 5 ต.ค. 2024
- After the roof trusses have been installed its time to work on the sub fascia and the eve blocking. The eve blocking is also known as roof ladders. The gable end trusses are 3.5" lower than the other trusses. This allows the ladder blocking to connect to the last full size truss and extend over the eve. I also install sub fascia to the end of the trusses. This will give me an attachment point to connect the fascia. Lastly I connect each of the trusses with a 2x4 to ensure that the roof system is secure and strong.
SethCraft is a participant in the Amazon Associates Program, an affiliate advertising program designed to provide a means for sites to earn advertising fees by advertising and linking to amazon.com


![React Tutorial For Beginners [ReactJS] | ReactJS Course | ReactJS For Beginners | Intellipaat](http://i.ytimg.com/vi/9vZ8ELqerPo/mqdefault.jpg)


Fly(ing) rafters for the gable overhangs, squared up subfacia tied in, by far your the best roof framing ever. I'm learning a lot from this one.
It was not easy to film this one! I am happy with the outcome though. Has worked well!
I'm here to get pointers and see what I'm about to get myself into. :) Great video, and very helpful for me to better understand what to do. Thanks!
Get ready for a lot of ladder time. Must have climbed up and down 2000 times.
That was the lesson I needed! Thanks!
Nice! Happy to help.
Really nice work.
Thank you, this build has taught me a lot and is really coming together nicely.
Ok Now that was funny " I tell what's not boring, this shaky ladder!" LOL
HA yes that ladder gets me every time!
Great explanation, good work.
Thank you. This step is one of those awkward ones because its all up on ladders.
It looks good... 👍 I know it's going to turn out great.
Thank you. So far the new build has turned out very well. I hope to have it done in the next 30 days.
Great update! Everything looks fantastic! Looking forward to the next video.
Thank you. Next is Roof OSB. A step that makes all the difference in getting the place weathered in.
Looking good, I was all set to start covering my roof OSB then realized my gutter apron and drip edge hung down too far over my subfascia and I wouldn't be able nail fascia....so off to Menard to grab LP smartside fascia trim. Got the first coat of paint drying on it now.
Sometimes we have to step back and rethink things. nice to hear you got it solved. Looks like I wont make it to painting this year. its starting to get cold and I dont have all the siding on yet.
@@sethcraftworkshop acrylic latex can be applied down to 35F...I'm hoping to paint before winter!
as mush as I admire his persistence, quite painful to watch the suffering of a single man building a massive structure .... but regardless ..... well done bro .....
This is a fantastic series for me. I’m planning to build a 16x20 shop this summer. It’s instructive to see you doing it alone as I’ll be working alone too. I’m going to build my own trusses for an 8/12 roof. I plan to build the flying trusses in the shop which will avoid the slight angle problem you encountered. I think using the same jig I can hoist the assembled flying trusses in place. Thanks for these excellent videos.
Thank you for watching. Building alone is a challenge at times but not impossible. Sounds like you have a great project ahead of you.
Great job! You’re an inspiration.
Thank you. This build worked well!
any reason why not just use a power nailer ??? screwing everything in ???? isnt that faster ????? (i know screws are tighter etc etc but all conventional builders rely on power nailing with a framing nailer)
The main reason that I did not use a power nailer is because I do not have one.
Great videos. You explain everything and we get to learn lots from you. We admire your efforts and time especially doing it alone. Be careful on the ladder ... we want more videos. Thanks