EEVblog

ฝัง
- เผยแพร่เมื่อ 1 พ.ค. 2024
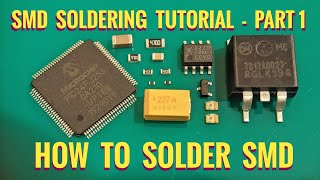
- Dave shows another method for hand soldering a surface mount SMD chip with a thermal pad, using both liquid and gel flux.
A method using hot air is here: • EEVblog #346 - MLF/QFN...
Also, drag soldering TSSOP packages is demonstrated.
pcbzone.net/
Forum Topic: www.eevblog.com/forum/blog/eev...
EEVblog Main Web Site:
www.eevblog.com
EEVblog Amazon Store:
astore.amazon.com/eevblogstore-20
Donations:
www.eevblog.com/donations/
Projects:
www.eevblog.com/projects/
Electronics Info Wiki:
www.eevblog.com/wiki/ - วิทยาศาสตร์และเทคโนโลยี


![จีเหลี่ยมโคตรตึง!! - Skibidi Toilet 73 (part 2) [FANMADE]](http://i.ytimg.com/vi/MBvD7tKeyPY/mqdefault.jpg)

The heat pad soldering trick is just what I needed. Thanks for the illustration.
Thank you so very much for your "down to earth" for the rest of us, true and true videos. No special gimmicks or effects, just what one would experience in the real world. BTW, ...please do more videos on soldering techniques. Those skills are important to master. God Bless.
4:24-4:25 magic!
Great tip about using the vias.
Thanks for that video! It helped me to solder a Htssop-32 with themal pad, It was the first time that I did it. And the TLC5947 works!. It's famous that soldering flows from the bottom through the holes.
Many thanks
Love that JBC unit!
Worked whit one for a while, been now on my wishlist ever since.
Dave, thanks for letting sharing my review of the JBC I have!
I can't wait for your review of the one you have!
This is great! Thank you for producing!
Hi Dave, thank you for your videos.
Thank you for this Dave, very helpfull
"Surprised Dave" is unarguably the best silkscreen logo any human can possibly hope to create.
Really glad I came across this video, I had set up a pad like this, and wasn't 100% sure it would work.
I've soldered 0.5mm pitch chips before successfuly, but I thought I would never be able to do this. Then I thought "oh, I might as well try", did some research and tried it. And I was blown away by how easy this actually is. But I did it slightly differently that this: I first aligned the chip and soldered only a single pin to keep it aligned, and then did the chisel tip from the bottom as described here. Then I can try to slightly nudge the chip to see if the bottom is soldered on the board: if the chip moves a little it means it is not soldered; if I can not move it means it is. Then I just solder the remaining pins and Bob's your uncle!
Thanks Dave!
I've used this method to hand solder the bottom of micro usb female jacks on small micro boards I designed. My first prototypes didn't have the bottom of the jacks soldered and low and behold after a few plugs and unplugs I ripped a jack straight off taking the traces with it. So second rev of the board I exposed the ground plane on the bottom, added some vias tying the two sides and just allowed the solder to wick through the board and onto the bottom on the jack. Works great and haven't ripped any more usb jacks off of my borads.
Tacky flux was a life saver when hand assembling high pin count smd's with solder paste. Nice big blob on the board, balance the IC on the top, and tease it down into position with tweezers, kept it place till you got it in the oven, and surface tension did the rest.
@Chris Gregory thank you for the suggestion. I will try that.
Another great video Dave, glad you showed how to hand solder the MSOP! Drag soldering is a good skill to pick up, I posted a video response showing drag soldering a FTDI using the side drag method.
Another quality video! Thank you.
Dave, love your videos, every one of them. A lot of guys complain about not being able to perform on camera, don't sweat it! ;)
Thanks, we needed some new soldering irons, and can live with that time lag. Will give JBC a try.
great trick with that thermal pad Dave. I'm working on a pcb design right now (first ever) and I was wondering how in the heck I'm going to solder my boost converter properly with just an iron and flux. Eagle DRC doesn't like putting vias on a pad, but OSH Park's board preview renders it perfectly.
Amazing work
Just removed a TQFP-100. Thanks a lot, great video.
hola! soy de mexico y solo queria decirte que eres extraordinario te felicito y aun que no entiendo mucho el ingles me encantan tus videos!!!
Very nice video, actually surprised it went so smoothly even with the go for it trial and error. Thanks actually feel much more capable about doing such things. Indeed it looked almost to easy.
this is so cool thanks , hope to see even more :)
Smashing tutorial :-)
Ive allways found it hell to solder the little critters.
And soldering wires to pins is fun, i have used fine hair thickness enameled copper wire stuck to the top of the chip with tiny strips of parcel label, it holds the wire in place while i attempt to solder it lol.
I wished i was a good as you are mate, just takes me a while, and a tongue stuck out while soldering :-)
Discovered the heating from the bottom method when I got some 1w leds. Just make a custom soldering iron tip, stick it into a weller 40w, and within seconds, I can heat up a strip of sheet metal and bond the led to it.
That is an interesting technique. Never thought of that before. Gotta remember this. :)
I like the flux capacitor you put on there
Seeing the amount you shake/can't hold your hand still, gives me hope for my terrible soldering xD I'm the worst.. had "experts" baffled..
thx for this guide :) I'm learning something new everytime :P
I had issues with these kind of filled vias when they cracked open because the solder resist heated up and expanded inside the hole on further processing at the pcb manufacturer. That's why I now keep the vias clear ...
great job!
Hi Dave! How do you set vias on Altium like that you have on your board? Thanks for your videos!
no info on tongue angle?
Nice live tutorial!
do you also have a desolder tut for those ic's?
Thanks! I was wondering how to solder those one ic's with thermal pads.
i didn't know there was a company in nz that did pcbs, awesome!
Hi Dave, great video as always. Could you tell me where you got the PCB holder that you have @ 5:52 ? or how do you call that in English? Thanks!!
Great advice ,thanks Dave will give soldering another go trying it with the use of one arm? Keep up the good work. Brian
I've always dragged along the pins instead of dragging them out.
As you can see, dragging out has taken the solder mask off the board and bear copper is shown which will in time cause problems.
Oh... Tried all yesterday evening to get a TSSOP attached to a board with my cheapo chinese equipment, fuckups all around. Rewatched the video and switched to my crusty old chisel-tip, and dabbing 2 pins at a time I did it! Even dug the fuckups out of the trash and fixed them afterwards. So, thank you!
I have a PCB design tutorial PDF file for download (google it), and have done at least one video showing me lay out a board and the considerations involved.
Love the slow motion Dave, thanks.
I have a brushless motor controller (L6234) that has a large thermal pad. I was thinking of mounting it on the bottom of the board and having pin header sized holes with which I could stick a bunch of pins in order to make a 'porcupine' style heat sink on the top. Tack the pads on one side first and then solder the pins. Thoughts anyone?
great dave :)
Hi Dave - May I ask where did you get this PCB manufactured? To me it looks like solder resist was getting peeled off way too easily in some places by the soldering iron (15:20 for example). And it does look quite bubbly and dodgy on some traces! - marko
You kinda can. In Australia and New Zealand we have Jaycar everywhere, most countries have a radio shack or equivalent. If you don't have one of those, digikey, mouser, RS and element14 all deliver internationally.
Hey Dave,
love the show. Which method would you prefer to use if you had to solder wires to a very fine pitch chip (0,5mm). For, say, diagnostic puposes?
Greetings from Germany
Nice Flux capacitor from Back to the Future Logo!)
where did you get your jbc iron from?
So Dave this is how you would solder those really really small components? Very interesting!
It's the exact same technique. Apply flux, apply solder to tip, drag tip (across from/away from) the pins.
Does the solder on the pins have lead in it? If it's lead free solder what temperature do you use? Do you have to increase the temperature?
Dave, did you still use altium for this PCB? Or DipTrace?
Is it really a surprise to see no videos by the citric? Haha, bang on job Dave.. as always.
All you have to do is "solder paste" for all your components and put it on a hot plate around 350c till the entire board "including the thermal pad, pins and all get soldered in.
It helps sometimes to press some points of the board down to the hot plate.
The fun part is with smaller size components like 0802 is "using the microscope.
I enjoyed your video/s
lui
I have to do some 0402 by hand, and next week I'll have to try 0201. 😬
Dave, how did you tin the PCB so nicely? Or did the PCB manufacturer did it?
if you drag across the pins instead of away from them does it create more solder bridges?
What is the surface treatment on those pads? Seems super flat.... or is it just white balance making ENIG look silver?
And your video showing us all how it's done is where?
Hi Dave greetings from England. I'm in Yr 2 EE Engineering. Desperately wanting to see a PCB layout designing tutorial from you. What software's to be used that can cope industrial as well as hobbyist standards?
Dave can you talk about impedance and miss matches of impedance?
Other question, why just mid high end oscilloscope have 50 ohms termination?
I mean is just to put a 50 ohms resistor over there isn't it?
Dave, can you solder a heat sink to the other side after reflowing through the vias?
Often when I'm drag soldering fine pitch, I position the chip then vertical stab down with the tweezers to hold it in place. Then solder a row. Avoids the time for tacking two pins as well avoids moving the chip while trying to tack it. Much quicker and less stuffing around.
BTW... I agree with 123cyr. Solder mask isn't very good. Neither is the hole registration.
What are your silkscreen dimension there Dave?
What is the name of the gel that you used in the tutorial?
I'd be very interested in seeing the results under xray. I don't have my own data to rely on, but my early research indicated the wicking effect would result in insufficient coverage over the whole thermal pad and effectively a dry joint. I don't hand solder any of my chips, but the method I always use is tent the via on top and leave it open on the bottom - prevents paste wicking and gas blowout. It's a bugger to do in altium, I use the method in thread205944 on edaboard (sorry, can't link)
Mine are called "Benign Essential Tremors." My whole family's got them, though most people assume it's from too much coffee. One thing I've found to help out is to brace a stick or something (oil painters call it a "mahlstick" because they like jargon almost as much as engineers) against the table top, then rest my hand on that.
Could you do a tutorial how to do that o to board that doesn't have solder mask. Way that looks half descent after board is soldered.
I notice you mentioned your hand doesn't usually shake... My hand is always shaking much more than that. I have an issue with hand tremors, but I can do through hole soldering well if I brace my arm on a surface. I have been afraid to try any surface mount for fear that components and solder will fly everywhere.
What about extending the size of the center pad so it comes out from under the chip? Would that work?
Do you know that a ton of people thought those Lecroy videos were boring?, and the HP one too?
Hello friend, could you tell me what you don't use and what measures is it to know what is good for sodar grace
Dave did you ever do a de-soldering tutorial? Last year I needed to de-solder 2 dpaks and they where a pita. I broke the board and I caused short circuit. The board itself was a ECU of a Ford Focus 1.4 zetec :)
Could you not place a small mirror on the table under the board to se where to place the iron?
I was trying to do one of these with hot air the other day, and even at well over 300° I was over it for what seemed like forever before it flowed. It was probably in excess of a minute. I think it may have burned the chip.
Thanks!
There is obviously a wide range of person that look a those video and that all like different thing. Personally i like conception video (where there is dave cad implied). The input protection one was the best, but I can't wait those usupply video again.
Yes, but it's good to show it's also easy with a normal chisel tip.
But then you don't know when the solder has "taken" to the thermal pad. i.e. like my first attempt. If you do it like I did it, without soldering first, then the chip self centering is the guaranteed indicator that the thermal pad has taken. Then immediately remove iron and you have the optimal soldering time too.
Although soldering through vias isn't recomended for industry it's nice to see it used as a method for hobbiests.
Concerning the layout, I have heard that a ground plane like the one on the bottom is not very good at all because you have big crack in it and there may be a considerable voltage if you measure from each side of the crack. Can you demystify a bit the ground plane. probably me wrong with a measure or juste explanation.
µSupply close to final release?
where do i white in line :p
thank you!!!!!!!!!!!!!!!!!!!!!!!!!!!!!!!!!!!!!!!!!!!!!!!
Was not going to be easier with soldering paste and fan heat solder ?
Sorry my ignorance , just learning !
Finally someone who can pronounce soLder correctly
Hi dave, informative vid :)
why not place your camera at the back of your bench and film towards you, will save having to lean over the camera when doing more soldering vids.
that looks great but could you do it by putting a bit of solder paste on the thermal pad and heating with the hot air gun?
th-cam.com/video/588iV07nEdM/w-d-xo.htmlm4s He mentions this just before showing his alternate methode.
Of course if you have a hot air gun it would be a more ideal way to do this. But he is showing a way to do this if you do not have a hot air gun.
what's an ideal via size to do this?
What is the chip you're soldering? Seems like a switching regulator...
still not convinced about your drag & soldering technique... it look more n trial and error for me. but a good tip to solder thermal pads from bottom up. thanks for this.
Clicks on video,sees lenght,goes to get some snacks
Im watching this for no reason since i dont have the tools to do smd soldering,but i just watch it
Dave, you need a mirror under the PCB where you solder underneath. at ~ 6:10 ...maybe you wouldn't have to go "off-camera".
They are called "tented vias". i.e. filled in with solder mask.
At 17:44 minutes if you look trace 3 and 5 especially 5 is damaged and will need repairs..Wonder what caused these damages to the traces? Was it from a to hot 🥵 of a soldering pen?…..
So enough heat travels through the bond wires to take the pins up to solder melting temperatures? That sounds horrible. A cheap board I had from China had the mask revoved under the chip and a few mm at both ends. I applied a god amount of solder to the pcb, then loads of flus and used the pcb 'underhang' to melt the solder whilst pushing down on the chip. That worked very quickly and the pins remained cold.
Dave, you should position the camera opposite side of where you're working.
You can do that too. I'm showing that you don't have to do that extra step.
Every time I've tried drag soldering I ended up with bridges, so I stick to doing individual pins.
what is this mini holes on pcb?
Where does the solder come from at 6:50? If it comes from the pins itself, is it enough to solder ICs by not adding any solder externally?
I think he put the iron with the solder underneath the board, and through the vias. The help of flux would have dragged it through i think.
the chip leads are made of pre-tinned copper. This is added to promote wetting during soldering, and is what is melting. You always need external solder as this tin layer is too thin to create an adequate solder joint.