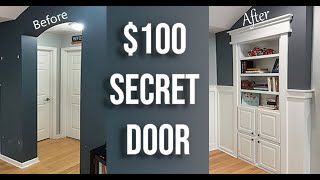
How I Used Simple Construction To Build Our Living Room Built-Ins - DIY - Living Room Reno Part 3

ฝัง
- เผยแพร่เมื่อ 7 มิ.ย. 2024
- This video is a deeper dive into the living room renovation we completed. I go over the built-in construction and how we worked around a few other issues that arose. If you haven't, be sure to check out the entire playlist called Living Room Makeover.
Subscribe
rb.gy/vt2lpa
This video is NOT sponsored. Some product links are affiliate links which means if you buy something we'll receive a small commission.
Tools and Supplies:
Glue Bottle - amzn.to/38xgeLd
Glue - amzn.to/3qOSWqd
Dewalt brad nailer - amzn.to/3bH5H0v
Kreg Track Saw - amzn.to/2NfyFwp
Hole Saw Kit - amzn.to/3rP66Fk
Shelf Pin Jig - amzn.to/38EAZEC
Social Media
Instagram - rb.gy/lkhhf3
Facebook - rb.gy/yeuahv
Check out my website
www.andybirdbuilds.com/
#andybirdbuilds #diy #livingroommakeover - แนวปฏิบัติและการใช้ชีวิต


Hole saw tip at 5:10 was super! Never thought about that.
I love the simplicity of tools. I have been trying to do more stuff on my own but I don't have endless room for all the fancy tools.
Thats great!
Loving the channel! Table saw injury pulled me in... I did the exact same thing. Clearing cut off. Left index finger. Fractured the bone, but kept the finger. It even sounded the same...
Thanks! I wish we didn't have this in common. Nonetheless, I'm glad you're enjoying the channel!
Very nice Andy, thanks for sharing.
You're welcome! Thanks for watching
Hey bro nice build an is very effective an looks real nice on entering the room👍hope them fingers are healing nicely,keep the videos coming as the content is very good an clear on how u use the equipment,peace out 📏📐🔨🔧🧰✌👍🇬🇧🇬🇧🇬🇧
Thank you for the encouragement! I've got more coming for you
Great build. My wife has been asking me to do this as well. I have it on my list.
Thanks! This was me and my wife's Christmas gift to each other
@@AndyBirdBuilds Haha, that's awesome.
Great video
Glad you enjoyed it
Where did you buy wood board, which you but on the top of cabinet? Thanks
How does a track saw track keep from moving during cutting? No dato? So it’s a built in place so the wall helps hold it square and up right? Makes sense as no backing needed. The shelf holes might be easier to mark and drill before the unit is installed. Good job.
The track saw track has anti-skid on the bottom.
I talk about why I choose to build this way in the video. Dados work well too.
Hey am new to your channel. I love that layout. how wide is that wall? Cause I have a 10ft wall and no clue what to do with it.
Welcome! They're 5' each
How did you make the countertop? Great video series.
The countertops are glued and clamped together. They're solid walnut.
Wont screwing a solid wood top on like that cause issues down the road due to wood movement? Also, why just brad nails for your support pieces? If you are using the brackets to screw into the wall, your weak point is the brad nails, right? Why not at least use some pocket screws?
I don't think there will be issues with wood movement attaching this way. The wood will move, but its attached to plywood. Its not like its a solid wood to wood connection on a dining room table.
When you get everything tied together and in place, I could climb these shelves like a jungle gym and they wouldn't budge. I think its important to remember what your building when it comes to what kind of joinery you choose. Pocket holes will work just as well, but I build with them all the time and wanted to do something different.
Both sides operate on one switch and one remote. How did you wire the left half cabinet stack to the right side to get the wires to the controller❓
They are wirelessly synced together. Good question
@@AndyBirdBuilds Ahhhh! I've watched all of the segments and I couldn't figure out how you did that wiring. But wireless sync is genius in this project! 👍 Thanks for replying!
I have similar bookcases surrounding my fireplace. Would love remote lighting like this. I am going to have to find this for sure! Thanks again! 😊
Any chance you have a link for those lights?
Sorry, I probably should of mentioned that in the video!
How's your injury healing up?
Seems to be healing well. Thank you for asking
Regarding your prior video, it was not a “lack of focus” that caused the accident; rather, it was a bad unsafe process you had/have in place for removing pieces from a moving saw blade. Use a piece of scrap to move the piece, or grab the dangling side from the other side of table, or stop the blade. This is basic saw safety 101.
As for “having a plan”, while you certainly should have a plan for dealing with accidents, I think your focus on that is misplaced, because the first part of your plan should be how to avoid senseless accidents, and I don’t see where you really addressed this aspect.
You also mentioned various technologies that maybe could have been used, but you completely ignored basic power-tool safety as a consideration, and in fact it’s the most important consideration. Technology is a great aid, but not a substitute for basic safety practices.
I suppose you turned off the comments on the video because you took a lot of heat, which is funny because in the video you specifically solicited comments from your viewers. Guess you couldn’t handle the reality that this was completely avoidable if your process was centered around safety and your poor safety habits were the cause.
Anyway, I hope you’re doing well and have modified your process to avoid such future accidents. I do commend you for posting the video, but it would have been more educational to people if you really gave some serious consideration to discussing safety practices for avoiding such mistakes.