I Make a New Plate for the Vice

ฝัง
- เผยแพร่เมื่อ 25 ก.พ. 2020
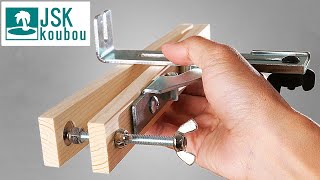
- In this short video I show how I made the wooden plate between the bench and the vice.
I hope you like my work and the video.
Huge thank you to all of my Patreon and PayPal supporters and specially to:
Afreeflyingsoul
Gregory
Adel AlSaffar
Alan Hanson
Amanda Taylor, Esq
Andreswara Hermawan
Andrew Phillips
audi4444player
Courtney Maleport
Cristian Zorilla
Dan Williams
David Barker
Dre Gilley
Hunter R.
JD Smith
Jonas Richartz
Kelly Imgrund
LVE
Martin Rønnow Klarlund
Mellissa Marcus
Nick Cannon
Paul Ambry
Paul Mampilly
Shikidixi
Trevor Kam
TRG Restoration
Vince Valenti
Yale Baker
My camera:
Panasonic HC-V180
If you have any questions about the process, machines i'm using or other stuff, just ask me in the comments. I read them all and i try to reply as soon as possible.
Sorry for my bad english, it's not my language. I try my best to improve my technical english.
Subscribe for more of my content. I'm uploading videos about mechanical stuff, as new creations and buildings and also restorations.
Thank you for watching :-)
My Main Channel:
/ @mymechanics
„I make a new one“ T-Shirts:
teespring.com/stores/my-mecha...
My Second Channel:
/ @mymechanicsinsights
My Patreon Page:
/ mymechanics


![24 ชั่วโมง ซื้อของสีเดียว!! [Ver.2024]](http://i.ytimg.com/vi/TNPgzIMr_w8/mqdefault.jpg)


I was literally so disoriented for a moment I did NOT expect a vocal commentary!! :O
He kept it to a minimum but I like it when he explains what he is going to do.
OMG, this is the first time I've ever heard you speak!
So THAT'S what you sound like! Awesome!
I know right?? I figured he had the English subtitles because he either didn't speak it or just just has broken English. But holy cow he speaks great English! I hope he starts narrating for the other channel too.
Most of the restoration channels on TH-cam don't speak during their videos, so that's pretty normal.
Hand Tool Rescue is in Canada like me, but you very rarely hear him talk. Only if the video he's doing really needs it, like a shop tour, or when he did a video on Japanning.
@@MUCKLEECH I don't - having only ambient noises make them perfect asmr videos. Only the item and his workshop 😌
I was shocked, for one, because I accidentally started two narrated videos at the same time and for two, I didn't anticipated talking at all :D
My first thought was "wait, why is there anyone speaking?" Second thought was "this guy is from switzerland and this is a swiss accent. Is that the first time he's commenting his work?" And I want to say: More of that please!
I love the thought of personal improvements over time to make your work shop better. I’d love to see more like this.
In my heart, the title reads: ‘My vice plate is loose... I make a new one.’
We all have many vice's. (Smoking, drinking, overeating, etc.) We only need one vise. And it needs to be solidly anchored to the bench. ;-) Vice; Bad Habit. Vise; The thing you clamp things in.
@@jlucasound And it seems your vice is imagining the whole world uses US English.
Oh, my mechanics, you are the best restoration channel. Thank you! Don't leave us for months.
It's so wonderful to hear your voice.
Best 8 and a half minutes of my day. And please leave the sand blaster button as it is. Character is important. Can't wait for the next installment. Peace!
I enjoy the "Insights" as much as the restoration videos, thank you!
Your voice is everything I'd hoped.
I ate my breakfast while watching the new video. Enjoyed both immensely. And yes it’s nice to hear your voice every now and then. Best wishes to you and all here.
The legend speaks the crowd falls silent 👍😁
Great job as usual. I would seal the wood with polyurethane to avoid the wood to continue drying and make it last forever.
Thanks for the tip, but I think I'll leave it as it is. If it turns bad one day I can make a new one again.
@@mymechanicsinsights everyone loves when you make a new one ;-)
@@mymechanicsinsights "I will make a new one" :) I should have known! I just bought your t-shirt :)
my mechanics insights Don’t you mean...? “I make new one”.
It’s dense hardwood, it’ll last a very long time and it’ll barely move. It looks like a piece of laminated worktop material, so I’m guessing it’s already very dry.
You make everything look so easy. We know it’s not.....that’s the difference between you and the rest of us
When I can't sleep in the middle of the night I get some peace watching your channel.
Me too!
Dude, I love your voice over. It’s crisp, simple, and straight to the point.
Great work!!
In Japan, we call brass insert "ONIME Nuts".
I sometimes use its.
When I use its, I put the epoxy resin into the wood holes to harden wood fiber.
It improves durability of wood base itself.
If you have next chance, let try it.
Thank you.
Yep Japan follower the same thing i have in mind: if the wood Is putted under stress its Better to avoid It cracks there are a lot of holes concentrated in a small portion of wood. I agree 🤘🤘🤘😁
Epoxy in a hole before screwing in, a good idea indeed
Dripping runny (not gel type) super glue (cyanoacrylate) into the hole will make softer wood turn rock hard and prevent splitting. For smaller screws and bolts, threaded inserts are not needed unless disassembly 100's of times is required. 1/4" lag bolts can be screwed in and removed many times.
Do a shop tour on this channel! I always wonder where you're going when you spray paint, clean parts, sandblast, all the good stuff 😁
So nice to see you use the tools you restored. Also, very nice to hear your voice 😁
I hate people that gives a thumbs down without comment. Great idea 👌
Seeing that Beverly always makes me smile. And the press! Good job on giving them a solid base.
Great multipurpose idea . The brass thread inserts come in handy for so many projects.
It's so satisfying to see all the tools you restored in a work setting.
You always sound so jovial! I love your voice!
Thank you very much, glad to hear that.
Yes, your Schweizerdeutsch-accented English reminds me of my hiking friends in Zug & Luzern.
Excellent program, as always. Thank you!
Ahh, we get to hear your voice! Happy day indeed! The threaded inserts are a nice touch, definitely good when you need to change out the tools you're using. Thank you for making a block of wood interesting.
Your voice sounds exactly how I pictured it in my head.
Totally wasn't expecting a voice. Glad to hear it on your second channel, but I really dig the silent style on your main channel. It's very soothing.
Very cleaver yet so simple...now that you have shown us all.
Wow! First time we hear the "my mechanics"s voice
I’m definitely adding the inserts to my existing plate. Great idea! Thank you again, and take good care.
Que grande...!!! El detras de escena de las restauraciones. Y con tu voz...!!!! Genio.
I have already seen all your video. I have searched other similar video channels but you don't meet my expectations. You are simply the best I have seen for attention to detail.
Nice versatility and love the butcher block base! I used the same technique to hold my vintage restored bench DP (1950 heavy iron) and made an extra set at 90º so I could rotate the DP to hang over the custom bench and be able to drill larger/longer pieces than 10"-12". I used a dab of quick epoxy for the inserts also. Also used 3/8-16 button head cap screws with an extra 3/8" length because they are easier to reach with a T-handle hex and don't take too long to remove. Thanks for sharing this, Nicely Done!
Until I hear you say "I make new one" I refuse to believe this is really you lol
So you don't believe it's actually him just because he said "I will make a new one" ?
One well thought out base encompasses all, bet ya slept well that night with that done, great job, thank you for sharing!!!!!!
Your videos are so good! I watch them multiple times!
Very clever way to utilize space in the work shop. Great and interesting video. Thank you very much :-)
I'd love to have a separate spot to fix them all the time, but my shop is too small. Allthough I don't use the shear and the press very rarely it's ok like that. Thank you
Methodical work practices that you have makes you a very good worker. Great idea to use one wooden base plate for different tools. Cheers.
I really enjoy your commentated videos with voice-over. Please make more!
I am happy to see you are not perfect at woodworking because with metal you work like a God
That's brilliant! Your mounting of the vice gave me an idea on how to mount a wood vice onto my workbench!
and finally the man has spoken!
Another Great Video Thank You! From Ray in Michigan USA
I am currently making the exact same thing for my bench... Thank you for the idea!
A thing of beauty!
Belissimo!
Elegant solution! Very satisfying to watch.
don't screw into face grain! that's your main problem. it provides much less holding strength for your screws. you should have turned your piece of wood by 90 degrees.
-face grain- *end grain*
Yeah, even the insert might loosen up over time in the end grain.
Might also be time to invest in a random orbital sander or something instead of a file lol
Guy is a machinist, not a woodworker, or he would have known.
I got the same vice , only mine is Boley .Great tools😁
It’s unlikely the stresses involved will cause a failure unless he gets too aggressive using the vise as an anchor for bending Steel !
Excellent video. As usual, you did not disappoint. Keep up the good work my friend!
Oh God I love your Swiss accent *.* reminds me of friends we got in St Gallen :)
Very good. You are the best.
First time hearing your voice and already love the accent
Swiss craftsmanship. Period.
You should introduce your videos more often. Your accent is wonderful...
Great job, nice to hear your voice too 😀👍👍👍
Perfect voice for this channel, just as I imagined ;)
Very nice work - as always!
I for one, would really like a brief video tour of your shop. You always seem to have exactly the right tools and materials and I am interested in how you have organized your work space and how big it actually is.
Now thats a good idea perfectly executed. ⚒️🧰⚒️
Awesome idea bro! Nicely done! Thats gonna come in very handy!
He speaks! 😳That was a pleasant surprise!
Very cool! But the whole time I was axpecting you to say: This is broken, I make a new one. XD
Thank you for sharing this video sir
As a wood worker I find all your videos fascinating! Though in this case if you turned your block 90 degrees you’d have more luck with the screws not wiggling lose. The inserts may also show wear too.
When you screw into end grain the threads cut away (over time) the wood all around the shank. The threaded inserts should last much longer but it’s possible they might come lose over time.
Even if your old block was turned 90 degrees you probably wouldn’t have to change it.
Anyways love both your channels.
Saugeile Idee und Umsetzung 👍👍👍🤘🤘🤘
This guy could say, “That last cup of coffee wasn’t very good. I make new one.” And 1 million people would watch the video.
Now we know why your restorations are so good, Swiss precision! Also, It is nice to hear your voice, that's a good upgrade on your, already, excellent video.
Big thumb-up.
That's pretty slick 👍
Lovely job
I love your channel! Please post more content
When you started talking I had to check the channel again... nice thing for a change!
Perfect as usually.
Such a cool idea
Nice solution!
This guy knows metal work. Great english by the way!
Your attention to details is amazing, Swiss made
Der Gressel ist so geil....love it
Smart idea using a lock nut and bolt for installation of the inserts 👍👍
Keep up the good work and keep the videos coming sir.
We'll be here watching and waiting.
You "make a new one" please.
Very clever!
It definetly looks like swiss cheese after all holes on upper side was drilled.
Haha i know right
@@mymechanicsinsights Wouldn't it last longer and be more robust if you made yourself a small steel bench with all the inserts for your vice, shear etc. ?
@@ebrahimseedat5554 If he had a steel bench he could probably just drill and tap the holes directly into the bench,
that ikea kitchen countertop is solid for the money 😉
As Jim Pudar has pointed out, putting screws into end grain is always going to be weak. The new piece is very dense so it will last much longer with those inserts but turning the wood 90 degrees and putting the edge inserts into the side of the wood grain would have been a good idea. BTW, It's standard to fix a stripped hole in wood by drilling it and gluing in a dowel as I've seen you do but it always bothers me because it will never be very strong.. Still better than a tripped hole but I would want to use an insert like you did here when possible. I hope you never get tired of making videos because I enjoy the beautiful work so much.
At first I thought, a new wooden base plate? That's it?
I'm sorry I didn't trust you. This video was really good. It's deceptive how complicated things can get for a relatively simple item. Always great to learn new things.
Thanks!
You're the best at TH-cam
Good job bro 👍💣👌🏽
Finally heard your voice. Remains your face master!!!
Amazing!
He speaks! Nice to hear your voice.
You should (if you haven't already) patent these modifications, & inventions.
You have way more patience than me. I would be too impatient to swap out the tools. I would have made 3. I'm impatient, or lazy? Not sure probably both. Great job!
Love it my mechanics!
This is a magical channel and you are a brilliant craftsman, but lag screws don't work well driven into end grain. The board needs grain rotated 90 degrees. The sawdust that pulled out of the hole when the screw was removed is a good illustration of why.
Very good work! Благодарю За видео!
Nice Project
Beautiful work as always. Just for myself id prefer a metal base drilled with nuts welded. Wood will always tend to work loose especially with the vise
You made a new one? That's never happened before. :D
I’ve used lag screws - and I’ve used helical inserts. But I’ve never used lag inserts! Excellent!
What do you do with the hardware for the arbor press and shear when the vice is in use?
I have them placed in the corner on the ground next to the milling machine. Always have some oil spray applied on the bare steel parts to prevent them from rusting again.
That is awesome
Impressive !!!!!!!!!!!!!!!!
Very nice.
That arbor press still looks so damn good.
You sound just like the Wandering Oaken guy from Frozen. That’s awesome.
A custom fixture plate for mounting shop tools... genius and just what I need in limited space.
I recently assembled a table from two different sources of materials. The top came from one table, and the legs from another. The legs were from a rolling table that had 3 levels. I took two sets of the sets of legs, and cut the longest two to the same height or length as the middle sized legs. I then took an Allen wrench and removed the threaded inserts from the legs, next I got the appropriate sized forstener bit, and drilled beyond where the threads were, cut the legs down, then threaded in the inserts to attach the legs to the top. I then drilled the holes for the attaching plates to the top, threaded the legs in, and had a nice little table that measured 76x76 cm.
Cool voice over !!!