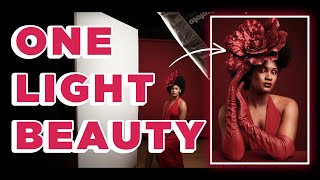
My Two Favorite Backgrounds for Flattering Skin tones

ฝัง
- เผยแพร่เมื่อ 30 ก.ย. 2024
- ✨As a beauty and fashion photographer, my job is to not only make the subject look good, but make also to make their skin look great as well.
We can go into the lighting, or the post processing part of things, but today, we’re going to be looking at something that doesn’t have much to do with your subject’s skin itself, but rather the background used to help compliment it.
My two favorite backgrounds for flattering subject’s skin tones, whether it’s lighter or darker are:
👉 Savage Universe Beige
👉 Savage Universal Cocoa
----------
Lighter skin tone setup
----------
For the lighting I am using one of my go-to setups for photographing skin which is a Westcott Scrim Jim 8x8' and a bare strobe. Basically a scrim jim is a large frame with diffusion material just like a softbox, however because it’s larger, it creates an even softer light source, and unlike a softbox, I can position the light independently of the box - since they aren’t attached.
Scrims come in different sizes, so don’t worry if you don’t have a big space for an 8x8' one. But remember, the larger your light source is compared to the size of the subject, the softer the light will be and the more flattering the skin will be. We’re not using a beauty dish here for example which is very specular and shows a lot of highlights and contrast. We want soft, beautiful skin.
After testing a bit I realized that the light on the background didn't quite match as closely as I would like the subject's skin as there wasn't as much light hitting it.
In order to fix this and counteract the fall off of light the background, I could either move the subject and lighting closer to the background (think inverse square law) or introduce additional lights. I opted for the latter because I can control exactly what I want to do and added 2 small white umbrellas. This proved useful because I was able to also feather the lights toward the subject a bit and create a kind of rim light on her face giving a bit more pop to her skin.
So which of the 3 setups do you think flatter this subject’s skin tones the most? (4:47) Drop a comment below and let know. 👇
----------
Darker skin tone setup
----------
For this setup when I want to flatter a subject’s darker skin tone I opt for the cocoa background. I’m going to start off building the lights just like the first setup, using the just scrim and seeing how that goes first. In this case I’m going to reintroduce the 2 background lights to lighten things up. Now if you only have one strobe you can definitely achieve this by simply moving the subject and entire lighting setup closer to the background.
Adding the lights to the background once again helped match it to the subject’s skin tone a bit better and in my opinion helped to flatter her more. I had to tweak the position of the lights because although they were turned down to their lowest setting, I still wanted less light on the background and had to move them back a bit.
✨ Drop a comment below and let me know if you experiment with your backdrops and if you found these tips for flattering skin tones useful. 👇
🔥 Also be sure to check out my forthcoming beauty class: lindsayadler.p...
💡 Main light: Scrim Jim
💡 Light 2 & 3 - Small umbrella with diffusion
📸 Gear Used:
✅ Canon EOS R5: adorama.rfvk.n...
✅ Canon RF 24-105mm: adorama.rfvk.n...
✅ Profoto D2: adorama.rfvk.n...
✅ Profoto Small White Umbrella: adorama.rfvk.n...
✅ Westcott 8x8' Scrim Jim: adorama.rfvk.n...
✅ Profoto air remote: adorama.rfvk.n...
✅ Avenger D600 boom arm: adorama.rfvk.n...
✅ Tether Tools tether cable: adorama.rfvk.n...
✅ Savage Seamless Beige backdrop: adorama.rfvk.ne...
✅ Savage Seamless Cocoa backdrop: adorama.rfvk.n...
🔥 To learn more about lighting definitely check out my class Master Studio Lighting: invite.lindsay...
----
👉 Portfolio: lindsayadlerpho...
👉 Instagram: / lindsayadler_photo
👉 Facebook: / lindsayadlerphotography
👉 Twitter: / lindsayadler
👉 Education: learn.lindsayad...
Some of the links in this description contain affiliate links to partners.


![[Full Episode] The Restaurant War Thailand ศึกพ่อค้าซ่าแม่ค้าแซ่บ Episode 2 | 29 ก.ย. 67](http://i.ytimg.com/vi/r3lfLNH6Ke4/mqdefault.jpg)


We couldn't agree more with your recommendations! This is very helpful (per usual!) 🤩
Savage response 😉
Awesome!! I will take pictures of myself again with fashion Jewelry and other this week. Having fun pretending to be a model this time.
In my field of astrophysics, I study the mysterious spectrum of the interstellar light. However, you show us the dynamics of artificial lighting. Your professional photography is full of vibrant natural colors and elegancy. You truly are a master of lighting. Amazing Video.
That's beyond my comprehension lol but kudos for your knowledge hehe. Thank you for the compliment! :D
Ten seconds in and I had to pause the video just to look at that amazing organizational system you have for your backdrops! How are they suspended and secured? I think I see velcro? Terrific video as usual. Love all the content your are producing!
I want to know this as well
I love it lol. It's been a struggle for many years to get a nice system in place. The backdrop system is from Savage Universal, check them out!
@Chaim Ariel No problem :)
Just found this video, thank you
How can I make people with yellow based skin tones look more tan/orange or warm instead of slightly jaundiced.
Get good at editing in Photoshop. It's all about color balance.
Great color choices. How do you feel about orange? I think blue is good for darker skin tones. You chose the best backgrounds overall.
I loved the explanations and learning about lighting. I love #1 with the first model. I think the deeper color really brings out her complexion. I like how it looks contoured under her cheekbones. Very flattering.
Awesome.
It’s so hard to decide what background colors to start with. I mean which colors will be more versatile. This lesson definitely borrows it down. Thanks! Very useful info.
I agree, 2.
i NEEDED this video, been on the fence about the beige/cream backdrop for such a long time and just relied on the safety of a neutral grey backdrop, gonna try this out
Glad you enjoyed it! :)
Finally! I was asking for months to everyone around me for that colour. Nooooo one could tell me.
great stuff
Thanks for all the knowledge lindsay. I love you ✨
Those of us working in small spaces (like me) will need to adapt these tips to the reality of our situation; no room for 8' scrims, and in many cases, no room for more than a single light (or getting your subject more than a few feet away from the backdrop)! But it's still very helpful to see how the difference in light levels affects the contrast between subject and background.
For the first time, I am coming across a photographer that is so particular about colors like how I am, I feel so good, color matters , color emotes and speaks loud.
This video was so pleasing to the eyes. And as I side effect I also learned from you Lindsay, thank you for these!
Lindsay.
Thankyou again !! Very generous from fou sharing all your knowledge!!!
I love your way to teach
You're very welcome!
My question I took a photography class the teacher told us never use any orange or red of any color can you explain to me why I see it being used and how would I bring it into my photography
Hi Lindsay, Thank you for your always helpful and clear explanations. Could I ask you where I can find your wall-backdrop system? (aka the system to store them?)
Thank you! It's from Savage.
The third one gives it a more genuine feel. Love the tutorial Lindsay
In my opinion, the second setup is the most flattering for this model's skin. Wonderful job, as always, Lindsay! 😍
Thanks so much!
Great ideas with lighting. Hardly wait for next class.
Thank you Lindsay ❣️
grey and eggshell blue are pretty backgounds
is it better to get lighter backdrops ? that way you can make them darker during the shoot using inverse square law. but if you get darker coloured ones, you will need more lights to make them lighter/brighter...
either way. I regularly use more lights to lighten because I can make a gradient (which creates depth). But lighter would require fewer lights, yes
I almost missed this...TH-cam’s lack of notification software. Glad it popped on my home feed. Great video! ❤️
Ugh sorry! If you're subscribed to my newsletter I also send out an email when these go live. lindsayadler.photo/join
Hi Lindsay. What color backdrop do you recommend for light skin African American skin tones, the almond or beige?
hmm... I like pecan/almond
Thank you! This was a fantastic lesson!!
This was amazing! Lots of great pieces of advice and insight ❤️
i just order a 86 inch beige seamless. Gotta wait a while here in Canada.
Ah well I hope you get it soon! :)
You’re literally the best when teaching and explaining. I cannot tell you how many videos I have watched trying to find answers to some background questions that you have answered here! Thank you so much for sharing your expertise. Now if I could only book you for a private teaching session LOL
Wow thank you so much! That's such a wonderful compliment to hear and warms my heart! So happy I can help. :)
@6:17 How do you draw expression and emotion from your models so efficiently?
I work with people who are good at their jobs. :D
Beautiful Lindsay 😊
I love the research you put in your picture and the background. We are painting out home and I want every wall to be perfect color for our skin tone - so every picture is amazing in the normal daylight. Our family has brown skin tone and I would love the name of the color that comes out when you brightened up the coco background for the lovely AA model.
I believe that Xrite or Pantone even has a color reader that can tell you the exact color. :D
Do you have a video with a list of equipment?
A list of all my equipment or something else that you're specifically asking about?
Awesome video Lindsay! Thank you! What kind of fabric do you use on the scrim? 😄
Whatever it comes with. :D
@@lindsayadlerphoto Great! Thank you for your reply! 😄
You just changed my life.
haha well I hope in a good way! :D
Would anyone have a recommendation for elderly women with gray hair and light skin? They make a lighter color called Bone and I am considering that but also have gray and black and a canvas beige with medium texture.
bone is great but also gray is lovely.
@@lindsayadlerphoto Thank you!
@@williamhicks2763 I do photograph a a lovely older woman with gray hair in my "Challenging Features" episode of Learn Plus: learn.lindsayadlerphotography.com/learn-plus-episode-37-challenging-features/ and another one is in my Money Making Photography class if you're interested: lindsayadler.photo/mmsetups
Wow thanks so much. I’m going to use the lighter background color when redoing my TH-cam profile picture!
I love this video! Thank you! I’m going to subscribe! You have great content
Excellent video, as always.
Looks like you might be using perhaps 24-105mm or is it a 24-70mm. I think I remember in one video that you mentioned about you're 24-105mm as a fav. I used that model as my go to lens at weddings with my Canon 5D Mark IV....The R5 is in my future also, but no wedding work right now! (virus). So I'll wait...All The Best.
Philip
Uptown Photography
Fantastic
You always have the best answers! You are my go-to photographer for advice :))
for me 2nd for background, 3 for actual lighting the model. Great work as always (y)
Great video! Thank you, Lindsay. I agree. Setup number 2 for the first model.
It's crazy how we take technology for granted.... I'm sitting in canada watching a video shoot in usa and the quality is good to the point i can tell this girl is wearing contact lenses. 2:21
These are very beautiful backgrounds .... for my own photos I really like to use a gray-blue one; in my BnW photos it looks really beautiful to my own taste and gives me lot of space in 'playing' lighting the background
Thanks. I love it! Btw where did you get your stool?
Not played with skin tone backgrounds so will look out to pick some up, great vid x
Great video as usual Lindsay, thanks for sharing.
Nr 1
Good advice and I look forward to these tutorials as well as seeing your work! For the 1st subject I slightly prefer the 1st set up probably because I liked the bit of contrast but yes option 2 would be my 2nd choice and it did more closely match her skin tone. For the second beautiful subject, I liked the 2nd option as well. I love using fashion gray just because I don’t have space but you can pretty easily make it go near black to white as well as change it color to a degree as well making it a little more flexible for my space and budget. Beautiful work as usual and maybe a gray background doing fashion could be one of your next tutorials 😊. Take care
Thank you, your videos are always inspiring
Love your paper background holders.
Thank you!
@@lindsayadlerphotocould you share where you got them from? Are they bespoke?
@@wfp9378 savage universal!
May I ask what you have your white balance set to?
Perfect! Thank you again for a great Tip!
Thank you, really helpful, clear, well explained. Great artist, wonderful teacher! Thank you 🙏🙏🙏
Glad you enjoyed it! :)
Nice way to get the Savage Seamless beige and cocoa backdrop out stock. 🤦🏾♂️😂😂😂
lol
thank you for this great video
I love that you finally upped a video with the scrim in your new studio!!!!!! :D Oh how I wish I had your ceilings! I refuse to be jealous of someone's work or gear or business because they worked hard for that and deserve it… But can I at least envy your ceiling height? ;-) So happy for you OWNING your new space! 🙌🏻🥳
lol i accept that :P
Wonderful work Lindsay!! Always learning new things from you !!
Thanks!
This was so helpful! Thanks Lindsay!
What color(s) for a background of a photo of two subjects, one with lighter skin tones and the other with darker skin tones? If you took a picture of both models together, what color(s) of background would you use?
Either could work depending on the clothing or makeup styling, or even the color of the hair. In other words.... it depends!
This is so awesome. I was thinking about getting Mocha and Primary Red, but I might go for Cocoa as recommended for starters.
I've branched out to using a lot of their different colors, totally worth it!
Really interesting using colour background to match the skin. Only ever thought in terms of black or white sort of thing. 😊
Totally!
Great tutorial Lindsay! You make the difficult tasks easy. Thanks!
Glad you enjoyed it! :)
You're such a great teacher. (just saying) Great Video. Thank you!
Glad you enjoyed it! :)
as usual, you make it look simple. the backgrounds are ordered. thanks for the tips and tricks!!!! you are great.
Glad you enjoyed it! :)
What if you have 2 strobes? Where would you position your background light so that it looks evenly lit?
Move your subject and main light closer to help, and if necessary put light directly behind subject for more even results.
I love watching your videos, they’re so insightful and inspiring! Big fan of your work and your style 😍
Thank you so much!
Brilliant! Thank you Lindsay. I learned so much.
Thanks for watching! :)
Great job Lindsay
I actually have the coco never used it but I will need to
Keep up the great work
Thank you so much!
Very helpful Linsay, a constant source of inspiration! Thanks a lot
Glad you enjoyed it! :)
Another great tutorial Lindsay! Thanks for sharing!
Thanks so much for watching! :)
Extraordinario!!!!! 👏🏽👏🏽👏🏽
are those two side umbrellas also firing, or are the just in modeling mode throughout please?
Firing. I don't use modeling lights for actual lights, they're just one so I can see what they're doing.
Nothing short of your usual amazing, Lindsay! Thank you for sharing not only the backgrounds but how they change with different lighting techniques. Also loving your storage system!
Thank you so much!
I really struggle to get Savage in the UK. Is there another brand with similar colours you would recommend? Love your work. I always learn so much from you! Thankyou x
I think there is colorama or something by the name. I legit only use savage so I dont know!
@@lindsayadlerphoto thanks for the reply. It means tons!
When will there be a tutorial on using flash outdoors?
I don't really use flash outdoors that often unfortunately.
Thanks Lindsay!
Love your work. Keep posting plz 😁
Thank you! I shall! :D
Nice tutorial. Thankyou.
Thank you!
Another great video Lindsay.
Thank you so much!
Do you ever adjust the background in post. Great tutorial. Thanks
I do, mostly the color but I try to just use the background that I selected IRL rather than completely change it in post.
Thanks.👍
Fabulous as always 😊
Amazing 👏
What is the grip used on the grip arm to secure the Scrim Jim?
She teaches all of that in Master Studio Lighting!
@@heyashleyboring Thank you Ashley.
xoxo
Gorgeous shotttts
Thanks so much!
Great video!
Thank you!
One of shots shown of the first girl had over exaggerated neck length. I think a tighter focal length would be more flattering in that same shot. I'm assuming you used 24-70mm. Try 85mm/90mm and you would see a more flattering composition. I agree number 2 backdrop is better