How To Create a SUN GLOW Effect in Photoshop - SUN FLARE Tutorial

ฝัง
- เผยแพร่เมื่อ 3 มิ.ย. 2024
- ► Subscribe to My Channel Here: / @photoshoptrainingchannel
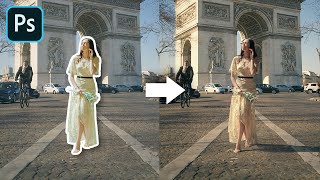
In this tutorial, I’m going to show you how to create sun flares in Photoshop.
The effect that we’re going to create in this video is the sun glow effect that is really popular in portrait photography. It’s a stylized affect that warms up an image and makes it more interesting.
Like everything else in Photoshop, there is a lot of ways of achieving this sun flare overlay effect. One of the best methods is to use the Gradient Fill Layer alongside the Hard Light Blending Mode, which allows you to work none destructively, and it gives you a lot of control as to how the glow effect looks.
Using Adjustment Layers or Fill Layers, do not add too much to the file size of the final photoshop file. So use them instead of pixel layers whenever you can.
Best of all, if you create a sun glow effect using a Gradient Fill, you can save it as a preset, and use it again on any other image that you like.
By learning to create these artificial light bursts, you'll be able to easily add sunlight to photos, and make sunset or sunrise glows.
In this tutorial, I will be using an Adobe stock for this image. You can download the free watermarked preview if you like, or use your own image to follow along.
⚡⚡ Adobe Stock Image:
bit.ly/2ptNI8B
If you have any questions, please leave them below
or head over to this tutorial's page on our website:
➜ photoshoptrainingchannel.com/...
👍 Subscribe + Like + Share + Comment = More Video Tutorials!
Thank you for watching!
- - - - - - - - - - - - - - - - - - - - - - -
⚡ PTC NEWSLETTER
If you enjoyed this video be sure to subscribe to our newsletter to receive free weekly Photoshop tips and more!
➜ ✉️: ptcvids.com/subscribe
- - - - - - - - - - - - - - - - - - - - - - -
⚡PREMIUM TUTORIALS
For more in-depth Photoshop Tutorials be sure to check out our Premium tutorials.
➜ ptcvids.com/shop/
- - - - - - - - - - - - - - - - - - - - - - -
⚡ FOLLOW PTC ON
- Facebook: PhotoshopTrainingChannel
- Instagram: / jrfromptc
- LinkedIn: / photoshop-training-cha...
- Pinterest: / ptcpins
- Behance: www.behance.net/JRfromPTC
- Twitter: / jrfromptc
- - - - - - - - - - - - - - - - - - - - - - -
⚡ LINKS
- Website: photoshoptrainingchannel.com
- TH-cam Channel: / photoshoptrainingch
- Google +: google.com/+Photoshoptraining...
- This Video's TH-cam Link: • How To Create a SUN GL...
- - - - - - - - - - - - - - - - - - - - - - -
⚡ CREDITS
- Stock Images provided by stock.adobe.com
- Photoshop video tutorials by Jesus Ramirez


I purchased one of your tutorials a few weeks back. Let me tell you, it helped me tremendously. I'm new to Photoshop and was overwhelmed by it all. Thank you again! 👍
Awesome! Thank you, Joe! If you can, please leave a review on the product page.
Love your tutorials. You make it easy to follow along!! Thank You!!!
You've helped me so much with this. Thanks a million!
That's so simple yet so effective... Thank you
I have been seeing this lately! I've done some layered gradients, but, never thought to save them. Doh! LOL Thank you!
Thank you so much, I've been wondering how to do this for ages!
I really like this effect. Thank you!!
Best sun-flare video by far on TH-cam, created an PS action for this to use going forward.. tnx
You are very good at explaining and this is probably one of the best, easiest to understand tutorials for photoshop I have come across!
Thank you!
Thank you! I'm glad you enjoyed it!
you make it look so easy. I am thrilled that I found your tutorials.
I'm glad you found them!
awesome tutorial. Thanks !
Awesome, your teaching style is great sir.
Awesome! I didn't know I could add a third color to a color gradient! Thanks so much for sharing your great knowledge and talent with us.
You're welcome!
You're so awesome, and so great at explaining things! thanks so much!
Thank you, Paige!
thanks for this tutorial. just what I needed!
You're welcome!
nice. you always make it look so easy, and understandable
Thank you!
Great Tutorial. Explained very well. Thank you!
You're welcome!
very well done. thank you.
You're welcome!
Best one yet!
Thank you!
Great tutorial, very effective.
Thank you!
Wow!. Nice effect with the slide icon with your picture and name. What I like about this tut is that I just learn how to save my own gradients 😎
Thanks!
Glad you learned something new! :)
BTW. If you can make a tuto about how to make that 'Icon Slide', would be nice.
I didn't do it in Photoshop. It was After Effects. I'm not planning on doing any After Effects tutorials at the moment. Sorry about that!
Yeah. I kind of suspect it. Many creators choose After Effects instead of working the hard, difficult road with Photoshop Timeline. But thanks anyway. At least I have an idea so I can start on my own to create that effect 😎
you have amazing skills about PS, please continue your good work prof.
Thank you!
Very well explained.
Thank you, Vishwas!
Thank you!
I think you are the best guide to photoshop ;)
Thank you!
Fantastic as always, Jesus. Thanks as always.
Vinny
Thank you, Vinny!
very nice tutorial my friend! greetings from Brazil. muito obrigado! :)
Perfect
Very helpful!! thankss!
Thank you, Thalia Serna!
Great tutorial Jesùs Ramirez thanks for your time.God bless you,I`m from Piura ,Perù.
Thank you, Vìctor!
That's great!!
Thank you!
Thank you
Awesome! Just killed my photo with this tip 🤙
Great tutorial, thanks a lot! Especially the tweaking using selective color. However, the blacks of her backpack in the bottom left corner don't look natural to me, I would mask them out (maybe not completely though)
Thanks, Patrick. Yup. On a real project. there would need to be more time spent on those details.
Do you have a tutorial specific to how to use the gradient bar? Each time you returned to make adjustments, you lost me. Don’t understand how it affects outer edges of the flare. Thanks
Thank you Jesús. I think your tutorials are great. You make them very easy to follow. The only problem is that I'm ending up with a flat forehead from smacking myself every time I watch one of your tutorials. I'm like, "So that's how you do that!" SMACK!
Thank you, Richard!
:)
Nice technique. One thing I miss is that you cannot add noise to the flare unless you create a pixel layer before, if I'm right. It can be good if photoshop creators added a noise slider in the gradient adjustment panel.
Thanks for your care !!!!
a noise layer would be nice! Thanks!
It's amazing hoe much you know about this software...
I better.
It's all I do. All day, every day! 😃 lol
Congrats!!!
Works like a charm, how about lens flare ?
Ahhhh - Filter Lens flare... Dohhhhhh
Brilliant tutorial. Funny thing is I've been thinking about using it on some shots and I wasn't clear how it was done. It's not something I use too much in my food photography but some projects I have loved up, it could help a lot.
Thanks Jesús, have a great weekend.....
Oh! One more thing... If the glow from the sun flare is too much on the subject but great everywhere else, can I out a mask on the whole effect and paint out a little of the effect where I don't want so much?
Yeah, you can. If you have a tablet, just set the pen pressure sensitivity to a lower value and build upon the mask until you get the effect you want.
Easy to understand.....(1)
Loud and clear ......(2)
Thank you!
Hello i can't move gradient map in any side of the picture
I can't seem to find Selective colour in Photoshop elements 2018.
Silence Spectre, I don't think it is available, unfortunately.
I am not sure why but I cannot move the gradient layer and drag it around
I cant move the adjustment layer
Thank you Jesus (this is a sentence I thought I would never say LOL)