Post Process Milky Way Images

ฝัง
- เผยแพร่เมื่อ 6 ต.ค. 2024
- DOWNLOAD THE IMAGE FILES LINKED BELOW TO WORK ALONG WITH THIS TUTORIAL
Hi Nightscapers,
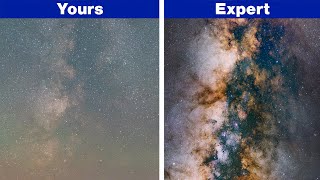
In this video I show you how I post process Milky Way images and talk a little about what I do at time of capture.
I'm hoping this video can help you build a bit of a foundation for your own Milky Way image post processing and be something that we can build on in future videos.
You can find the images to work along with the tutorial in the blog post via the link below on my dedicated night photography site nightscapephot... I sincerely hope you like this video and it helps you with your own post processing and photography in general.
DOWNLOAD IMAGES HERE
nightscapephot...
If you do download the images please do not re-sell or re-print they are made available purely for the purpose of following along and learning post processing techniques.
You can find the blog I mentioned in the video that talks about settings for milky way photography here
nightscapephot...
I will be creating more videos like this around the topic of Nightscape, Astrophotography and Night photography in general.
The plan is to first create videos around the basic techniques I use and then build on them to show some more advanced techniques, sharing the knowledge I have learnt over the past 10 years of shooting almost exclusively at night. I will also try include info about what I do at time of capture and give some info about what I was thinking and experiencing.
Anyway if you find this video useful and or interesting, please subscribe to the channel and smash that like button to help my videos get seen, it's just a few clicks but it really helps.
See you in the next video, cheers
Daniel Gangur
Want to see more of my personal work you can also find me here,
WEB - www.danielgang...
IG - / danielgangu. .
FB - / danielgangur. .


![CAMPปลิ้น | EP.82[2/2] เมาท์มอยกับ 3 สาวเพื่อนซี้ ที่พร้อมขยี้พ่อหมีได้ทุกเมื่อ](http://i.ytimg.com/vi/Wwn7WnylNtQ/mqdefault.jpg)


Thanks Daniel, I picked up some great points out of your email, well done and thank you.
No worries and thanks for the feedback
Great tutorial Daniel. Thanks for taking the time to produce.
thanks Tony
Good simple processing guide
that was the plan, glad you like it
Thanks Daniel, that video was awesome. And look forward to practising. Its also giving more some tips on PS too. Thanks again
thanks, I hope you have managed to get out for some practice
Nightscape Photographer no not yet, due to restrictions. But I’m hopeful I will be able too soon
That's a grea tutorial - thank you. Do you not stack several images of the Milky Way to reach your final image? There is some light pollution, which is always a curse; do you have a video explaining how to get rid of it? Far better tutorial that Americans, who always seem to go a 90 mph and expect you to keep up and absorb
Thanks for the feedback. I’ve deliberately slowed down so it’s easier to follow, my goal is to help others the best I can not just pump out as much content as possible which I feel is the reason others go so fast.
This image is a single frame, no stacking to keep it simple. But I do use stacking if the situation suits, I have a video on how I stack. I don’t generally get rid of light pollution, I find places where there is none in the first place. I’m not a fan of light pollution filters as they minimise light hitting the sensor but they do help get more pleasing colour in heavily light polluted areas.
Hope this helps, feel free to ask questions anytime.
Hi Daniel. Finally a really easy peasy tutorial that is simple an effectful. As an windows user ive only got one problem? Around 12:47 in your video, you are talking about using the "backslash" key too paint/brush with red color. I cant find that shortcut on my windows keyboard. Got a tip? Cheers :-)
@@nightscapephotographer6029 Thats the problem? with a danish win keyboard :-/. As statet in this link community.adobe.com/t5/photoshop/backslash-for-toggle-rubylith-layer-mask-on-off-is-not-working-danish-keyboard/td-p/9693636?page=1
But ive found a solution. Just press Shift+ALT and click on the mask in the curve layer. It will do the same as your "backslash" on mac ;-).
Nice one Dan! Always interesting to see how differently people edit and I picked up some nice tips here, thank you!! Sal :)
Glad you liked it
awesome mate, well done
thanks mate