Create a Magical Landscape With Luminosity Masks in Photoshop and Raya Pro 3.0

ฝัง
- เผยแพร่เมื่อ 27 ก.ค. 2024
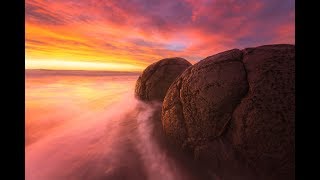
- In today's tutorial we look at how to blend two landscape exposures in Photoshop with luminosity masks. We take this a step further by using the dodge and burn tools to further refine our masks. This gives us the selection that we want. And once we blend the exposures, we then use that very same mask, in combination with Raya Pro's Glow Free layer, to burn the sky and add more mood.
Download Raya Pro here: www.shutterevolve.com/raya-pro...
Download the Free Easy Panel here: www.throughstrangelenses.com/e...


Great video once again Jimmy! Thanks for sharing your processes and techniques on Raya Pro 3 - it's such a terrific set of tools!
Another fantastic tutorial, Jimmy! It's just proof there are endless possibilities with Raya Pro. I learn something new every time. Thanks again!
Dear Jimmy, would like to thank for all your great videos! I absolutely love instamasks and have all your courses. I learnt so much from you and really like your calm explication style. Thank you for everything!!!
You’ve been gone far to long. Good to have you back.
Excellent tutorial and beautiful photograph too! 👏👏👏👍
Excellent tutorial Jimmy, thank you.
Thanks for the tutorial. I love your work.
stunning as always ... welcome back Sir
thank you for sharing this video... quite interesting... love the result
I love Raya Pro, awesome stuff!!
Brilliant Jimmy, loving Raya Pro 3
Thank you, this really helps a lot!
As usual a very informative video. Good luck with your move to Europe.
Great tutorial. Plz make more videos with using your Raya Pro panel :)!
I enjoy your tutorials and your Raya Pro 3.0 product is great! Jimmy, keep up the good work and stay focus. Meaning, ignore the trolls!
Fantastic!
Brilliant thanks
Terrific stuff! The end result is simply wonderful! Thanks for these insights JM!
Hi Jimmy, thanks for the helpful video. But I have a question: For me it looks like the reflection of the sky is lighter then the sky (esp. the darker clouds). Should this not be the opposite case? Maybe this is only caused by my screen.
Jimmy McIntyre Hey Jimmy, thanks for the tutorial. Do you ever use focus stacking before blending the exposures? Or do you usually focus on the background when exposing sky and focus on the foreground when exposing close areas of the image? Thanks for Raya 3.0! :)
Thank you
Hello, my name is Hugo, I am from Spain. Thanks for your tutorials, they are great and very educational. I have a question, do you focus on hyperfocal in your landscape photographs? When you need a close foreground and you have to do focus stacking, with what exposure would you take those photos and how would you introduce it in the blending of the other shots with different exposures? Thank you in advance, greetings.
can you provide us with those two exposures shots so we can test RP 3 on them following your steps ?? ,, thanks in advance
Hi Jimmy. How are you? When the raw images are opened in ps as layers, do they auto align? Regards Barrie
Hi bro!!!
Please kindly guide me create a Panel for Photoshop CC 2018. Thank in advance!
Hi Jimmy, looking through the link you provided I'm struggling to find the purchase link, I'm on the purchase options page but still can't see it 🤔. Maybe I'm just missing it?
Hi Stuart, on the purchase options page there is a text that says 'But Now' in blue under each option. Do you see it?
Jimmy McIntyre excellent thank! Using my mobile which meant I needed to scroll over to the right hand side. Thanks
how do you open both photos into camera raw at the same time like that
Just go to Files/Open in Photoshop and instead of selecting one image, select two. And that's it!
Jimmy McIntyre dude thank you so much for the reply! When I do that it still doesn’t show both photos on the film strip at the right side. It makes me
Edit each photo separately in camera raw then puts its in photoshop
You might need to speak to someone at Adobe if that is the case. Sounds like a setting/error with Photoshop.
@@JimmyMcIntyre i found out. i was Ctrl clicking to select multiple images. now i just highlighted the images i wanted with my mouse and now it seems to work. weird. but thanks for replying though. i just purchases raya pro 3.0 and love it!
Jeez, there are other ways to get a balanced shot other than raya Pro. Hdr or a grad filter to name two.
Exposure blending is much cleaner than HDR. A grad filter works if the horizon is straight otherwise it creates even more problems that now need to be corrected.
el _stormbringer oh I'm aware of that. Just people will watch this and think it's the only way to get a balanced image.
Not everyone has such a blinkered view of things. Photography can involve a vast a selection of tools, and one's preference out of that large array. The larger the better really. Your mentioning HDR tells me that you probably still use a flip-phone, and frankly, passing off such an immensely powerful technology as needless suggests you're just afraid of it. Open your mind.
Tom Martinson and your comments on hdr make you sound like a the type of person who must this year's camera and as many mp as possible or throws their toys out of the pram.
Raya Pro is a nice enough tool but the same results can be achieved without it within photoshop and light room. It's just well marketed.
How does a desire to broaden experience and understanding equate to toys and a pram? Paging Dr. Freud... Paging Dr. Freud....stat