
ฝัง
- เผยแพร่เมื่อ 21 ก.พ. 2020
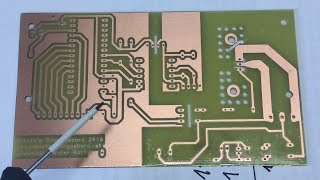
- First few attempts at using the fiber laser to ablate the copper surface of a single sided PCB. Includes the flow from Eagle to Illustrator to EzCad2. The laser used in this video is a Chinese 20w fiber laser with a 150x150 mm lens.
- วิทยาศาสตร์และเทคโนโลยี


![[TH] VCT Masters Shanghai Playoffs DAY 4 // 100T vs GEN | G2 vs TH](http://i.ytimg.com/vi/UkTGSxdCUQw/mqdefault.jpg)


by choosing polygon tool and drawing a rectangle around your pcb and then clicking on ratsnest will filll in the unused copper so your laser only needs to trace and remove the copper closest to the signal wires and will speed up the laser "etching" time
Yes. I asked you a few months ago a video about this. Glad you made it. Thank you very much.
Hi there. Great idea using a Laser to make a PCB, nice one. The issue you mention at 1:33 is most likely the Soldermask. On a green PCB, the tracks are partially obscured by a green coloured mask to protect and insulate the tracks below. There is a small exclusion area around solder pads and vias where the bare copper is exposed and the Solder Mask is not placed, but the lines that appear within the substrate are actually just obscured by the translucent Solder Mask
Lol. This works so well. This is how I do all my circuit prototyping. My 50w will remove the copper in 2 passes. And I do 5 low power fast passes and it cleans it almost 100%. Use the laser to Mark holes and then manually drill them with a .5mm bit afterwards. 👍
hey! I'm considering getting some laser tool for pcb prototyping, sucks to waste much time before each prototype arrives from china; what kind of tool are you using? could you give a link/feedback? thank you
Would you mind sharing your settings? I have a 50W JPT and would love to experiment with this a little more. Thanks in advance!
My 30W machine doesn't seem to make it. Dont understand why.
In other videos on this topic I have read people claiming the burnt G10 is conductive. Have you had the problem? I imagine for some high impedance circuits this 'may' be a problem, but I am curious what results you may have seen.
dan
I have the same issue, no mark on the copper at all. I'm using a 50W raycus. Have no problem marking steel but basically no mark on pcb copper. Tòo reflective?
A pcb eraser (like a pencil eraser) is a nice soft way to clean up the board afterwards.
I found I got cleaner results (less charring etc) on FR2 material- it's pretty cool because with the right settings you can keep repeating until the copper is gone without affecting the board below.
I have a 30w unit and use 1200mm/s 50% power and a combination of vertical, horizontal and diagonal paths, plus multiple outline steps.
As you noticed, the small details between close tracks are the hard part and where you need to follow the track direction so it has more time to accumulate heat in the copper I guess.
I made a board with 3.5 mil track and space thickness which I don't think is achievable with most other processes.
Interesting, I didn't know about FR2...that would certainly be nice to run at 50% power without damaging the board. I was initially using autorotate with the bidirectional hatch but became more cautious when I was getting inconsistent results over a larger area. Thanks for the eraser tip also!
@@jefferyj Actually I think it was FR1. I got some from the inventables web shop and they were good.
also, 25khz and 80ns pulse width
Thanks again....I just looked it up on inventables and bought some to play with. Apparently FR1 is made of cellulose paper based material rather than woven fiberglass.
About heat accumalating: what about heating pcb while laserwork? It's possible to use infrared heater from reparing station or bga rebolling. Or simple by iron upside down
Thank you, Jeffery! Very useful!
Thanks for your efforts, but still have a question reharding to the eye safety from the laser, is the laser glass safe or better to put inside a case and how should the case be, as a safety requirements as I heared that laser affect eyes in a long term, thank you
Saw your video on the 50w laser may i ask what you paid for it?
Another style of board would be isolation routing. The pads and tracks get an isolation area cut away to isolation each track. This leaves lots of copper (most of it) still in place which is the ground plane. I use this for making boards with a simple 3018 cnc router but it makes a lot of dust and is quite slow so using the laser would be good.
Good job, what is the power of laser?
Whoa, so satisfying video, good job. Can you share the specification of the laser machine? or the name of the laser machine maybe? thanks before.
Please tell me , all softwares you used for this ..
Hey there, I have tried etching some similar FR4s using a fiber laser but the laser can barely mark anything on the surface even with 100% power... and Im pretty sure my laser is around 100w. Tried different frequencies and speed and none of them worked. Wondering if there's anything special about your laser or was there something that I missed?
Hey Jeffery love your videos! Can you make a video how you dial in your settings for a given material?
It's mostly guess and check. If I'm removing material I'll use a high power and low frequency combo with a reasonably dense hatch and tweak from there. If it's just a surface mark or an anneal it will be the opposite: low power, higher frequency - but still a dense hatch.
What laser/machine do you use?
Thank u very much!I just need it!!!
es una CNC ROUTER CON LASER ?? o es otra Maquina??
Awesome!
have 50 w raycus, 175 175 lens but not able to engrave on copper, raycus brand wonder what is the difference
What version of Illustrator are you using? What kind of settings dpi you prefer ?
I don't recall the version but it's not the newest. All these features are available in the newest version. The file is just vectors so dpi shouldn't matter, ezcad will see the paths.
i do this with a normal laser (not CO2 and not fibre) what i do is i paint the whole copper side of the pcb with spray paint , then i open the gerber files with flat cam select the top layer and generate the job ,then export as a DXF , then i use lightburn and import the dxf and burn off the paint on the area i want to etch with etching solution
so the traces i want after the laser operation are still covered with paint
now i put the pcb into an etching solution and etch away the exposed copper and the traces are perfectly covered under the paint ,then i use the laser again or some acetone to expose the pads
this operation works for me great ,and i can go down to super small traces and smd components with it
I have a 50 w fiber laser but always burn the board, can you help me please?
Hi JefferyJ, your presentation is very nice.
I have a problem : I have a 20 watt fiber laser machine with a 240x240 lens.
I cannot engrave pcb copper glows, reflects beam.
How can I solve it?
I believe that 240mm lens is too large for 20w. Need to go with at least half of the 240mm lens to be able to engrave Cu. Smaller lens mean finer detail and more power. Trade off is smaller working area.
if you use a 240 x 240mm Focus Lens the Spot Diameter of your Laser is much bigger as if you use a 110 x 110mm Lens. If the Spot Diameter is bigger the Power Intensity is more less. For example if the Spot area is double the power Intensity decreased to 1/4. And your Laser has only 20W. I recommend to use a 70 x 70mm or 110 x 110mm Lens with a 20W Laser if you will make PCB's
how did you get your red light to outline the object? my 30w only gives me a red box around the area it is marking but not an outline of marking?
if use ez cad select show contour on botton check box
@@RuiSjm thanks. found out it only does it if the item is a vector image not JPG
Expensive fiber laser and a crappy multimeter what a combo
Hey man I cannot figure out how to make the pen settings stay.
I am attempting a power grid
And when I change the pen power it changed all of them
Make sure you don't have any objects selected on the screen when you are changing pen settings. It's an ezcad quirk.
Takk for en god video med flere nyttige tips og guiding spot. Jeg har ikke kommet dit at jeg har gått til innkjøp av en dedikert laser skriver for PCB, men deter like før det skjer akkurat nå. Jeg leser med interesse at 120x120 graders linse med 20xxx50 watt er det jeg må gå for. En ting til, hvorfor waisted time med å brenne bort all kobber? Hvorfor ikke er det en bedre ide å brenne isoler baneganger rund de ledende kobber baner?
På den måten vil tiden med brenning av kobber overflate bli redusert, og det betraktelig. Igjen takk foren interessant video, nå kan jeg kjøpe PCB laser utstyret mitt :D
Nice.
why not use multiple offset passes. instead of hatch?
you can create multiple offset lines at the pitch you want on ilustator, corel or inkscape.
and you can even use the open source flatcam software to create complex paths that can be exported to dxf.
thanks for posting this video, i will see if i can do some tests on my fiber and share any positive results.
maybe by ajusting the HZ we can get in a spot that cleans copper but avoids the substrate.
kind of like cutting vinyl over petg on the fibe laser
Yes! I actually tried to just use the illustrator 'offset path' command under the object menu to do minimal marking around each trace instead of hatching the full rectangle. If I had the space, it would look much better too, but for a board of this size the traces didn't look very good in the tighter areas when I tested it. Maybe if I were more patient and used lower power it would have been ok.
@@jefferyj problem is not power per se. it is the mirror speed. you need to decrease the general speed to compensate for the mirror speed difference on a line and a corner
Can you share the chinese (aliexpress?) link for this 20W fiber laser?
It came from ebay and the seller is no longer active.
I'm new to fiber laser and just ordered 20W. Interested in making PCBs. What I have read is that EZCAD can import GCODE. So I don't need to go through pre-processing steps instead export the PCB design as G-CODE using program like Flatcam and EZCAD can read the file correctly? Can someone can confirm? I'm guessing EAGLE would be able to export g-code as well.
I'm using EZCAD2 and have confirmed that EZCAD2 do have GCODE as one of the option type for importing into the software.
JefferyJ, congratulations! Can you provide more details? How many watts is your laser? And the wave length? Which lens are you using? Thanks for any help!
Check out my first video for details. It's just a simple 20w chinese fiber laser with a 150x150 lens.
@@jefferyj Thanks!
5 wats laser?. Model?
Is it engraved or surface marked?
Engraved
Parameters?
Great video! I've already used my laser for pcb. Simply apply some spry paint on it, and remove it only in desidered spot with laser. After, drop the pcb to HCL+H2O2 and a perfect pcb will be! 🤣
the fiber laser gives a one-step process that doesn't require extra consumables or a wet process, and has a smaller spot size (30um vs 250-500um) which allows finer precision.
ink mask selective removal technique works even better with a fiber laser since you can fine tune it to clean but not erode the copper.
Yes, I'm talking about my fiber laser. Actually it's not so powerful, only 15w, but I will try to push it and see if is possible to engrave copper whit this low power output. Considering all the process, maybe is more fast using laser for remove a paint, and powerful acid to remove copper. But, speaking about costs, maybe using only the laser is more effective. I don't know. The only thing I know is the absolute precision and detail of traces using fiber laser. I think more precise of using fotoresist method at home. And (I haven't tried it yet) I think is way too easy make double layer whit laser!
@@iainwade Laser ablate epoxy and leave "fuzzy" insulator surface that is very easily to contaminate or get wet and give leaks. If you have something above 47 or 100k in circuit, I would prefer etched board.
Why not just export it as a DXF? it imports easily into EZCad, I've done this to make a solder stencil, it's much quicker and easier in my opinion. Great video by the way.
Thanks, that might be a good suggestion. I've had mixed results with DXF files in ezcad (not from Eagle though...haven't tried it yet) so I tend to go for the sure thing with AI.
@@jefferyj the eagle dxf export isn't great out of the box- it's all built using user changeable scripts though, so I have some fixes I applied to make it do what I want (select the layers like top+via+outline, trace the outlines, export the dxf).
even then though, the line segments aren't connected into a single path so I think it was causing problems in ezcad until I ran another conversion process to clean them up (e.g. import/export through a smarter program like vcarve works).
If you have a process you're comfortable with I'd say just go with it.
let me know if you're interested and I can share the scripts.
@@iainwade Anything to make it bullet proof is always good, please share what you have. Thanks
@@Angryhelder bit.ly/2SOUKSA
it contains a lightly patched copy of the outlines and dxf scripts, and a wrapper called make-dxf.ulp which calls them to produce the dxf files.
first it traces path/pad/via outlines from the top layer (1) into a new layer 101, and the same for bottom (16) into layer 116.
then it exports dimension layer (20) and the outlines (101, 116) into top and bottom dxf files (and some other variants which can be ignored).
Thanks for this. I've had similar experiences with DXF files that you describe above; disconnected point and that sort of thing.
Lower price, more reliable quality
If they are called FR-4, they are not "Bakelite" or SRBP (Synthetic Resin-Bonded Paper) - Those are called FR1 or FR2 :)
Definetely I must have some sort of issue with my 50W laser...!!
Correction. I had some sort of issue. It's just a matter of focusing and get the right lens...!
Aquesta placa és inutilitzable, el làser crema el plàstic de la PCB i crea una capa de carbó la qual crea un circuit amb perill que es creïn arcs elèctrics.
i want :O
Man that must have smelled..... ugh!
Luckily I have an enclosure coupled with an inline exhaust fan which keeps the fumes and dust to a minimum.