Black Beard, you're making me miss my trade, and working too, after watching videos like this of yours. Process control work in a factory or rewiring/upgrading complicated machinery with new nice components can be so much fun... or was for me. Very nice upgrade on the oven. Thanks.
Great job! Been meaning to do that for a while on my cheap oven, currently got the controller attached with lots of loose wires 😁 I found that running the fan constantly and just using the controller to switch the heater resulted in better temperature control, since the air can settle out if the fan is switched off.
Hey man, Watching this got me to work on my toaster... I think I have my PID system tuned up better than it was before! Thanks for the inspiration and wherewithal
So I moved my PID system from a dedicated "plug and play" box to integrated into my toaster side compartment. I must say it didn't workout. First tempering cycle my SSR blew up / melted down due to the heat. I had it insulated but... it probably could have been better. I'd suggest to most people that building a stand along PID box, then plugging your toaster into that box may be an easier and safer option (less heat to the SSR). To be fair my toaster is older... and my insulating job likely wasn't as good as yours. Just and idea for people looking to do this. Cheers
Nice job on the insulation and PID controller something Also considered doing. regarding the insulation for back and bottom think I would put on the outside for those two areas so food does not splatter on it.
Depending on what you're using it for a couple bricks for thermal mass could help you maintain and even more constant temperature. Longer to heat up however.
I made a similar oven for annealing polymax pc 3d printed parts. Even though their glass transition temp is 113 degrees, and I set my oven to 100c, it still melts the parts.
I love you... :)... I'm addicted to your channel.. I would love to learn how to make things out of nothing...me and husband are planning to live off the grid... and these skills will totally come in handy😊😊.. You're a true inspiration
Great job man! I wish I knew how to alter the internal wiring of the oven like you. I just wired a female plug to the PID and then plug the oven in when ready to use. It creates a small problem or two, but nothing I cannot work around.
Awesome!! I found an old kitchenaid toaster oven in someones trash that looks brand new but wont heat up. I'm going to try this and see if I can get it going! If not I'll toss it and go thrift store shopping lol
Great project, Can I build something like that for PCB drying? I have problem when reballing some IC chips with "popcorn" effects. The best way I think is build oven like yours and get moisture out from electronics board and chips by sticking them inside the chamber for few hours. What do you think?
I'm probably missing something but why did you use a PID controller? It's used to adjust output power to make the heating up process shorter but these small ovens usually use only full power or nothing. If it was just about holding the temperature, you could have hard patched the temperature sensor to the main switch (you would need a voltage controlled switch, but they cost nothing) and it would hold the temperature.
I used to feel the same way about a lot of PID projects that I've seen. In most of them the PID is not needed. But they are very cheap and programmable. So cheap that I've used them for AUX temp displays.
Great vid!! So I've got this tiny toaster oven bought for clay jewelry projects. The problem is that it has only 1 temp. 450°. I need a range between 225° and 275°. Is it possible to modify?
Very nice build. Can I ask... what PID values did you use? I did the same thing using an Arduino but I am having a hell of a time getting the tuning right, it always overshoots by ~20° before settling down to the set point. I think it is due to the extended time between when the heating elements are turned on/off until that change is registered by the thermocouple. Not sure if there is a way around that without the oven taking 20 minutes to hit the SP. Anyway, thanks for the video!
Check out barley and hops brewing they have videos on everything you would ever want to know about PID controllers. They cover over shoots in a video about setting parameters. Sorry cant remember exactly which one.
@@damionlowther78 Thanks... I ran across them in my searching; brought back memories of when I used to brew :) I think the problem was with the responsiveness of my system rather than the tuning itself. I ended up modifying the algorithm slightly and it works fine now.
Since this oven is now PID controlled will that allow the oven to heat to higher temp than what it would typically? I don't really know much about this sort of thing, but I imagine there is a certain threshold for how hot the elements in said appliance can reach, and if so, what would that max temp be???
If you do the template cutouts with dremel often enough, do yourself a favor and buy the diamond cutoff wheel, it will save you a ton of time, and probably money in the long run.
Thanks!! Noisy? It sounds good to me, maybe it's different from when I used it on the workbench because the table I have it on now is less stable? Maybe just audio pitch difference? Not sure! It does sounds the same in real life anyway :) Thanks again
Bel lavoro! Sarebbe stato meglio, però, orientare il dissipatore del relè di potenza nell'altro verso per favorire la circolazione dell'aria (a occhio lo spazio c'è!), e se dovesse scaldare troppo, visto l'ambiente "caloroso", aggiungere una ventolina... Ciao!
Following your instructions, I got my own toaster oven/PID working with exception to the issue where the temperature fluctuates inside a 30C window. were you able to program the pid to keep a tighter control over the temperature?
Very very late response. But it may help someone in a similar boat. This type of issue can be caused by uneven temperature distribution within the oven (for instance if you use a solid sheet metal tray), a delay in the temperature sensor (only use a bare sensor not one encased into a metal rod), delay in the heat release from the heating element, or a badly tuned PID controlled loop. Or any combination thereof. So: 1) Get a convection oven, and hardwire the fan to run at all times 2) Make some holes in the tray, if you use the solid one, to ensure air and heat can circulate 3) Only use a bare temperature sensor, no metal tube 4) Follow internet tutorials to tune your PID loop, and be especially careful about the I parameter as it can create a lot of fluctuations if set too high. Hope this helps someone. I got the temperature right within a ~3 degrees band with a Walmart oven (non convection), but please get a convection one, it will make your life much easier
Could you share your PID settings? I've built something similar, also with an InkBird PID. But it's not hitting the set point very well. It overshoots by 25F and then drops below by 25F.
Not sure if you did this, but supposedly there's a self calibrating function that should be performed which will help in a more accurate temp setting...
You mean cost? PID kit was 30€. K-whool something like 25€ but I used half of it or less. Other parts I had on hands! Not much overall with how cheap I got the oven. Happy :)
After trying to bake for a yr I have discovered all scales are inaccurate, i am using a beam..All thermostats are the same..this is the only way to bake.
Never reverse engineer'd one, but the temperature prob is sense, and the relay output is just that. It changes the on time depending on the temperature setting + whatever temperature it's sensing. So if it was sensing the room temperature, let's say 24.6C, but the target temperature was 670C, it would keep it running if no fail-safe was present. Tho it probably has one or two.


![[#2024MAMA] ROSÉ (로제), Bruno Mars - APT. | Mnet 241122 방송](http://i.ytimg.com/vi/dgGqD28J6aQ/mqdefault.jpg)

There's a very small chance you may have voided the warranty. 😈😈😈
What warranty?
@Nathan Yusuf Is she still your gf?
Damn. I'm still cackling to myself about your comment minutes later. Loved it, thanks for the laugh.
Nah dude at the counter said it covers anything
Black Beard, you're making me miss my trade, and working too, after watching videos like this of yours. Process control work in a factory or rewiring/upgrading complicated machinery with new nice components can be so much fun... or was for me. Very nice upgrade on the oven. Thanks.
This is definitely on my list of things to build my toaster oven doesn't get hot enough or hold temp well.
Its cool watching the Dremel cutting disks shrink in fast forward
Ikr so satisfying
I thought it looks about how it feels. When using them i swear you can see dollar signs in the sparks and dust
Great job! Been meaning to do that for a while on my cheap oven, currently got the controller attached with lots of loose wires 😁 I found that running the fan constantly and just using the controller to switch the heater resulted in better temperature control, since the air can settle out if the fan is switched off.
Как всегда, смотреть одно удовольствие!
I have to admit that is going to be an awesome upgrade to that oven and nice job on that also
With not much refinement, you get an excellent incubator. Thanks for the idea!
You did a WAYYYYY better job than I did! Major props!
Hey man, Watching this got me to work on my toaster... I think I have my PID system tuned up better than it was before! Thanks for the inspiration and wherewithal
So I moved my PID system from a dedicated "plug and play" box to integrated into my toaster side compartment. I must say it didn't workout. First tempering cycle my SSR blew up / melted down due to the heat. I had it insulated but... it probably could have been better. I'd suggest to most people that building a stand along PID box, then plugging your toaster into that box may be an easier and safer option (less heat to the SSR). To be fair my toaster is older... and my insulating job likely wasn't as good as yours. Just and idea for people looking to do this. Cheers
I agree! Blackbeard is the coolest!
You could add some thermal mass with a baking stone, this should also help the PID stabilize the temperature, like a physical capacitor of sorts.
Using the recently restored sensitive drill! Neat!!
Nice job on the insulation and PID controller something Also considered doing. regarding the insulation for back and bottom think I would put on the outside for those two areas so food does not splatter on it.
Depending on what you're using it for a couple bricks for thermal mass could help you maintain and even more constant temperature. Longer to heat up however.
I made a similar oven for annealing polymax pc 3d printed parts. Even though their glass transition temp is 113 degrees, and I set my oven to 100c, it still melts the parts.
Inspiring; looking around the house for things to undo. I got a sneaky suspicion anything I touch won't go back together though
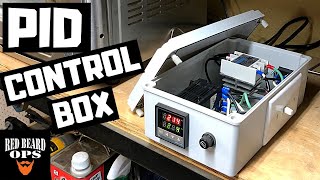
That is an awesome build. Do you have a wiring diagram for it ?
I never do this myself. Well done man
I love you... :)... I'm addicted to your channel.. I would love to learn how to make things out of nothing...me and husband are planning to live off the grid... and these skills will totally come in handy😊😊.. You're a true inspiration
Lovely....wanting to do this for a long time exactly like this
Great project, enjoyed that one.
Thanks for sharing.
I give you a thumbs up before the videos is over, youre just that cool.
Much appreciated!
You are really a GREAT Handworker 👏👏👏💪
Great job man! I wish I knew how to alter the internal wiring of the oven like you. I just wired a female plug to the PID and then plug the oven in when ready to use. It creates a small problem or two, but nothing I cannot work around.
Awesome!! I found an old kitchenaid toaster oven in someones trash that looks brand new but wont heat up. I'm going to try this and see if I can get it going! If not I'll toss it and go thrift store shopping lol
Very Cool project. Many uses for this.
Awesome job! I've been meaning to do this for a couple years!
Very impressive stuff Sir !!!!!!!!!!
Great project, Can I build something like that for PCB drying? I have problem when reballing some IC chips with "popcorn" effects. The best way I think is build oven like yours and get moisture out from electronics board and chips by sticking them inside the chamber for few hours. What do you think?
Great upgrade/reuse Gader!
Nice work. I need one like that but I doubt I will built it.
I plan on insulationg my toaster oven in like this. I have doubts though because it has ventilation grilles and surley they are there for a reason.
love that bench drill
Nice, never thought of that. Just wondering if that insulation is still in place after you flipped it around.
That's pretty awesome. That will come in real handy in future projects.
Very cool idea i need to try to make a similar
Enjoyed your video and gave it a Thumbs Up
Know this is an older post but I'm curious what's the upper end of the hear spectrum this can withstand
Nice job , i am gona work on my 56 liter oven
Why mess with the kaowool for just tempering temps? I guess it keeps the controls/wiring cooler, but I hate that stuff . . .
NICE one! Well done!
I'm probably missing something but why did you use a PID controller? It's used to adjust output power to make the heating up process shorter but these small ovens usually use only full power or nothing. If it was just about holding the temperature, you could have hard patched the temperature sensor to the main switch (you would need a voltage controlled switch, but they cost nothing) and it would hold the temperature.
I used to feel the same way about a lot of PID projects that I've seen.
In most of them the PID is not needed. But they are very cheap and programmable. So cheap that I've used them for AUX temp displays.
How much would you charge to make one of these 50 liters and send it to Brazil? The voltage here is 110 or 220 volts
Whoa! What's the little adjustable wrench you used?
oh yes going to give this a go.
drilling holes in the corners before grinding makes it easier to finish the cut. Ask me how I know.
Happy to oblige. How do you know?
@@pekkasaarinen2902 1/4 century of sheet metal work. Thanks for asking!
Could I also suggest drilling holes for rivets before doing the cut to keep the rigidity and avoid some metal bending ? 🤔
What about the door, is it possible to double-glaze it or something similar, or would that not be much of a improvement?
Great vid!! So I've got this tiny toaster oven bought for clay jewelry projects. The problem is that it has only 1 temp. 450°. I need a range between 225° and 275°.
Is it possible to modify?
Hi your video is very good,may i know the name of the white insulator like sponge . Tq
Very nice build. Can I ask... what PID values did you use? I did the same thing using an Arduino but I am having a hell of a time getting the tuning right, it always overshoots by ~20° before settling down to the set point. I think it is due to the extended time between when the heating elements are turned on/off until that change is registered by the thermocouple. Not sure if there is a way around that without the oven taking 20 minutes to hit the SP. Anyway, thanks for the video!
Check out barley and hops brewing they have videos on everything you would ever want to know about PID controllers. They cover over shoots in a video about setting parameters. Sorry cant remember exactly which one.
@@damionlowther78
Thanks... I ran across them in my searching; brought back memories of when I used to brew :)
I think the problem was with the responsiveness of my system rather than the tuning itself. I ended up modifying the algorithm slightly and it works fine now.
Since this oven is now PID controlled will that allow the oven to heat to higher temp than what it would typically? I don't really know much about this sort of thing, but I imagine there is a certain threshold for how hot the elements in said appliance can reach, and if so, what would that max temp be???
I’m trying to do this with a electric smoker. Is this the same way? Just bypass everything and hook to the heating element? Thanks
Better than the original.
If you do the template cutouts with dremel often enough, do yourself a favor and buy the diamond cutoff wheel, it will save you a ton of time, and probably money in the long run.
Been looking to build a baking oven for paints and I think you just saved my butt. I assume I could do the same with any size oven?
Avoid microwave oven - I think you could be disappointed. :P
Great video and oven build, thank you!
How hot can you take an oven like this?
After modifications, can that toaster use with food? I mean the insulator inside oven safe for food?
it's still food safe if i dont put insulation inside?
Nice work. Always wondered how much does it take you to make this? And how long? Can you put that in your videos? Thanks for sharing with us!!!
Nice, what made you to make this? How much,how long?
Thank you.
I'd like to watch more videos of making a sword... but this video was really cool, great job🔥👌🏽
My kit didn’t not have a on/off switch what kind should I get?
Nice job, but I couldn't help notice how noisy your beautifully restored drill press is. Why?
he has problems with the motor
Thanks!! Noisy? It sounds good to me, maybe it's different from when I used it on the workbench because the table I have it on now is less stable? Maybe just audio pitch difference? Not sure! It does sounds the same in real life anyway :) Thanks again
VFD and motor problem are now solved. Made a community post about that earlier this week!
Author you are best!
What temperature would it get to and hold with out burning up
Well done 👍👍👍
Is it ok to insulate inside the oven cavity with ceramic wool?, Isn't that health hazard?...
Good work by the way! I enjoyed the video...
Very nice! I assume it's also capable of holding temps between 30-40°C? Like for careful food/herb drying purposes?
Молодца!
нужная штука.
استمر متابعك من العراق
Hello big like 396 thanks for this good presentation
hi, how to wire the heating element to the PID? pl show in video format, thanks
Nice work man, should be a great addition to the shop :)
Bellissimo, che temperature raggiunge?
saudações do Brasil a todos. oficina nova??? muito bom. será um ``aparato´´ realmente útil. sucesso.
Use it for powder coating too...👍🇬🇧
Good job 👍
Are the last installed insulator in the oven fiberglass? Does it safe to use like that?
O meu TOC não deixou me ver esse vídeo tranquilho kkkk dava pra arrumar mais
Bel lavoro! Sarebbe stato meglio, però, orientare il dissipatore del relè di potenza nell'altro verso per favorire la circolazione dell'aria (a occhio lo spazio c'è!), e se dovesse scaldare troppo, visto l'ambiente "caloroso", aggiungere una ventolina... Ciao!
Your so creative. 😁
Badass!!
Nice job
How much insulation did you buy and use?
Following your instructions, I got my own toaster oven/PID working with exception to the issue where the temperature fluctuates inside a 30C window. were you able to program the pid to keep a tighter control over the temperature?
Very very late response. But it may help someone in a similar boat. This type of issue can be caused by uneven temperature distribution within the oven (for instance if you use a solid sheet metal tray), a delay in the temperature sensor (only use a bare sensor not one encased into a metal rod), delay in the heat release from the heating element, or a badly tuned PID controlled loop. Or any combination thereof.
So:
1) Get a convection oven, and hardwire the fan to run at all times
2) Make some holes in the tray, if you use the solid one, to ensure air and heat can circulate
3) Only use a bare temperature sensor, no metal tube
4) Follow internet tutorials to tune your PID loop, and be especially careful about the I parameter as it can create a lot of fluctuations if set too high.
Hope this helps someone. I got the temperature right within a ~3 degrees band with a Walmart oven (non convection), but please get a convection one, it will make your life much easier
Can you show us the proper way to sharpen a knife? Everyone suggests different ways, I'm confused.
Hey are you selling this or where can I buy or get the cad? Thank you!
That is use magnetron for microwave source?
Could you share your PID settings? I've built something similar, also with an InkBird PID. But it's not hitting the set point very well. It overshoots by 25F and then drops below by 25F.
Not sure if you did this, but supposedly there's a self calibrating function that should be performed which will help in a more accurate temp setting...
I can’t understand why do you insert the fiberglass inside the oven?
That's brilliant, what'd that run in extra parts?
You mean cost? PID kit was 30€. K-whool something like 25€ but I used half of it or less. Other parts I had on hands! Not much overall with how cheap I got the oven. Happy :)
After trying to bake for a yr I have discovered all scales are inaccurate, i am using a beam..All thermostats are the same..this is the only way to bake.
Ah! PIDs, no one knows how they work, but just follow the circuit scheme and plug into anything and watch the magic!
Never reverse engineer'd one, but the temperature prob is sense, and the relay output is just that. It changes the on time depending on the temperature setting + whatever temperature it's sensing.
So if it was sensing the room temperature, let's say 24.6C, but the target temperature was 670C, it would keep it running if no fail-safe was present. Tho it probably has one or two.
Was that Noctua thermal paste i see...
mister, this PID have timer function or only temp control ??
Good!
Ciao devo adattare una resistenza ma ho paura che tocca il polo al telaio del forno cosa posso mettere come guarnizione hai una idea ?
What were the noises in the background?
Belo video abraço 🇧🇷