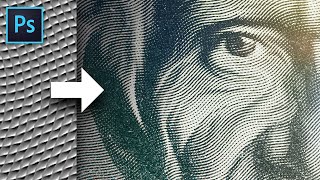
Great tutorial. working on a picture of my girlfriend for her birthday and she loves the Matrix. After two days of trying myself with GIMP and looking at tutorials I managed to use a multiply blending of a picture on top of text, but because the tutorials I started to follow had this text set against a grid layer below the numbers were too static and flat. even when I changed this around and managed to get matrix code looking more like it was flowing there was still a lack of depth between the face and background. It looked more like a Lo-fi eighties movie version of what the Matrix would like. It turns out the step I was missing was a displacement map and a free trial of Photoshop! Thanks for the great tutorial!!
I had a model pose as a character from another sci-fi film and applied your Matrix tutorial. A fun sci-fi mashup! Thanks Marty, for your simple step by step instructions.
Just thank you so much for giving such detailed tutorials. I subscribed, and can’t wait for more and more and more of these very detailed helpful videos thank you. You’re amazing.
@@BLTV_Photoshop one more question. Regarding copying and pasting matrix code/characters. It doesn’t give me any characters when pasting a photo on my Mac in text edit
Hello Marty..Hi gr8 work you're doing. Just requesting you to make a video on resolving 'Wacom intuos pro' pen's pressure sensitivity issue with windows 10. I just bought the pen tablet and now am stuck with it. Thank you :)
@@BLTV_Photoshop I tried a heck given by few people on TH-cam but it didn't work. I don't know how but actually problem is solved now. I thank you Marty as well for the help. TC
I copy a large string of text in TextEdit, then paste in Photoshop, and all I get are H, square, the sword symbol, and a couple more squares. I'm using Times New roman size 24 (should be smaller, I know, but that's not the point). I'm not sure if I need the most updated Photoshop or not (I'm using Photoshop 2019 because the computer I'm using is too old for a more recent Photoshop).
Some fonts work better than others. Just experiment with different fonts to see which ones look best once they're dragged into TextEdit. That's what I did.
@@BLTV_Photoshop Okay, out of curiosity, what font did you use? Size? Your videos are awesome btw. I watch them all the time and you always give me fresh ideas. Like I just did the Frozen Planet and Mezzotint ones.
@@BLTV_Photoshop Okay, so I figured out that, while I'm unable to paste the random string of text from TextEdit, I can still get the same effect if I hold the Alt/Option (IIRC) key and type random characters. It does (obviously) take a lot longer, but it's a decent alternative as opposed to not going ahead with the project.
I'm using the 2022 version. When I do filter render clouds, it just turns white 😭 Also, when I used the text editor, it copied my picture 😭😭. I really wanted to do this for my husband he loves the Matrix! Your tutorial is so great! I wonder why it doesn't work the same for me?
Clouds: Make sure your foreground & background colors are black and white. Drag photo into text editor: Make sure your text editor is either "Notepad" (WIndows) or "TextEdit" (Mac).
I have just found a workaround from a post online. Instead of dragging the picture, in your Textedit, choose File> Open and select the picture and THEN select open. It will convert it to random text.🤩
It could be due to one or more of your computer's specs or other settings, helpx.adobe.com/photoshop/system-requirements.html helpx.adobe.com/photoshop/kb/troubleshoot-crash-or-freeze.html


Best Matrix data stream effect tutorial on the Internet - period.
you rock, Mr. Anderson.
Great tutorial. working on a picture of my girlfriend for her birthday and she loves the Matrix. After two days of trying myself with GIMP and looking at tutorials I managed to use a multiply blending of a picture on top of text, but because the tutorials I started to follow had this text set against a grid layer below the numbers were too static and flat. even when I changed this around and managed to get matrix code looking more like it was flowing there was still a lack of depth between the face and background. It looked more like a Lo-fi eighties movie version of what the Matrix would like. It turns out the step I was missing was a displacement map and a free trial of Photoshop!
Thanks for the great tutorial!!
Thank you Martie.
I had a model pose as a character from another sci-fi film and applied your Matrix tutorial. A fun sci-fi mashup! Thanks Marty, for your simple step by step instructions.
One of the best photoshop tutorial very detailed,
You updated tutorials keep getting better
Thanks. A few years, they need updating! 😉
@@BLTV_Photoshop exactly
Outsanding sir ! Morpheus, Trinity and Neo would be very proud LOL!
Excellent thanks👍👍🙋♂🙋♂
Sir your work is great
Excellent.
Marty, you’re the best !!! ✌️
Blue Lightning TV Photoshop, hi. THANK YOU SO MUCH. Happy 2022!!! Marcelo Baglione from Brazil, Rio de Janeiro, Rio
I love how you explain every body will get it thnk uuu
Fantastic sir 👏
Excellent an update at previous tutorial, good job. Both of them are useful!
Amazing...
Super Detail Tutorial..
Thank You..
Did I just take the red pill? I think so… thank you for waking me up Marty.
your videos are awesome! Thank you a lot
Great, as always. Thank you for all your superb work.
Another amazing tutorial. I can't wait to try it myself. Thank you 😎
Just thank you so much for giving such detailed tutorials. I subscribed, and can’t wait for more and more and more of these very detailed helpful videos thank you. You’re amazing.
Nice! I changed my photo to Divide instead of Soft Light and looks pretty cool.
Nice one - thanks!
Hi. Thx 4 the tutorial! You r amazing. BTW do you have tutorial how to creat moving hologram?
I did a hologram gif many years ago on After Effects. th-cam.com/video/mTeJ8qH-2IU/w-d-xo.html
Excelente tutorial que bien utilizados los recursos👌
Gracias por el tutorial.👌
Absolutely amazing!
Really appreciate it!
Cheers and may this be the most successful year ever :) 🤘🏻
Anyway I could only wrap half of my face?
Go to Image > Adjustments > Shadows/Highlights
@@BLTV_Photoshop one more question. Regarding copying and pasting matrix code/characters. It doesn’t give me any characters when pasting a photo on my Mac in text edit
Also, congratulations on over one hundred million views!
Thanks! 👍
thx a lot. but what if the portrait remains colorful at the end? Displacement image is grey though
Your Blend Modes may be incorrect.
Hello Marty..Hi gr8 work you're doing. Just requesting you to make a video on resolving 'Wacom intuos pro' pen's pressure sensitivity issue with windows 10. I just bought the pen tablet and now am stuck with it. Thank you :)
I use the same pen and OS, however, I'm unaware that there's as issue. Have you tried contacting Wacom's tech support?
@@BLTV_Photoshop I tried a heck given by few people on TH-cam but it didn't work. I don't know how but actually problem is solved now. I thank you Marty as well for the help. TC
very cool ;)
"Whoa"
I copy a large string of text in TextEdit, then paste in Photoshop, and all I get are H, square, the sword symbol, and a couple more squares. I'm using Times New roman size 24 (should be smaller, I know, but that's not the point). I'm not sure if I need the most updated Photoshop or not (I'm using Photoshop 2019 because the computer I'm using is too old for a more recent Photoshop).
Some fonts work better than others. Just experiment with different fonts to see which ones look best once they're dragged into TextEdit. That's what I did.
@@BLTV_Photoshop Okay, out of curiosity, what font did you use? Size?
Your videos are awesome btw. I watch them all the time and you always give me fresh ideas. Like I just did the Frozen Planet and Mezzotint ones.
@@BLTV_Photoshop Okay, so I figured out that, while I'm unable to paste the random string of text from TextEdit, I can still get the same effect if I hold the Alt/Option (IIRC) key and type random characters. It does (obviously) take a lot longer, but it's a decent alternative as opposed to not going ahead with the project.
hai Marty, in my Photoshop there's option for clouds when I choose renders😭
Do u have any idea how to do it?
So, you're saying that "Clouds" isn't there under Render?
@@BLTV_Photoshop yes, my Photoshop is CS6. Is it earlier version?
👍👍👍👍
Don’t work for me when I press to paste the text I get one line and I can’t progress
At the top of your text editor (i.e.: Notepad), open "Format" and check "Word Wrap".
@@BLTV_Photoshop I use text edit on Mac and it just don't want to know
@@BLTV_Photoshop I did the same but I am still getting 3 lines only.please help
I'm using the 2022 version. When I do filter render clouds, it just turns white 😭 Also, when I used the text editor, it copied my picture 😭😭. I really wanted to do this for my husband he loves the Matrix! Your tutorial is so great! I wonder why it doesn't work the same for me?
Clouds: Make sure your foreground & background colors are black and white. Drag photo into text editor: Make sure your text editor is either "Notepad" (WIndows) or "TextEdit" (Mac).
@@BLTV_Photoshop I thought I did all of that, but w will try again! Thank you! 😊
I have just found a workaround from a post online. Instead of dragging the picture, in your Textedit, choose File> Open and select the picture and THEN select open. It will convert it to random text.🤩
👍👍👍👍👍👍👍 14
photoshop crashes every time i try to paste
It could be due to one or more of your computer's specs or other settings, helpx.adobe.com/photoshop/system-requirements.html
helpx.adobe.com/photoshop/kb/troubleshoot-crash-or-freeze.html