TH-cam
US
How to Make Cardboard Crafts HARD and STRONG After They are Finished (the Cheap way)
14:58
133. Simple DIY - working with corrugated cardboard - part 1
18:23
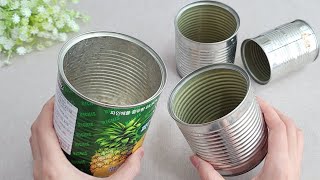
I make MANY and SELL them all! Genius Recycle Idea with Empty can - Amazing Tips and trick
11:20
Wall Rebound Challenge 🙈😱
00:34
Enceinte et en Bazard: Les Chroniques du Nettoyage ! 🚽✨
00:21
ล่ามหาสมบัติทองคำ!! ใครเจอก่อนเป็นผู้ชนะ!!!
26:26
Make Your Cardboard Super Strong! (10 DIY Tips You Wish You Knew)
Maker Brain
ติดตาม
6K
ดาวน์โหลด
โหลดลิงค์.....
มุมมอง 29 312
0
0
เพิ่มลงใน
เพลย์ลิสต์ของฉัน
ดูภายหลัง
แชร์
แชร์
ฝัง
ขนาดวิดีโอ:
1280 X 720
853 X 480
640 X 360
แสดงแผงควบคุมโปรแกรมเล่น
เล่นอัตโนมัติ
เล่นใหม่
เผยแพร่เมื่อ 13 ธ.ค. 2024
ความคิดเห็น • 60
ต่อไป
เล่นอัตโนมัติ
14:58
How to Make Cardboard Crafts HARD and STRONG After They are Finished (the Cheap way)
Maker Brain
มุมมอง 45K
18:23
133. Simple DIY - working with corrugated cardboard - part 1
Imagine then Make
มุมมอง 14K
11:20
I make MANY and SELL them all! Genius Recycle Idea with Empty can - Amazing Tips and trick
Merry Craft
มุมมอง 1.8M
00:34
Wall Rebound Challenge 🙈😱
Celine Dept
มุมมอง 9M
00:21
Enceinte et en Bazard: Les Chroniques du Nettoyage ! 🚽✨
Two More French
มุมมอง 20M
26:26
ล่ามหาสมบัติทองคำ!! ใครเจอก่อนเป็นผู้ชนะ!!!
My Mate Nate
มุมมอง 674K
5:10:46
🔴LIVE สด! PGC 2024 ศึกชิงแชมป์โลกพับจี Circuit 2 วันที่ 2
PUBG: BATTLEGROUNDS THAILAND
มุมมอง 153K
15:52
How to Make a Smooth Curve with Cardboard (6 Easy Ways to Bend Cardboard)
Maker Brain
มุมมอง 50K
8:17
Cardboard Hardware Boxes
Jer Schmidt
มุมมอง 224K
9:27
Liquid Plastic DIY! I wish I had known this SECRET when I was 50!
You Can!
มุมมอง 903K
10:01
I Made The Sharpest Cardboard Katana!
davidsjones
มุมมอง 2.7M
10:58
CardBoard Advanced Basics Tutorial guide for model making: modeling for Designers & Architects
Eric Strebel
มุมมอง 117K
8:05
NEVER throw away Styrofoam leftovers! Genious idea!
Tips and Hacks
มุมมอง 8M
8:45
COOL HACK HOW TO MAKE A CARDBOARD KNIFE || Awesome Invention
5-Year Crafts
มุมมอง 10M
9:23
How to Hide the Edge of Corrugated Cardboard (5 Simple Tricks to Make Clean Cardboard Crafts)
Maker Brain
มุมมอง 23K
7:39
How to Make Strong Folds in Cardboard!
Maker Brain
มุมมอง 22K
1:09:32
The Wall Song ร้องข้ามกำแพง | EP.223 | พอร์ช / ณัฏฐ์ ทิวไผ่งาม / เอมี่ | 12 ธ.ค. 67 FULL EP
WorkpointOfficial
มุมมอง 266K
00:53
เอ็ด มือกลอง Jetset'er #LessonB #เอ็ด7วิ #โตโต้คมกฤช #่jetset're #เจ็ทเซ็ตเตอร์
Lesson B
มุมมอง 34K
34:55
กินข้าวพร้อมกับ 'เซียนหรั่ง' มื้อนี้แซ่บหลายเด้อ!!
DJ Poom
มุมมอง 800K
04:04
พูดแบบนี้อยากเป็นแฟนพี่เหรอ? | Fourever You เพราะรักนำทาง
Studio Wabi Sabi
มุมมอง 126K
00:38
ร้องเพลงสั่งข้าว Ver.จื่อบ่ (ຈື່ບໍ່) - ก้านตอง ทุ่งเงิน | Feat @sayamo9589 #ร้องเพลงสั่งข้าว
Bie The Ska
มุมมอง 284K
40:07
เปิดบ้าน โคตรสวย ป๋องกพล รู้จักตั้งนาน เพิ่งรู้ว่ารวย!!! l [Nickynachat]
Nickynachat
มุมมอง 601K
2:39:20
🔴LIVE มาเลเซีย vs ติมอร์-เลสเต | ฟุตบอล ASEAN Mitsubishi Electric Cup™ 2024 | รอบแรก กลุ่ม A
Thairath Sport
มุมมอง 844K
12:23
#ด่วน พลิกคาด!ฝรั่งร้อง!คอมเมนต์ขู่เลิกดูถ้าเทคบอลยกเลิกตีลังกาฟาด,ไทยสร้างมาตราฐานใหม่เทคบอลโลก
บิ๊กแชมป์ F.C.
มุมมอง 250K