Ep10: A little Upgrade. The DIY CO2 Laser Cutter / Engraver Build Series

ฝัง
- เผยแพร่เมื่อ 22 เม.ย. 2021
- Documentation for the Y-1200 Laser:
www.furtherfabrication.com/re...
If you've already got a copy of the documentation and would like this updated version, you can send me an email with your Order Number.
rob@furtherfabrication.com
One day I'll figure out a more high-tech way to do updates, but this'll have to do for now.
Follow me on Instagram to keep up with the latest:
/ further_fabrication
//It should go without saying that electricity and lasers are dangerous.
None of this video should be treated as professional advice. - วิทยาศาสตร์และเทคโนโลยี


![[TH] 2024 PMSL SEA W3D5 | Summer | ชี้ชะตา 16 ทีมสุดท้าย](http://i.ytimg.com/vi/PabKlXzcK8c/mqdefault.jpg)


Just want to say that I'm a long way away from doing my own diy laser, but I really appreciate the content! Heading over to get a copy of the build guide now!
Hi Rob. The upgrade to linear rails and one engine on the Y axis is great. I have placed the link in all my upgrade videos. Too bad you didn't do this a few months earlier. I would have used your version to make my 600x400 laser. Your 3D prints very well done. Cheers
I bought the plans and I've ordered most of the parts so far (including for the rotary attachment), amazing design and great documentation! It seems I managed to find the last dual shaft stepper available anywhere for now which seems a shame. Anyway, I may be going over the top but I've planned for a 130W laser with the appropriate power supply, and found an unused 'industrial' chiller at work that'll save some dollars there and allow for consistent cooling for such a beast of a laser. We're also getting a metal printing setup installed which needs external ventilation so I requested an extra 4" port on that 'just in case', so this is working out well. Now to find the time to build it when all the parts come in :(. Thanks again for sharing all your videos and very affordable documentation, can't wait to have this up and running.
Awesome stuff mate! Just came across your channel and absolutely loved your videos! And yes, I'll be building one of those following your guides. Cheers
Great video Rob. Im applying these mods to my build. Thanks
As always, excellent job. And thank you for sharing.
Great Job on your DIY Laser Engraving machine. I have a Laser on order and I should be receiving it very soon.
Great content! Loved it, including the bloopers.
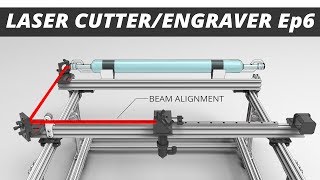
I'd say good choice for the mechanical connection to drive both ends of the moving gantry, I opted to use two separate motors since I also rearranged the gantry to hold the laser tube along the long axis. Using a drive shaft to connect them across that large span runs into some whip issues and just in general needs a pretty large drive shaft so I've got to live with alternative solutions to keep the gantry square, still trying to figure out what the best long term solution is. On the plus side though I put a brushless servo on the long axis for faster engraving, the steppers on the other axis can keep up with cutting operation and moving the scanning lines. That could be another upgrade if that nema 23 stepper can't go as fast as you'd like when engraving, though I bet a low inductance stepper could keep up with what the tube rise time can demand
loved the video and appreciate the content and hard work you put in. Can't wait for future videos Rob. Cheers
Thanks Kyle!
Ditto, I'm a great admirer of your work too. Thanks for taking the time to make this available to others. Greatly appreciated and look forward to beginning my build later this year.
😶
I gave up on v wheel rails and went with hiwin rails instead with my 3d printer as well - so much smoother and more reliable over time.
Liked it to watch all the videos. What a nice project.
Gotta say that this has been a fun build. Got my first engraving done yesterday. First picture was of my first Grandchild. 3 months old. Going to do a couple more one for the kids and one for the other set of grandparents. Thanks for this adventure! I truly enjoyed it.
Always enjoy your videos, entertaining and informative.
Thanks Zak!
Mad comedy skills - laughed out loud at least twice! Oh, they lasorz ok too !
Something I've noticed with my belt is that the grooves are a set space apart and are supposed to match the grooves or gears on the motor drive. But when you tension the belt that Gap changes on the belt slightly and you get a little bit of a vibration that shows up in some finer work. I would think that some direct mechanical screw drive would be most precise but slower..
Finally got my linear rails in. I'm going with a 60 tooth reducer for the X axis and putting a integrated Nema 23 servo instead of my closed loop Nema 17 stepper motor. If I can figure out how to fit a Nema 23 integrated servo on the Y axis, I'll be upgrading to that. Anyway still very happy with my two machines from your plans!
Now I just got to figure out how to design a 4x8 laser frame.
This looks great - probably a better route than my attempt at modifying it for this. Glad you're updating the plans (will eventually email for them), the new belt tensioners look much easier to use 👌
Thanks mate, yeah it's always a challenge when you start messing with the moving bits. That new tensioner is muuuch easier to use haha
@@FurtherFabrication
Hello rob I recently purchased your co2 manual!
But 3d print file for old version is missing!
Could you please share it!
And could you please check your mail!
Excellent video, from all points of vue!
love this build and going to look at doing the Y-400. I was wondering if youre planning to do a rack and pinion upgrade to stop the belts causing a curtains effect on burns?
Very nice, one day when I have space to put it I will build one
Just about to start ordering parts and doing a split between the inner and outer frame parts using the new build guide. I think the new linear rails and carriages are missing from the new build guide. Rails are mentioned there, but not listed like other parts. Other than that I am happy. Hoping to save some money by building the outer frame from other materials.
Great video
Man, you rock, truly. I'm in market for 80w or so, are you sure about your money policy? I'd easily pay 4x without hesitation for those plans. The added benefit of clear and professional video is huge. Thank you for your work!
awesome series Rob !
I enjoyed it that much that I bought your Y-1200 Laser documentation
Couple of questions
I assume the belts stretch after a while ... will you ever decide to modify/upgrade to direct drive to keep long term accuracy?
Will you at some point in the future decide to build a DIY "CNC milling machine" that can also mill metal ?
It shouldn't be that much of a change from your Y-1200 Laser construction would it?
I assume you would need to change from belt drives to "direct drive axis' because of the additional milling stresses.
Amazing work, just wanted to say sorry for messaging you a bunch, I understand you have a ton of people just like me asking a million questions, thank you for everything you do
No worries Anatoliy, I'm sorry I missed your messages. Unfortunately I just can't keep up with helping everybody, but if it's a quick question I can usually get to it
Fantastic job👀 congratulations 👏🏻. I have trouble installing the stepper in y axis near of the laser tube, the electromagnetic field effect of the laser tube in work affect my y travelling definition of cut or engraving jobs it look like a sawtooth , I need change the position of y motor
Have you found the upgrade worth the cost and wait for parts?
BTW thank you for your build guide - giving me the confidence to make my own. I think the biggest benefit of making your own machine, besides cost, is you are not buying a big box of air that requires a lot of room. and you can build in smaller space than big box requires.
Thanks for all of the detailed info bro! I was looking in to building a CNC machine intially, but now after seeing this...im thinking the machine is identical, with the only differece being the laser tube and laser. That being said, how practical/feastible would it be to start with CNC and add an interchangable head: the Laser head? This way im not building the same thing twice. cant wating to hear your reply. lol. Thanks again
Best DIY laser engraving machine.
Excellent, Rob! A few days ago the rotary axis and now this upgrade. I haven't finished building the original Y-1200 and I'm at the perfect stage to go for this modification. I already ordered the parts for the rotary axis. Will the updated documentation with this upgrade include the parts sourcing recommendations? Thank you in advance. All the best to you!
Thanks Julius. Yup I listed where I got all my new bits from in the parts list as well
@@FurtherFabrication Got the updated documents today! Thanks again Rob!
I'm looking into making my own machine too. I wonder what dictate the vertical distance between the last mirror and the lens in the head? I feel that by having the lens as high as possible, close to the mirror, we gain some vertical height in the entire machine, making it thinner.
Question... As you started in your build you wanted options for being able to upgrade the C02 tube as power is proportional to size... Could you just add a 4th mirror and have the tube running the length of the build instead of the width allowing for upgrading without reconstruction? Or would a 4th mirror inhibit power somewhere down the line? A 4x8 would be wonderful doing full sheets but you can limit your size by additional mirrors instead of building machine larger to fit.
Just a small note. On the new part row 112 and 113 have the same link. But you can find the link on the old version row 72.
thanks u so much!
The plaque that you made looked like polycarbonate (GE / Sabic Lexan). Take care as the fumes that come off while being cut are toxic. Pressure sensitive adhesives (PSA) like 3M467 (200MP series) also give off fumes that are not healthy. Wear a high quality mask with replaceable filters (not a dust mask) while cleaning the cutting bed. Great project.
I think it was acrylic but I appreciate the great advice nevertheless!
I just bought your plans yesterday, I would like to have an addon for a mechanism that can move a fixed length of textile fabric from one roll to another and basically rolling out the new textile after the laser is done cutting the current work area.
I am thinking of some kind of mechanism that pulls and stretches the fabric from a fixed starting point to a fixed end point that could be activated through a sensor, what controller would you suggest I could use for that and could I use the u or z axis for this, or would it just be better for a manual switch to activate the process each time?
is there a benefit in updating the Stepper Motors to ones that are servo driven? Would this improve both precision and speed?
Nice upgrade. Will there also be upgrades to the y400 plans?
Thanks. yip I'll go through and update them as well, they'll be a few weeks away though
I'm looking at adding an inline beam combiner for a red dot. I was thinking about mounting just after the 1st mirror. Any thoughts or input?
Does your card file have the laser head and mirrors. I can't seem to find them on GrabCad and I might just buy some ahead of time to model and then buy all the aluminum vslot after it is finished being designed in cad.
Awesome.
Hello, does this update is also available for the Y400 version?
buying the construction guide now, it will be sent with these updates already ?? I was very interested in the electrical panel, do you have information about it?
Funny. I used roughly your design for the overall frame, but I opted for linear rails and a single motor right from the getgo. Seems like the right decision ;) Right now I'm trying to figure out, if a core-xy design would be practicable at these large scales. Because this would be a phenomenaly easy and fast way of moving the gantry.
Hi there. No coreXY is not feasible on a larger scale. The belts get way too long.
CoreXY would be very good, as there would be no need for any cabling running along the gantries, and you could use a battery-powered pointer for the sight. You might even be able to do away with the blast tube, to mean the only thing moving is the reflector and lens, making for a very light, and fast, laser system.
I love you content :D Like at 2:06 :D dude im learning so much while having fun watching your videos :)
I love your work. How long did the shipping take for your linear rails. My new spindle took 3 months!
ooof. I think it was a bit over a month for me
I ordered the parts list a while ago before the version 2 came out. I only have the version 1. Do I have to rebuy it to get the version 2??
Is there any way I could know what the parts that connect to the motor at 4:02 are and where I could get them online? I'm not sure if it was a shaft collar but I can't seem to find it
Using belts over with the dual spindle motor....is it same as Using rage and pinion
Great job. Chief. Purchased the plans and Building my shopping cart now! Question, is there options to attach the rotary tool? Also how has it been running?? I haven't seen Videos of Any of its finished Works of art
Hey man could you juste help figuring ou how much would the final laser cutter cost ? Roughly ? Thanks a lots I’m debating building one
wooo, amazing machine , congratulation , I wonder if you could tell me please where you bought your linear rails, they move so smoothly.
From AliExpress, the supplier was called AliExpress
"RDB Bearing and mechanical Parts".
All the links to the parts I used are also in my Parts List documentation
thank you very much, you are very kind
@@FurtherFabrication I’ve bought this how do you open the list documents thanks
Hey, is there anything about this design that couldn't be scaled up to fit a full 2400x1200 sheet of plywood? I'm assuming maybe flex in the gantry that holds the cutter head?
Hey! This is an incredible build series - thanks so much for all of the time you've put into it! I've just bought your parts list for the Y-1200 to get a confirmed cost based on current availability and supply and one thing that quickly jumped out at me was the delivery for the laser tube. I'm a fellow kiwi and the link you've provided for the laser tube lists a delivery charge of NZ$470 (the laser tube is listed currently as $220). Did you find a way of reducing this through local NZ supply by any chance? Also, who did you find was the best supplier here in NZ for the extrusion? I can only find a few companies that do it and they're about $30 per meter :( Thanks again!!
Hi. Out of curiosity, do you remember what the cost ended up at? I'm considering doing the build, and it would be nice to have some numbers for comparison, regardless of how up to date or relevant the numbers are.
Ok so where's the riser block your using there, or did you name it something else? :)
How much was the 90W tube and the rails?
are those mgn15h rails in 1300mm,? or what kind is that
Hi, I watched your whole series and might overheard that but wat was the final cost of the build ?
Did you get an answer?
You think 3 18v 6ah power tool batteries can sustain power to a 1000w brushless motor with a 30ah controller?
hello sir. ur doing good job there hope u can help me . i hqave two head co2 lasser but i ddont need two of them i turn it off one of it , but i cant use all the table work its just half of it work one head . how can i use one head in all table full;size work can yopu tell me pls . hope ull answer me if u have a time . thank you
Could this machine be scaled to a 48x96 inches working area?
AWESOME my name's Rob too and I want to make this! I love the fact you worked at wetta studios. I trained in Interior and Spacial 3d design when doing my degree I then worked as a stand-by prop-man as well as a propmaker for theatre and small film productions, My dream was to work for a company like wetta. The only change to the machine I want to make is making a steel enclosure. (When you can weld, you weld everything). How's the machine holding up? Is it still making money? I'm planning on building a CNC router to make end grain plywood furniture. Have you considered something like this? They seem like the prefect partner for a Laser cutter considering the availability of free/cheap hardwood pallets. (concrete slabs/ roof tiles are packaged in hardwood pallets. they are usually chucked away by builders)
Does it means the v wheels where not good...pls tell us why...and can the double spindle be used wit v wheels
Hi mate. I like your video. Just wanna ask. Do you have filter for the smoke. Im planning to buy one. Im worry abou the smoke. Thanks.
I'm venting far enough away from anything else that I'm not using one (though in a perfect world ideally I should always use one) but if you're close to other people you it would be a good idea
@@FurtherFabrication cheers mate. Im from south island.
My brother and I love your videos. We bought the Y1200 plans and are going to build one for the family craft business. What speeds are you seeing for engraving? My wife is really enamored with the speeds of the AEON MIRA 7 and 9, but not the price tag. Do you think the Y1200 can get 75% of the MIRA 9's claimed speed of 1200mm/second with/without upgtades?
Hey man could you juste help figuring ou how much would the final laser cutter cost ? Roughly ? Thanks a lots I’m debating building one
Hi is this upgrade in the documents?
Good
Maybe, one of these years, I can attempt this build. I have a "safe" area where it can operate and space enough for it. Sadly, the 2 are not at the same location.
classic dilemma. operating a laser in your bedroom probably isn't a good idea though haha
@@FurtherFabrication it won't take the place of my truck in the garage either. "Undesirables" roam through the area every few years looking for opportunities.
if i buy the plans, is this upgrade and parts available. I have a 3d printer
How to maintain the belt?
I'm building the y1200 right now. I went straight for the 90w tube because I wanted a little more power. Any tips on what modifications might be needed? Currently waiting on parts
nice one, I'm using a 90w as well so the latest documentation should suit you just fine
@@FurtherFabrication Is there a newer version than 1-03 now?
my friend from indonesia how can i get detail file of components and equipment to make 130 x 90 size laser like your video.

Are these changes in the plans
Hello rob!
I recently purchased your build guide for co2 laser cutter and I have found that you have used 2028 corner connector but I am unable find these type of connector in my place so could I use 2020 corner connector instead of this?
And I have one more query can I use sliding t nut for all purpose instead of spring t slot nut and rotating t slot nut?
Hey man could you juste help figuring ou how much would the final laser cutter cost ? Roughly ? Thanks a lots I’m debating building one
@@damienblachier4360
Around 3k @ India!
Hey awesome build series has anybody tried to make this bigger like Y2000 x X1000 Cutting bed? Willing to pay for schematics and parts list. Need help resizing this build please!
This router cut fabric?
Do you make this update for your smaller laser as well? Tnx fr Info Regards Tom
I will update the Y400s plans soon as well, just give me a couple of weeks
@@FurtherFabrication OK Thank you
Hmmm. This got me thinking. Shoot me down if I'm stupid for combining shit. ;-)
Add a bunch (technical term, I'm sure) of Z height, make a really rigid and indexable/repeatable
mount for the "laserhead" and then you could switch in a router/milling spindle for light milling duty.
Getting rid of those microplastics 10:15
Damn it lol I already ordered all the parts for the original build.....
Anyone got a cheap source for the t-slot in Australia?
Your not really supposed to use the rear shaft to drive like that, it's there for hand wheels and encoders...Probably be ok for this application with it being such light weight, time will tell. Thanks for sharing 👍🏻
Hi,
So watched the complete serie and have bought the plans :) Currently scavenging materials from an older laser and sourcing the construction from a company in EU. :)
However some things are confusing me. How is the best way to get in hold of you for some part questions? Email? IG or here? :)
Hello Sören. I sent a couple of emails but understandably the response rate is low. I feel like I have a pretty good grasp of the build. What were you wondering about? I'll try to help if I can.
@@oskartegnesjo1111
Well I've tried mail and IG, with no answer :) But I'm guessing that responding to those comms are down the list of priorities :)
Even though Rob wrote in the parts list, that if there were dead links, he would like to know :)
@@sorenac Same. I tried to send updated links but damn he must be getting a lot of emails.
@@oskartegnesjo1111 I hope you don´t mind if I drop a question, checking the parts I´m ordering for the build I am puzzled by the two 24v power supply listed in electronics, I saw one being used for x and y axis stepper motors on episode 4, and another one in the DIY water cooling, but that one is listed separately in Water cooling (for a total of 3). In the episode regarding the installation of the z axis motor he simply mentions hooking it up to the driver, but no second supply is shown... hence my confusion is this the missing second power supply?
Or is this a typo? is it just two 24v supply, one for the 3 axis and another for water-cooling? Or it is meant to be a total of three 24v power supply, one for x-y axis, one for z-axis, and one for water cooling.
Thanks a ton!
@@nachobev Hey Nacho! I'm not 100% sure, I didn't reach that point yet in the build before I had to go out of country for school. I do remember ordering two 24v though, since I got readymade water cooling. I'm guessing it's the latter with one powering the x and y, and the other one powering the z. I would try to do some more digging though. Hope that helps a little bit.
Should of just used ball screws on liner rails and get rid of all those belts and pulleys
A "little" upgrade :D :D :D
haha that's what I tell myself when I start these things
Wait I thought you took linear rails OUT of the plans when you first published them?
nah I originally didn't use them because I couldn't get them shipped to my country at a reasonable price, and I had always found the v-wheels were 'good enough'
I believe your x and y axis are mixed up . Please verify and let me know.
This is the first time seeing someone downgrade their dual motor setup to single motor.
MATREYL KAHA MILEGA
Fine Ozzy engineering mate.
Cheers mate!
We gave to Def factory para this code HF8888 then machine frame work opposite could someone tell how to restore Def factory para sitting
Toplam maliyeti nedir tecrübesi olan varmı
MGN15 rails or 12?
15's
I guess this explains why my download links kept saying "download unavailable?
Just to be clear, I love the update and this wasn't meant as a complaint!
Yeah sorry, I was updating the website earlier
I have my machine (Def fact pare) now the machine is not working everything is silent
please keep the mistakes in
Just tried to pay with Paypal. Something broken???
😶
Everything went wrong when I gave this code
به پیج ماهم سر بزنید