Mastering the Art of Sewing Blind-Stitch Channeling

ฝัง
- เผยแพร่เมื่อ 2 มิ.ย. 2024
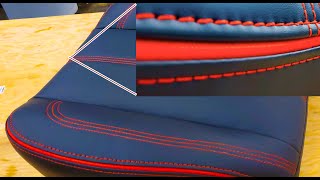
- Vinyl seating fabric can be purchased with channeling that pre-manufactured, but it is typically sold in neutral colors and only in specific brand lines of vinyl fabric. It also comes only in standard width sizes. Learn how to sew your own blind-stitch channeling and you can use any color and brand of vinyl seating fabric you want to match your project demands. This video will first cover sewing an oversize pleated or channeling panel that you can trim to size after it is made. It will also show how to make a finished size pleated or channeling panel that has an equal size pleat from end to end for an exacting fit and look.
If you prefer deeper depth channeling consider using the Tuck & Roll Channeling approach instead: • How to Sew Tuck & Roll...
OVERSIZED PLEATED PANEL:
Intro - 0:00
Sewing a Test Piece - 1:04
Calculating Pleats for Oversized Panel - 4:14
Cutting & Marking Fabric & Sew Foam - 5:34
Sewing Pleats - 6:36
Trimming to Finished Size - 9:39
DESIRED LENGTH PLEATED PANEL WITH EQUAL SIZED PLEATS:
Calculating Pleats for Desired Size Panel - 13:16
Cutting & Marking Fabric & Sew Foam - 15:32
Sewing Pleats - 17:58
Trimming to Finished Size - 20:10
Adding Adjacent Fabric Panel - 22:35
Materials List:
Fabric Backed Sew Foam 1/2" - SKU: 124306 www.sailrite.com/Fabric-Backe...
EverSoft™ Indoor/Outdoor 54" Vinyl Fabric - we used SKU: 122224 & 124470 www.sailrite.com/Fabrics/Mari...
Tex 90 Polyester Thread from Sailrite www.sailrite.com/Notions/Thre...
Seamstick 1/4" Basting Tape for Canvas & Upholstery (36 yds.) - SKU: 122065 www.sailrite.com/Seamstick-1-...
Tools List:
Sailrite® Deluxe Fabricator® Sewing Machine Package (110V) - SKU: 400600 www.sailrite.com/Sailrite-Del...
Sailrite® Clear Acrylic Ruler 6" x 24" - SKU: 102400 www.sailrite.com/Clear-Acryli...
Scribe-All® Water Soluble White Marking Pencil - SKU: 120681 www.sailrite.com/Scribe-All-W...
Basic Thread Snips - SKU: 123222 www.sailrite.com/Basic-Thread...
Gingher® Scissors Right Hand Lightweight 8" - SKU: 101017 www.sailrite.com/Gingher-Scis...
Scribe-All® Black Marking Pencil for Vinyl - SKU: 121977 www.sailrite.com/Scribe-All-W...
Zipper Foot Left for Sailrite® Fabricator®, 111 & Big-N-Tall - SKU: 400311 www.sailrite.com/Zipper-Foot-...
Pencil, Calculator, Marker - แนวปฏิบัติและการใช้ชีวิต


![[TH] VCT Masters Shanghai Playoffs DAY 3 // FNC vs FUT | EDG vs PRX](http://i.ytimg.com/vi/pw2T5v0ogDI/mqdefault.jpg)


Wow! I didn’t know how easy this was to do! Thanks!
Thank you so much for your comment! I'm glad that you found the video helpful and that it made the process seem easy for you. Keep up the great work!
Thank you! Perfect timing! I was going to skip doing that on my project because I didn’t know how. Thank you so much for sharing your amazing expertise!
Thank you for your kind words! I'm thrilled that my video was able to assist you with your project. Your support means the world to me!
Great video, thank you Sir 👍😁
Thank you so much for watching! I'm glad you enjoyed the video.
thank you for this video
You're welcome! Just doing my part to save the world, one TH-cam video at a time. 😄
Woo! Let’s go!!
Thanks for the enthusiasm! Let's go indeed!
9:32 Great video and informative content!
Have you tried lifting up the presser foot and sliding the fabric backwards or off to the side after stitching an individual pleat and then reengaging/lowering the presser foot back down to begin sewing the next pleat? Rather than consecutively cutting the thread after sewing every individual pleat? I find this method saves a bit of time, conserves thread, and helps maintains sewing cadence/tempo.
A potential manufacturing efficiency gain that may be helpful 🙂
Yes, I often do that same thing with many projects. However, this one was a very small sample piece (only 6 inches in height) and it would seem reasonable to do what you described on it since it was small. But most of these panels will be about 15 to 20 inches in height, at average, and pulling that much bobbin thread out for each pleat may diminish the quantity of the bobbin rather quickly, that is why we did not do as you describe. Great suggestion for small jobs!!!! Thanks!!!!
@@SailriteDIY I appreciate your thoughtful response! That rationale definitely makes sense, thank you.
3rd!!! This is going to be a huge video for you guys. What the heck took you so long??😇😀😁
Thank you for being patient and for your excitement! We appreciate your support and can't wait for you to see what we've been working on next "Tuck & Roll Channeling" coming soon!
love that math dontchya Eric 😂😂
Well, math does have a way of stealing hearts, doesn't it? Thanks for the love!
@@SailriteDIY oh I hate math 😂😂
How do I get a more rounded pleat?
Can you show the same concept, I'm guessing, so they are not just channels but boxes that remain puffy... quilted? Normally, I'd run straight stitches down and then turn to stitch lines the next direction. However, that first pleat stitching looks different. 😊
Maybe you are looking for the Tuck & Roll Channeling found here: th-cam.com/video/AadVjQmmla8/w-d-xo.html
@@SailriteDIY No, not exactly. I'm looking for the channeling that the cushioning is not just channels. They are more like quilted boxes. The channels show vertical stitching. But, I also would need the horizontal. This would be the whole top and not just a short 6" piece. I can beat describe it like a mattress top.
@lada5876. I think you may try this video by Sailrite: “DIY Box Cushion: How to make a box Cushion” (sorry not sure how to link it here for you). Within this video they show you how to prepare part of vinyl for the seat with a “quilted” look. Hope it helps.
@@mbheydrick8375 Thanks, I did look at those. It's close. I love @sailriteDIY videos so if anyone would know, it would be them. I'm making a mini mattress. You know the kind with a pillowtop... it's not just quilted, it's very puffy and plush set on top of a firmer mattress part, creating a one piece unit. Thanks for the info. It did get me a bit closer. I appreciate it.
“Measuring device” ?? It’s called a ruler. There is also an incredible invention called a tape measure.
Ah, the age-old battle between the ruler and the tape measure! Who will reign supreme? Well, it's all about personal preference and the task at hand. But hey, at least we have options to measure in style!