I should have mentioned seamless / DOM tubing. It’s hard to find, not available in all regions, and expensive, but if you’re able to get it and afford it then it could be a good option! I haven’t ever used it so I’m not sure how the precision compares to regular tubing.
A piece of advice I learned from Tom Lipton's book is to not start your welds at the tack. It liquifies the tack, essentially letting go of that small section. When you weld into the tack, your initial weld has frozen by the time you reach your tack.
Honestly I’ve always thought that square tube would be the easier method but after watching this I’m fully convinced that welding the tube is the way to go, great explanation!
So I purchased the plans,, Wow the level of detail and information is 2nd to None. Its like a Brilliant guide to build a great Grinder. Im very proud to say I built it and yes its home made and Its Jer's Design. It took some time but well worth it. Fantastic Kit.
It is one of my favorite channels that pass on knowledge with quality, congratulations for your excellent work and motivation that you provide to us, mere spectators. Thank you for your inspirational content. Stay strong and blessed. Always looking forward to the next video.
Love the videos you post. I always look forward the notification that another is out. You do terrific, practical work. Your version of the belt sander remains, IMO, the best, most versatile version on the internet.
I built my grinder from your plans but I used the square tube knowing about the seam. I do have a milling machine to cut a groove in the solid bar and that is what I did. During the build I realized it would be so much easier to build this machine if I already had one completed. Thanks for the video keep on keeping on.
I may never actually build one (but may eventually lol), but I just purchased the Gen 2 grinder and attachment bundle to support you and your channel (as well as your modular box plans in the past). Thank you again for sharing your awesome inventions, talents, creativity and vids. You are one of my top TH-camrs.
Thanks, Jer, for sharing this. While DOM tubing would be pretty accurate internally, it's not as readily available and more expensive... and this project doesn't call for much tube length. So, from a practicality standpoint, the home welded tube wins in my book. 😃
Laser welded Tubing is more accurate than DOM tubing. Largely due to welded tubing using bent sheet metal which is extremely accurately, and DOM being drawn over a mandrel which will wander over it's length.
Good to see you posting again Jer! Another option, is if you happen to have a metal supplier, or trailer supply vendor in your area that carries square tubing meant for building truck receiver hitches. Basically square tube, that already has that annoying seam weld removed from the interior. You'd still have to dog ear the corners of the solid bar. I built my grinder per your plans using the welded flat bar, and it was no trouble really. Great job on the plans BTW, I love my grinder!
I thought about mentioning this in the video, but the problem is 1.5” hitch tube doesn’t exist, at least not that I could find. 1.25” is too weak and 2” is too bulky to fit my design, so it’s not relevant.
Jer, I built your design a couple of years ago. Your method of building the tubes from flat bar is the right method. The weld stitches are not a problem. I’m one of those who attempted to fill in the gaps with more welding but I stopped midstream because the tube began to tighten onto the square bar, probably from warping. As completed, it all worked well. If I continue to dress it up later, bondo is a reasonable option.
Bondo is likely to crack with vibration. A better alternative is something like Isopon p40. it's fine glass fibre strands in epoxy resin. Same sort of consistency as Bondo but sticks better and is not prone to cracking. Just before it sets hard use a sharp knife to carve the edges and sand when dry.
Also using the tube might prevent you from having an attachment that can be rotated 90 degrees, if the inner tube opening's cross-section isn't square enough.
I think you can get seamless tube just like DOM round tube. Or just use DOM instead of square tube. It would be more expensive of course. One thing you forgot to mention is always use cold rolled flat bar if you go with the welding. Hot roll has a lot of mill scale and is never straight and smooth like cold rolled. Other than that, I know where to go when I decide to build my own. Thanks for the upload Jerry, I am a fan
There is a much easier way to weld this diy square tube! Here a instruction on how i did it and it was so simple while holding tight toleranzes( i made it with the metric plans): Take the 40mm squarebar as normal and clamp one of two 50mm with flatbar onto the side of the squarebare with two clamps (tight them to max). Then clamp down on of the 40mm flatbar and weld it into an L shape( also clamp it tight). Then lose the clamps and look to the angle and make it 90⁰ to another(probably warped). After that clamp the L shape piece onto the square bar again and put the other 40mm flatbar to the other side of the 50mm flatbar(It should look like a U shape) [PUT SHIMS BETWEEN THE L SHAPE PIECE AND SECOND 40MM FLATBAR TO CREATE A SMALL GAP FOR CLEARENCE, i used 2-3 soda can shims and one paper folded once] After you have weld the u shape you can take it off of the squarebar and make it square again. Then you clamp it down one the squarebar again and put the second 50mm flatbar onto the U-Shape piece and put shims under it( again 2-3 soda can shims and a folded pice of paper two layers thick) you only have to clamp it slightly at the last part or it will be get stuck a one point. All other weld can be clamped very hard. The upside is you can weld it solid and warping will not effect it activly. And you will not spend more time then in the "Normal" way. I probably will make a video and show it. I am sorry for my writing, it not my best😂 for any quastions please comment under this comment.
an excellent month for you. Thank you for this inspiring video. I follow your channel and log in every week just to see if there's anything new, thank you for being an excellent source of knowledge and inspiration. Thank you for everything.
I think you are right on Jer. Personally I think the skip also shows the work done to make it along with the better fit up. But as you said, it just personal preference. 🙂 Great video and thanks for sharing.
I bought the Schmidt plans 3 or 4 years ago, and built two of them. The first one, I followed the plans to the letter, even having a friend machine the hinges and some other parts so that it would be perfect. It turned out absolutely precise, and is way more refined than some of the commercially available belt grinders. I actually welded mine with a TIG welder for pretty beads, and had the entire thing powder coated, then added some hot rod pin stripe stickers (I tried hand striping, but it looked horrible) and then clear coated the whole thing. It was very pretty to look at. The second one was for a friend who wanted it built on the tightest budget possible. I used square tube that he had on hand, and hand cut the parts I had previously machined. It all worked as expected, but the accessory bar/tube fitment was sloppy and out of square, just as Jer mentioned. Now, my friend didn't care because he wasn't using the grinder for precision, but for down and dirty gorilla fabrication and as an alternative to a bench grinder. The moral of the story is... it is faster, easier, and more accurate making the tubes from flat stock. Just thought I would confirm the statements in the video, as someone who built it both ways.
When Jer said pretty looking, I thought of Tig Welding the plates/parts. If you have the skill. Stack of dimes welds would look very good and show off your welding skills.
I like the make your own tube option. If you continue to step weld around the pieces you can make the welds complete and look nice if you are careful at the weld tie ins.
I did this on my first Gen 1 belt grinder, but I’m not good enough at welding to make it look nice. Someone who’s good at welding could for sure though! It looks REALLY nice if you grind a 30° chamfer into after welding it fully, but that pretty much requires already having a belt grinder.
@@Jer_Schmidt What are the pitfalls of fully welding the seams? If you do the welding in a few sessions so you don't overheat the metal and warp it, is there anything else to be cautious off? I often see seams not fully welded, and I assume its due to potential warpage, material/time usage, and the fact that the parts are strong enough with only half the seam welded. But, I always think it looks so much better to have a fully welded seam, and it doesn't take that much more time or material to do; I'm a very novice welder, however, so I imagine there's something else that I'm missing in the equation.
@@SwagmanMcGee Yeah I don’t know of any other pitfalls. Fully welding them on Gen 1 worked fine, just be sure to keep the heat evenly distributed and it shouldn’t warp. The only reason I don’t fully weld them anymore is because it’s not necessary for strength, and uses more wire, gas, electricity, & time than it’s worth to me.
When I made my grinder from your plans, I ended up having to use tubing instead of solid bar. No one around me had it. The only downside to the tubing is some vibrations when doing some serious grinding. Otherwise the plans you got are awesome! Recommend them to anyone
I built a 2x72 from Jers plans and one from House Made kit. Here is my comparison, it relates to this video. HM uses tubing with the seams removed. (already removed in the kit, nice). All of the HM tubing is Pre-made .025 wall. Brian House makes it easy , Jer makes it industrial. Adjusting the tool/platen arms is the difference. JS tubing, once made, is MUCH smoother to adjust. For me, it is worth the extra time to make Jers. Jers is an industrial machine, IMO. I am a blacksmith btw, so I grind lots of metal. JS machine is in the shop, BH is in the garage. I gets much use from both. I should also mention that the JS recommended motor is 3x more $, at least. I am sure that influences performance. The balance of the HM machine, when tilting, is helpful, you really have to muscle the JS. I love the JS design of supporting the tool rest directly under the platen (no flexing), a rock solid grinding rest. If I did it once more I would do the JS plan. I just bought the small wheel kit from BH so I still think well of it. Jeremy, what the hell does that thing weigh once completed?
Thanks for writing this up, and thank you for the positive review!! Really glad to hear you like it. Here are the exact weights of mine: Power Unit: 56 lbs, 101 lbs with recommended motor Platen Attachment: 16.5 lbs Table Holder: 16.5 lbs Fixed Table: 8.5 lbs Adjustable Angle Table: 10 lbs Small Wheel Attachment: 16.5 lbs Contact Wheel Attachment: 9.5 lbs (without contact wheel)
I've built your grinder earlier this year and the welding of those tubes isn't as much work as one might think. Just go with Jer's plans, it works well. Wouldn't want to miss the grinder from the shop.
Having built your grinder with the limited welding skills I have, the manufactured tube is by far the easier option. For what it's worth, I build a temporary belt grinder body out of plywood with the wheels I purchased for the final product so I could grind all the curve parts instead of trying to angle grind/file them into shape.
just a thought: what if instead of modifing the bar you could broach the tube? like make a tool that is concave and pull it trough to cut the corners, wdyt about that?
That probably could be done, but building the tool sounds like a lot of work. Way easier to just weld up the tubes, and bondo the corners if you want a clean look.
I have a small, yet strange project. I am very curious how you’d go about fabricating it. It’s another case of “nobody makes it, so I’ll have to make it”. Brilliant work, young man!
I bought your original plans however here in Australia the belts are almost impossible to get so I haven't done anything with it yet. Love the improvements and starting to really get a good workshop set up. Looking at buying the updated metric version soon with all attachments. keep up the awesome work. Your design is by far the best I've seen anywhere on the market and that's in the DIY designs available. There's nothing that comes close even if you were to spend 10G here in Australia
The Sandpaper Man, Artisan Supplies and 84 Engineering are three places I can name off the top of my head that carry belts. Not even close to impossible to get :)
I modified your design to build it with the materials I had, and made it using square tubing...I left the seam and haven't had any issues...it all depends on what level of precision you're aiming for and comfortable with
I bought your plans when they first came out with intent to build this. Life has other plans for me. But at any rate, you think 12 steps ahead when most of us think 4 steps ahead, so I trust your judgement on what works. And when you have designed and made something, then found a little tweak to it, you let us know.
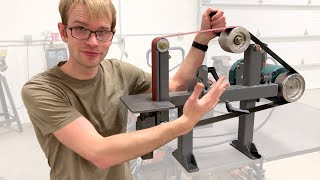
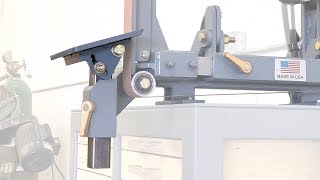
I'm in the middle of building your fantastic grinder. 1) I notice the gussets between the legs and main tube. Do they help with machine performance? 2) Your grinder table is very shiny. How did you get it so shiny and how do you keep it shiny?
1) No. This was my first prototype of Gen 2, and I added those gussets because I thought they would be necessary, but they’re not. They only add complexity and risk warping the frame when you weld them on, so I deleted them from the final design. 2) That’s the result of some experiments with the surface grinder attachment. So that table is surface ground perfectly flat and square to the post, within ~0.002”. I’ll show how I did it in a future video about the surface grinder, when that design is ready. I just keep a bit of oil on it to prevent rust.
Instead of welding have you considered bolting 4 flat plates together to form the square tube? 2 of the plates might need to be a bit thicker to accommodate the tapped holes for the bolts but drilling and tapping a bunch of holes might be easier for people who can't weld (for whatever reason). It also prevents getting any welding warp. The top/bottom bars could be strips of 1cm thick flat plate so that 5mm holes could be drilled and tapped along the sides then use a bunch of countersunk M5 bolts to bolt all 4 plates together to form your square tube.
The rest of my belt grinder design is not really good for people who can’t weld, which is an issue I should probably work on, but since welding is required anyway, it makes sense to use it here. However I have seen at least two of my customers bolt the tubes together, just because they were more comfortable with that (mostly concerned about warping). It’s a reasonable way to do it, just way more time-consuming than welding.
Bought my plans from you 2 years ago and just put the last coat on the cabinet today. Still have the VSD stand to build. BTW, where's your trolley/cabinet gone?
I have a question : You stated that the solid bar is the weakest part of the grinder, and that the tube is stronger (homemade or otherwise), so why not replace the solid bar with an equal outside perimeter hollow tube? I do understand that the solid bar will have a dampening effect on vibration, is this why you use it?
It’s mostly because of size. Stepping up to a 2” tube for the tool arms means I have to bump a lot of other dimensions up a little, and the machine gets bulky. Also the cold-rolled solid bar is very precise, so it’s easier to make a nice square precise machine. And yes, damping is also a factor.
I’ve been developing one for years, and it’s getting really close! I finally have a concept that works super well, it just needs some final refinements. The belt grinder tables that I was using in the video were ground flat & smooth with it, so you can see the mirror finish it produces. The 6x8” table is flat to within 0.003”.
I’ve tried various things as shims, and everything I have tried has worked. One customer told me they had a problem with two razor blades wedging against each other and binding up, so I don’t recommend that option anymore. MIG wire works great once it’s set up, but can be a little finicky to work with. Paper is probably my new favorite, it’s just simple and effective.
I much prefer your method its simple and as long as a person can weld a little bit its easy. Im just a DIY welder and your method is still very easy to achieve.
Hi Jer. I looked at your plans on Etsy. Do you have a DXF version so I could plasma cut many of the parts. let me know if that's available or not. Thanks
1000%, build the socket tube! And to add another pitfall, a random spatter blob or wall thickness/ I.D. variance in the middle of the tube and your screwed. Not to mention you can't rotate the mod'd solid arm with out needing to mill all 4 sides of it. Huge PITA! And realistically, you could probably do half the welds and it would still be plenty.
Hi Jer, I could not quite follow your reasons for using solid bar instead of hollow for the inner bar? Would hollow tube not be much more rigid, and would that not be desirable? One day I will build this, and I am looking forward to it!
To be clear, I get that hollow tube off the shelf is not as straight - but the DIY tube from flat bar is evidently so quick, I would be tempted to follow the same method to make an inner tube.
I assume solid bar will be more rigid than hollow, it’s the maximum amount of material that can fit the space… but I’m not an engineer; is there something I’m missing?
@@Jer_Schmidt No, you missed nothing, I did (and I am an engineer… 🙇🏻♂️) The confusion in my head came from the fact that almost all the resistance to deformation comes from the outer layer of a material, so _for the same mass_ a hollow structure is much stronger than a solid one. So perhaps you would save a few $ in material cost, and your back might be grateful if you move those bits around a lot, but the solid bar is not going to be an issue in terms of deformation - and possibly dampen the vibrations better as a bonus. My apologies for not thinking before writing! And thanks for the videos!
De las mejroes para mach3 son las CSMIO, yo tengo una Tomatech2005 y va excelente, a mi me costó $630 con codificadores de valir absoluto y de 5 ejes simultaneos... semajente la GSK980Mdc...
DIY is clearly the pragmatic way. I wonder about using a torch or induction heater to warm a piece up just the right way that you could drive a form tool through and expand it to suit though...
If you used flat 2 flat bars the same width as the square bar, and 2 flat bars as wide as the thickness of 2 flat bars plus the width of the square bar, you could butt weld the seam full length, then grind the welds flush. After beveling the appropriate edges to be welded, of course. 😊
Yep. I do it this way to save the work of beveling, since the little offset creates a corner to weld in. (Also because 2.25” flatbar is hard to get / nonexistent). You can still weld them fully and grind them off at 30° for a really clean look, but the 30° chamfer is best done with a belt grinder…
Nah, I frequent a steel supply store that has that on display, and sliding two of them together confirmed that there is WAY too much slop for *this* application. I welded the tube per the instructions and have no regrets.


I should have mentioned seamless / DOM tubing. It’s hard to find, not available in all regions, and expensive, but if you’re able to get it and afford it then it could be a good option! I haven’t ever used it so I’m not sure how the precision compares to regular tubing.
Thats what I use here, is cold drawn tube. comes in lengths of 3200mm in stead of the 6000mm a regular comes in.
A piece of advice I learned from Tom Lipton's book is to not start your welds at the tack. It liquifies the tack, essentially letting go of that small section. When you weld into the tack, your initial weld has frozen by the time you reach your tack.
Really obvious now that you say it, but I never thought of that! Thank you!!
Wow This is a great tip! Thank you!@@Jer_Schmidt
Exactly right
Great tip!
You're so humble. you could have just said "I'm right" but you went above and beyond to explain alternative methods. Top notch.
Woohoo! Jer is back.
Honestly I’ve always thought that square tube would be the easier method but after watching this I’m fully convinced that welding the tube is the way to go, great explanation!
Hey Jer, hope things are going well. No pressure, just wanted to let you know I'm sure I'm not the only one missing your content and wishing you well.
More videos please. The world needs them!
I hope you are okay! You do you! We miss your uploads, but it'll come when it comes.
So I purchased the plans,, Wow the level of detail and information is 2nd to None. Its like a Brilliant guide to build a great Grinder. Im very proud to say I built it and yes its home made and Its Jer's Design. It took some time but well worth it. Fantastic Kit.
I'm not a maker but I watch all your videos. Not sure why, but I do enjoy them.
Genius and creativity👍
My eyes lit up when I saw a new video. So thankful!
I wish you would make more videos. You were a favorite go to person for great videos. Have a blessed holiday season
Your grinder is on my list of things I want for the shop. When I have the time and fuds to put towards it. Great job on the design.
It is one of my favorite channels that pass on knowledge with quality, congratulations for your excellent work and motivation that you provide to us, mere spectators. Thank you for your inspirational content. Stay strong and blessed. Always looking forward to the next video.
Always love to see a fresh video pop up from you Jer!
Thanks for sharing, nice to see you working again. Charles
Love the videos you post. I always look forward the notification that another is out. You do terrific, practical work. Your version of the belt sander remains, IMO, the best, most versatile version on the internet.
I built my grinder from your plans but I used the square tube knowing about the seam. I do have a milling machine to cut a groove in the solid bar and that is what I did. During the build I realized it would be so much easier to build this machine if I already had one completed. Thanks for the video keep on keeping on.
I was just thinking about your channel and the grinder! Thanks for the update.
Keep making videos its always a pleasure watching them...
Glad you're back! Hope all is well
I may never actually build one (but may eventually lol), but I just purchased the Gen 2 grinder and attachment bundle to support you and your channel (as well as your modular box plans in the past).
Thank you again for sharing your awesome inventions, talents, creativity and vids. You are one of my top TH-camrs.
Thanks, Jer, for sharing this. While DOM tubing would be pretty accurate internally, it's not as readily available and more expensive... and this project doesn't call for much tube length. So, from a practicality standpoint, the home welded tube wins in my book. 😃
Laser welded Tubing is more accurate than DOM tubing.
Largely due to welded tubing using bent sheet metal which is extremely accurately, and DOM being drawn over a mandrel which will wander over it's length.
I think that was a clear enough reason for a home made box section jer and a pretty cool time saver too
Hope to see you on more now I love your precision work it's relaxing and satisfying
Good to see you posting again Jer! Another option, is if you happen to have a metal supplier, or trailer supply vendor in your area that carries square tubing meant for building truck receiver hitches. Basically square tube, that already has that annoying seam weld removed from the interior. You'd still have to dog ear the corners of the solid bar. I built my grinder per your plans using the welded flat bar, and it was no trouble really. Great job on the plans BTW, I love my grinder!
I thought about mentioning this in the video, but the problem is 1.5” hitch tube doesn’t exist, at least not that I could find. 1.25” is too weak and 2” is too bulky to fit my design, so it’s not relevant.
Jer, I built your design a couple of years ago. Your method of building the tubes from flat bar is the right method. The weld stitches are not a problem. I’m one of those who attempted to fill in the gaps with more welding but I stopped midstream because the tube began to tighten onto the square bar, probably from warping. As completed, it all worked well. If I continue to dress it up later, bondo is a reasonable option.
Bondo is likely to crack with vibration. A better alternative is something like Isopon p40. it's fine glass fibre strands in epoxy resin. Same sort of consistency as Bondo but sticks better and is not prone to cracking. Just before it sets hard use a sharp knife to carve the edges and sand when dry.
Make more videos! Keep em coming 🎉
Still have and LOVE my grinder from your plans. It’s sooo good
I 100% agree home-made is always better, excellent information, thanks for sharing..
Alway a humbling pleasure to watch you work my friend!
What a perfectly timed video! I just bought your plans and am going through this exact quandary.
Also using the tube might prevent you from having an attachment that can be rotated 90 degrees, if the inner tube opening's cross-section isn't square enough.
Where the videos at 😢
I think you can get seamless tube just like DOM round tube. Or just use DOM instead of square tube. It would be more expensive of course. One thing you forgot to mention is always use cold rolled flat bar if you go with the welding. Hot roll has a lot of mill scale and is never straight and smooth like cold rolled. Other than that, I know where to go when I decide to build my own. Thanks for the upload Jerry, I am a fan
There is a much easier way to weld this diy square tube!
Here a instruction on how i did it and it was so simple while holding tight toleranzes( i made it with the metric plans):
Take the 40mm squarebar as normal and clamp one of two 50mm with flatbar onto the side of the squarebare with two clamps (tight them to max). Then clamp down on of the 40mm flatbar and weld it into an L shape( also clamp it tight).
Then lose the clamps and look to the angle and make it 90⁰ to another(probably warped).
After that clamp the L shape piece onto the square bar again and put the other 40mm flatbar to the other side of the 50mm flatbar(It should look like a U shape)
[PUT SHIMS BETWEEN THE L SHAPE PIECE AND SECOND 40MM FLATBAR TO CREATE A SMALL GAP FOR CLEARENCE, i used 2-3 soda can shims and one paper folded once]
After you have weld the u shape you can take it off of the squarebar and make it square again. Then you clamp it down one the squarebar again and put the second 50mm flatbar onto the U-Shape piece and put shims under it( again 2-3 soda can shims and a folded pice of paper two layers thick) you only have to clamp it slightly at the last part or it will be get stuck a one point. All other weld can be clamped very hard.
The upside is you can weld it solid and warping will not effect it activly. And you will not spend more time then in the "Normal" way.
I probably will make a video and show it.
I am sorry for my writing, it not my best😂 for any quastions please comment under this comment.
I think I got it and it totally makes sense. Thanks for the tip! Both ways are great ☺️
I like the make your own tube option
Great to see you - love your videos! Thanks for sharing!
Glad to see you after so long.
an excellent month for you. Thank you for this inspiring video. I follow your channel and log in every week just to see if there's anything new, thank you for being an excellent source of knowledge and inspiration. Thank you for everything.
Nice overview of the pro's and con's.. Thanks Jer !
ATB...
Thank you very much for this video!
Cool! You are back!!! Nice Video.
would love more videos on the cabinet system!!
I think you are right on Jer. Personally I think the skip also shows the work done to make it along with the better fit up. But as you said, it just personal preference. 🙂 Great video and thanks for sharing.
You’re the best! Miss you
definatly make your own tube, is the way too go, thanks for sharing
Really interesting process indeed, Jer! Awesome work! 😃
Stay safe there with your family! 🖖😊
And happy holidays!
I really like what you made Belt grinder🎉🎉🎉
I bought the Schmidt plans 3 or 4 years ago, and built two of them. The first one, I followed the plans to the letter, even having a friend machine the hinges and some other parts so that it would be perfect. It turned out absolutely precise, and is way more refined than some of the commercially available belt grinders. I actually welded mine with a TIG welder for pretty beads, and had the entire thing powder coated, then added some hot rod pin stripe stickers (I tried hand striping, but it looked horrible) and then clear coated the whole thing. It was very pretty to look at. The second one was for a friend who wanted it built on the tightest budget possible. I used square tube that he had on hand, and hand cut the parts I had previously machined. It all worked as expected, but the accessory bar/tube fitment was sloppy and out of square, just as Jer mentioned. Now, my friend didn't care because he wasn't using the grinder for precision, but for down and dirty gorilla fabrication and as an alternative to a bench grinder. The moral of the story is... it is faster, easier, and more accurate making the tubes from flat stock. Just thought I would confirm the statements in the video, as someone who built it both ways.
When Jer said pretty looking, I thought of Tig Welding the plates/parts. If you have the skill. Stack of dimes welds would look very good and show off your welding skills.
Pretty cool, you are talented.
Great video, Jer. Totally believe your tube method is the way to go.
I like the make your own tube option. If you continue to step weld around the pieces you can make the welds complete and look nice if you are careful at the weld tie ins.
I did this on my first Gen 1 belt grinder, but I’m not good enough at welding to make it look nice. Someone who’s good at welding could for sure though! It looks REALLY nice if you grind a 30° chamfer into after welding it fully, but that pretty much requires already having a belt grinder.
@@Jer_Schmidt What are the pitfalls of fully welding the seams? If you do the welding in a few sessions so you don't overheat the metal and warp it, is there anything else to be cautious off? I often see seams not fully welded, and I assume its due to potential warpage, material/time usage, and the fact that the parts are strong enough with only half the seam welded. But, I always think it looks so much better to have a fully welded seam, and it doesn't take that much more time or material to do; I'm a very novice welder, however, so I imagine there's something else that I'm missing in the equation.
@@SwagmanMcGee
Yeah I don’t know of any other pitfalls. Fully welding them on Gen 1 worked fine, just be sure to keep the heat evenly distributed and it shouldn’t warp. The only reason I don’t fully weld them anymore is because it’s not necessary for strength, and uses more wire, gas, electricity, & time than it’s worth to me.
@@Jer_Schmidt Dope, thanks for the insight
!
Great update video. I plan on building your grinder very soon as I happened across the exact motor VFD combo that you use for a great price.
Great video, insight and advice, thanks Jer!
thank you my friend
Very good point.
Great follow up to the grinder project. :o)
Yes a Jer vid .... Nice one Jer...
peace
When I made my grinder from your plans, I ended up having to use tubing instead of solid bar. No one around me had it. The only downside to the tubing is some vibrations when doing some serious grinding. Otherwise the plans you got are awesome! Recommend them to anyone
The 3rd option is to get seamless tubing. And then knock off the 4 corners. Either way great update sir!
Function over fashion. The precision is worth it.
I built a 2x72 from Jers plans and one from House Made kit. Here is my comparison, it relates to this video.
HM uses tubing with the seams removed. (already removed in the kit, nice). All of the HM tubing is Pre-made .025 wall. Brian House makes it easy , Jer makes it industrial. Adjusting the tool/platen arms is the difference. JS tubing, once made, is MUCH smoother to adjust. For me, it is worth the extra time to make Jers. Jers is an industrial machine, IMO. I am a blacksmith btw, so I grind lots of metal. JS machine is in the shop, BH is in the garage. I gets much use from both. I should also mention that the JS recommended motor is 3x more $, at least. I am sure that influences performance. The balance of the HM machine, when tilting, is helpful, you really have to muscle the JS. I love the JS design of supporting the tool rest directly under the platen (no flexing), a rock solid grinding rest.
If I did it once more I would do the JS plan. I just bought the small wheel kit from BH so I still think well of it.
Jeremy, what the hell does that thing weigh once completed?
Thanks for writing this up, and thank you for the positive review!! Really glad to hear you like it.
Here are the exact weights of mine:
Power Unit: 56 lbs, 101 lbs with recommended motor
Platen Attachment: 16.5 lbs
Table Holder: 16.5 lbs
Fixed Table: 8.5 lbs
Adjustable Angle Table: 10 lbs
Small Wheel Attachment: 16.5 lbs
Contact Wheel Attachment: 9.5 lbs (without contact wheel)
Just found your channel and Subscribed. Nice job
I've built your grinder earlier this year and the welding of those tubes isn't as much work as one might think. Just go with Jer's plans, it works well.
Wouldn't want to miss the grinder from the shop.
Having built your grinder with the limited welding skills I have, the manufactured tube is by far the easier option. For what it's worth, I build a temporary belt grinder body out of plywood with the wheels I purchased for the final product so I could grind all the curve parts instead of trying to angle grind/file them into shape.
That sounds quite sketchy hahs
just a thought: what if instead of modifing the bar you could broach the tube? like make a tool that is concave and pull it trough to cut the corners, wdyt about that?
That probably could be done, but building the tool sounds like a lot of work. Way easier to just weld up the tubes, and bondo the corners if you want a clean look.
Great video, is the square bar hardened? Mild steel?
Mild steel (1018 cold rolled)
I have a small, yet strange project. I am very curious how you’d go about fabricating it. It’s another case of “nobody makes it, so I’ll have to make it”.
Brilliant work, young man!
Would still love to see what you do with a CNC design.....
Love his videos
We made the frame tube from two pieces of square root angle iron.
I bought your original plans however here in Australia the belts are almost impossible to get so I haven't done anything with it yet. Love the improvements and starting to really get a good workshop set up. Looking at buying the updated metric version soon with all attachments. keep up the awesome work. Your design is by far the best I've seen anywhere on the market and that's in the DIY designs available. There's nothing that comes close even if you were to spend 10G here in Australia
The Sandpaper Man, Artisan Supplies and 84 Engineering are three places I can name off the top of my head that carry belts. Not even close to impossible to get :)
I modified your design to build it with the materials I had, and made it using square tubing...I left the seam and haven't had any issues...it all depends on what level of precision you're aiming for and comfortable with
I'll try "Stuff that's home made " for two hundred Alex😄
Cheers
I bought your plans when they first came out with intent to build this. Life has other plans for me. But at any rate, you think 12 steps ahead when most of us think 4 steps ahead, so I trust your judgement on what works. And when you have designed and made something, then found a little tweak to it, you let us know.
I'm in the middle of building your fantastic grinder.
1) I notice the gussets between the legs and main tube. Do they help with machine performance?
2) Your grinder table is very shiny. How did you get it so shiny and how do you keep it shiny?
1) No. This was my first prototype of Gen 2, and I added those gussets because I thought they would be necessary, but they’re not. They only add complexity and risk warping the frame when you weld them on, so I deleted them from the final design.
2) That’s the result of some experiments with the surface grinder attachment. So that table is surface ground perfectly flat and square to the post, within ~0.002”. I’ll show how I did it in a future video about the surface grinder, when that design is ready. I just keep a bit of oil on it to prevent rust.
Instead of welding have you considered bolting 4 flat plates together to form the square tube? 2 of the plates might need to be a bit thicker to accommodate the tapped holes for the bolts but drilling and tapping a bunch of holes might be easier for people who can't weld (for whatever reason). It also prevents getting any welding warp.
The top/bottom bars could be strips of 1cm thick flat plate so that 5mm holes could be drilled and tapped along the sides then use a bunch of countersunk M5 bolts to bolt all 4 plates together to form your square tube.
The rest of my belt grinder design is not really good for people who can’t weld, which is an issue I should probably work on, but since welding is required anyway, it makes sense to use it here. However I have seen at least two of my customers bolt the tubes together, just because they were more comfortable with that (mostly concerned about warping). It’s a reasonable way to do it, just way more time-consuming than welding.
Bought my plans from you 2 years ago and just put the last coat on the cabinet today. Still have the VSD stand to build. BTW, where's your trolley/cabinet gone?
@Jer_Schmidt ... hope all is well ... we miss you
I sure do miss your vids.... 😀
I have a question : You stated that the solid bar is the weakest part of the grinder, and that the tube is stronger (homemade or otherwise), so why not replace the solid bar with an equal outside perimeter hollow tube? I do understand that the solid bar will have a dampening effect on vibration, is this why you use it?
It’s mostly because of size. Stepping up to a 2” tube for the tool arms means I have to bump a lot of other dimensions up a little, and the machine gets bulky. Also the cold-rolled solid bar is very precise, so it’s easier to make a nice square precise machine. And yes, damping is also a factor.
Gr8 build
have you decided on a surface grinding attachment for this belt grinder ?
I’ve been developing one for years, and it’s getting really close! I finally have a concept that works super well, it just needs some final refinements. The belt grinder tables that I was using in the video were ground flat & smooth with it, so you can see the mirror finish it produces. The 6x8” table is flat to within 0.003”.
@@Jer_Schmidt waiting for a built video, your grinder is still hands down the best I found till date.
Hey Jer, I built your grinder and its awesome. I noticed you're using a plug from grinder to VFD (brilliant).
Thank you! I share the VFD between the grinder and drill press, so the plug lets me easily move it between them.
So now you're using folded paper shims instead of razor blades or MIG wire as in your grinder plans/video?
I’ve tried various things as shims, and everything I have tried has worked. One customer told me they had a problem with two razor blades wedging against each other and binding up, so I don’t recommend that option anymore. MIG wire works great once it’s set up, but can be a little finicky to work with. Paper is probably my new favorite, it’s just simple and effective.
I much prefer your method its simple and as long as a person can weld a little bit its easy. Im just a DIY welder and your method is still very easy to achieve.
Hi Jer. I looked at your plans on Etsy. Do you have a DXF version so I could plasma cut many of the parts. let me know if that's available or not. Thanks
Yes, the plans come with DXFs for CNC cutting.
another issue is having to modify the bar of any other adapters or fixtures you decided to attach later. The home made tube is "one and done".
Is 1.5 inch tube on the inside gonna flex at all over such a short distance?
Personally Id go diy for this project
1000%, build the socket tube! And to add another pitfall, a random spatter blob or wall thickness/ I.D. variance in the middle of the tube and your screwed. Not to mention you can't rotate the mod'd solid arm with out needing to mill all 4 sides of it. Huge PITA! And realistically, you could probably do half the welds and it would still be plenty.
Hi Jer, I could not quite follow your reasons for using solid bar instead of hollow for the inner bar? Would hollow tube not be much more rigid, and would that not be desirable? One day I will build this, and I am looking forward to it!
To be clear, I get that hollow tube off the shelf is not as straight - but the DIY tube from flat bar is evidently so quick, I would be tempted to follow the same method to make an inner tube.
I assume solid bar will be more rigid than hollow, it’s the maximum amount of material that can fit the space… but I’m not an engineer; is there something I’m missing?
@@Jer_Schmidt No, you missed nothing, I did (and I am an engineer… 🙇🏻♂️) The confusion in my head came from the fact that almost all the resistance to deformation comes from the outer layer of a material, so _for the same mass_ a hollow structure is much stronger than a solid one. So perhaps you would save a few $ in material cost, and your back might be grateful if you move those bits around a lot, but the solid bar is not going to be an issue in terms of deformation - and possibly dampen the vibrations better as a bonus. My apologies for not thinking before writing!
And thanks for the videos!
PS it is stress-free most other build shows is like watching an episode of red and green😅
Jer, how ya been ?
De las mejroes para mach3 son las CSMIO, yo tengo una Tomatech2005 y va excelente, a mi me costó $630 con codificadores de valir absoluto y de 5 ejes simultaneos... semajente la GSK980Mdc...
DIY is clearly the pragmatic way. I wonder about using a torch or induction heater to warm a piece up just the right way that you could drive a form tool through and expand it to suit though...
I don’t have any of the equipment to try that but I would love to see someone do it!
If you used flat 2 flat bars the same width as the square bar, and 2 flat bars as wide as the thickness of 2 flat bars plus the width of the square bar, you could butt weld the seam full length, then grind the welds flush.
After beveling the appropriate edges to be welded, of course. 😊
Yep. I do it this way to save the work of beveling, since the little offset creates a corner to weld in. (Also because 2.25” flatbar is hard to get / nonexistent). You can still weld them fully and grind them off at 30° for a really clean look, but the 30° chamfer is best done with a belt grinder…
@Jer_Schmidt Agreed! Your method is the best for strength and speed, no doubt about it. Thanks for a great channel, Jer!
I used receiver/hitch stock and that made it MUCH EASIER
Nah, I frequent a steel supply store that has that on display, and sliding two of them together confirmed that there is WAY too much slop for *this* application. I welded the tube per the instructions and have no regrets.