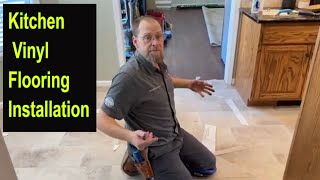
How to Install a Vinyl Floor - Do It Yourself

ฝัง
- เผยแพร่เมื่อ 2 มิ.ย. 2024
- If the vinyl floor in your kitchen is old and scarred up, replace it! Armstrong Flooring has a wide range of color and styles to choose from to brighten up your kitchen. And best of all, it’s not expensive and you can do it yourself!
MATERIALS
-Armstrong vinyl flooring
-Armstrong flooring installation kit
-notched trowel
-vinyl flooring adhesive
-utility knife (comes with flooring kit)
-pry bar
-hammer
-masking tape
-putty knife
GETTING STARTED
First remove all appliances from the kitchen area i.e. stove, refrigerator etc.
Next remove the quarter round from the baseboard. To do this, take a pry bar and a hammer. Put the pry bar on top of the quarter round and gently tap it with a hammer to get the pry bar between the quarter round and the wall. Once that’s done, gently pry the quarter round away from the wall. Repeat this process up the wall to remove the quarter round.
Once that’s done, you’re ready to use the flooring kit to measure and mark the dimensions of your new vinyl floor.
INSTALLING THE FLOOR
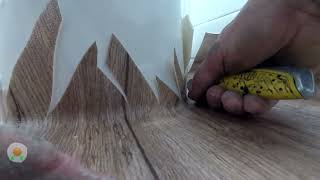
The Armstrong flooring kit makes this job much easier than it used to be. The kit comes with a utility knife and several large sheets of paper. Take the first piece of paper, and lay it up against the wall and into a corner. Then use masking tape to keep it in place, taping it to the baseboard in this case. Take the next piece of paper and put it next to the first piece with a slight overlap. Then use masking tape and tape one piece of paper to the next. Do this all the way around the kitchen until your floor is covered. Once you’ve done that, cut away any excess paper. The effect is that you are creating a template from which you’ll cut your new vinyl floor.
TIP: In each kitchen there are corners, so you will more than likely have excess paper here. To cut it correctly so your new floor will fit, smooth the paper down in the corner to where you create a crease in the excess paper. Then take a putty knife, put it in the crease, and take a utility knife to cut away the excess paper. The putty knife acts as a straight edge for you to cut along so that the utility knife blade doesn’t slip and make an incorrect cut.
Once you’ve got your paper template laid out, use more masking tape to reinforce the entire area. Then roll it up, and you’re ready to lay it out over your new vinyl flooring material.
Lay the template down over the flooring material, tape it in place and you’re ready to cut. Use the utility knife that comes with the flooring kit and cut along the template. The vinyl flooring cuts very easily.
TIP: When you make your cut, skip over the tape you used to secure the template to the new flooring. This will prevent the template from shifting and causing an incorrect cut. Once you’ve cut the flooring out all the way around, then go back and cut the flooring under the tape.
Once your flooring is cut, simply take it to the kitchen and unroll it to make sure it fits.
Once it’s in place, use a notched trowel to apply vinyl flooring adhesive to keep your floor in place.
Then wait 24 hours before re-installing your quarter round and appliances and your kitchen will look great!
MORE FROM YOUR NEW HOUSE
Featured videos:
• YNH Featured Videos
Great DIY Projects from Your New House:
• DIY - Do It Yourself w...
Quick Tips:
• Quick Tips - Great, ye...
Gardening and Landscaping:
• Gardening and Landscaping
Adventures in Homebuilding:
• Adventures in Homebuil...
Choosing and Using Tools with Carmen Ciricillo:
• Choosing and Using Too...
Factory Tours and Product Testing:
• Did You Know? - แนวปฏิบัติและการใช้ชีวิต


This was uploaded 3 years ago but everything about it screams the 90's 😄
I used to be a carpet/vinyl fitter.
This is the nuttiest way to lay vinyl that I've ever seen
can you upload the unnuttiest way then so everyone knows?
Did she use a 2" straight edge around the perimeter to mark the template, then use that line to mark outside of finished product?
I watched quickly (time restraint) & didn't see that.
Today I had to re-lay some old lino (I'm a decorator) and I'd only watched videos of guys using tape around the edges, so I did that, and it sucked!
I wish I'd seen this video yesterday and properly glued it all down 🤦♂
Extra tips:
#1 (learned when Armstrong used to sell a “trim & fit kit” very much like what she’s using): when you lay out the paper on the existing floor (and you don’t need really special paper, you can get inexpensive rolls of even brown paper from an office supply chain store), besides taping the edges of the paper sheets together you can make it impossible for the paper to accidentally slip around or to not lay completely flat, so the temple is absolutely perfect. Use a sharp razor blade in a utility knife or x-acto hobby knife-or you can even hold the razor blade alone if you’re not accident prone-and throughout the plane of paper, every 12 to 16 inches or so in all directions across the paper LIGHTLY slice a V shape about an inch tall just through the paper. Then flip the paper point of that V up to create small triangular holes. You can then press small, roughly square, pieces of 1+1/4 or 1+1/2 inch wide masking tape across those holes so that the paper is lightly attached to the floor and completely smooth. After you make the template as she’s demonstrated, remove it slowly so that the tape remains on the paper and bridging the holes. Then when you lay the template on the new vinyl sheet, the tape will lightly stick to the new vinyl and not shift around at all.
#2 It’s really important that you don’t use the template on vinyl that’s colder than the room it needs to fit. Lay it somewhere that’s about the same temperature as the room you’re going to put it in & leave it there awhile to relax, lose its memory of having been rolled up, and to do any slight expanding it may need to do, because it will have slightly contracted if it spent time anywhere colder than the room you’ll be laying it in. If you use the template on cold vinyl and then move it to the warm room where you intend to attach it, it’ll slightly expand in that room and turn out to be just slightly larger than the space you cut it for! That’ll make it buckle, and you’ll have to fight & do some trimming to get it to fit.
#3 consider using newfangled adhesive that will allow you to lift & reposition the vinyl if necessary. if any foreign crumb has sneaked in under the vinyl (you can slide around in socks to feel for such things) it’s nice to be able to pull the vinyl away from easy-release adhesive to get to the crumb and remove it without having to worry that your adhesive has already gotten an iron grip on the vinyl and that lifting it could easily make the vinyl tear! In fact, if you used traditional adhesive and then find a pimple created by a crumb, you’ll be much safer making a very small V cut through the vinyl to pick it out than to fight traditional adhesive, unless the pimple is so close to the edge of the vinyl that you don’t have much vinyl to pry up.
#4 lastly, it’s well worth the money to rent a 50 to 75 pound roller that you can push around like a lawnmower after you’ve glued down the vinyl. Some big box stores will even loan you a roller for free. You’ll want to carry it to the center of the room and roll away from the center in all directions just 3 feet at a time, eventually working all the way to the edges. That’ll get rid of any air bubbles under the vinyl, so that every bit of it is in full contact with the floor. Leaving any bubbles can later bite you in the butt when you push furniture into or around the room, because an edge can catch on an innocent looking bubble and stretch a tear through your new floor. Don’t be at all nervous, it’s very easy to fit & install vinyl if you just avoid these few pitfalls. Enjoy,
Looks like you need to replace that carpet too 😂
She has looks, skills, intelligence...dynamite! Thank you for showing a novice the way to manhandle flooring!
She’s just reading a script 😊
Thanks for sharing!
Perfect template and easy installation.
I’m doing my bathroom floor and I’ll share my pics with you soon!
Beautiful! Great instructions on the floor as well.
Fabulous easy to follow video. Thank you! I'm all set to install my flooring.
Absolutely wonderful and perfect looking - the floor was good too
Thanks so much for this video. I followed step by step and I did my kitchen
That was great 👍 thanks for your show. Really helpful.
That template is a great idea!!!💯😀
I’m a man and pretty good luck with almost everything especially cars= BUT THIS VIDEO IS THE MOST INFORMATIVE SENSIBLE VIDEO IVE SEEN SO FAR = attempting to vinyl floor my 16x18 dining room = never done before = THANK YOU 🙏 GOOD JOB = I never thought about a template
Awesome work 👏👏👏
Thanks for this. It's a big help.
Thank you for sharing this video
I have been begging for help on this damn floor for ages! I’ve been walking around on a subfloor For 5 years after peeling up the nasty CARPET that was in my BATHROOM 😩🤮 I am very thankful for this video and I have huge rolls of painters brown masking paper so I think a template is the way to go.
Wasn't this show on in the late 90s early 2000s? I knew I had watched this before. Amazing the info is still valid.
beautiful ❤️❤️❤️
Thanks for the video, did exactly what you did and aced it, Thank You!
Awesome, thank you, this is perfect!
Thank you for sharing.
Good work👍👍
no do not use channel locks to remove the gas line. the gas line nut has flat sides for a reason, and its not for channel locks.
She's a GURL. 😝
Thanks for this.
Thank you 🙏
I dont know what she was doing but she shure looked good doing it.😮❤❤❤❤❤❤❤❤
thanks leady this is will be helpful for me .
Love these Teresa videos!
I've done this once before in another house, but needed reminders!! So glad I found you!! Can't remember my other house, but I now have "stick down tiles" that I want to cover with vinyl sheeting. Should I remove them first? Some are moving or popping up. Or will the glue hold them and keep seams from popping or wearing
through over time?
This is the proof I needed. She said Vinyl... in 2020 that typically means vinyl plank. But she put a 1 sheet vinyl in a 1980's kitchen. This is a late 1990's video. I wish they added that into the description because it induces nostalgia.
Muy bonita y trabajadora, very helpful thank you.
Thank you!
I always did my floors. But this time I got them ready and hired it done. At 67 I don't crawl around like I use too.
thanks for the video
Amazing
Where to lay out if you dont have the space? Outside?
Thank you 🙏🏽
Sorry was distracted ...Great job!
Nicely done and really-really-really nice hair spray, it seems to hold really well.
I know right? I was like "how ia she working and her hair is no in her face like mine is?" hahaha
thanks
Cool video & spot on
Nice working I also same work
Using a paper template is a great idea.
Wow I love seeing you stretch across the floor.. Honestly
Come. Long way since then, vinyl and best way to lay it.
you dont need to much glue or it becomes hard to get a smoth finish even with a roller
Extra work
Hey which method is the best in your opinion to make everything perfect?
What about nicks, scratches and little holes in existing vinyl sheet ? How do I fix it so these don't surface through my new floor ? Thank You
So u don't have to worry about air pockets underneath?
She looks she is in Beverly Hill's 90210 in the ninetees
That’s all you payed attention to?
She's gorgeous
...and looks, skills, intelligence...dynamite!
@@erraticchromatic1667 that and she arches her back well on all 4’s
Why even comment?
In a large room like that, I just put the flooring down and start trimming. Keep pushing the vinyl into the corner of the wall and floor and trim at the crease. Much faster. I've done templates for small bathrooms.
Which method is the best for the most perfect result in your opinion?
I've never installed a vinyl floor but I want to do my whole house with vinyl. I think I'm going to do it on my own, it looks like it's quite easy to install if you're a noob.
@@Emily34593 In my experience, a small room like a bathroom is easier to do by making a template. I tape thing cardboard together to fit the room exactly and then lay the vinyl out on a floor large enough to hold the shape. Trace around the template and cut the sheet vinyl. You can then just drop it into place.
Foe larger rooms, I can just drop the full sheet down, then press into the wall and keep trimming it down, a bit at a time, going around the room. Eventually you will have it trimmed exactly to fit.
@@Emily34593 Did you end up installing vinyl floors? How did you do it?
Thanks for this I'll be using this for my project 💙💙new SUBBIE
What year did that kitchen come out of , looks like the video was shot in the early 70s
Nice idea with the putty knife though
What kind of paper is that I been looking ??
What suce is the flooring please?
So vinyl over vinyl?
What year is this? Is it from some kind of a show?
Yes, it was an early DIY program ran 30 minutes weekly. It was just before HGTV became a "thing." About the same time as the original "Trading Spaces" was popular.
I'd peg it to late 90's/early 2000's
Can someone tell me what sort of glue will suit this. I am in Australia and I have the exact requirement ie to lay vinyl on top of existing vinyl . I checked several hardware stores here and they all said that there is only glue to put the vinyl over cement or timber.
You can use acrylic adhesive maybe f balls 44 if you can get it .
But what ever adhesive you use dont spread it to thick as it will show through
@@michaelwest6238 Thanks heaps
Thanks.
330 was may favorite part just the way she looks back at me made me forget about the floor I was installing
She's a 🦊
Maybe use that crescent wrench instead of pliers on that gas line so you don't booger up that nut.
Don't you need a linoleum weighted roller. That's how did it when I was a kid. But great idea with template. We use to cut it as we laid it out.
A roller is preferable, but not always available as a rental.
with all due respect......I love you........lol jk. great vid. like the step by step approach.
What about dishwashers. Do you remove that too?
Yes
Why to glue new vinyl on top of the whole old flooring instead of just to the edges of it?
Depends on how thick the vinyl is and on manufacturer's recommendations. If it's thin vinyl, and you only glue it around the edges, then if you drag heavy furniture across the middle it might catch and tear the floor.
holy shit lady -- I am 2 mins in and you've done everything BUT install flooring.
Is this expensive
Template is the way to go. One quip, if the paper roll was facing down (not up), I think it would be easier. And when it comes to cutting the straight parts on the vinyl, I'd use a straight edge (like a metal yard stick, etc). And I saw another tip: cut holes in the template at various points and then tape the template onto the actual vinyl. That'll keep it from sliding around. But you glue the WHOLE THING down? "Loose lay" is an approved method for small spaces like this when the vinyl has a rubber backing.
So no cleaning of the floor/baseboard area etc...?! ~ SMH 🙄😫🙄
Please clean those skirting boards first!!!
be sure to remove the filth first
Excellent work, but ain't nobody got time for that.
Never install over the old
Laying vinal on vinal not a good idea
Good work and a hot woman. Great combo. Helped me
I want a job I have 10year experience vinyl installation
If you’re going to completely redo the kitchen, why wouldn’t you remove the cabinets, baseboards and all appliances first. Also, remove that gross carpet. This just seems a bit backwards.
So simple, I dont even need to turn on the sound
3:25
Ummm. I was taught you remove baseboards and replace those. I'm freaked out by how filthy everything is. The template idea is good , though.
@Hopper33 Exactly.
Yeah I know what your saying..
✌✌👍👍💪💪🙏🙏
@3:30 should of been the thumbnail instead.
Very informative but you should definitely start using knee pads if u don’t already. Years of doing floors really takes a toll on your knees
Don't bother with the template. Just lay your new material out , cut to fit, then glue it.
Which method is the best for the most perfect result in your opinion?
Do you think someone with no experience can do a good/perfect job at this?
@@Emily34593 I cut the straightest edge first then leave a few inches all around. Put it in the room and cut the excess off each side. When it lays flat roll 1/2 over onto the other side and glue. Lay that side in place then pull the unglued side up lay it over on the finished side. Glue that second half down and then start from the middle and roll out toward the edges. Do any final cut then. Usually you have a 1/2 trim board around the edge covering any miss cut. Just use the right trowel. 1/16 x 1/16 I recall. Not a whole lot of adhesive.
@@Emily34593 www.amazon.com/gp/slredirect/picassoRedirect.html/ref=pa_sp_phone_search_atf_aps_sr_pg1_1?ie=UTF8&adId=A0815487MCLRCCL73X5E&url=%2FExtendable-Laminate-Linoleum-Coverings-Extends%2Fdp%2FB07SGRJ1H8%2Fref%3Dmp_s_a_1_1_sspa%3Fdchild%3D1%26keywords%3Dvinyl%2Bfloor%2Broller%26qid%3D1616456114%26sr%3D8-1-spons%26psc%3D1%26smid%3DA2NWLOWWF5G7JX&qualifier=1616456114&id=1991590162328085&widgetName=sp_phone_search_atf
Did anyone pay attention ? She’s pretty hot with the 90’s look
Way too much glue, you have to let the glue dry about 20 minutes until it is tacky
Way too much glue.
--------2:10
Mmm mebgusta
Can't watch American diy videos because they use a different name for everything lol
Quarter round? Quad!
Cresent wrench? Shifter!
Open wrench? Spanner!
Wow... Then what do you call half round? A deuce? I ask because quarter round is an accurate description. It is 1 quarter of a full circle. Quad means 4 which would mean 4 circles, that's why we call a 4-wheeler bike a quad... Lol! However, I do understand shifter and spanner. Those are old English terms. Lol!
Looks like the 1980' 😂
No way
No
Pro tip this is how to bodge your floor
New flooring? The rest of the kitchen is gross.
Do not do this. She put the new over the bad flooring without tareing it off first. Wow. Totally wrong
Love when she down oh her knee
I came to this channel to look at this beautiful lady but all I've got was vinyl flooring installation 😠
As a professional installer this is terrible advice. So many things you should not follow here. This needs to be taken down
Can you explain what she suggests that you wouldnt?